I wanted to show the possibilities of iClone 6 when creating a sci-fi set mixing 3D props and billboards with video textures. The new Reallusion PopVideo 3 software allows one to mask HD video footage filmed using green screen backgrounds, creating a keyed high definition video format than can be used as texture in iClone 3D props. It allows one to mix real footage in virtual sets without further compositing operations.
In addition, iClone also allows to render video sequences with transparent background that can be used later in a new project such as billboard textures, in order to create crowds, vegetation walls or any other compositing layer.
All these video textured billboards, can be placed in the 3D set as any other prop. It's very convenient, as they get fully affected by the lights of the project, (colour, intensity, etc.), receiving the shadows of the other props in the scene and projecting their own shadows as well.
Also, if the scene has a camera travelling, the parallax effect is automatically created in the final render, as the billboards are actually placed in the set.
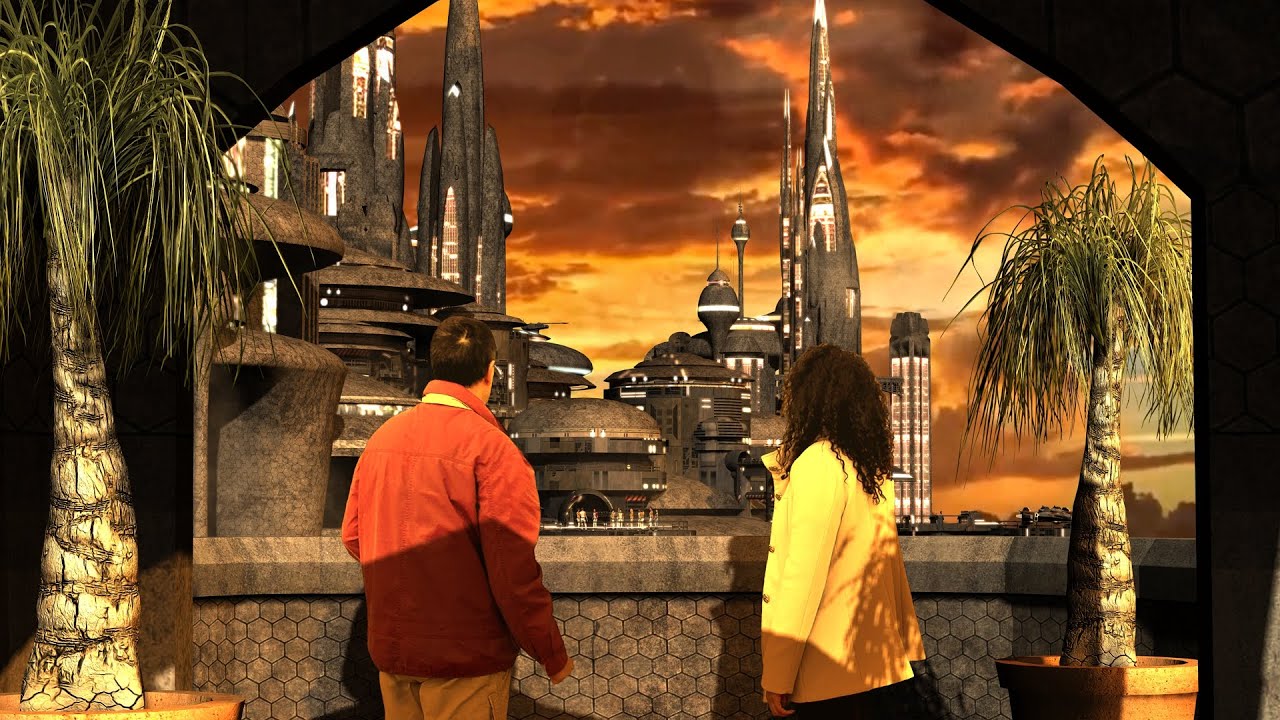
To show all these features, I have created a sequence that combines a heavy change in the ambient light, starting with an orange sky that turns to purple at the end, with a travelling camera zooming through a multilayer scene. In the foreground I have included a masked green screen shot, of my partner Izara and myself, which has been made using PopVideo, and has been integrated in a 3D balcony that faces a futuristic city. All the other characters scattered over the city platforms and the dense vegetation on the beach are billboards as well, but created from iClone itself in auxiliary projects.
You'll see how iClone automatically manages the shadows and the changing lights, integrating the billboards in the scene without further editing. I hope you'll like it.
01. Creating the background

To create the background video I just dragged and dropped the video file from its folder to the main iClone screen, while keeping the Ctrl key pressed. It will automatically create a wall with the video file as a diffuse map. I modified the material settings, 'Self Illumination' to 100 and its shadow properties to 'No Shadows' in order to avoid the background being affected by the lights and the shadows of the other props of the set.
You can also set a video as background in iClone, but if you are planning to make camera travelling, I recommend you use the wall instead, as it provides a better parallax effect with the rest of the objects of the set. (The video background just fits the screen, and is not affected by the angles or movements of the camera).
02. Loading and refining the city buildings

I used the beautiful models supplied by Herminio Nieves for the city complex. I loaded the models on Reallusion 3DXchange, refined them and modified their textures, playing with the 'diffuse', 'blend' and 'glow' maps until I was happy with their aspect.
03. Loading and refining the flying ships

In the same way, I downloaded the ships from Turbosquid and imported them to iClone through 3Dxchange. I also changed their materials, using the 'Reflection' map to obtain a metallic aspect in some parts. I almost never use the real 'reflection' property of the material, because it slows the rendering time.
04. Creating the animations of the groups of people

I wanted to include several groups of people acting on the city platforms, but adding all the actors and their behaviour in the scene would have consumed a lot of processor resources. To avoid that, I made animated textures with alpha channel that I used after over simple planes placed in the main project.
I created two secondary iClone projects. One with a group of actors talking, and another with a couple walking and stopping after a while. Then I rendered them from iClone in PopVideo format.
05. Checking the transparent background of the 'PopVideo' Render

iClone can render directly in PopVideo format. It doesn't need further manipulations, but I loaded the file on PopVideo, just to show you the is the aspect of the obtained clip. As you can see, the background has been completely removed...
06. Creating the animations for the jungle elements

I created three more PopVideos from three more iClone secondary projects, showing animated vegetation walls. I used some of the iTrees included in the Reallusion Botanic Pack. Those are very realistic plants and trees that can be affected by wind effects. As I planned to use a big number of them, I decided to create PopVideo textures as well to reduce the number of polygons in the main project.
07. Creating the auxiliary animations

I also created an animated fog cloud using the particle effects of Hitfilm 3 Pro and rendered it as a sequence of 'png' images with alpha channel. I loaded this sequence on PopVideo and generated another transparent PopVideo file, that I used in the main project as a texture in a wall that simulated a mist effect.
Finally I made a last PopVideo with a clip of a seashore. (This one didn't require alpha channel), That I used to create the seashore of the main project.
08. Loading my green screen recording on PopVideo 3

I filmed my partner Izara and myself over a home made green screen background. We used a cheap Canon PowerShot SX530 HS that records at a simulated full HD 1920x1080 pixels at 30 fps. The better the quality of the image, the better masking results you get, so I sharpened and enhanced the original video footage before loading it on PopVideo.
Considering that iClone will have their own defined lights, illuminating the set, it's highly recommended to film the shot as neutral as possible in light terms, avoiding hard shadows or heavy light influences. A cloudy outdoor environment for example, gives the perfect conditions.
09. Creating the automatic chroma key mask of my footage with PopVideo

PopVideo masks the selected background colour and allows to play with several sliders in order to avoid the 'spill' effect. The mask settings are very useful to expand or shrink the automatic key and create a subtle blur effect that helps to integrate the masked video in the final scene.
10. Painting the non-green areas that have to be also masked

Although you can clip the area to be exported, PopVideo also allows you to 'paint' over the areas that are not covered with the key colour, in order to create a complete masked shot.
11. Rendering the masked sequence as PopVideo file

Once completely masked, I exported the desired sequence in PopVideo file format, that keeps the alpha channel and the original quality reducing the size of the video file.
12. Adding the elements on the main iClone project

I created a camera in the iClone City main project and placed the city blocks on the scene. I repeated several times the same item, rotating the copies and obtaining the appearance of a more complex set. Then I created several walls and used the vegetation PopVideo files on them as diffuse texture while the opacity maps are automatically created using the embedded alpha channel. It allowed me to create a dense jungle animated by the wind using very few polygons.
I also added a floor where I applied the clipped PopVideo texture with the sea waves arriving at the shore. It has no transparent background, and allowed me to hide the sea that actually was in the original background footage.
13. Adding the PopVideo files of the people and the jungle vegetation

The next step was to add the walls texturized with PopVideos showing the groups of acting people. I did it in the same way as with the vegetation walls, and once again, it allowed me to include a lot of virtual actors on the project, adding just a small number of polygons.
14. Adding the PopVideo file of the mist

Just in front of the camera’s last position, I placed a big wall texturized with the fog PopVideo. In the image below, you can see a closer look from the camera view, but still showing the 'tricks' used in the project.
15. Creating the motions for the flying ships

All the billboards used on the background are actually animated by their PopVideo textures, so I only had to move the 3D space ship models included in the project as well as the camera in order to create the travelling effect. In all the cases, the easiest way is to create paths and link the objects to them.
iClone has the 'Follow Path' feature that forces the object to follow the path in one defined axis. So, rotating the keys of the path, the object linked to it, turns itself on its way through the path, to match the inclination fixed by the keys. That's really convenient when playing with flying objects.
16. Setting the changing lights – beginning of the scene

As I mentioned, the light of the background video changes dramatically during the duration of the clip, so I adapted the environmental lights to match the background colours.
Besides the ambient light, the project has two directional lights defined. A main key light, and a secondary rim light that helps to manage the shadowed areas. I left a very dark ambient light with just Red:27 Green:11 and Blue:3 values, and focused on the directional lights.
I went to the first frame and set the light values, picking over the background image. For the main light I chose a part of the image with an intense orange colour that gave me these values, R:216 G:124 B:40. Meanwhile I set the Rim light values to R:236 G:291 B:147 also picking in a brighter area of the background image.
17. Setting the changing lights – end of the scene

I then moved to the last frame, and repeated the process for both directional lights. I also reduced the multiplier of the main light from 1.20 to 0.80 to create the dimming effect of the evening light.
18. Checking how the changing light affects to the elements of the scene

iClone automatically calculates the light values between the two keys, creating a soft transition from the initial orange tone to the final purple. That light affects all the elements in the scene, including the billboards, which are automatically integrated to the global light conditions.
19. Creating the foreground elements of the scene

In order to obtain a more dramatic effect in the camera travelling, and to show all the possibilities of the PopVideo masked textures, I added some foreground elements in the camera path, including a wall texturized with my green screen video footage previously masked. I placed some potted plants just to show how their shadows drop over the billboard, while it also projected its own shadow over the railing.
20. Final tunings

Finally, after checking the animation, I decided to add a couple of modifications. First I added a particle effect attached to the nose of the closer ship, in order to simulate the spray generated while it travels across the foggy cloud.
Also, to make the fog movement more dramatic, I augmented the size of its wall in the last frame. So, as it was getting bigger through the animation, it gave the impression that the clouds were moving faster and expanding.
And that's all! This is the final compositing sequence... No further manipulation is necessary to completely integrate the real footage on iClone's projects. Although, if you have video editing software, you can always filter the whole rendered clip to add dramatic visual effects...
