Beginner's guide to building web apps with AngularJS
Ajeet Yadav reveals all you need to know about Google's open source web app framework.

If you're a professional JavaScript developer, you've probably heard about Ember.js (an open-source JavaScript framework) and Backbone.js (a JavaScript library with a RESTful JSON interface). But if you're not familiar with AngularJS yet, you're going to miss some of its very compelling features that can really enhance your HTML for web applications.
Here we'll give you a taste of AngularJS, a super heroic JavaScript MVW framework, including its stand-out features and the process of getting started with it.
Hopefully, this will not only help you develop well-architectured and maintainable rich web applications, but also give you some solid reasons to choose AngularJS for your upcoming projects. Let's begin!
01. What is AngularJS?
AngularJS, built by Google, is an open-source web application framework that is designed to make both front end development and testing easier for web developers. The main goal of AngularJS is to elongate web applications with MVC (Model–view–controller) capability. It is a client-side JavaScript MVC/MVVM framework that is fully extensible, runs with no library dependencies, and also works great with other libraries. Even, you can also modify or replace its every feature to fit your specific needs.
AngularJS was developed in 2009 by Adam Abrons and Miško Heverym, who were Google engineers at that time. As mentioned on official website, it is a "structural framework for dynamic web apps" which is best fitted for creating one-page web applications that only require JavaScript, CSS, and HTML on the client-side.
It allows you to make use of HTML as your template language and lets you expand HTML's syntax in order to express the components of your web application neatly and concisely. AngularJS helps you structure your JavaScript code better and makes it easy to test, teaching the browser how to make use of dependency injection for any server technology.
How to use AngularJS
Getting started with AngularJS is quite easy. You can have a simple Angular app in just five minutes by putting a few attributes to your HTML scripts. These are:
Daily design news, reviews, how-tos and more, as picked by the editors.
1. Include the "ng-app" directive in the <html> tag. It'll make AngularJS run on the page, defining the page as an Angular application.
<html lang="en" ng-app>2. Place the Angular <script> tag at the bottom of your page, where the <head> tag ends.
<script src="lib/angular/angular.js"></script>3. Add regular HTML. HTML attributes are used to access AngularJS directives, while evaluation of expressions is done with double-bracket notation.
<body ng-controller="TasksListCtrl">
<h1>Today's tasks</h1>
<ul>
<li ng-repeat="tasks in tasks">
{{task.name}}
</li>
</ul>
</body>
</html>
Here, the directive ng-controller defines a namespace, where you can place your Angular JS for controlling the data and evaluating the expressions in your HTML. While the ng-repeat directive is an Angular repeater object, which asks Angular to create list elements as long as you've tasks to display.
While most of the frameworks today are just a bundle of existing tools, AngularJS is a next generation framework, having some very compelling features that are helpful not only for developers, but also equally useful for designers. Following are some incredible features of AngularJS, which will help developers make their future web applications awesome...
Directives
Directives are one of the most powerful and compelling features of AngularJS. They allow you to extend your HTML and are used by AngularJS to plug its action into the page. They allow you to specify custom and reusable HTML tags, which can be used to manipulate DOM attributes and moderate the behaviour of specific elements. All of the Directives are prefaced with ng-, designed to be standalone elements separate from your MVC application, and placed in HTML attributes.
Some of the notable AngularJS directives are:
- ng-app: This directive tells Angular where to get activate. To define a page as an Angular application, you need to use a simple code: <html ng-app>.
- ng-bind: This directive tells Angular to change the text content of an HTML element with the given expression's value, and to update the text as the value of that expression alters.
- ng-model: It is very similar to ng-bind, but binds the view into the model, which other directives like select, textarea, or input require.
- ng-class: Allows dynamic loading of class attributes.
- ng-controller: This directive lets you specify a JavaScript controller class for evaluating HTML expressions.
- ng-repeat: It effortlessly loops through an item, to which the given loop variable is set, in a collection.
- ng-hide and ng-show: Using the value of a Boolean expression, this directive decides whether the element will be displayed or not.
- ngIf: It is basic if statement directive that allows to re-insert a clone of the compiled element into the DOM, if the conditions are true. If the condition is false, then it removes the element from the DOM.
Following is an example of a directive that listens an event and updates its $scope, consequentially.
myModule.directive('myComponent', function(mySharedService) {
    return {
        restrict: 'E',
        controller: function($scope, $attrs, mySharedService) {
            $scope.$on('handleBroadcast', function() {
                $scope.message = 'Directive: ' + mySharedService.message;
            });
        },
        replace: true,
        template: '<input>'
    };
});
This custom directive can be used as following:
<my-component ng-model="message"></my-component>Two-way data binding
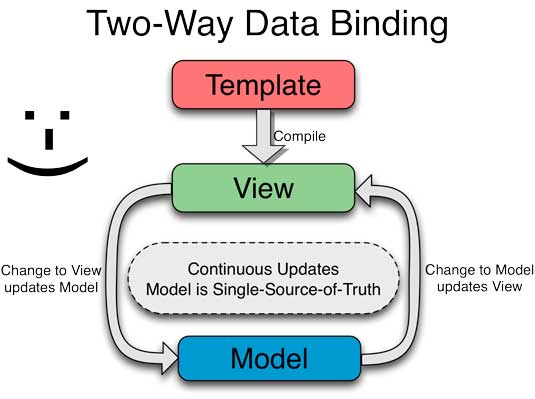
Data-binding is probably the most dominant and notable feature of AngularJS. It saves developers from writing a considerable amount of code by reducing much of the burden on the server backend. In a typical web application, 80% of the code base is dedicated to manipulating, traversing, and listening to the DOM. Data-binding makes this code invisible, so you can focus on other important things of your application.
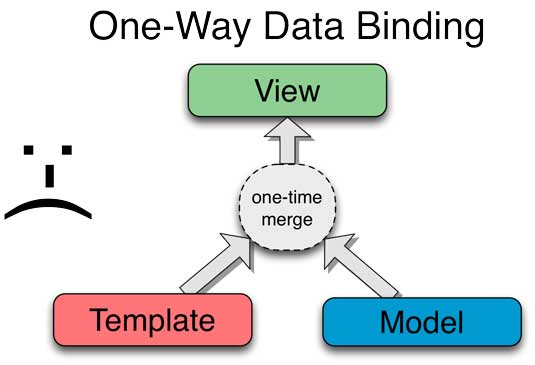
Traditionally, most of the templating systems have one-way data binding: they merge model and template components together into a view. After the merging, changes to the model are not automatically reflected in the view. To reflect these changes, the developer needs to manually manipulate the DOM elements and attributes. This process gets more complicated and cumbersome, when a user makes any changes to the view. Because the developer then needs to interpret the interactions, merge them into the model, and update the view.

In contrast, AngularJS do the data-binding in a better and different way by handling the synchronization of data between the model and the DOM, and vice versa.

Following is a simple example, explaining the binding of an input value to an <h1> tag.
<!doctype html>
<html ng-app>
  <head>
    <script src="http://code.angularjs.org/angular-1.0.0rc10.min.js"></script>
  </head>
  <body>
    <div>
      <label>Name:</label>
      <input type="text" ng-model="yourName" placeholder="Enter a name here">
      <hr>
      <h1>Hello, {{yourName}}!</h1>
    </div>
  </body>
</html>
Dependency Injection
AngularJS has a built-in injector subsystem that makes it easy for developers to develop, understand, and test applications. The dependency injection in AngularJS is responsible for creating components, dealing with how they get hold of their dependencies, and making them available to other components when requested.
By making use of dependency injection, AngularJS brings traditional server-side services to client-side web applications, which results into reduced burden on the backend and making the web application much lighter.
If you want to gain access to core AngularJS services, then you require adding a particular service as a parameter. AngularJS will automatically notice that you want to use that service, and will make an instance available for you.
function EditCtrl($scope, $location, $routeParams) {
     // Write something here...
}
In addition to this, you can define your own custom services and make them accessible to injection.
angular.
    module('MyServiceModule', []).
    factory('notify', ['$window', function (win) {
    return function (msg) {
        win.alert(msg);
    };
}]);
function myController(scope, notifyService) {
    scope.callNotify = function (msg) {
        notifyService(msg);
    };
}
myController.$inject = ['$scope', 'notify'];
Templates
In AngularJS, a template is written with HTML that contains Angular-specific attributes and elements. By combining the template with information from the controller and model, AngularJS renders the dynamic view in browsers.
Below are Angular elements and attributes that can be used:
- Filter: Formatting of data for display is done by this element.
- Form Controls: It is used for user input validation.
- Markup: To bind expressions to elements, using the double curly brace notation {{ }}.
- Directive: An element or attribute that renders a reusable DOM component or elongates an existing DOM element.
The code given below shows a template with directives and markup:
<html ng-app>
 <!-- Body tag augmented with ngController directive  -->
 <body ng-controller="MyController">
   <input ng-model="foo" value="bar">
   <!-- Button tag with ng-click directive, and
          string expression 'buttonText'
          wrapped in "{{ }}" markup -->
   <button ng-click="changeFoo()">{{buttonText}}</button>
   <script src="angular.js">
 </body>
</html>
In a typical application, the template has CSS, HTML and Angular directives in a single HTML file (usually index.html).
Testing
As JavaScript is dynamic and interpreted with great power of expression, but doesn't take almost no help from the compiler. Therefore, the AngularJS team well understands that any JavaScript code needs to go through with a set of severe tests. So they've designed AngularJS from ground up to be testable, making testing of your web applications as easy as possible.
AngularJS takes full advantage of dependency injection, comes pre-bundled with mocks, and encourages behaviour-view separation. For end-to-end testing, AngularJS has an end to end test runner, called Protractor, which understands the inner workings of AngularJS to eliminate test flakiness, and simulates user interactions with your application.
Another kind of test in the AngularJS is Unit test through which you can test individual units of code. Furthermore, the Angular team also built a Chrome extension, named AngularJS Batarang, which allows developers easily detect performance bottlenecks and lets them debug their applications in the browser.
Ajeet Yadav is a professional web developer, associated with wordpressintegration.com, a reputed web development company that provides a high quality Photoshop to WordPress theme/template conversion service. Follow @Wordpress_INT on Twitter.

The Creative Bloq team is made up of a group of art and design enthusiasts, and has changed and evolved since Creative Bloq began back in 2012. The current website team consists of eight full-time members of staff: Editor Georgia Coggan, Deputy Editor Rosie Hilder, Ecommerce Editor Beren Neale, Senior News Editor Daniel Piper, Editor, Digital Art and 3D Ian Dean, Tech Reviews Editor Erlingur Einarsson, Ecommerce Writer Beth Nicholls and Staff Writer Natalie Fear, as well as a roster of freelancers from around the world. The ImagineFX magazine team also pitch in, ensuring that content from leading digital art publication ImagineFX is represented on Creative Bloq.
