Have you always wondered how to draw a face but never known where to start? Then this is the guide for you. We understand that every face is completely different with many features ranging in shapes and sizes, but if you get a good grasp of the basics, you will be able to build up your confidence enough to help you experiment later down the line.
We are going to teach you how to draw a face step-by-step, starting with the initial structure and features and then progressing to emotions and details. We have included plenty of references and specific technique tips to help you along the way. And once you’ve mastered them, jump to our advanced section, where you will find more tips to help you draw expressive and characterful faces.
Make sure you check out our roundup of the very best how to draw tutorials — from roses to dragons, we have a range of brilliant guides to cater to all your sketching desires. If you are looking for a tool to help you on your drawing journey, then take a look at our line-up of the best lightboxes.
Click on the icon at the top-right of the image to enlarge it.
How to draw a face
Initial drawings
01. Start with two circles

The first stage in learning how to draw a face is drawing two overlapping circles. Where they intersect is the eye level. From there, put a centre line down the two circles. This gives the basis of the human head.
02. Add construction lines

Draw two lines slightly in from either side of your circles. These will indicate where the forehead and cheekbones sit. From the centre intersection, place a triangle for the nose and mark out where you want the mouth to go. Then add two triangles for the eyes – these will also help you locate the eyebrows and eye sockets.
03. Explore different proportions

You can experiment with different sized circles to give different head dimensions, perfect for any ideas you have of different faces to draw. The more squashed the circles, the wider and heavy the face, while the more elongated the circles, the longer the head shape.
04. Line up the features

Always remember that the eyes, nose and mouth are on the same plane on the face, otherwise things start to go a bit lopsided and weird! Imagine the facial features are wrapped around a cylinder, so they have a natural curve.
Position the top of the eyebrow and bottom of the nose so that they’re lined up with the height of the ear. This helps the face look more natural; giving it a flow, and stopping it from feeling flat.
05. Start with the eyes

Your character’s eyes are crucial to conveying the right emotion – a key part of conquering how to draw a face. Try to keep them focused and tell a story with them. Give the top eye a thicker line to indicate a shadow from the eyelid, and add a light source to give them life. Longer and thicker eyelashes create a more feminine look.
06. Add in the nose

Noses can be pretty difficult to get right. I initially create a triangle with a diamond shape for the tip of the nose. From there I draw nostrils, remembering to add line weight and shadow to the bottom of the nose. I keep the details light, adding only what’s needed.
07. Try different lip shapes

I keep a little sketchbook to practise different lip shapes. Study films and TV programmes to see how actors exaggerate their mouths. Experiment and explore different mouth shapes. Try to convey ‘oh’, ‘ah’ and ‘esss’: this will help when you want figures to look like they’re having a conversation.
08. Consider differences between male and female faces

The male face is a harder, angular shape. The female face is softer and rounder in general. For women, try to depict fuller lips, larger eyes and rounder cheeks. These are not hard and fast rules, though – just a guide.
09. Finish with some hair

Of course, learning how to draw a face and head also means learning to draw hair. When drawing a character’s hair, I first create the basic hair shape, noting that the hair is bigger than the scalp. I then add direction to the hair, remembering to draw strokes from the crown of the head. To give hair a more natural appearance, I introduce a sense of weight to the bottom of the shape. Trying drawing the hair shape with a thicker outline and thinner internal lines. This gives it direction.
Advanced Techniques
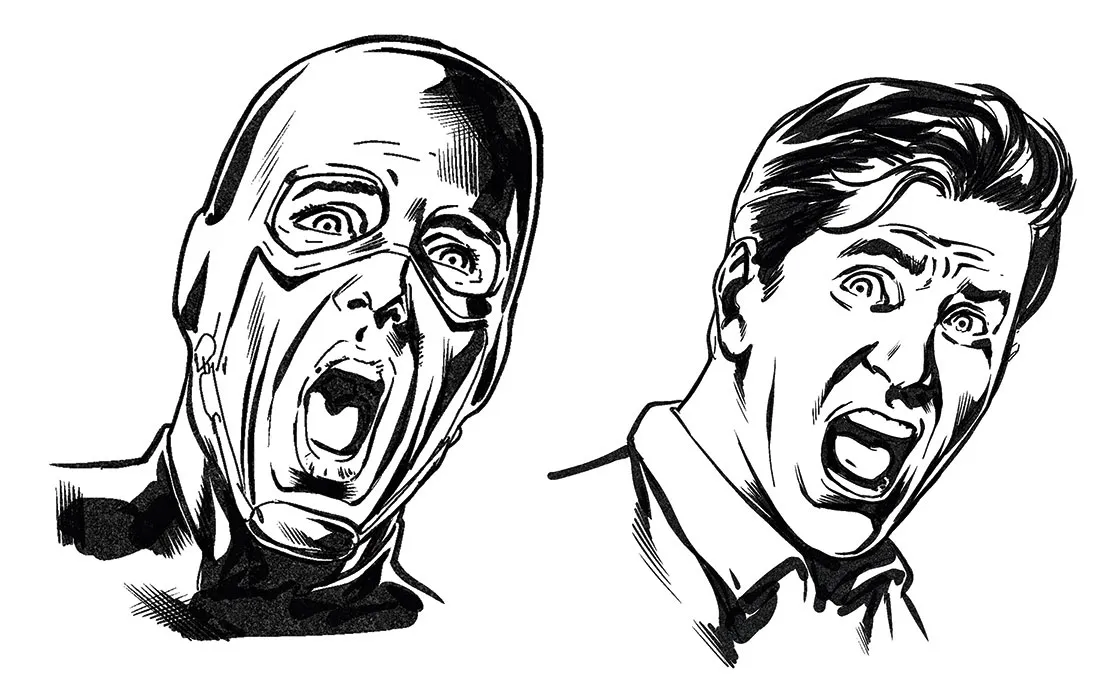
10. Exaggerate emotions
Once you’ve got the basics it’s time to have some fun with your figures! As a general rule, try to make the character over-act, to really convey the emotion in your drawing. I usually start with a super-quick gesture drawing to capture the emotion I’m after. Look in the mirror and exaggerate your facial features. Try to put feeling into the drawing.
11. Use photo references

When drawing characters, try to get into their mindset: how they’re feeling and where they’re coming from emotionally. Then act out the expression, using a mirror or photo reference to capture the emotion. Always try to get that perfect snapshot moment, and make it look as dynamic as possible.
12. Add creases

Adding facial lines to characters can emphasise an expression, but it’s important to bear in mind the age of the person. The more character lines and emotion lines you depict on a face, the older a character will look. Men usually have harsher lines and females have fewer. Younger characters will have also have fewer lines around the eyes, forehead and mouth. This is a good excuse to put together a reference library of different faces to draw – young and old.
13. Make subtle tweaks

Sometimes, though, subtlety is required. A slightly raised eyebrow or smirk can be very effective. Adding just a touch of emotion or quirkiness to the character can make them feel natural and lifelike.
14. Try new facial expressions

Grab every opportunity to experiment with the expressions. Try to push what you’re used to drawing, and look at yourself in the mirror to see how the face can move. Try and be whacky with the different facial expressions, but be careful not to hold your breath for too long!
15. Explore feature close-ups

Both the eyes and mouth are expressive. A powerful technique when drawing a comic page is to use a close-up of one of them. Consider illustrating an open mouth, snarling teeth or stern lips. Using just one area of the face will really push you to convey the emotion and sell the drawing.
16. Remember body language

While thinking of different faces to draw, you also have to think of the different figures' varied body languages, which will show in the close-up. A tilt of the head or shrug of the shoulders can emphasise an emotion. I draw beyond the panel to check that the body language is working and is anatomically correct. Remember to have fun and try out new things!
This article was originally published in ImagineFX, the world's best-selling magazine for digital artists. Subscribe here.
Related articles:
- The best sketchbooks to make you a better artist
- How to draw a neck and shoulders
- Best pencils: the best mechanical, colouring and drawing
