10 Procreate art secrets that will improve your creativity
Simple tips and tricks to make digital art easier.
Procreate on iPad isn’t just easy to use, it’s been crafted for artists, by artists. With silky-smooth Apple Pencil support, intuitive gesture controls, and the kind of real-time responsiveness that desktop apps can only dream of, this pocket-sized powerhouse is more than just one of the best drawing apps on iPad.
To help you get the most out of Procreate’s tools and workflows, we’ve teamed up with game artist Antony Ward (via our friends at ImagineFX) to unlock 10 secret Procreate tips and tricks that everyone can make use of. From using reference images to easily harmonising and setting colour palettes, these Procreate hacks are designed to elevate your art.
Whether you're fine-tuning your portraits, stylising your characters, or just looking to break through creative blocks, these tips will transform the way you work in Procreate. Want more ways to push your digital painting further? Check out our Procreate environment painting tips and explore our curated list of Procreate tutorials to level up every area of your art.
1. Procreate Widget
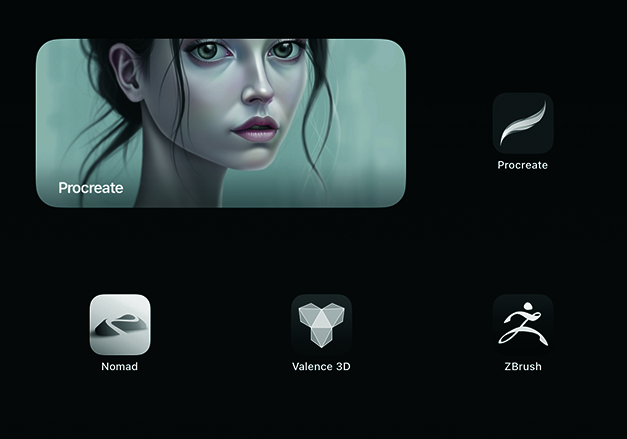
An often-overlooked option is the ability to add a Procreate widget to your iPad home screen rather than the standard icon. The main benefit is that it allows you to instantly jump into your current project so you can continue working. Another advantage is that it also lets you quickly show off some of your art. As with any iPad widget, there are options to adjust its size, shape, and position for your preferred layout.
2. Use Reference Images and layers
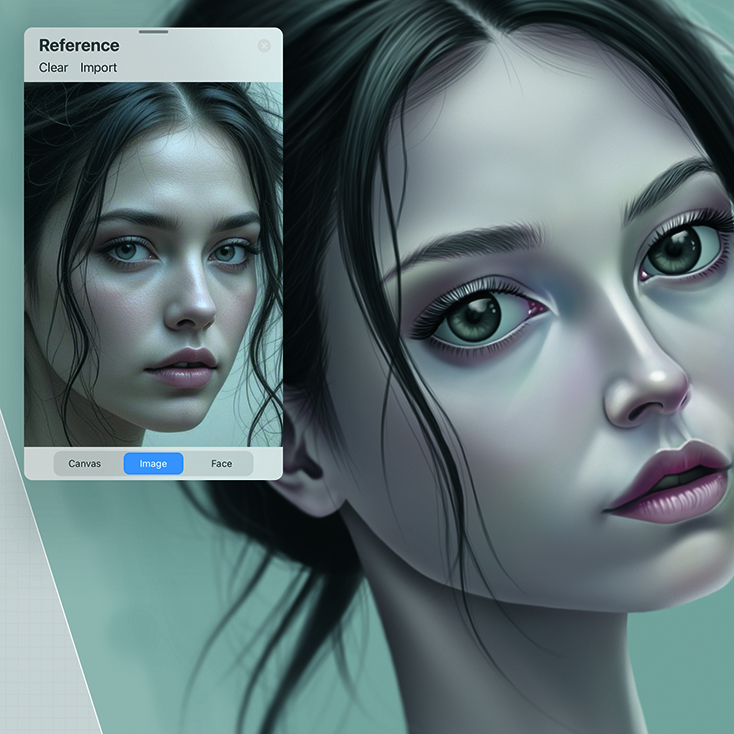
If you’ve ever needed the option of a second reference window rather than using the iPad’s split screen, which isn’t ideal, Procreate has got your back. Go to Actions>Canvas and you’ll see a Reference option. When enabled, this gives you a new floating window that you can move around and scale. You have a few options with regard to what the window displays: you can use it to show the current canvas, add a reference image, or use your face as a reference.
Here’s another reference trick! We all know you can quickly fill an area of your work by dragging the colour dropper into it, but the problem when working with line-art is that you end up with the filled colour on the same layer, making it difficult to edit it later. Another option is to set the line art layer to Reference. This will let you quickly fill areas on a separate layer beneath so they’re kept apart and easily edited later.
3. Instant Colour Palette
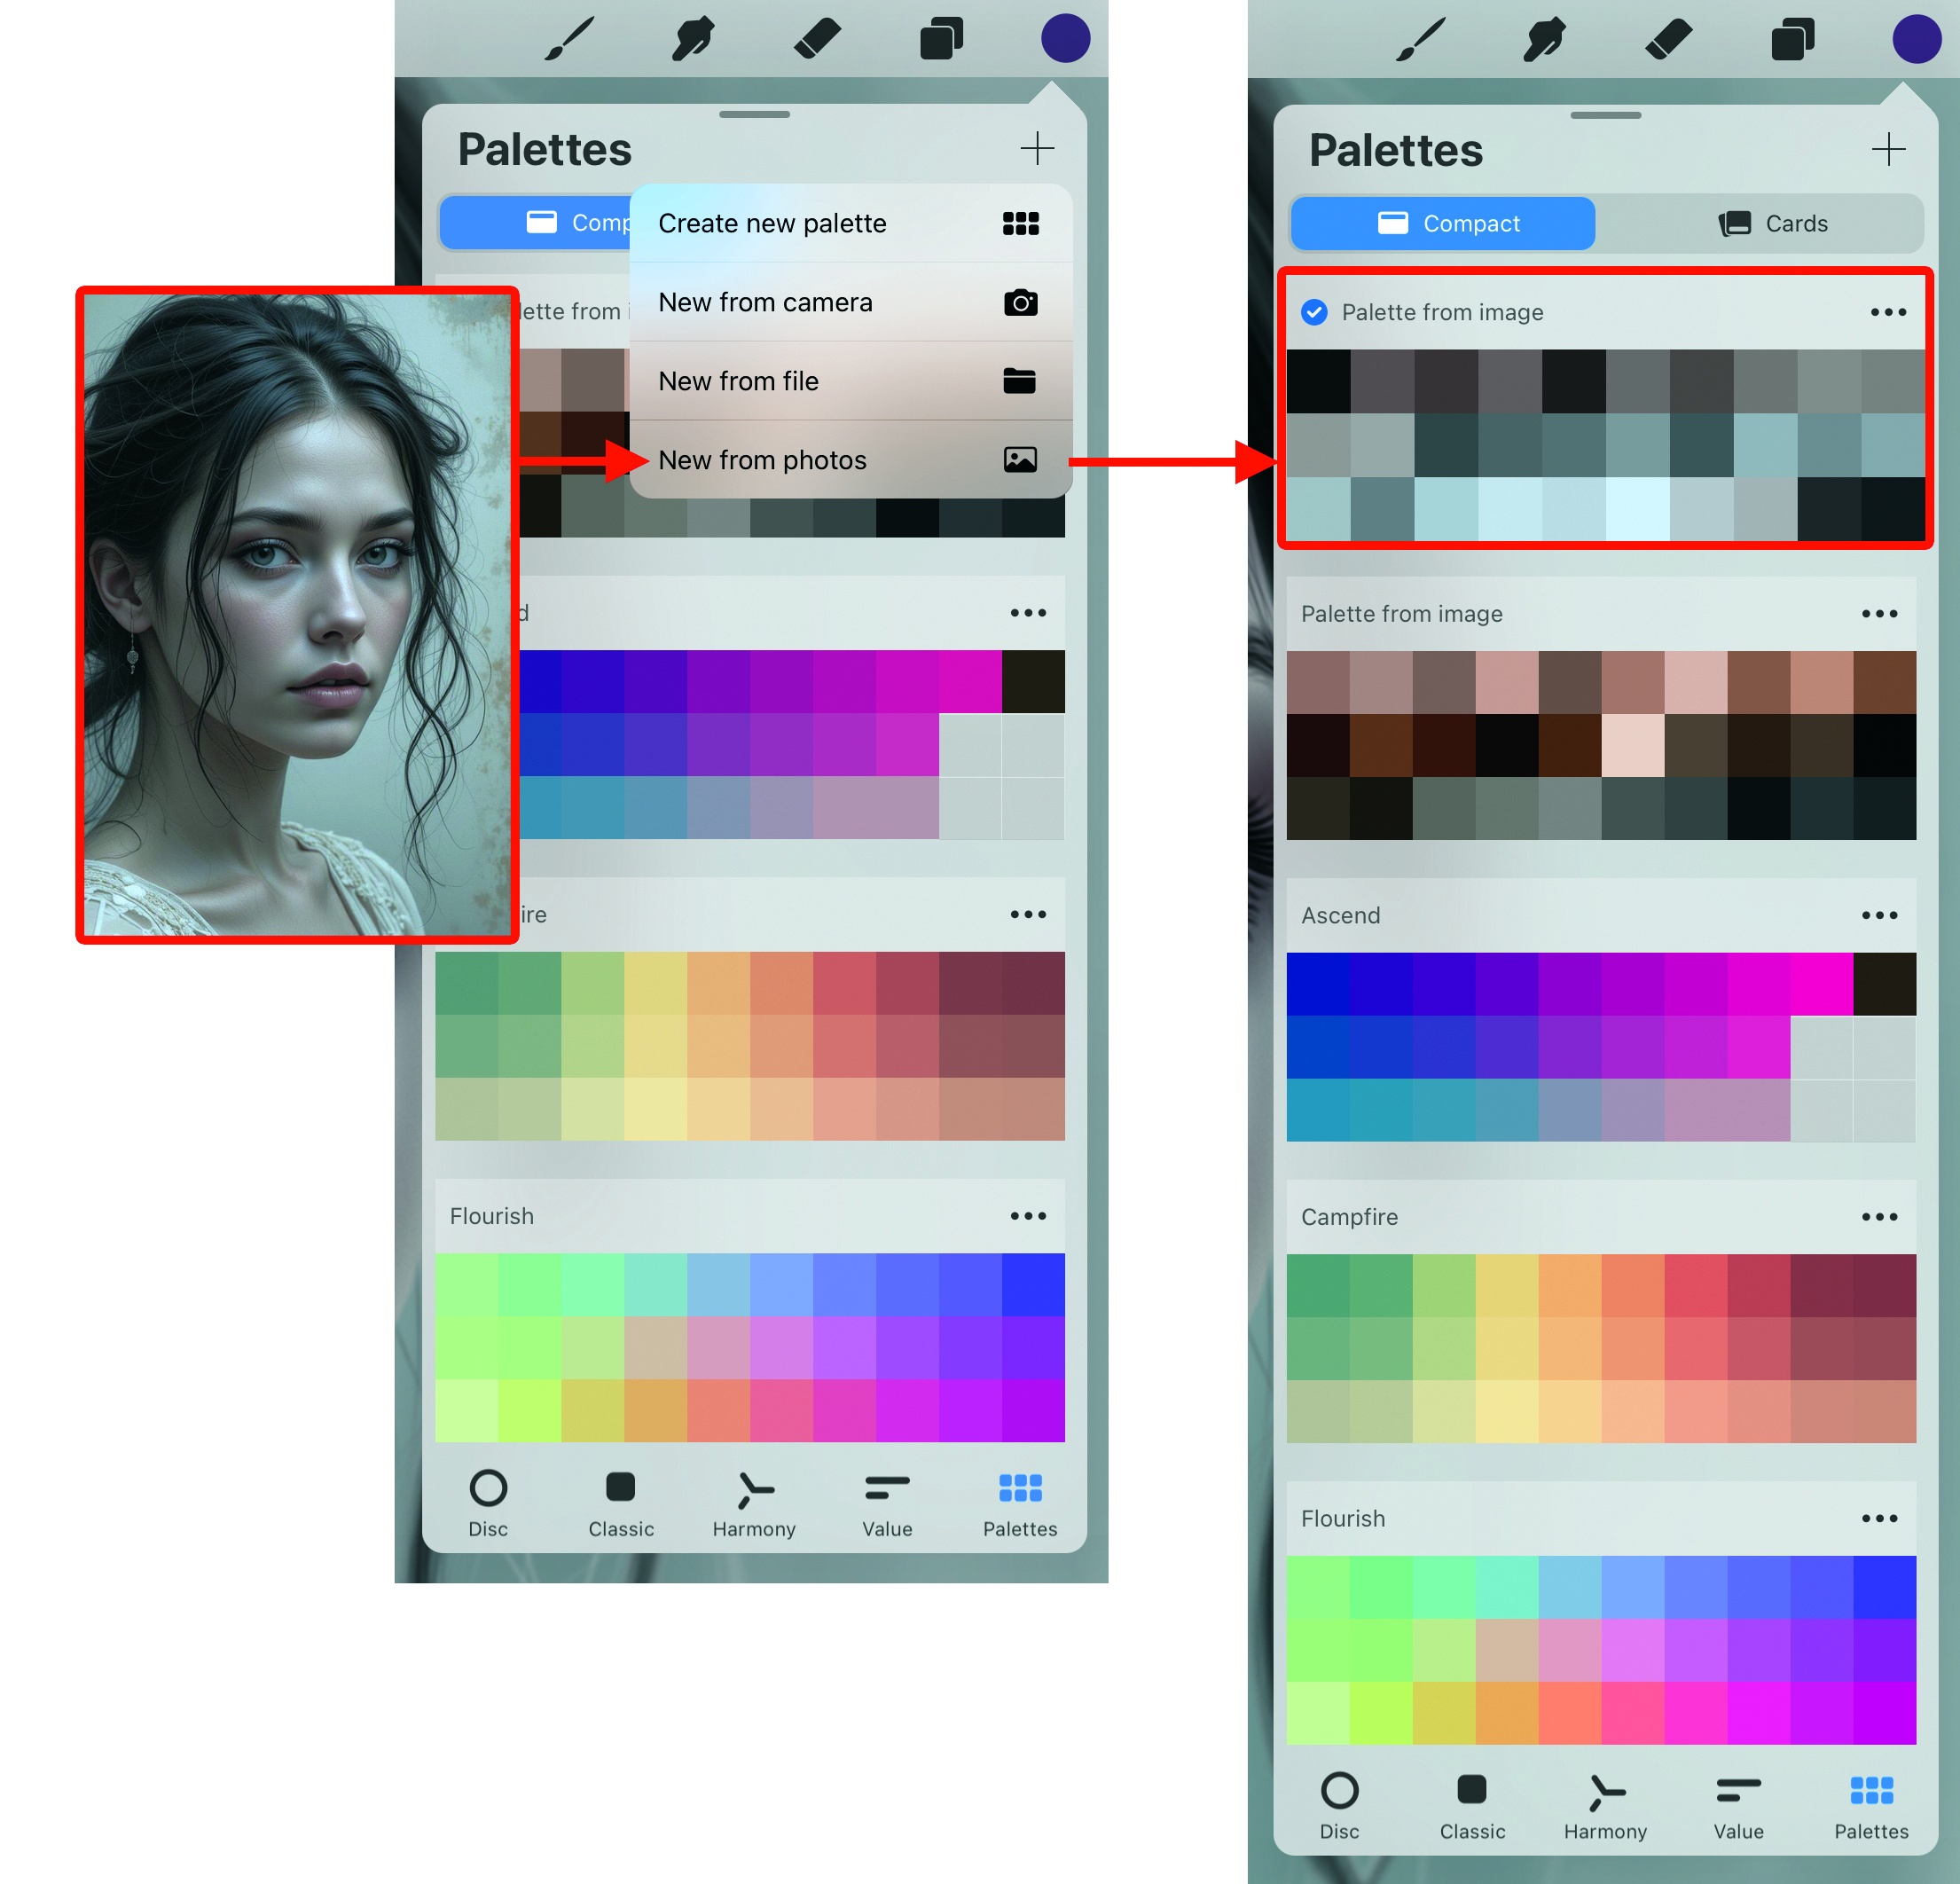
Rather than trying to pick colours from a photo to use in your work, let Procreate find the dominant shades and generate a palette for you. To do this, open up the Color Panel and head to the Palettes tab. Now press the ‘+’ icon in the top corner and you’ll be given an option to generate a new palette using the camera, a file, or a photo from your library.
4. Private Photos
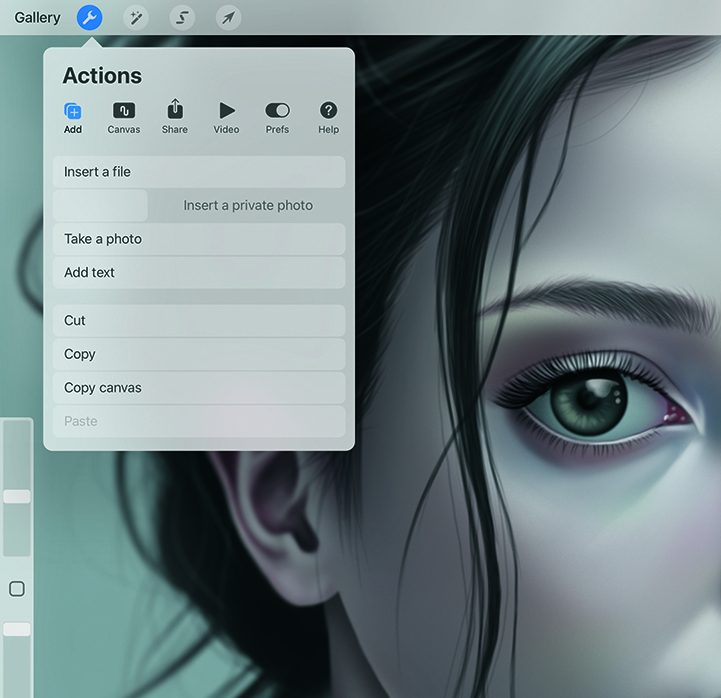
When generating a timelapse video of your work, typically, everything that happens on your Procreate canvas is recorded. Sometimes you may need certain layers to be hidden, though, like a reference image or a temporary sketch. In Procreate, you have the option to import images as Private Photos, which creates a new layer that’s invisible to any timelapse recordings. To add one, go to Add and then Insert Photo,
but swipe it left to reveal the ‘Insert a private photo’ option.
5. Colour Harmony
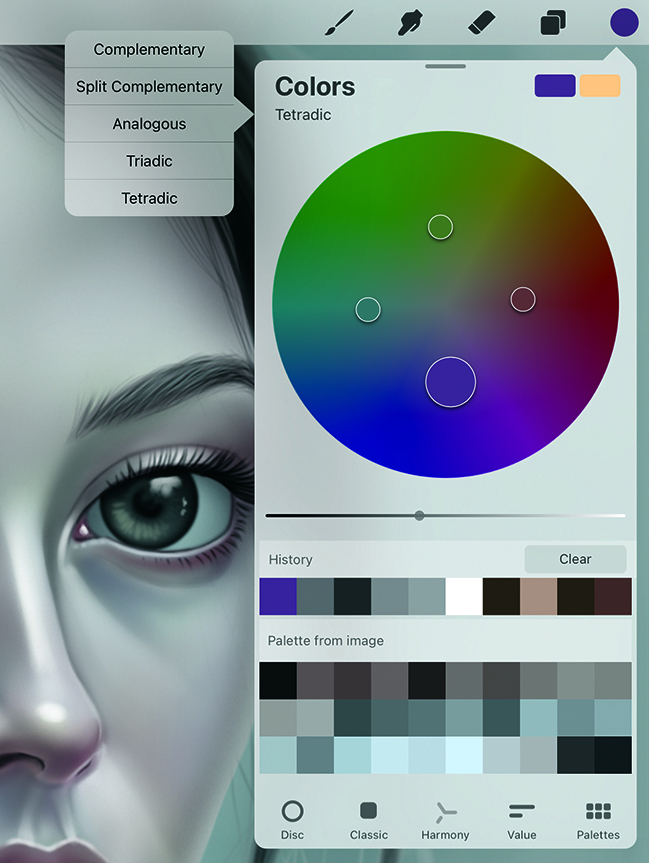
Colour theory plays a huge role in art, and this is something Procreate’s developers are well aware of, so they built tools to help. If you open the Color Panel, you’ll see a Harmony option along the bottom. Choosing this will open the dial and show you the complementary colour related to what you’ve selected. And if you click the Colors title, you’ll see a whole range of options available.
6. Remove Fill Lines in Line-Art
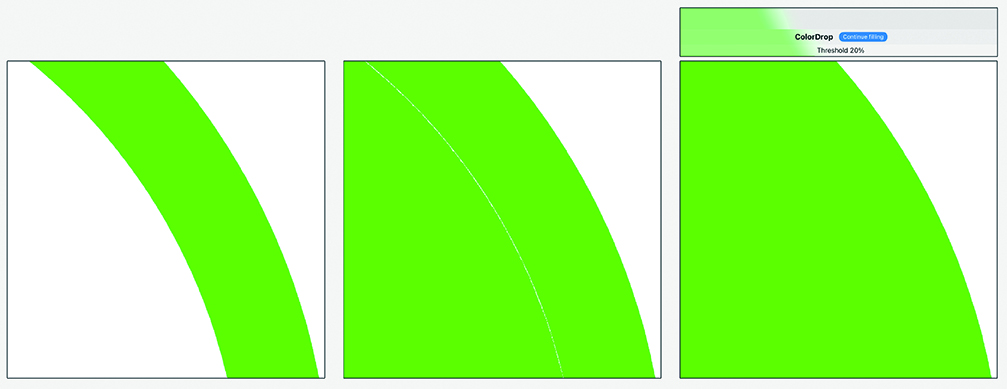
Dragging a Color Swatch onto the canvas is a quick and easy way to fill an area, but sometimes the fill doesn’t quite go all the way, leaving a faint white line just outside the radius. To combat this, all you need to do is keep the pencil, or your finger, held down, and you’ll see a Threshold bar appear across the top of the UI. You can now drag to the right to increase this Threshold and eliminate your line.
7. Move the Brush Bar
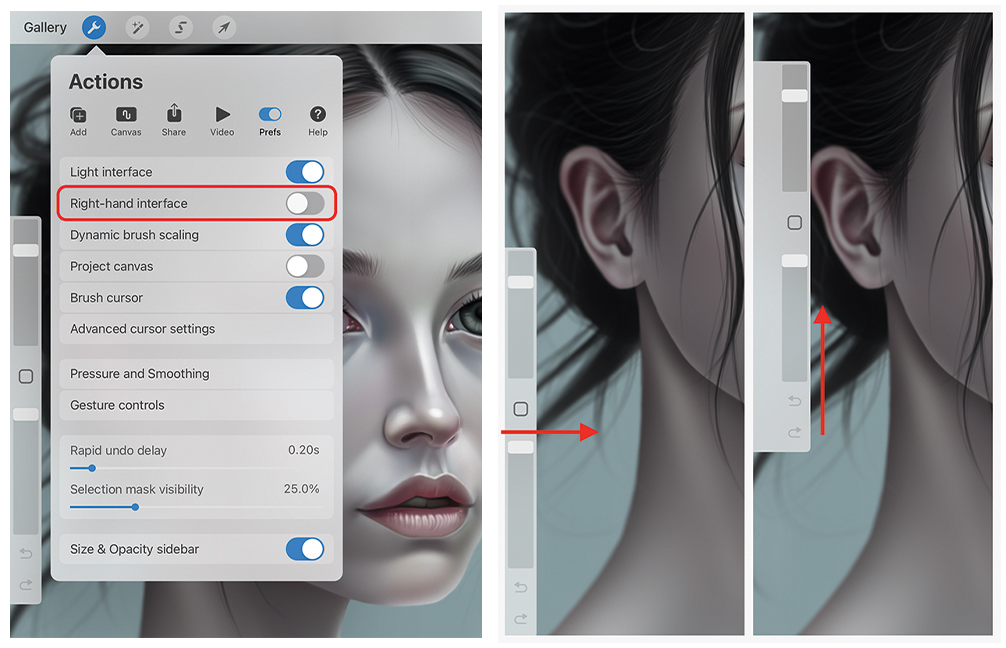
Did you know that the Brush Size and Opacity bar can be moved? Firstly, there’s the ‘Right-hand interface’ option in the Prefs tab, which will mirror the bar to the opposite side of the canvas. That’s great, but you can also change its vertical position. Swipe in from outside the screen, and the bar will move out. Keep holding it, and you can move up and down to adjust the position.
8. Project Canvas
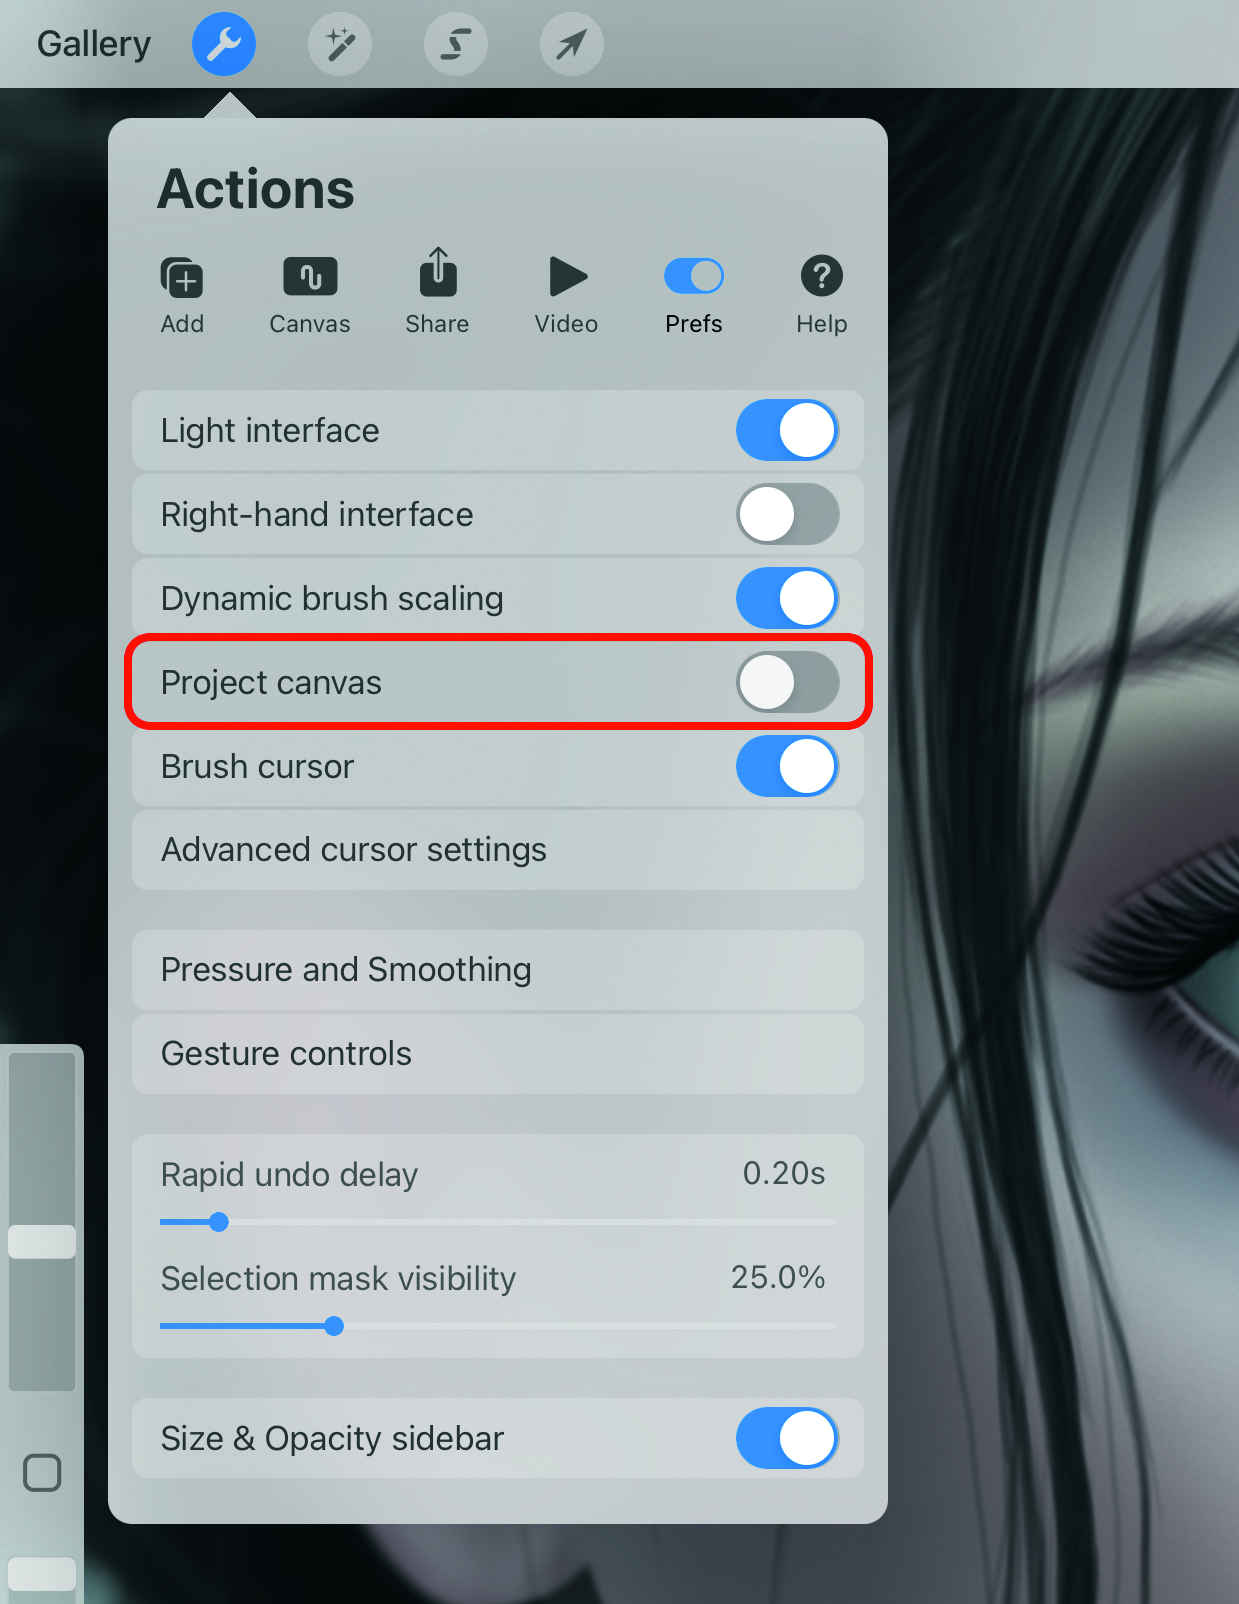
Using the reference window is a great way to quickly see your canvas while you focus on a specific area, but the iPad screen isn’t huge, so the canvas can sometimes feel cramped as you do this. Another option,
if you have a spare monitor, is to project your canvas onto it as you work. Connect the iPad to the monitor to do this, which will simply mirror the iPad screen initially. Now go to Prefs and enable Project Canvas. The canvas will be displayed but remain fixed, so it won’t show you moving and zooming into it as you work. This is also great if you’re giving demonstrations.
9. Find Layers Quickly
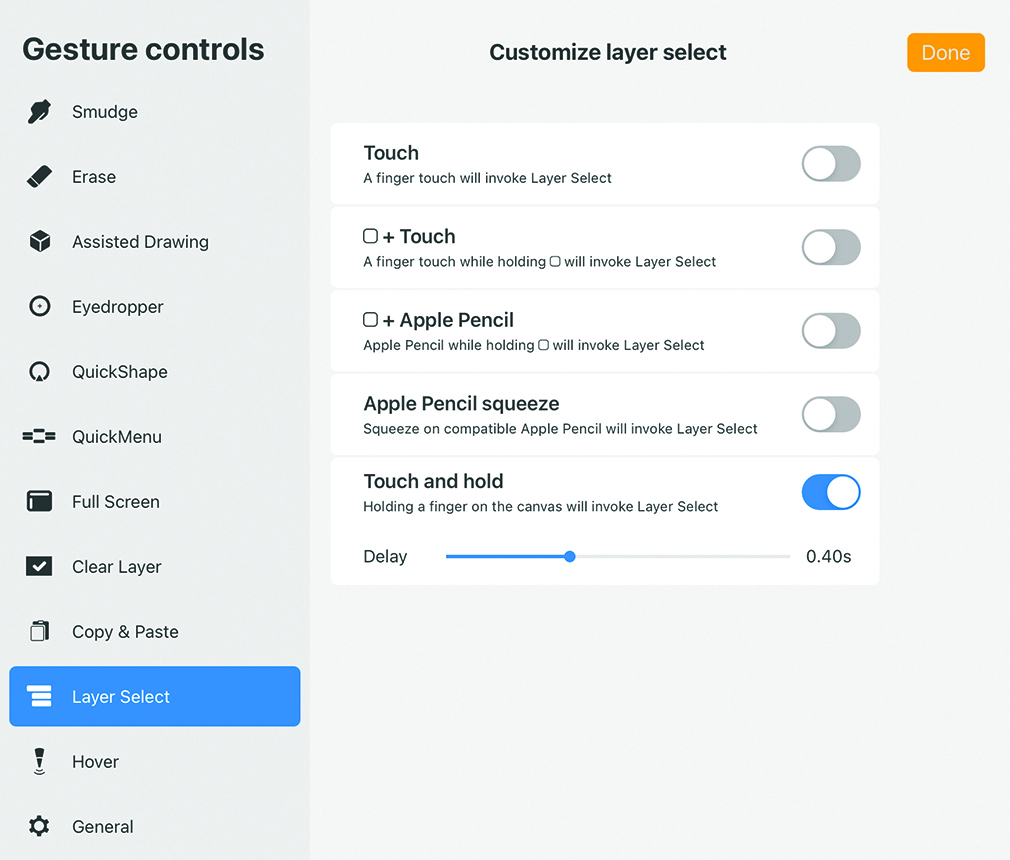
While working on a piece of art, your layer management will inevitably go out of the window unless you like to organise and name your layers as you go. Even still, when you have a lot, it can be difficult to quickly find the one you need. Procreate has a neat option that lets you hold a finger on the screen, and it will automatically select the layer you want by detecting the pixels beneath. To enable this, go to Actions>Prefs>Gesture Controls. Choose Layer Select and enable ‘Tap and Hold’. You can also adjust the delay needed before it’s triggered.
10. Smudge with your finger
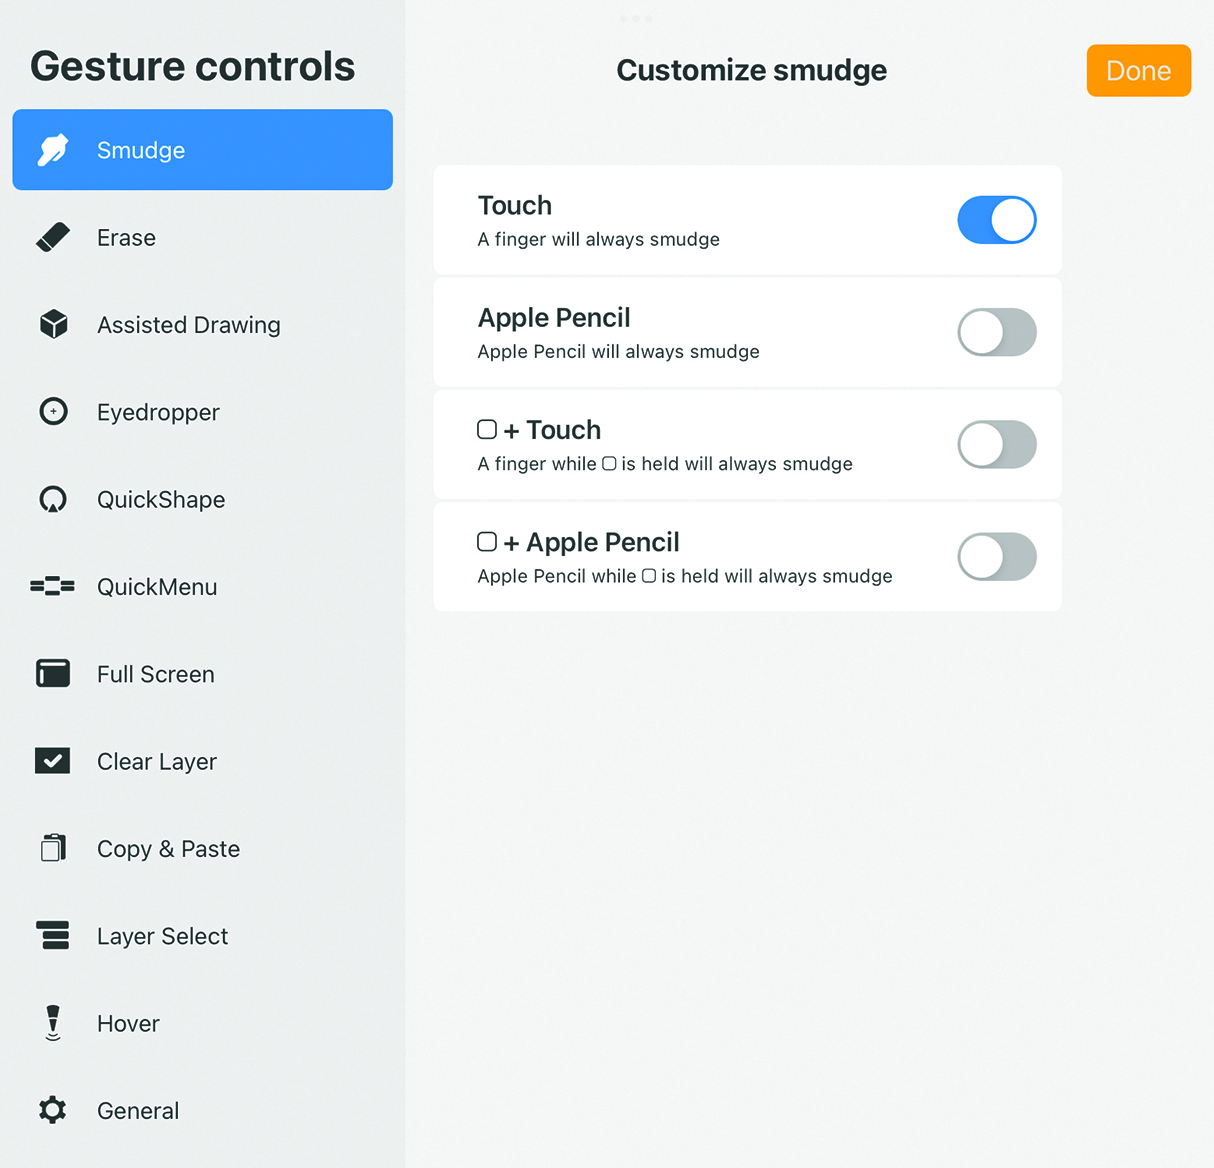
If you’re more of a traditional artist who’s used to chalk, charcoal, or maybe even pencil, you’ll frequently use your fingers to quickly smudge your work for blending. There’s an option in Procreate to get a similar effect! Go back to Gesture Controls, but this time choose the Smudge option. Simply enable Touch at the top, and you can now smudge the screen with your finger.
Daily design news, reviews, how-tos and more, as picked by the editors.

Since the early 90s, Antony has worked for many of today’s top game and VFX studios. He has written three technical manuals on Game Character Development in Maya, Game Character Development and 3D Modeling in Silo, all of which have been translated into multiple languages. He is the owner of antcgi.com, and regularly produces both written and video tutorials on technical aspects of game development and VFX.
You must confirm your public display name before commenting
Please logout and then login again, you will then be prompted to enter your display name.
