12 steps to a kickass showreel in Premiere Pro
Wow potential employers by creating the perfect showreel using Adobe software. 3D artist Tom Skelton explains how.
This article is brought to you in association with Masters of CG, a new competition that offers the chance to work with one of 2000AD's most iconic characters. There are big prizes to be won, so enter today!
So you want to build a kickass showreel using Premiere Pro, but don't know where to start or how to plan things. Here I'll take you through a few thought processes and get you away from that terrifying blank page (or empty NLE).
I've been working with Premiere for about eight months now. I jumped ship from Final Cut when they put a stake in the ground and tried something new with FCPX.
It wasn't working for me and Premiere was there, waiting with a tone of cool features to help me work faster and smarter.
Content is king
It's been said many times, but it bears repeating: content really is the backbone to having a killer showreel. If you've been working on some exciting stuff, then that'll translate straight away to how visually stimulating your piece will be.
If you've been working on projects that are not so 'dynamic' then maybe you'll need to put a creative around it or even better, go out there and make some cool stuff.
When I built my first reel I was pretty limited so I went out with my Canon 550d, did some shooting around London, got some skateboarding in there, some pans onto exciting buildings (there is such a thing), loads of generic shots and put it all in.
Daily design news, reviews, how-tos and more, as picked by the editors.
01. Do your research
Before I start any new project I'll always open up Vimeo or Behance and spend 20 minutes checking out others people's work, getting visual inspiration and figuring out where I want to take my project.
If you've never done a reel before this is a great place to start, find out how other people are doing it, find out what makes you think 'this is awesome' or 'this is not so awesome'. Write down some notes and get inspired.
02. Music
Music has the power to make your edit stand out from the crowd or suck. Don't mess around here. Although the viewer is going to be immersed in your visuals, they'll be ambushed by the soundtrack. If you choose to go down a commercial route then that's great but be careful of copyright issues. Sites like premiumbeat.com offer great soundtracks at great prices.
03. Include a call to action
If this reel is to help you get work or to let people know who you are, you're gonna want to think about how to do that. An opening and closing three-second animation or holding slide is a great idea. Do you want to include your name? Company name? Email? Phone Number? Reel title?
04. The edit
Open up Premiere, save your project and import all of your assets. Figure out what sequence settings are going to be best. Most of the time I just drag the first clip I want to use over and onto the 'New Item' icon and Prem makes a sequence that matches the clip. Premiere is awesome for working with any media. Be it an mp4, wmv, avi, it works with it all, one reason I was happy to jump ship!
05. Pull ups
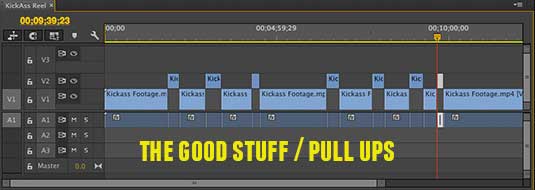
The next thing I like to do is to pull all of my assets onto the timeline, and then start doing 'pull ups'. Every time I find a clip I like I 'pull it up' onto the layer above. Doing this gives a great visual representation on what works. Once I'm happy with my selection then I duplicate the sequence (so I have a back up) and delete all the clips I didn't want to use.
06. Soundtrack edit
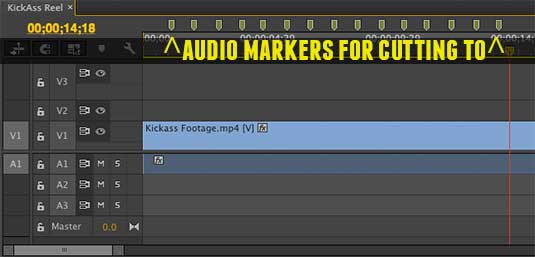
If you chose a soundtrack that you want to edit to then you'll need to import it and start cutting to the beat. A good way to do this is to make a series of markers by playing the sequence and tapping in markers to the beat, that way you have a visual representation on where your cuts need to go.
07. Handy shortcut
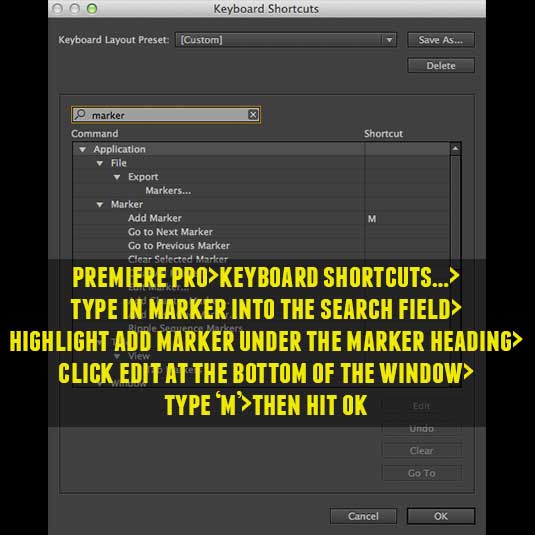
I love a good shortcut and for something like markers it's great to set up the 'M' key so can tap away while listening to your music. Go Premiere Pro>Keyboard Shortcuts…>type in marker into the search field>Highlight Add Marker under the Marker Heading>Click Edit at the bottom of the window>type 'M'>then hit ok.
08. Duration
You probably noticed from your research (or will do) that reels vary in length quite dramatically. I think the golden duration of a reel is between 30 & 60seconds. Bear this in mind when you're putting your edit together.
09. Pace
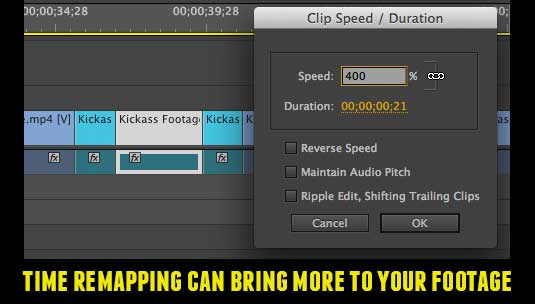
Keep things pacey, and show off your best bits. If you're not happy with a particular cut then try using the slip tool, to see if moving the in and out points (while keeping the clip in place and at the same length), can offer a quick fix. Another cool trick is to play with time remapping. I like to cut up a clip into three sections and then speed up the first and third cuts. This is a great way to change-up the feel of footage.
10. Titles
One of my favorite features of Premiere is the dynamic link into After Effects. After Effects is an amazing application and premiere works with it in a way that is a serious game changer in this industry. Try it out by duplicating some footage onto the track above, then right click>Replace with after effects composition.
When I started putting this article together I thought this would be a great way to work in your titles. The dynamic link means you can work inside the two Adobe applications at once, so no rendering out to import in. If you update some text in AE then jump back to Prem, abracadabra, it updates in Prem, pretty sweet huh!
11. Rendering
Once you're happy with your edit, set your in and out points and go File>Export>media. By using the h264 format there are some great presets to get your edit set up for vimeo or youtube.
12. Feedback
The last thing to do is to get some feedback. I know you're eager to get this published to the world, but don't rush into things. Send it out to your nearest and dearest. Ask them what they think of it, what they think it says about. It's not unusual to go back and tweak your video, or even to slap a new soundtrack on and see how that changes everything.
Remember, getting started is the hardest part, once you've got something down, you've got something to work from, something that you didn't have before you started. Thanks for reading and I'd love to see your reels so please leave a link in the comments below.
Words: Tom Skelton
Win a trip to SIGGRAPH!
Masters of CG is an exciting new competition for EU residents that offers you the one-in-a-lifetime chance to work with one of 2000AD's most iconic characters: Rogue Trooper.
We invite you to form a team (of up to four participants) and tackle as many of our four categories as you wish - Title Sequence, Main Shots, Film Poster or Idents. For full details of how to enter and to get your Competition Information Pack, head to the Masters of CG website now.
Enter the competition today!

The Creative Bloq team is made up of a group of art and design enthusiasts, and has changed and evolved since Creative Bloq began back in 2012. The current website team consists of eight full-time members of staff: Editor Georgia Coggan, Deputy Editor Rosie Hilder, Ecommerce Editor Beren Neale, Senior News Editor Daniel Piper, Editor, Digital Art and 3D Ian Dean, Tech Reviews Editor Erlingur Einarsson, Ecommerce Writer Beth Nicholls and Staff Writer Natalie Fear, as well as a roster of freelancers from around the world. The ImagineFX magazine team also pitch in, ensuring that content from leading digital art publication ImagineFX is represented on Creative Bloq.
