Screen design has come a long way in the past few years. Heck, we weren’t even saying 'screen design' a few years ago. As scores of graphic designers and illustrators evolve to tackle screen design, so too must our toolset. We’re no longer creating static, singularly-specced pieces of art – we’re planning living, breathing design systems that must work across a variety of environments.
This new set of demands has given birth to an explosion of flexible, focused new tools. My favourite of the bunch is Sketch, a rising star from the team at Bohemian Coding.
Sketch lets me work faster than I’d ever dreamed, all while freeing me up to do what I do best: design. It’s light enough to quickly prototype and strong enough to go high-fidelity when I’m ready. One of Sketch’s biggest strengths is its growing community, which has created a huge selection of plugins that extend Sketch in any direction you want.
In this lesson, we’ll take a look at using three key tools from Craft: Photos, Type and Duplicate, to create a complete and realistic screen design for a list of contacts.
01. Set up your artboard
Let’s start by creating a new document in Sketch and setting up an artboard to work inside. In a fresh document, hit Insert > Artboard or simply the A key to activate the Artboard tool.
In the right pane you'll see a menu filled with predefined artboard sizes (created to match popular devices and scenarios). Select iPhone 6 and an artboard will be created for you in the centre of the canvas.
02. Draw a header
Although we're specifically creating a list of contacts in this lesson, we'll need some extra interface bits to complete the illusion. With the rectangle tool (Insert > Rectangle or R), draw out a header across the top of the artboard. Insert the title 'Contacts', and some icons for good measure, like 'menu' and 'search' actions in the left and right corner of the artboard, respectively.
03. Build the footer

Before we get to the data, let's also build out a quick tabbed footer, complete with a FAB (floating action button) for adding a new contact. With the rectangle tool, draw out a white rectangle and place it at the bottom of the artboard. Using the oval tool (Insert > Oval or O), draw a circle for the FAB.
04. Insert icons
Next, insert some icons to show the user where to click: a 'plus' inside the FAB, a 'user' icon in the left tab, and a 'history' icon on the right. We’ll also add an indicator – a simple black line – to show that the Contacts view is selected. Now’s also a great time to set the artboard background colour (black), which you can do by selecting the artboard and then picking a colour in the Inspector.
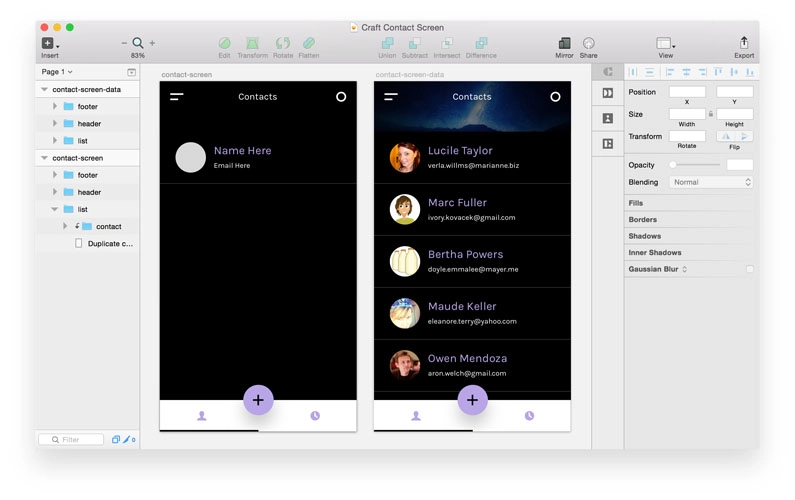
05. Create a contact item
With our stage set, it's time to create a single contact item. This is the item that will be filled with data, duplicated, and arranged into a grid to complete a full list of contacts. Let's start with a simple circle, which will act as a placeholder for the avatar (a photo that represents each user).
06. Make some text layers

Next to the oval, let’s also insert of pair of text layers. With Insert > Text or simply the T key, use the Text tool to insert a layer that reads 'Name Here', and another underneath that reads 'Email here'. These will be the layers we fill with data from the Type panel inside Craft.
07. Pick a name

Time to make the sausage! We'll start by inserting a real name and a real email address. First, select the layer that reads 'Name Here' and open up the Type panel (located in the Craft bar next to the Inspector). You’ll be presented with a menu of data to select from. Pick 'Names', then select from male, female or both. Your text layer will automatically be filled with a real name.
08. Fill the email text layer
We're going to fill the email text layer the same way we did the names. Select the 'Email here' layer, open up the Type panel, and select Email Address to quickly insert a realistic email address.
09. A random face

Next up we want to fill that grey circle with a real photo avatar, which we'll do with the Photos panel. Start by selecting the circle layer, then open up 'Photos' from the Craft pane. Here, you've got a few options, like sourcing from a local folder, Dropbox, or the web at large.
Here I'm selecting a local folder full of images I downloaded from the website uifaces.com. Click 'Place photos' and Craft will fill your circle with a random face taken from your collection.
10. Create a list of contacts
With a single contact filled, it's time to create a complete list of contacts. Before we do that, let's insert a small dividing line under the layers we just created.
11. Duplicate
To repeat our single contact element into a whole list, we're going to use Craft's Duplicate panel. With your group selected, open up the Duplicate panel and check out the options.
We've got two choices: Inside Selection and Specific Count. The first allows you to select the area you want the list in, then fills it with however many items fit. The second lets you define the exact count ('I want a grid X items wide and Y items tall').
12. Using Inside Selection
We'll be using the Inside Selection option, which I've found is perfect for screen design. Since this is a vertical list, not a grid, we're only going to check the Vertical option. Click Duplicate Content and you'll see a few things will happen.
First, your single contact group has been tripled. Second, each time Duplicate does its magic, your fields get re-populated, so each new group uses fresh data. Third, there is a new layer created under your contact groups, which we'll use to define the area we want to be filled with contacts.
13. Resize the layer

To make the contact list fill the entire screen, we're going to resize the Duplicate Control layer. Simply grab the bottom handle of the shape and drag it down to the bottom of your artboard.
As soon as you let go, Duplicate will automatically create more contact groups to fill the new space, again filling each new group with fresh data.
14. Fix the spacing
Now our list is in place, you might notice the spacing isn't quite right. With Craft, adjusting gutters is pretty simple. With the Duplicate Control layer selected, open the Duplicate panel once again, and notice that the button now reads Adjust Gutters. Instead of nudging each new layer around the canvas, simply change the Vertical Gutter option to 20, then hit the Adjust Gutters button. Your list will automatically snap into the correct spacing.
15. Add a cool header
With our list complete and populated with real-looking folks, let's double back to the interface and insert some flair, maybe in the form of a full photo header. We'll start by selecting the original 'header-bg' shape we drew with the rectangle tool, and resizing it down towards the first contact in the list. The header should probably stop around 20px from the first item, since that's the same gutter we used in our list.
16. Find the right image

With our newly sized shape selected, let's open up the Photos panel, and head to the Unsplash tab. Unsplash is an amazing online resource, filled with royalty-free, high-quality photos.
Craft lets you filter by colour and category, so finding a perfect photo for any occasion is easier than ever. With our dark colour scheme, I think the Space category will do just fine. Click Place Photo and your new photo will drop into place.
17. Tweaking colours
Since Craft places a random photo based on our filters, it's easy to shuffle the image again and again, until you find one you like. Simply keep clicking Place Photo until you like what you see.
The photo I like is a little bright, so I'm going to turn it down a notch by adding a dark translucent fill on top of the image. Sketch allows you to 'stack' fills on a single shape, so all we need to do is click the little '+' icon in the Fills section of the Inspector. I've added a 50 per cent black layer on top of the image, which now looks just right.
18. Done!

That's all there is to it! The normal mad dash to find content usually consists of searching, copying, pasting, and repeating – no longer. Filling an entire layout with realistic data is just a few clicks away, and you don't even have to leave your favourite design program.
