Colourise a black and white photo in Photoshop
Take control of your image colouring with Photoshop's Color Balance tool – Ben Secret shows you how
Sign up to Creative Bloq's daily newsletter, which brings you the latest news and inspiration from the worlds of art, design and technology.
You are now subscribed
Your newsletter sign-up was successful
Want to add more newsletters?
In this tutorial I’ll walk through a quick and easy way to colourise a black and white image using the Color Balance tool. For each colour that you want to incorporate, add a Color Balance adjustment layer, shift the colour sliders to give you the desired hue, invert the layer mask, and then paint the effect back in only where needed with a white brush.
For slightly more realistic recolouring of skin and hair, bring in the Blending Options panel. This way you can fade the colourising effect in the shadows, have full-colour in the mid-tones, and fade the colour out again in the brightest highlights.
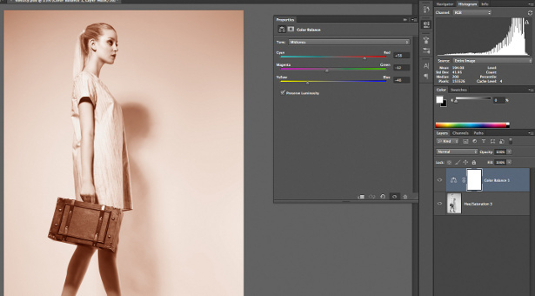
01 Load your black and white image and then add a Color Balance adjustment layer. We want to create a somewhat natural-looking skin colour here, so here I’m using the settings: Red +55, Green −12 and Blue −48, to give an orange hue. Now, to hide this colouring effect, invert its mask by pressing Cmd/ Ctrl+I with the mask selected in the Layers panel.
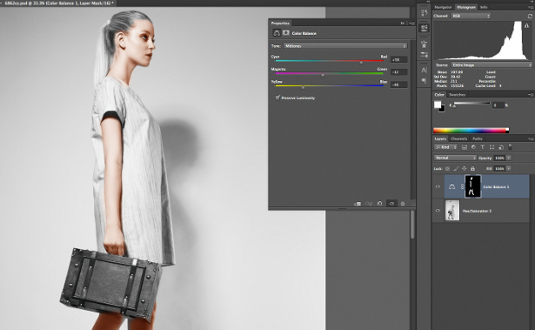
02 Using a medium-soft white paint brush, with full opacity and flow settings, you can crudely paint the colouring effect in over any skin regions. We’ve got a rather rough colouring – and you could leave it like this for an unsubtle, retro look. But we can create a more complex and realistic skin colour effect by tapering our colour strength. So Ctrl/right-click the layer in the panel and bring up the Blending Options panel.
Article continues below 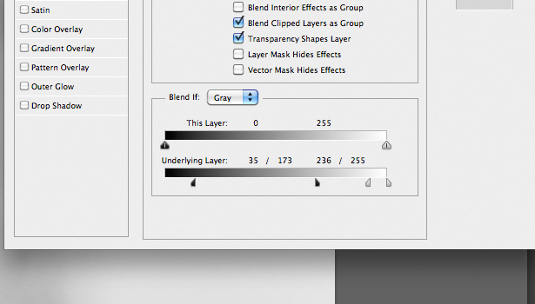
03 Now go to the Blend If options. With the Underlying Layer sliders, you can control where the colouring effect punches in and out based on the luminosity of the underlying image. Opt/Alt-clicking the sliders lets you break them apart and fade the effect in, and then out again. I’m using values of 35 and 173 on the black point, and 236 and 255 on the white point.
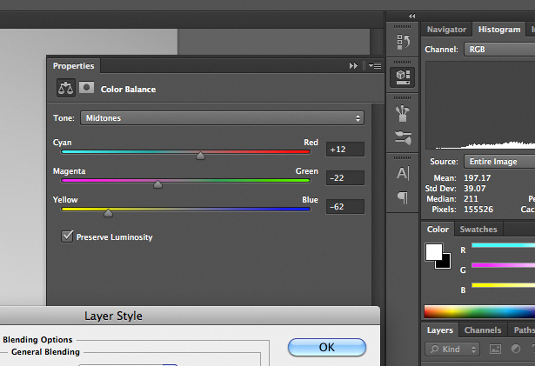
04 You can add another Color Balance adjustment layer to colour in the hair. Here I’m using a blondish yellow: Red +12, Green −22 and Blue −62. Mask and reveal as in step 01. I’m using the Blend If sliders here to give darker hair roots: I’m just breaking apart from the black slider and having that fade in from 0 to 163. I’ve also selected Highlights, in Color Balance, to subtract a bit more Blue, taking it to -9.
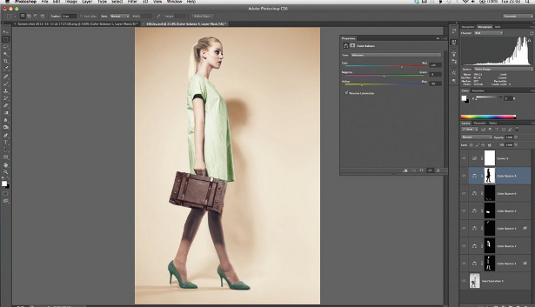
05 The rest of the colouring can generally be taken care of without too much trouble. Clothes, details and backgrounds can usually just be coloured in simply, with their own Color Balance layers, without any special blending options. Because this colouring is completely nondestructive, you can go back and adjust or completely remap all your colours, if you want to.
Sign up to Creative Bloq's daily newsletter, which brings you the latest news and inspiration from the worlds of art, design and technology.

The Creative Bloq team is made up of a group of art and design enthusiasts, and has changed and evolved since Creative Bloq began back in 2012. The current website team consists of eight full-time members of staff: Editor Georgia Coggan, Deputy Editor Rosie Hilder, Ecommerce Editor Beren Neale, Senior News Editor Daniel Piper, Editor, Digital Art and 3D Ian Dean, Tech Reviews Editor Erlingur Einarsson, Ecommerce Writer Beth Nicholls and Staff Writer Natalie Fear, as well as a roster of freelancers from around the world. The ImagineFX magazine team also pitch in, ensuring that content from leading digital art publication ImagineFX is represented on Creative Bloq.
