How to edit videos on a Mac: The basics in 6 easy steps
Video editing is a complex affair: there’s so much to bear in mind. This tutorial will introduce you to the basics, on a Mac.
Truth be told, there’s really little difference between a Mac and a PC when it comes to video editing these days. You soup up your machine with as much RAM as you can cram into it, get the best CPU and GPU you can afford, and install the software you need for the job. Of course, getting one of the best Macs for video editing will do all that for you!
Adobe’s Premiere Pro works on both platforms, and so does the excellent yet little known DaVinci Resolve. But those are very complex programs aimed at pros, and Macs have a couple aces up their sleeve. First, their fabled “it just works” mantra that applied especially to their hardware. Second, they’ve produced two excellent apps: Final Cut Pro, and iMovie.
Now the former is really for pros, but if you’re new to editing, or just want to have a little fun making a home movie chronicling your latest vacation, I’d advise you start with iMovie. Sure, it hasn’t been updated in years, but it’s free, usually comes bundled with your Mac, and still packs a punch despite its age. So if you’re interested in this video editing malarkey, welcome: this tutorial will show you the iMovie basics, so you hit the ground running.
1. Choose a Trailer
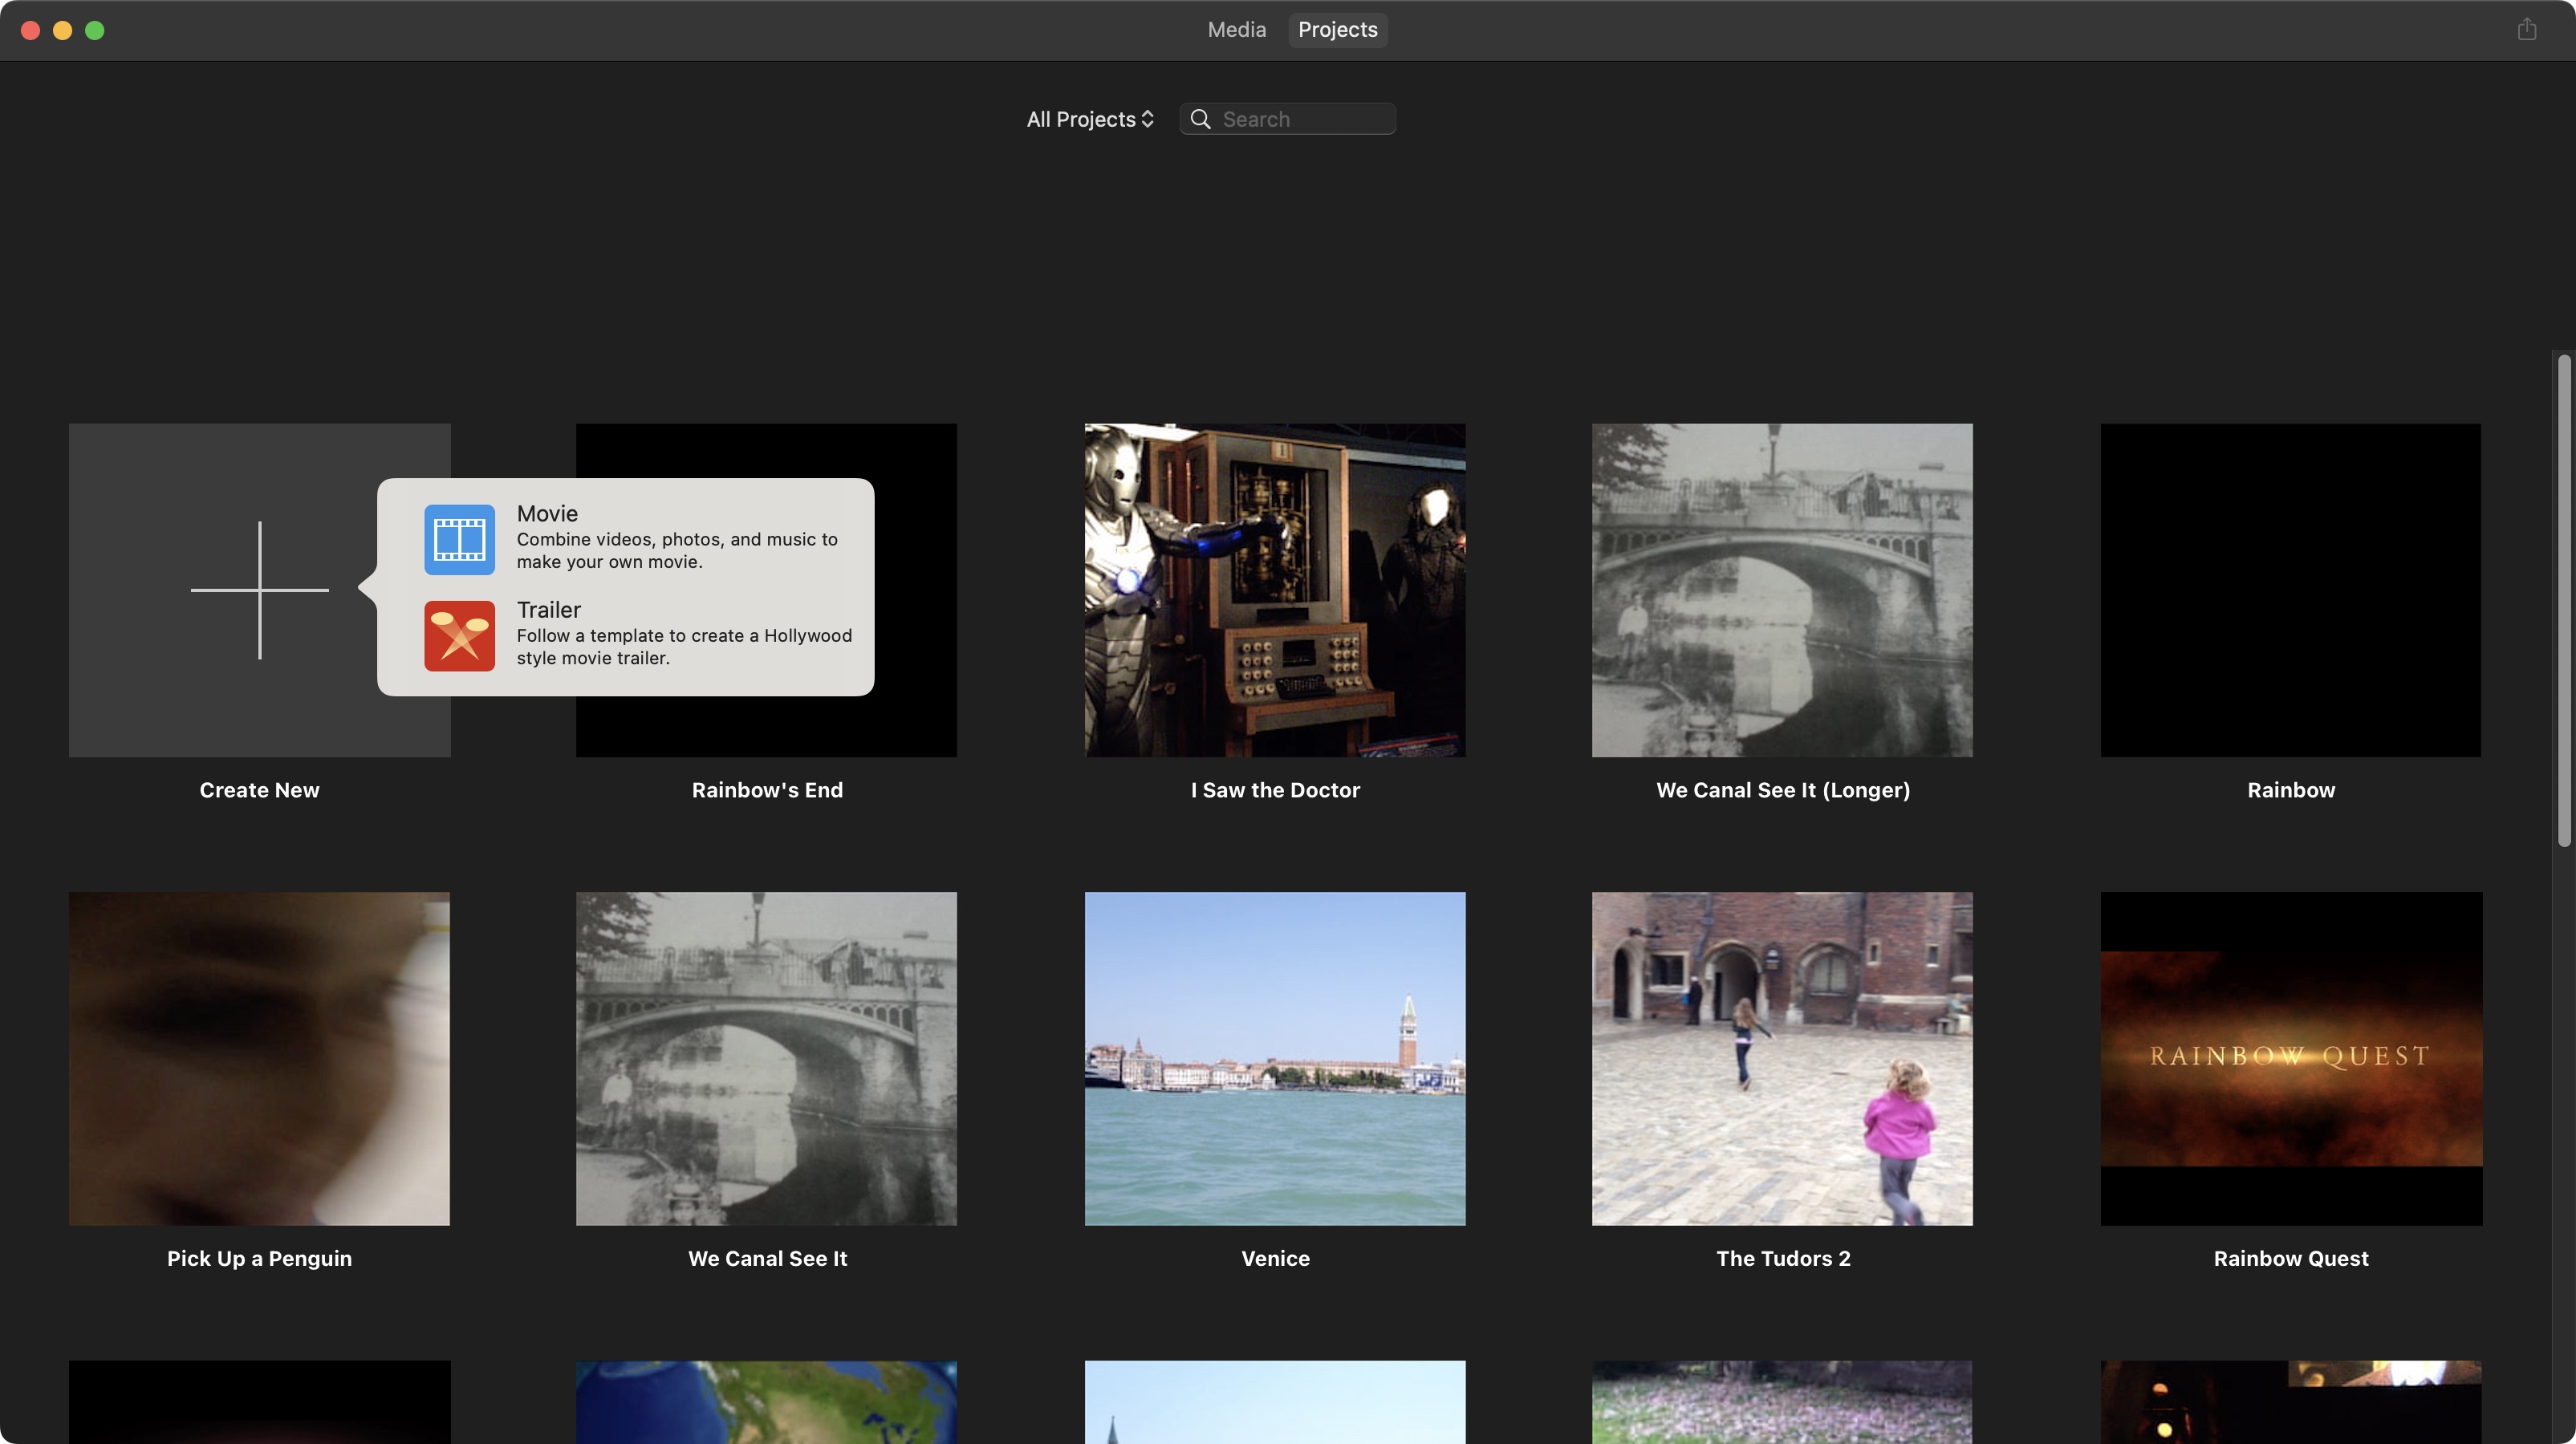
iMovie is a simplified video editor that comes in two modes: ‘Movie’ and ‘Trailer’. The latter is the simplest, as it does most of the job for you, so let’s take a quick look at it. If this is the first time you’ve launched iMovie, all you’ll see on the interface is a giant ‘+’ thumbnail (otherwise you’ll also see other thumbnails representing your previous projects). Click on it and select ‘Trailer’.
You’re offered 25 templates (which you can preview by clicking on their thumbnails). Select the one that best suits the mood you’re after, and click on ‘Create’. You’ll then be taken to the interface proper.
The top third is devoted to your media, stored either in your Photos library, or your dedicated iMovie library (dragging any media from elsewhere on your Mac onto that area will copy it and store it in that library), top right is your viewer, and the bottom is devoted to a series of tabs. This is where you’ll assemble your project.
2. Create a Trailer
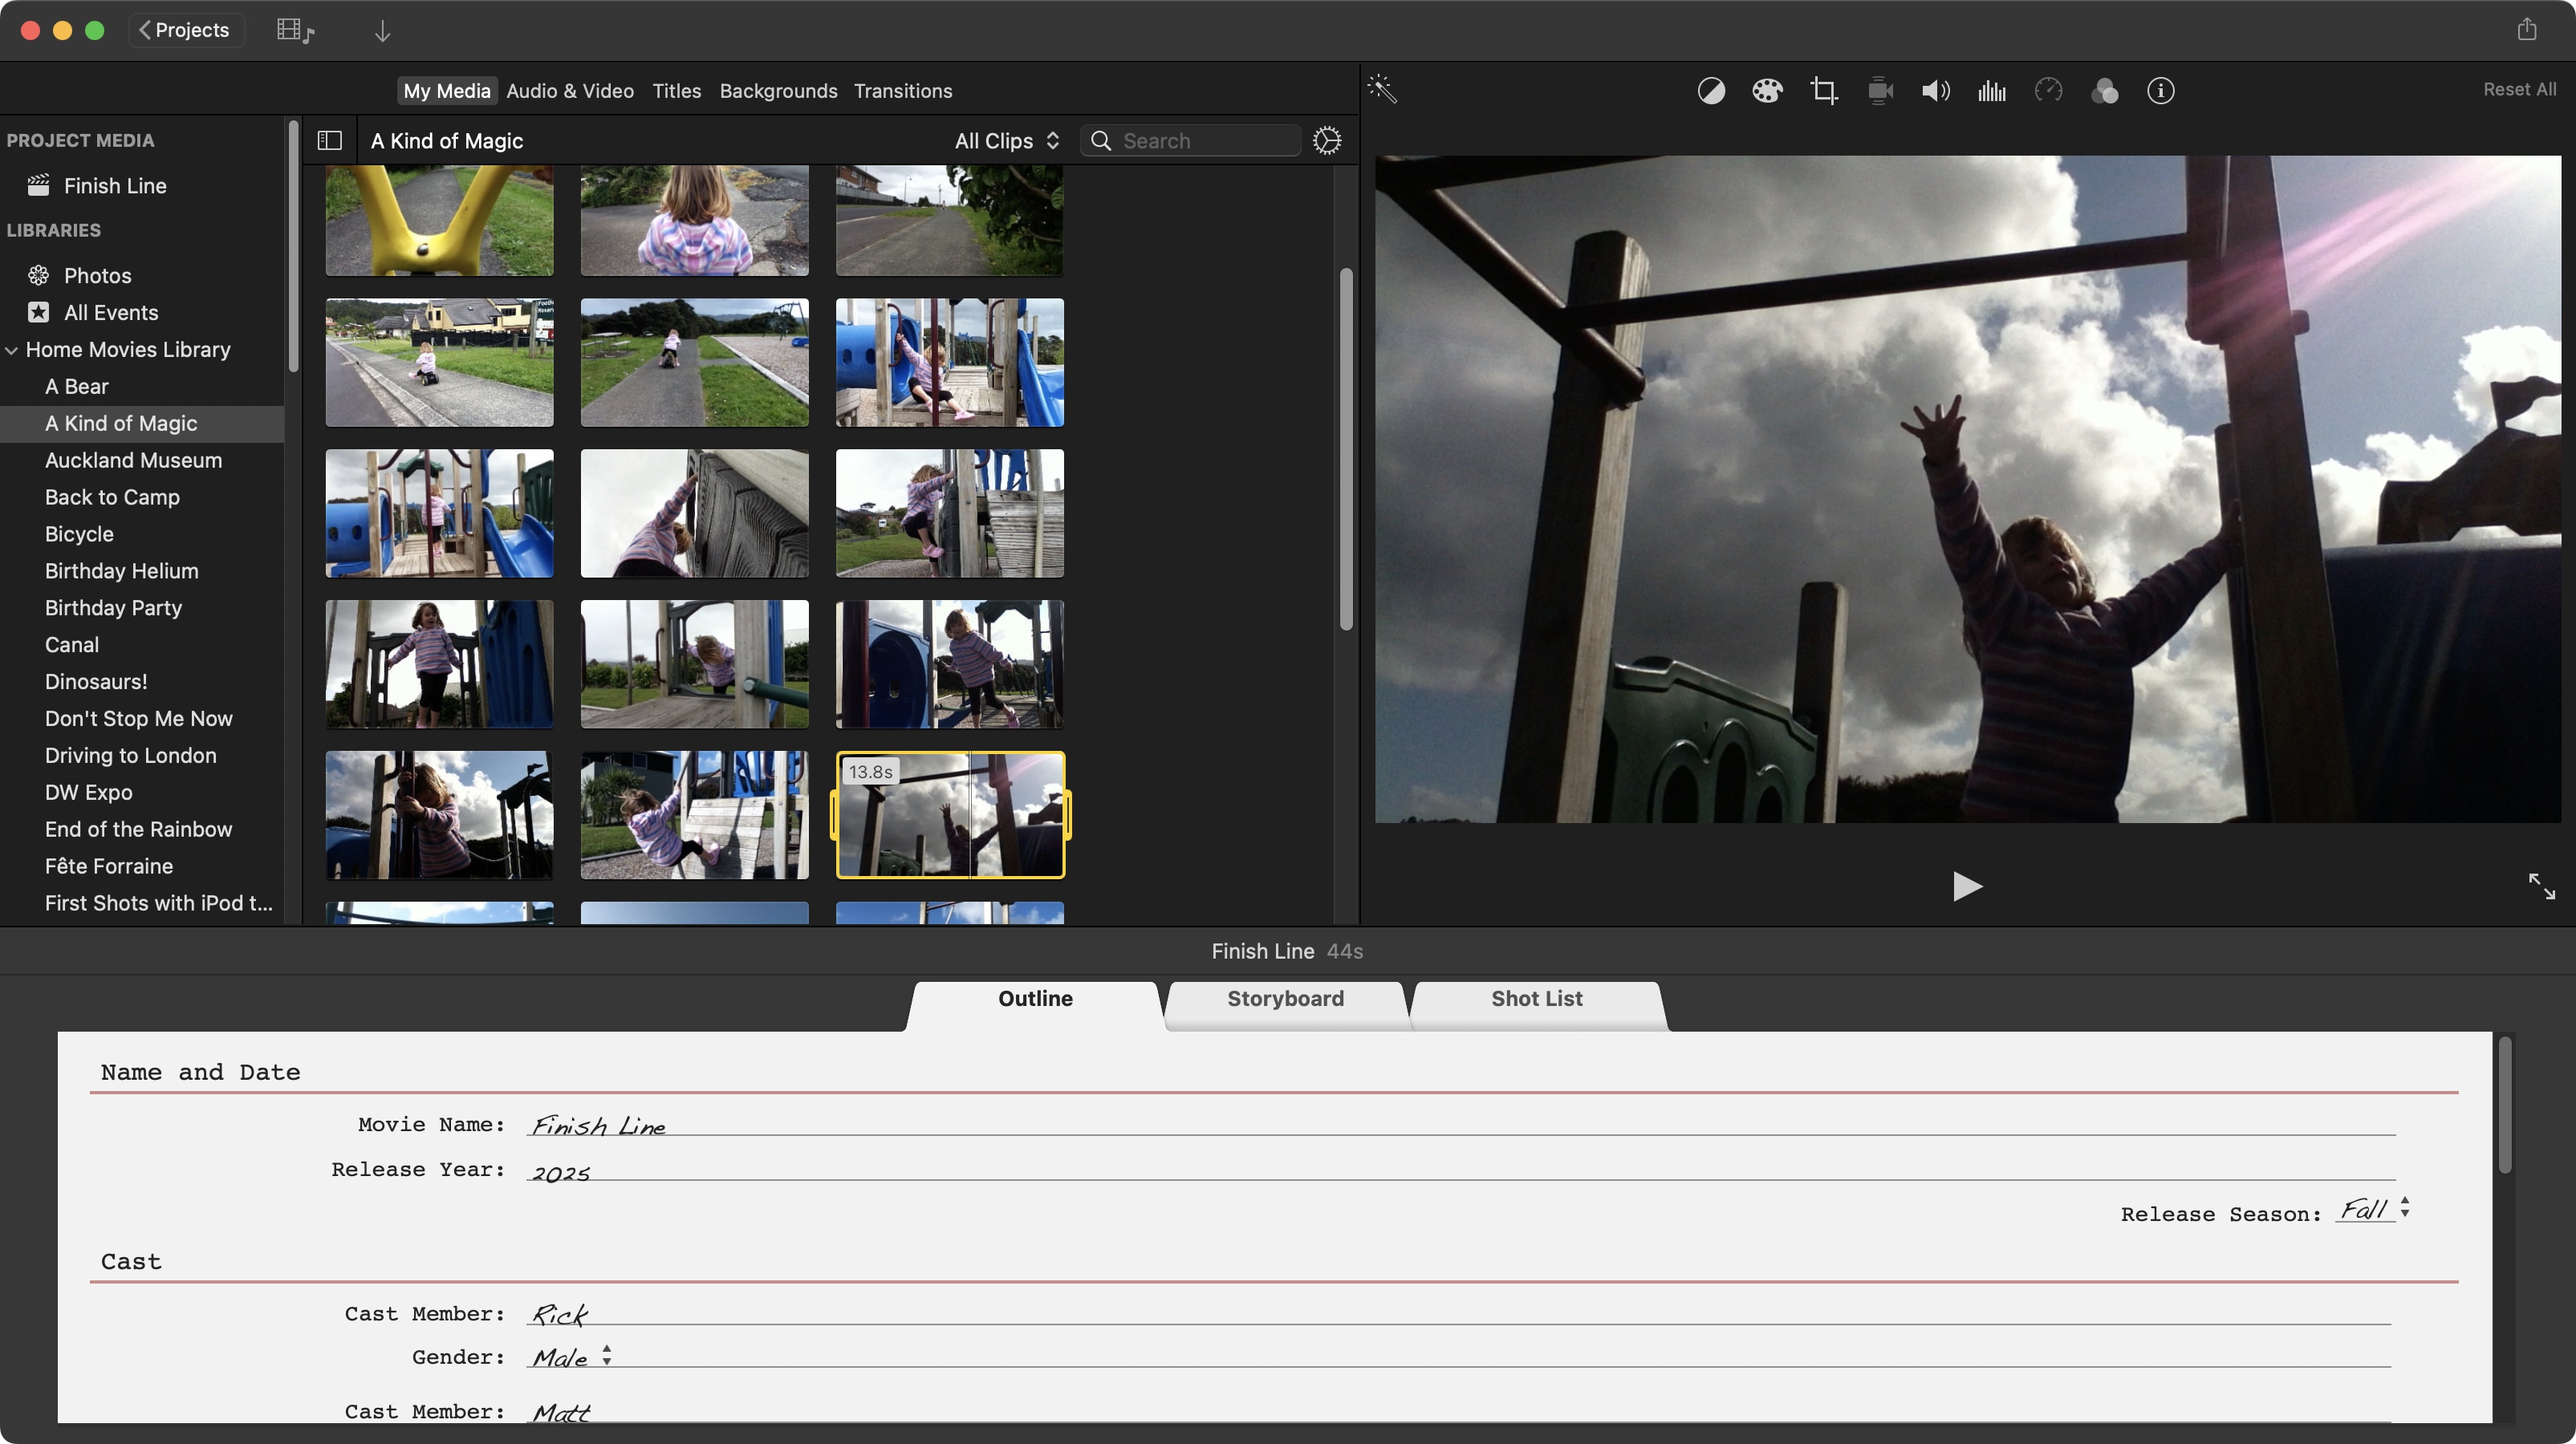
Those three tabs are there for your customisation. ‘Outline’ is for your movie’s title, studio name, title, cast and crew, etc. You don’t have much space for it all, and can’t add nor remove fields. Perhaps the funnest section here is the Studio’s logo style, which you have 11 to choose from, some of which might even look very familiar.
Daily design news, reviews, how-tos and more, as picked by the editors.
‘Storyboard’ and ‘Shot List’ provide the same information in different ways: the former lists the shots the trailer needs in chronological order, complete with taglines (which you can customise), while the latter shows the list of shots broken down by category (action, two-shot, landscape, etc).
In Storyboard, clicking on a shot in the Media section instantly adds it to your project, which then moves to the following clip ready for your next click. You can literally build an edit this way in seconds. Once you’ve done this and altered all the taglines, you can preview your work by clicking the play button in the preview section, and if you’re happy with the results, click on the share button to export your film (I’d recommend sticking to ‘Export File’ from that menu, to save your work at the highest quality).
3. Add Your First Clip
Having the computer do everything for you may be fun, and a godsend when you’re in a hurry, but it practically removes all creativity from the process. So let’s get our hands a little dirty: click on ‘Projects’ (top left of the interface), click once more on ‘Create New’, only this time, choose ‘Movie’.
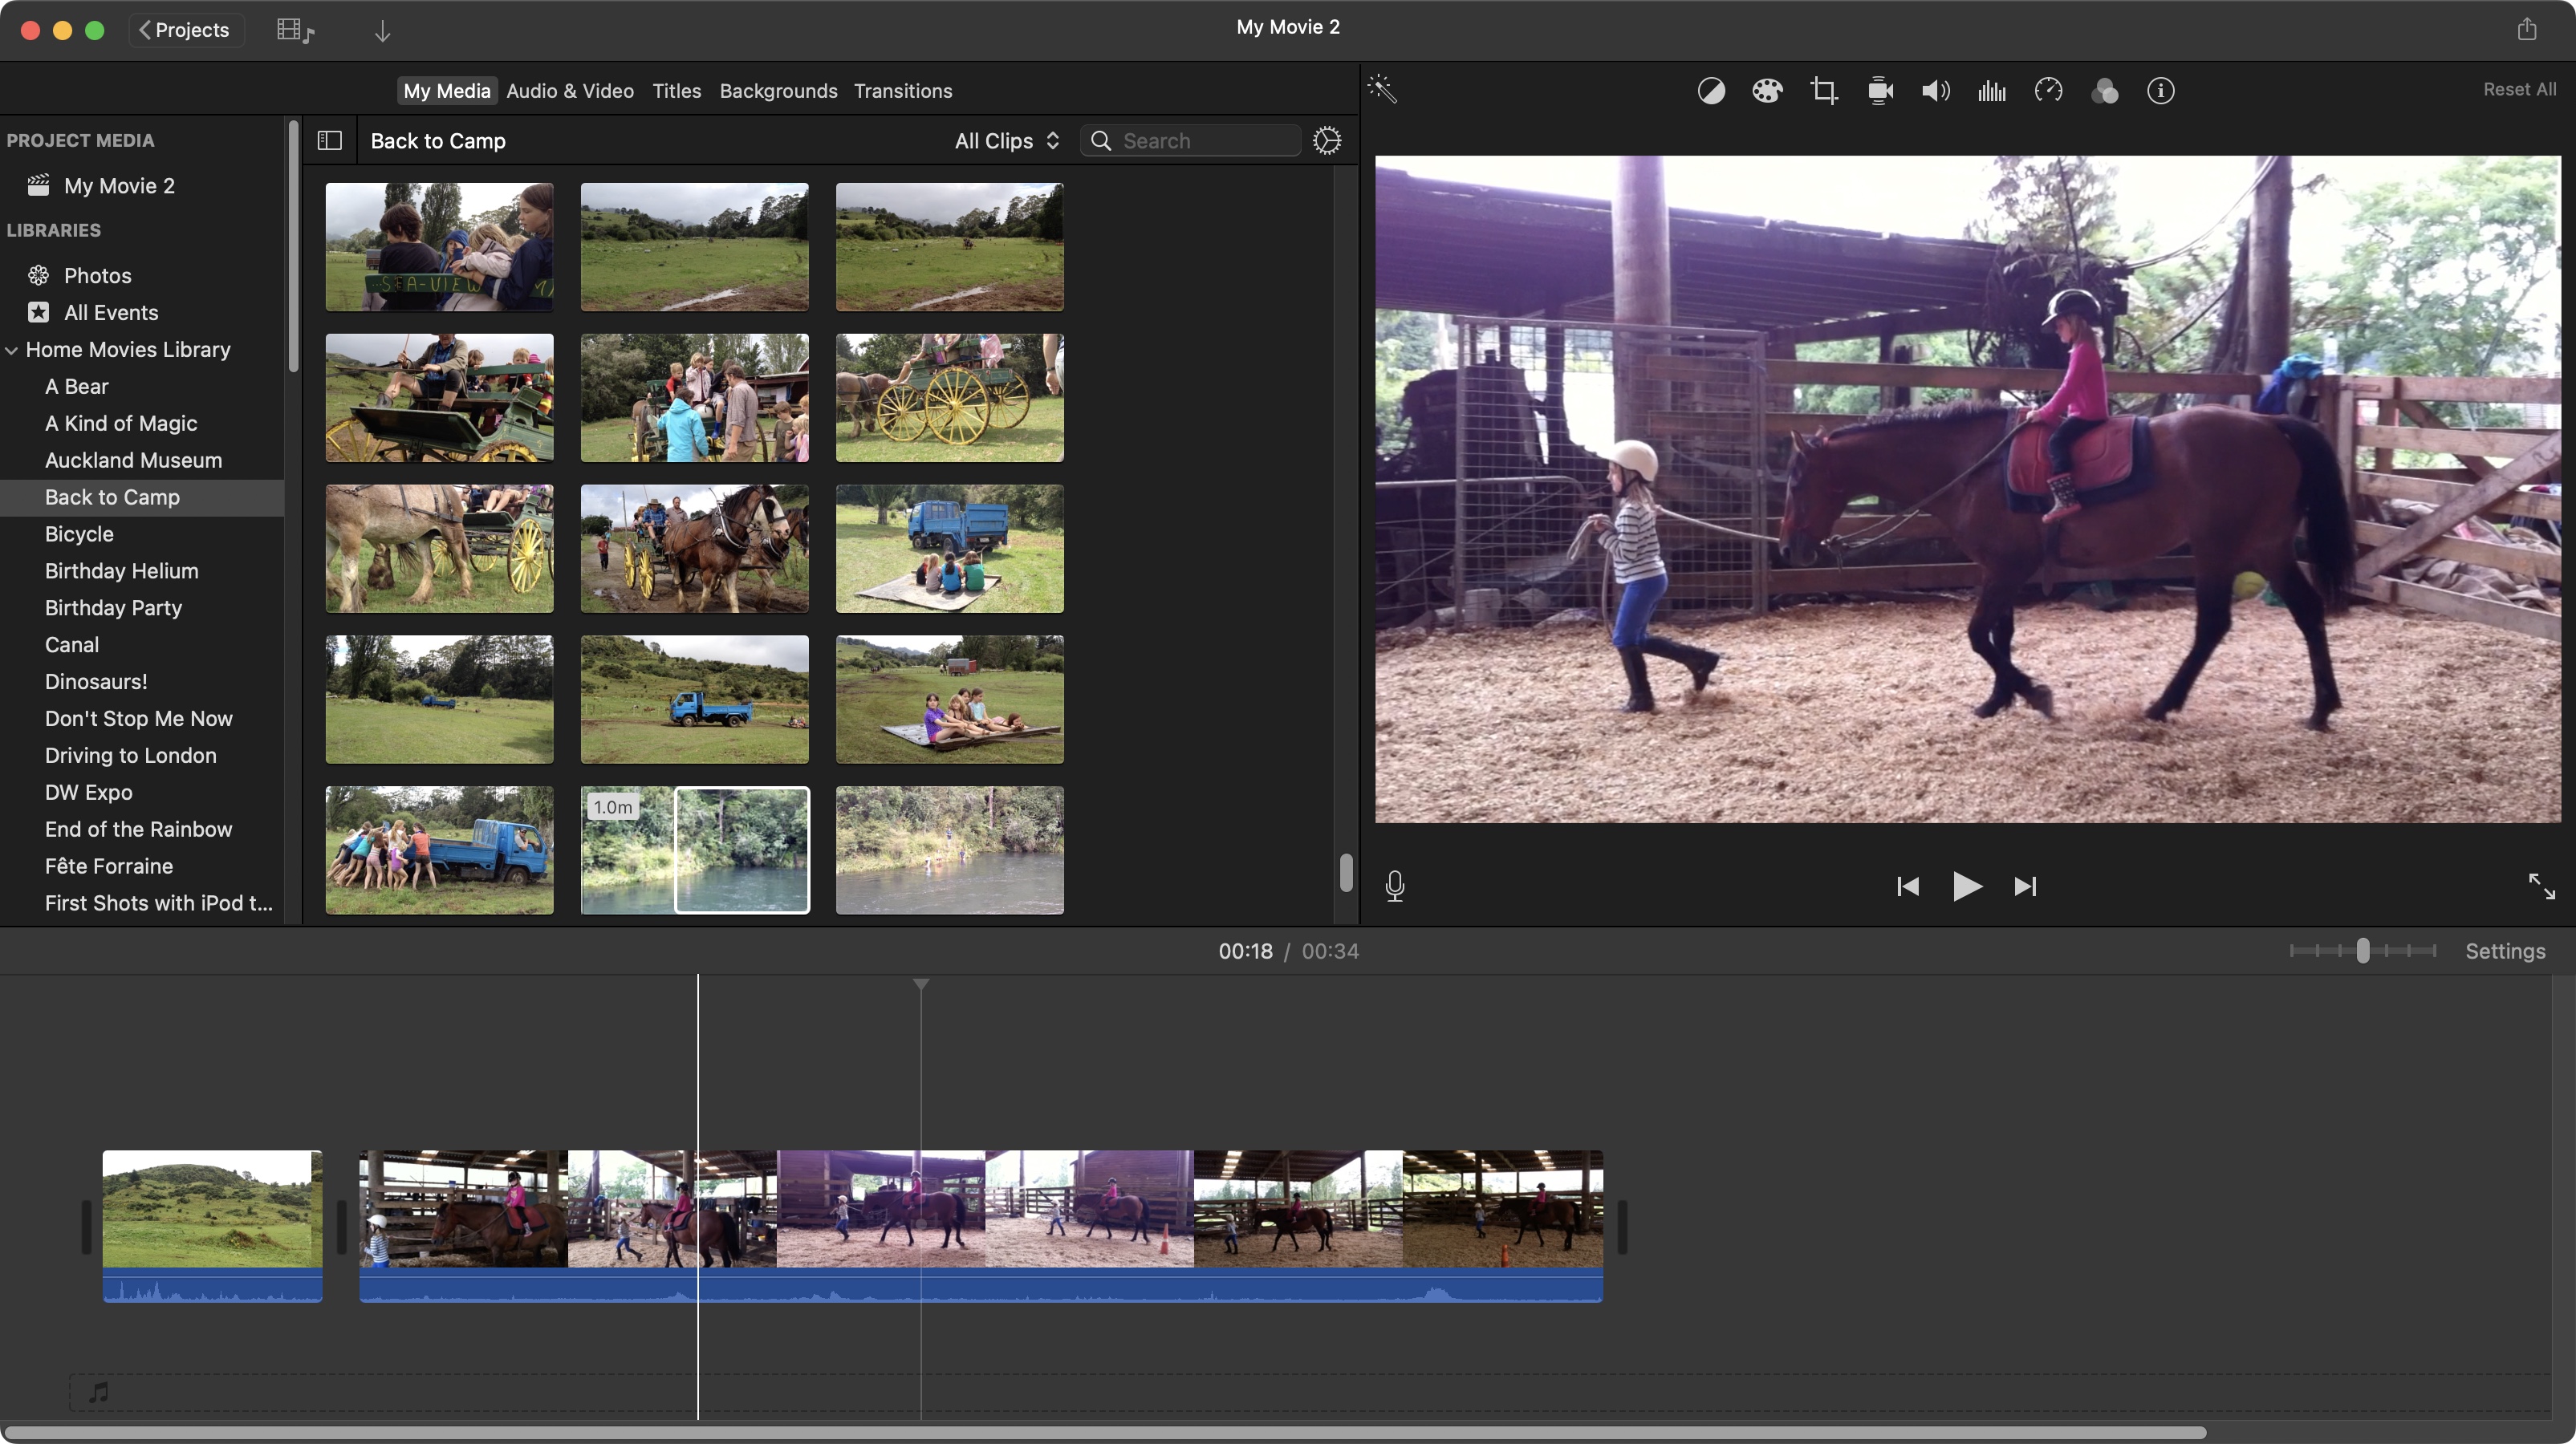
The interface looks kinda the same except for the bottom part. No tabs for you this time. What you see is a bare timeline - but it won’t be bare for long.
When you mouse over a clip in the Media section, you’ll see a preview of it in the Viewer, top right. Clicking on it reveals yellow handles which you can drag inwards from either side. This selects the part of the clip you’d like to use. You’ll also see a little grey ‘+’ in the corner. Click on that to add your selection to the Timeline at the bottom.
4. Build Your Edit
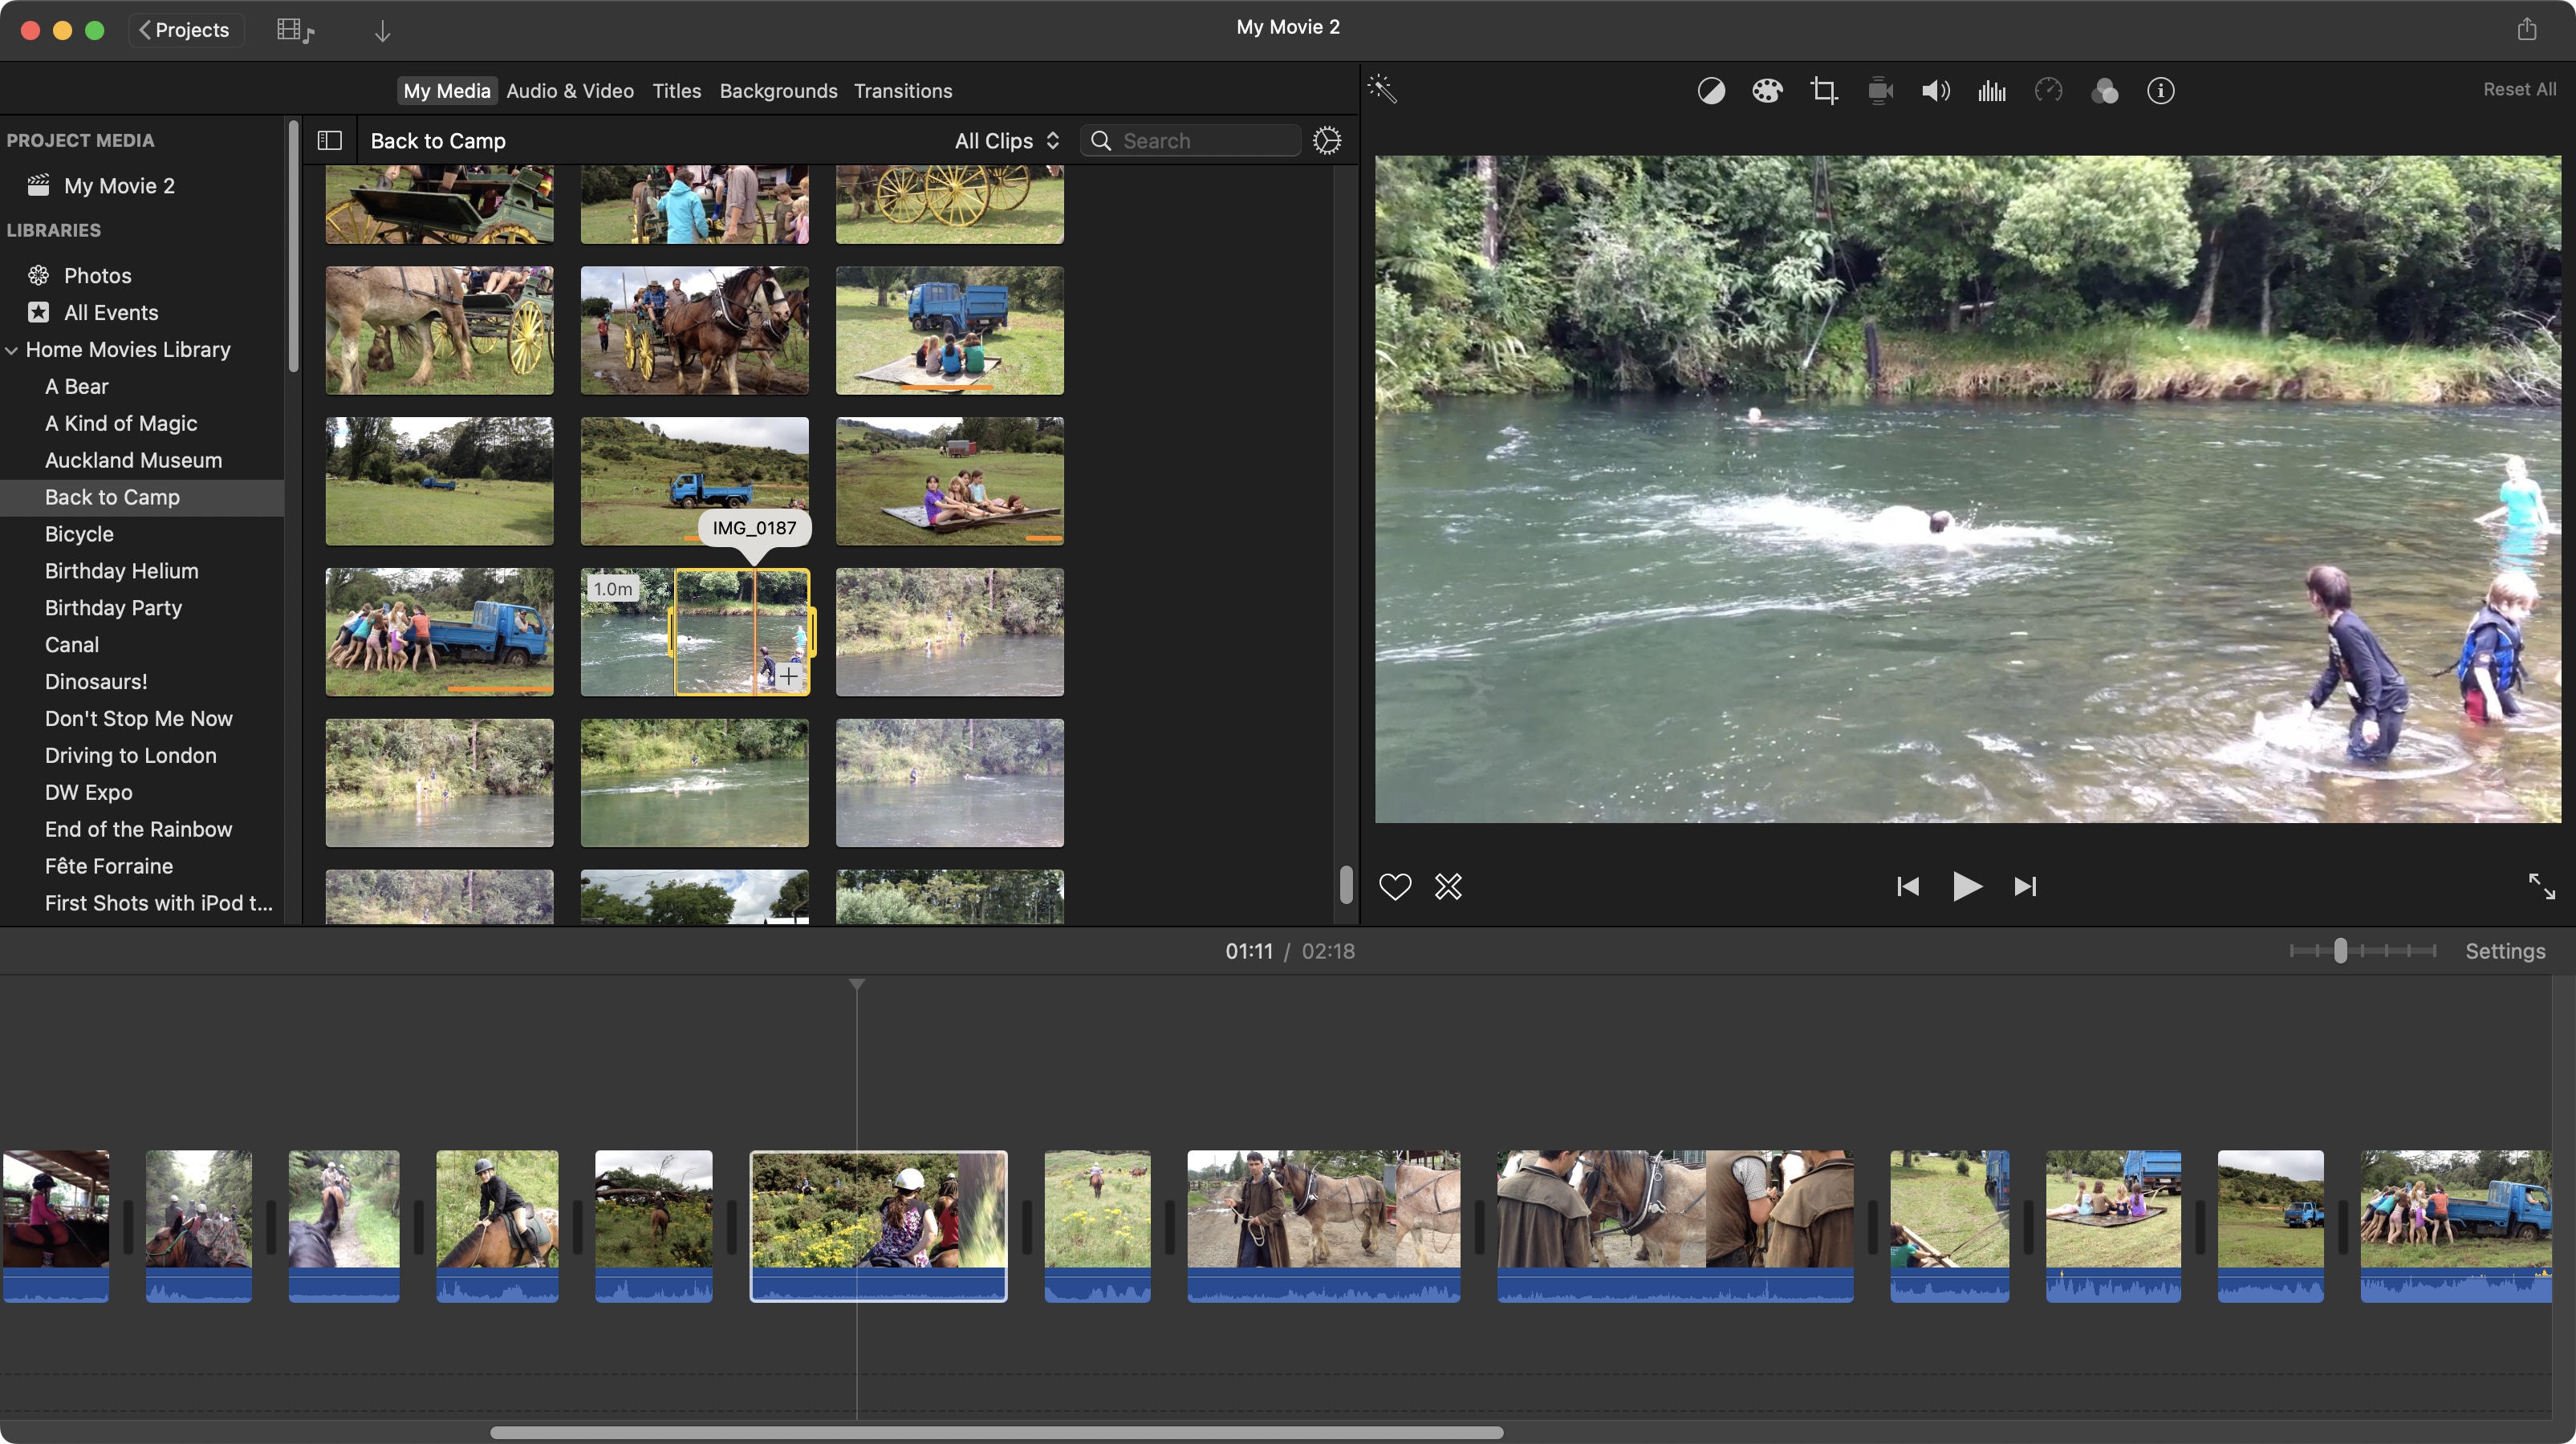
Repeat the process for other clips. Rather than dragging those handles, you can also type ‘i’ or ‘o’ as you’re mousing over the clip to set an In and Out point respectively (a much quicker process). You can also drag that clip onto your timeline instead of clicking on the ‘+’, which allows you to place the clip anywhere in your project, even in between clips already in the timeline, rather than adding it at the end of your Timeline, as the ‘+’ button does.
Those In and Out points you set aren’t fixed once you’ve added your clip to the Timeline: move the cursor to a clip’s edge. When the cursor changes to two large arrows pointing in opposite directions (or a single arrow if your In or Out point is at the edge of the clip), you can start dragging inwards or outwards to fine tune your cut.
Changing the order of your clips is a simple matter of dragging one from one location, and dropping it into another. All the other clips will move along to accommodate that clip’s new position.
You can build a movie very quickly that way.
5. Improvements
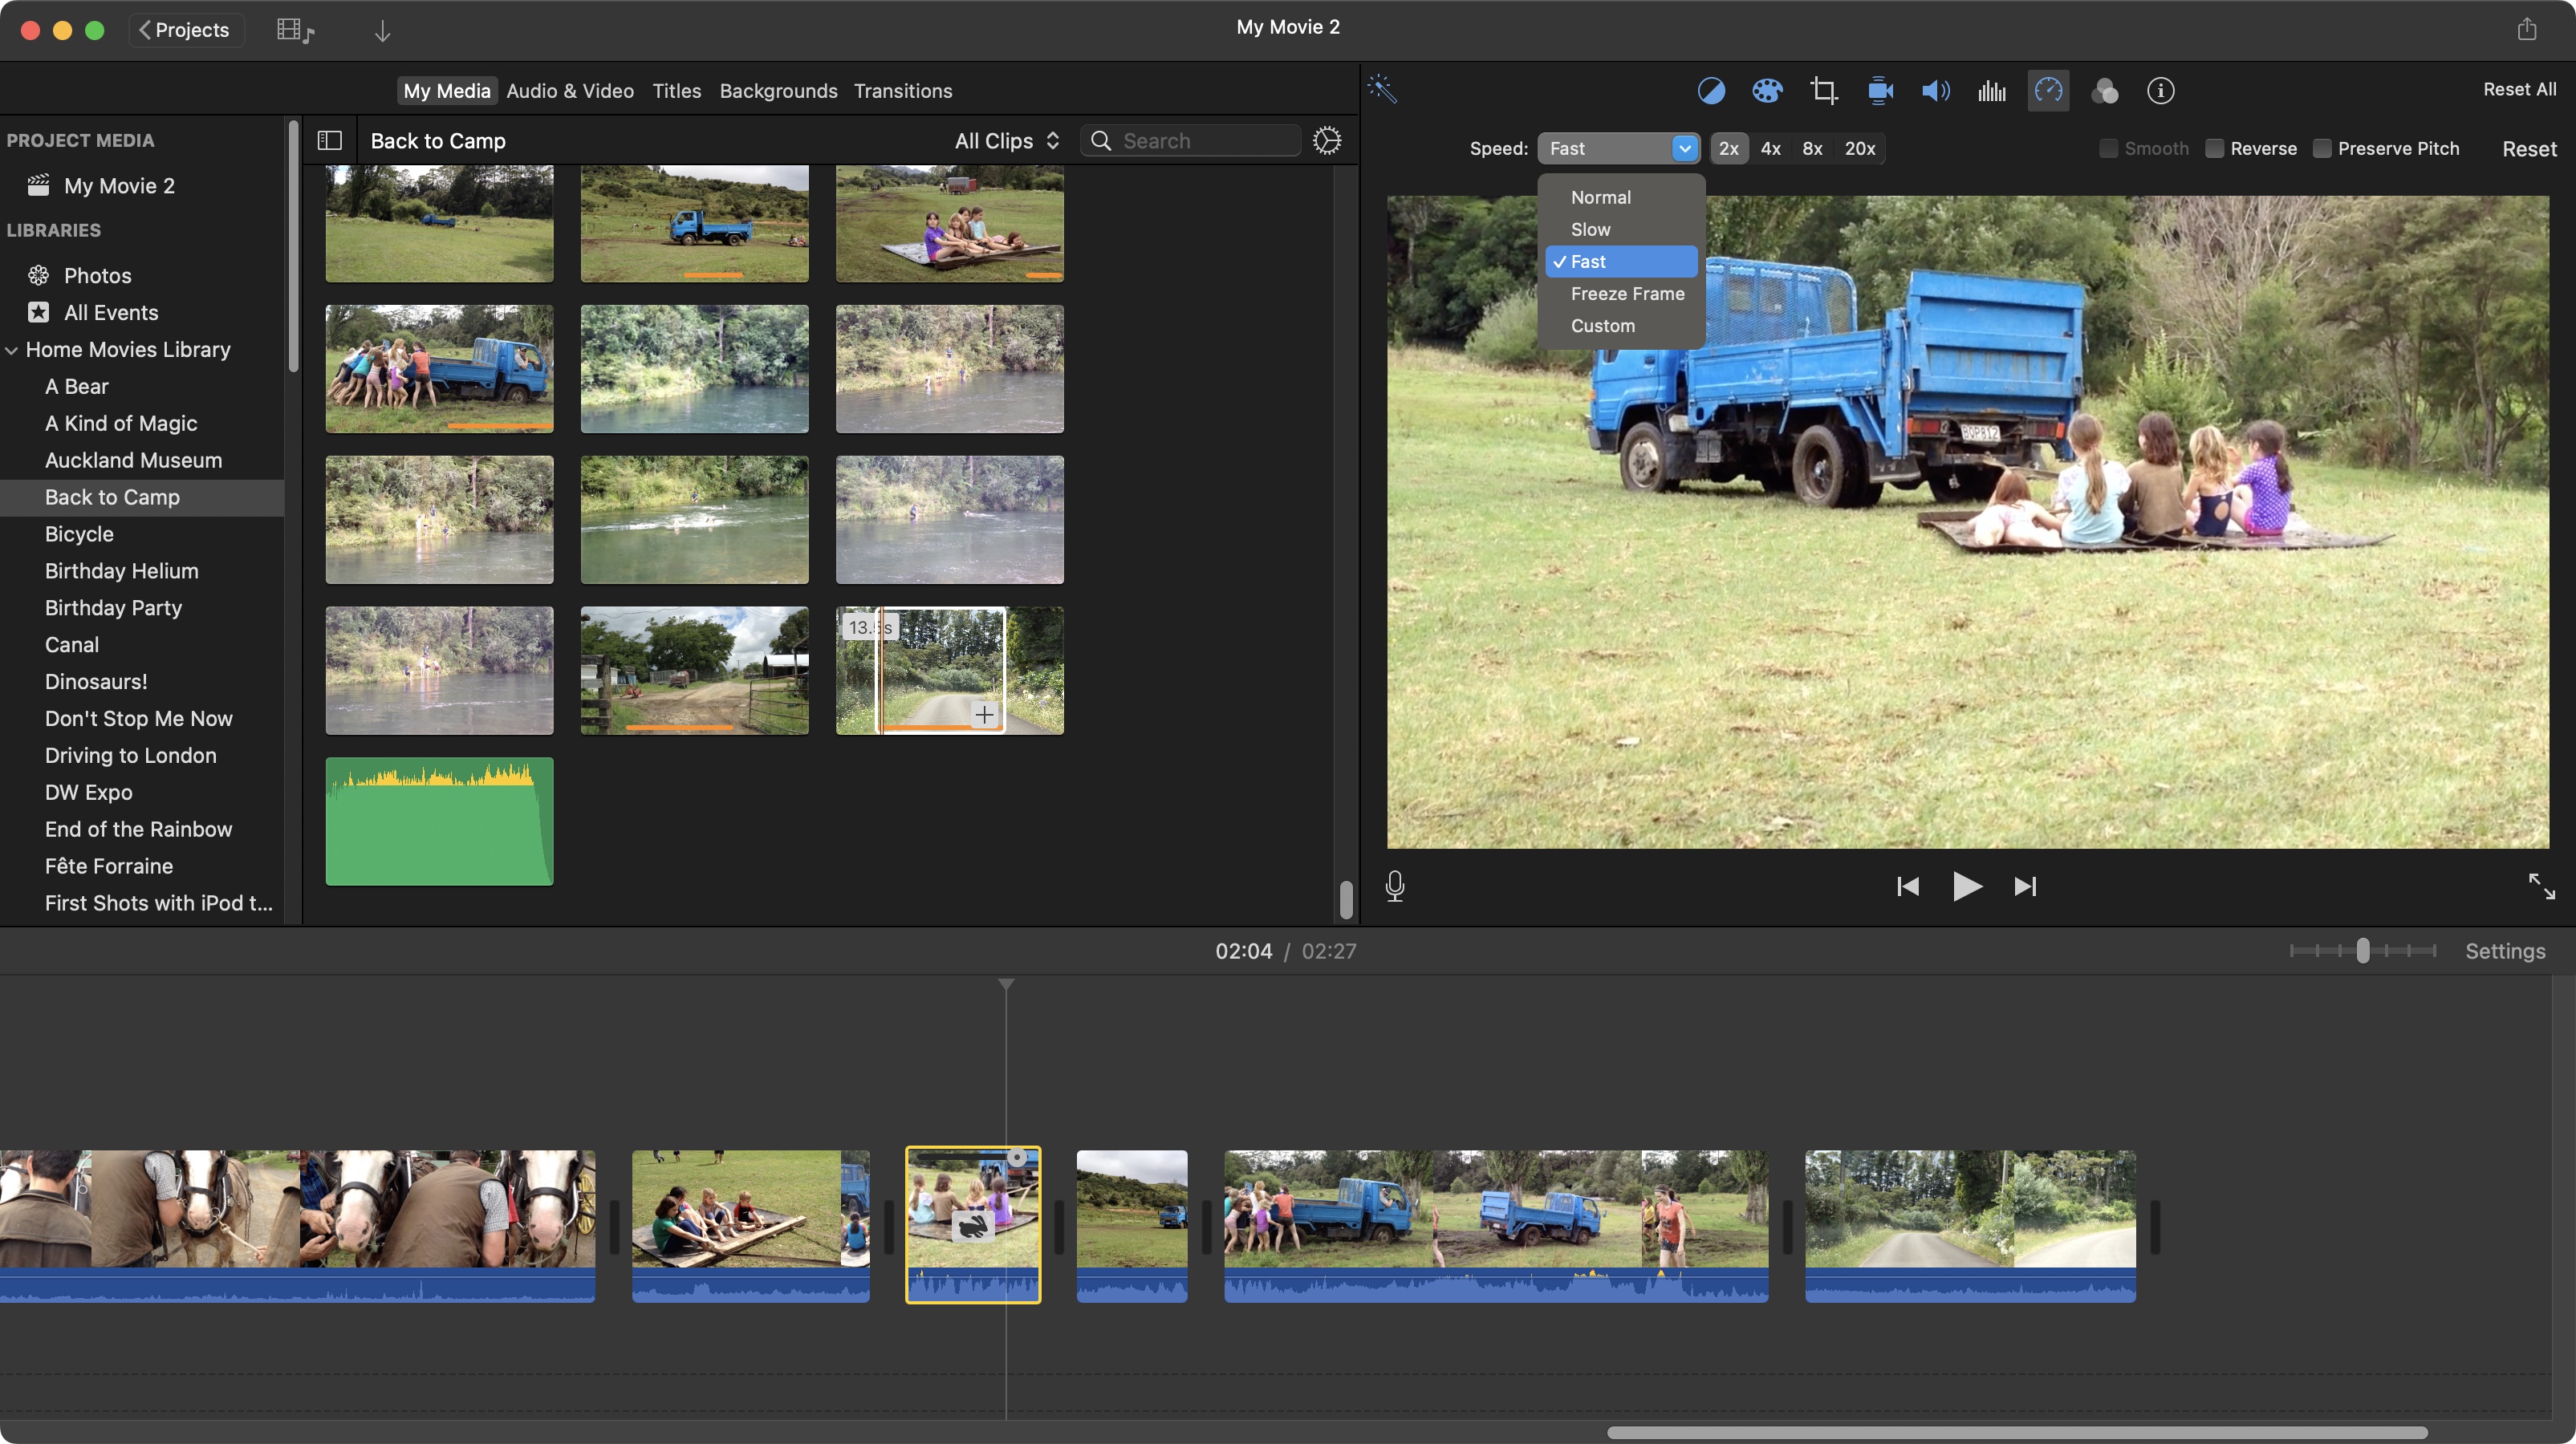
Adding clips is obviously a crucial part of editing (after all, you can’t have a project without them!), but you also need to fine tune your work, tweak the colours, clean up the audio, maybe even crop the footage, or stabilise a shot. Thankfully, iMovie allows you to do all of this, and more.
Just above the ‘Viewer’ section are a series of 9 icons. The one on the left-most side is a ‘magic wand’, which will analyse your selected clip and alter it for you. Any tools that have been used then turn blue. But you’re free to select those other tools yourself, and make manual alterations.
From left to right, these are, ‘Colour Balance’, ‘Colour Correction’, ‘Cropping’, ‘Stabilisation’, ‘Volume’, ‘Noise Reduction’, ‘Speed’, and ‘Filters’.
One cool trick which will save you tons of time: if you’ve altered one clip to perfection and would like to apply those changes to others: select it in the Timeline, copy it (Edit > Copy), select the other clips you’d like to alter, then go to Edit > Paste Adjustments, and choose either ‘All’ or a specific one of those correction tools.
6. Titles and Transitions
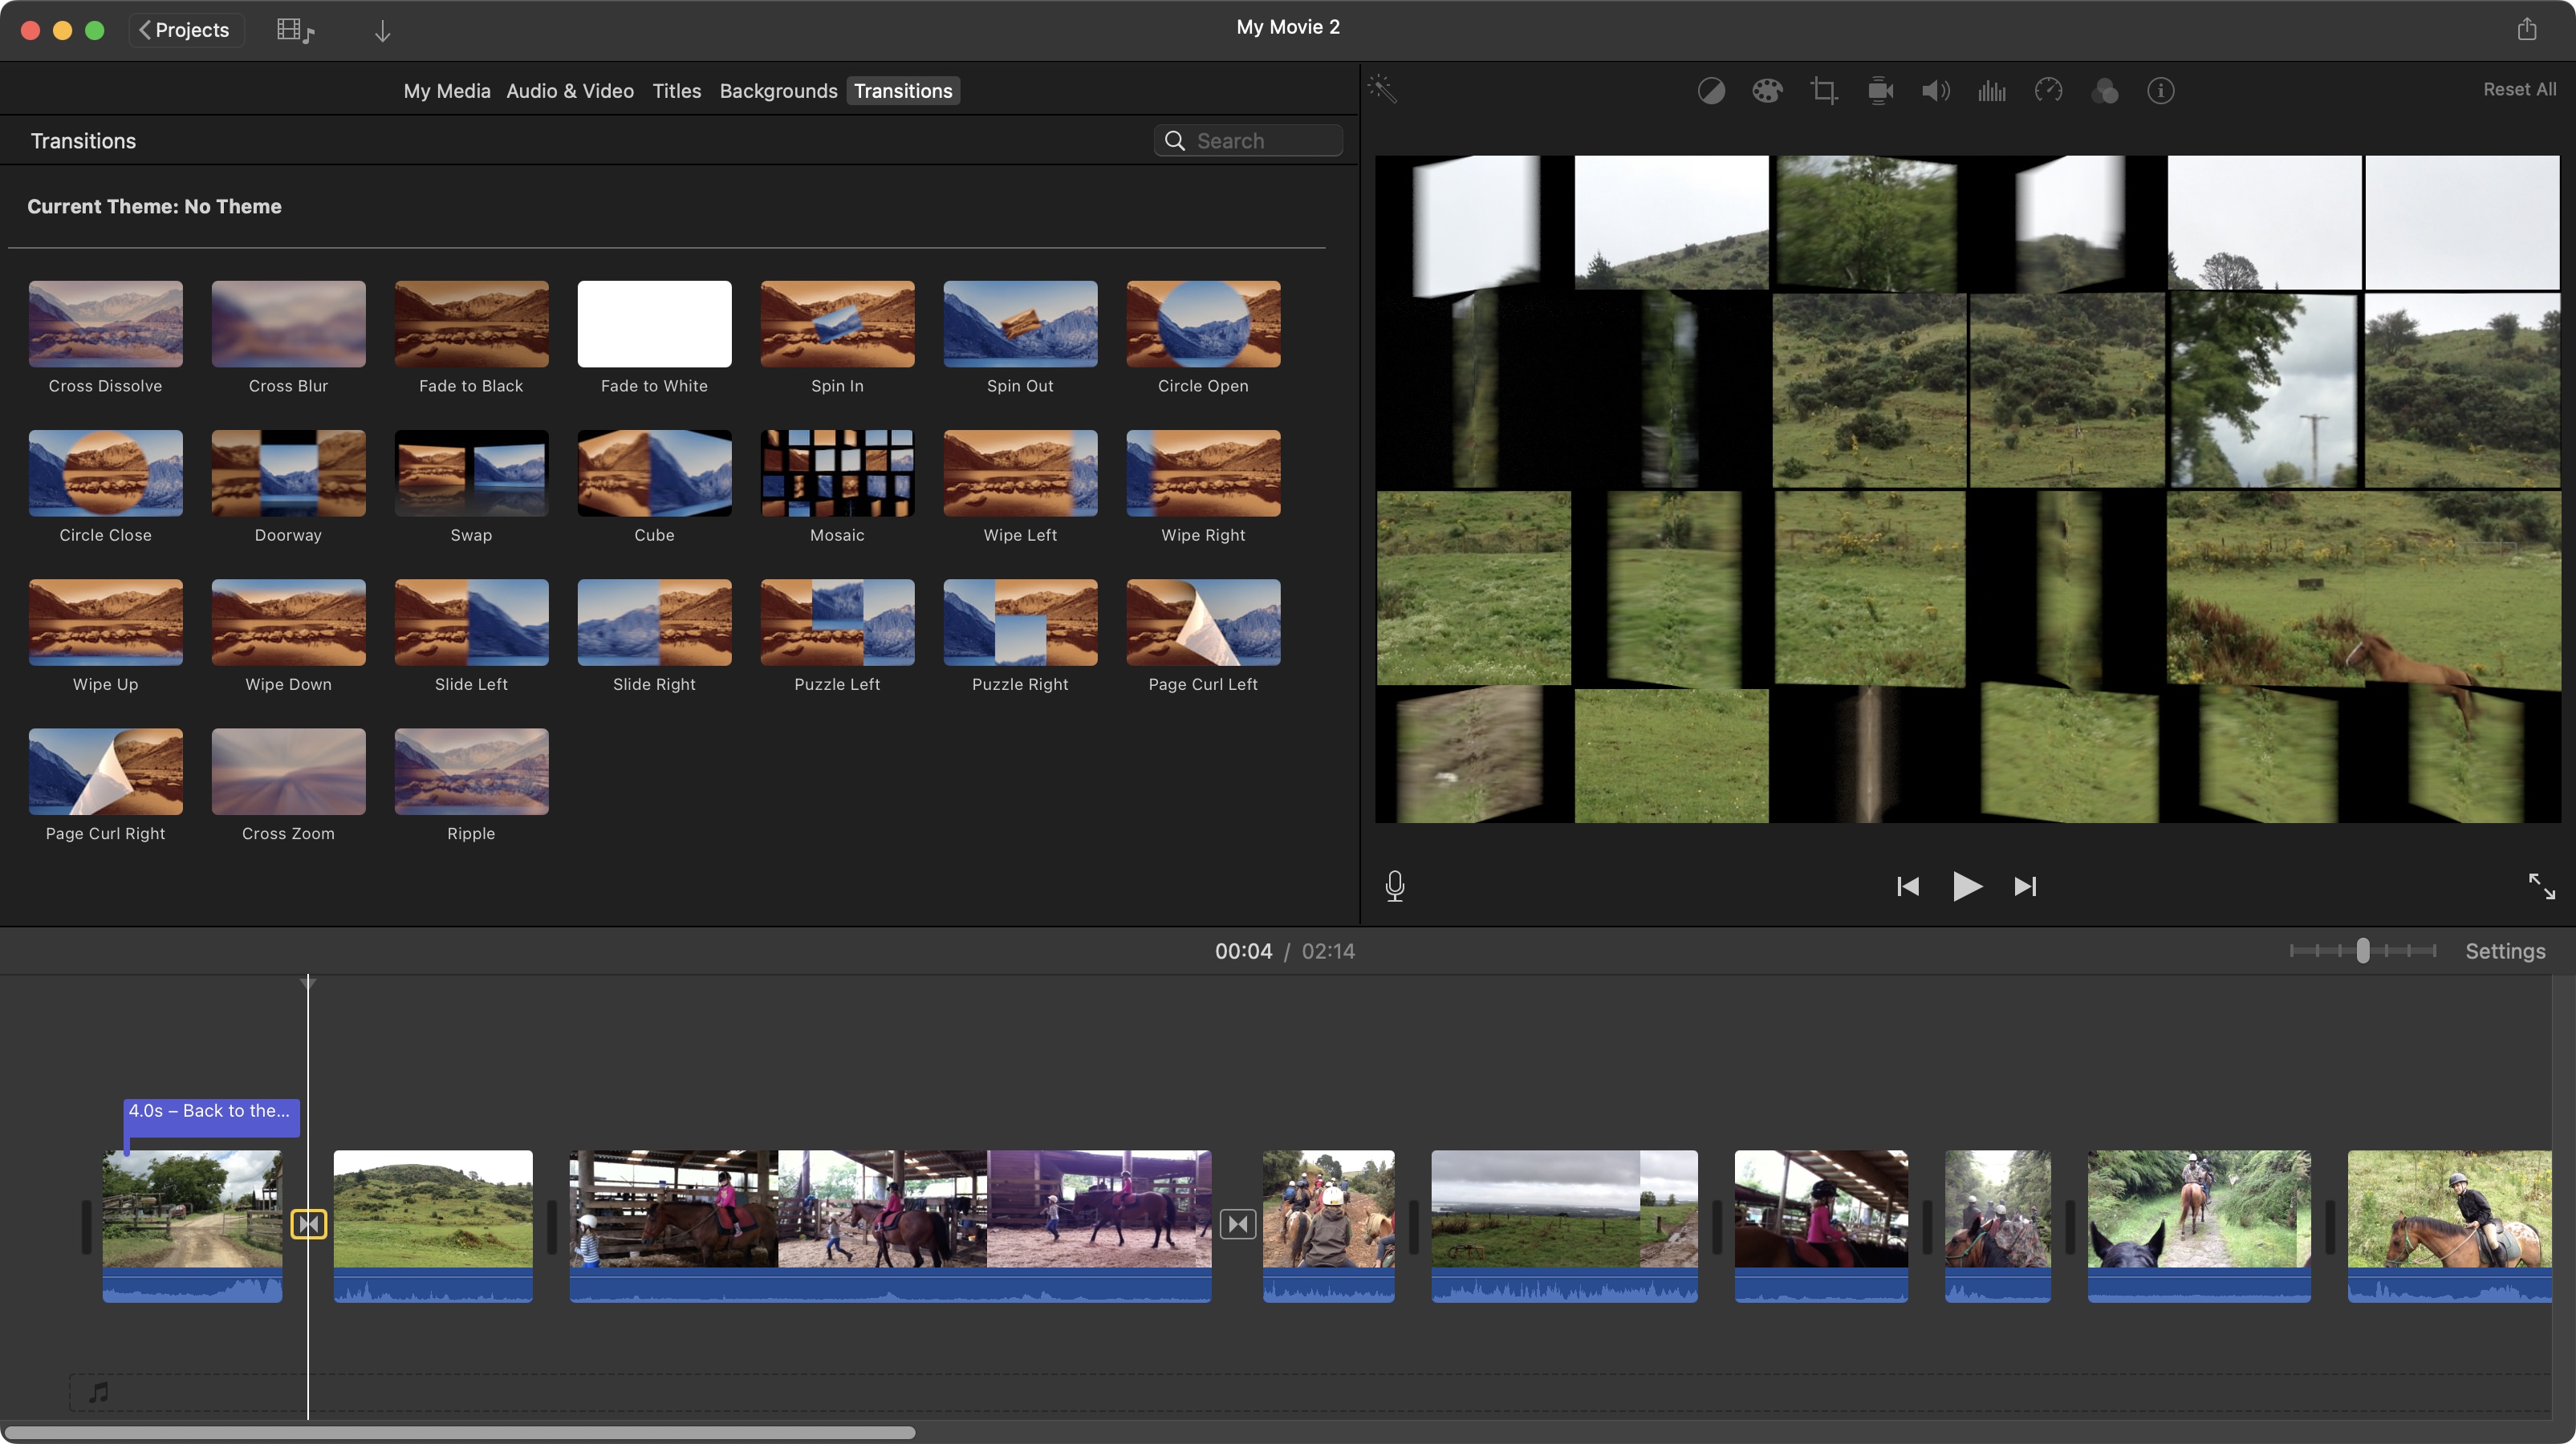
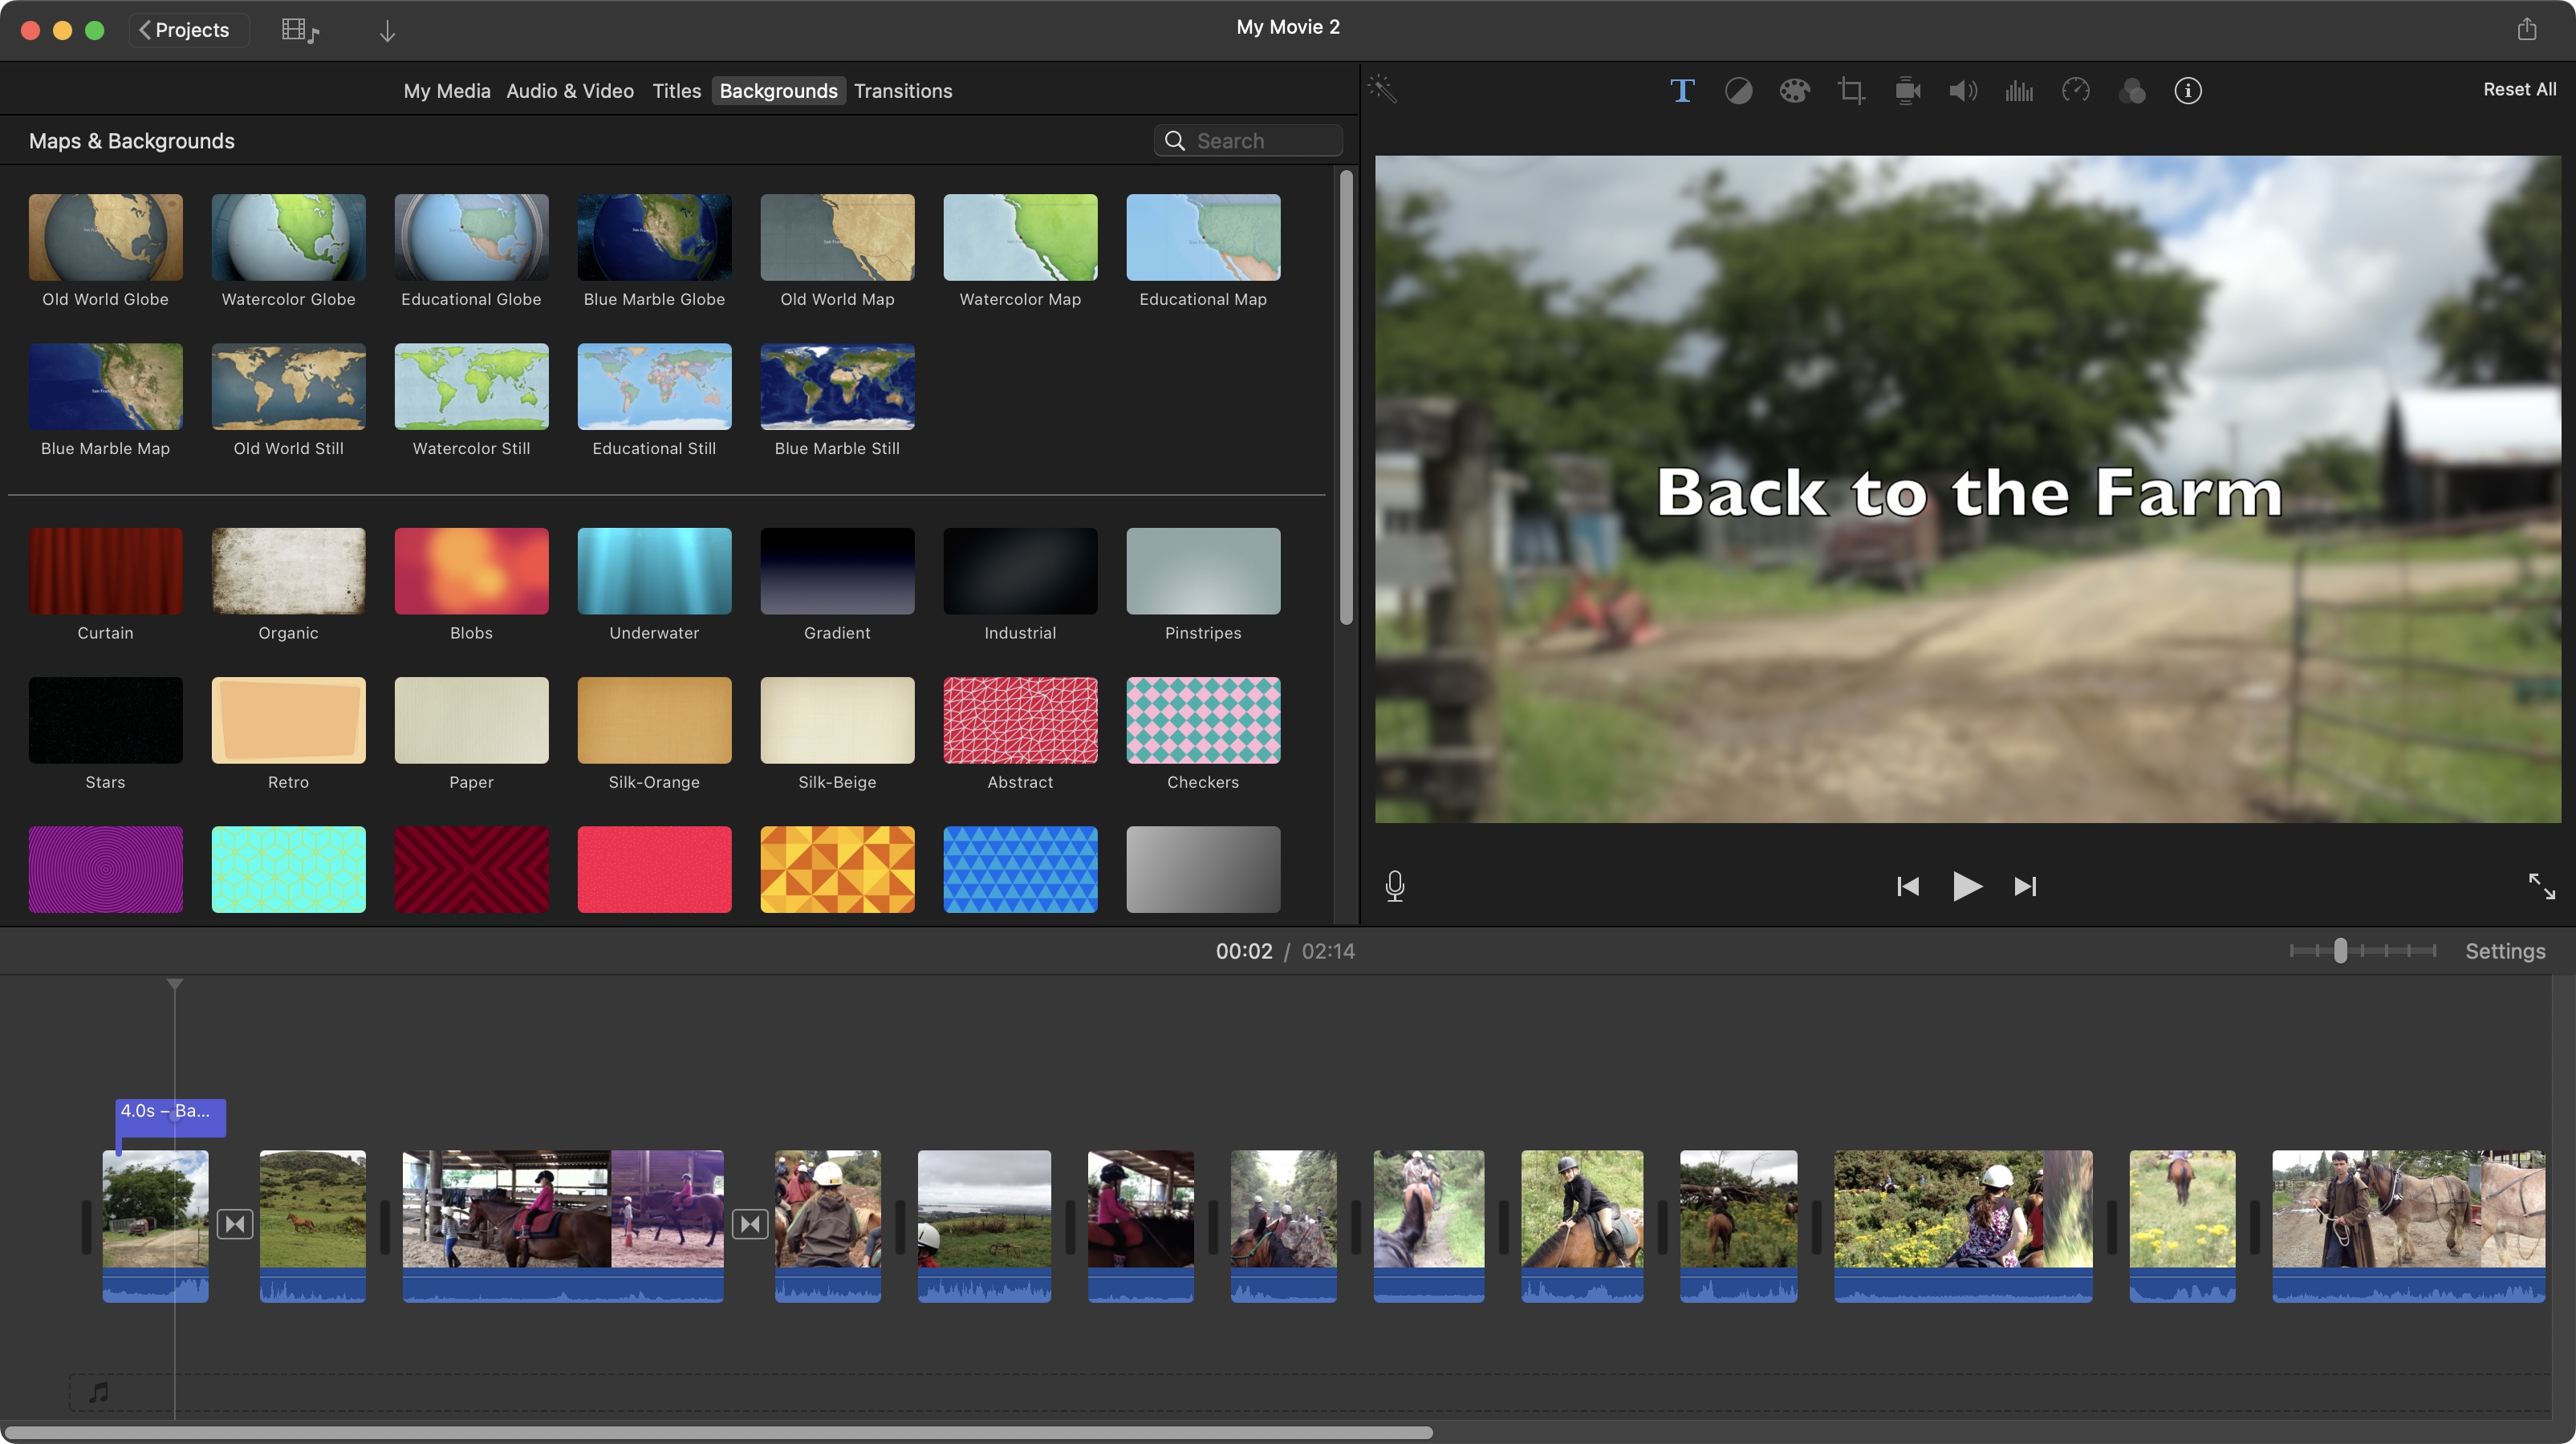
What’s a movie without fancy titles and transitions? Once you’re happy with your project, it’s time to spruce it up a little. You may have noticed just above your Media section is a small menu. Click on ‘Titles’ to reveal all available animated titles (iMovie has 54 of them). Drag the one you want, either on top of an existing clip, or in between two clips. To edit the text, simply double-click on the placeholder words in the Viewer.
Transitions can often make shorts more visually exciting. iMovie has 24 in its ‘Transition’ section. As with clips, titles, or anything really, you can mouse over any transition to see how it will look, then drag it in between two clips, to add a one-second transition to your project.
You can do this in between every clip if you like - although moderation is always advisable: remember, less is more.
With all of this done, you’re pretty much good to go. Click on the ‘Share’ button (top right) and choose ‘Export File’. The other three options are a sign that iMovie is in need of a serious upgrade, and should be ignored.

Steve has been writing about tech since 2003, sharing his tech expertise with titles such as iCreate, MacFormat, MacWorld, MacLife, and Creative Bloq. His focus is on the creative arts and tools creatives need, such as website builders, image manipulation, and video editing software. He uses many of the apps he writes about in his personal and professional life, and he loves how computers have enabled everyone to delve into creative possibilities.
You must confirm your public display name before commenting
Please logout and then login again, you will then be prompted to enter your display name.
