4 essential image optimisation tips
Images are typically the bulk of any site, so keep them trim with these techniques.

Sign up to Creative Bloq's daily newsletter, which brings you the latest news and inspiration from the worlds of art, design and technology.
You are now subscribed
Your newsletter sign-up was successful
Want to add more newsletters?

Five times a week
CreativeBloq
Sign up to Creative Bloq's daily newsletter, which brings you the latest news and inspiration from the worlds of art, design and technology.

Once a week
By Design
Sign up to Creative Bloq's daily newsletter, which brings you the latest news and inspiration from the worlds of art, design and technology.

Once a week
State of the Art
Sign up to Creative Bloq's daily newsletter, which brings you the latest news and inspiration from the worlds of art, design and technology.

Seasonal (around events)
Brand Impact Awards
Sign up to Creative Bloq's daily newsletter, which brings you the latest news and inspiration from the worlds of art, design and technology.
A few lucky developers and this author had the opportunity to tech edit Addy Osmani's new image optimisation eBook, Essential Image Optimization, which you absolutely should read.
Whether you're building full-size eCommerce websites or simply making an online home for your design portfolio, in this article you'll learn a few tips from Addy's book that will help make your images leaner and faster.
Be selective and preload critical images
Take a look at your site and identify a critical image asset. For most, this would be a logo or hero image that you want to have render as soon as possible.
This is where the preload resource hint comes in. preload is a way of hinting to the client that an asset should be retrieved before the browser parser would otherwise discover it. You can use it for pretty much anything, but it works splendidly for preloading critical imagery. Here's an example of it in use in the HTML <head> element on order to preload a hero banner image:
<link rel="preload" href="/img/logo.svg" as="image">You can also use preload in an HTTP header:
Link: </img/logo.svg>; rel=preload; as=imageBelow you can see two screenshot rolls of the same page loading in Chrome. One scenario uses preload to load a hero banner image, while the other doesn't.
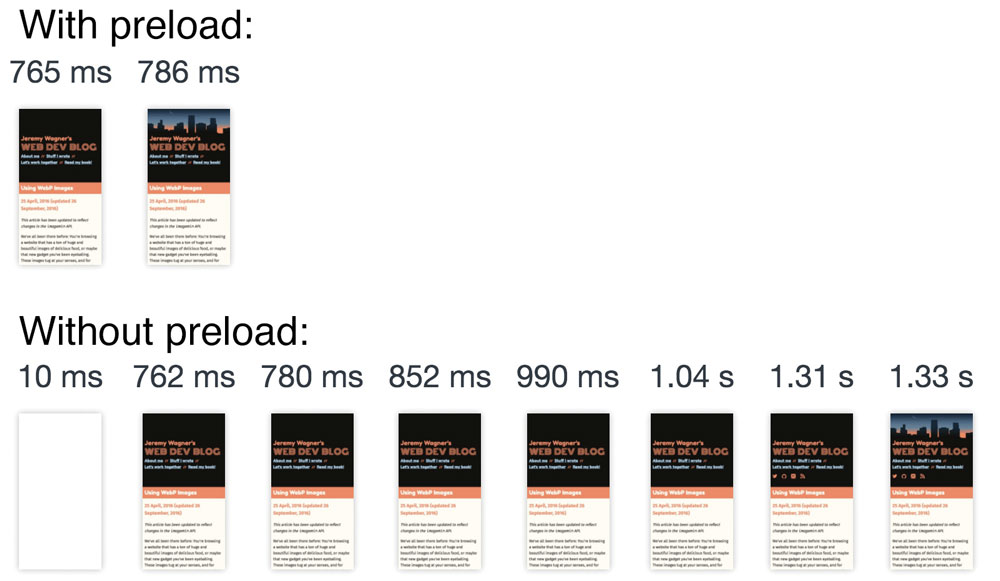
In the example with preload, the banner image appears in the browser window half a second faster. All because of a quick one-liner that gave the browser a head start.
Sign up to Creative Bloq's daily newsletter, which brings you the latest news and inspiration from the worlds of art, design and technology.
Automatically simplify your SVG artwork
Optimising SVGs is different than with other image types, because unlike JPEGs or PNGs, SVGs are comprised of text, specifically XML markup. This means that typical optimisations you would apply to text-based assets (for example, minification, gzip/Brotli compression) can and should also be applied to SVGs. Beyond that, you can use an optimiser such as SVGO to tamp down the size of SVGs.
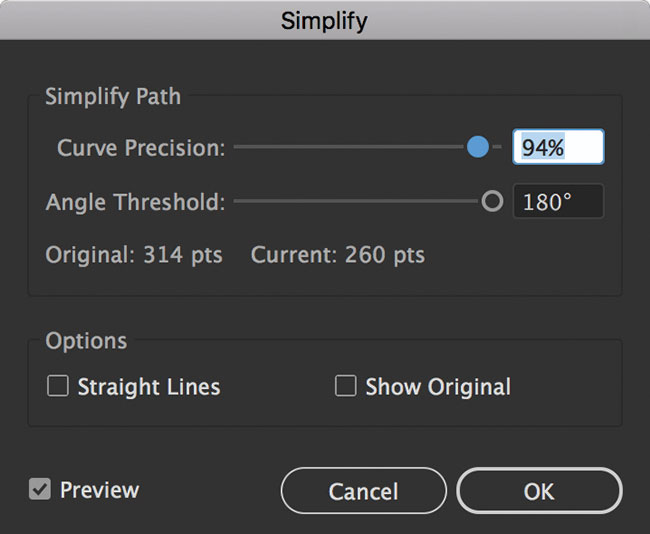
But what if you're not merely consuming vector artwork, but creating it? If you're an Illustrator user, you can automatically simplify your artwork to reduce the amount of anchor points in paths via the Simplify dialog window.
This dialog can be found in Illustrator CC's menu by going to Object>Path>Simplify. By reducing Curve Precision (and optionally adjusting Angle Threshold), it is possible to remove extra path points in your artwork. In this instance, you'll note that a reduction in Curve Precision of as little as 6% removes 54 path points. Used judiciously, it could even improve the appearance of your artwork.
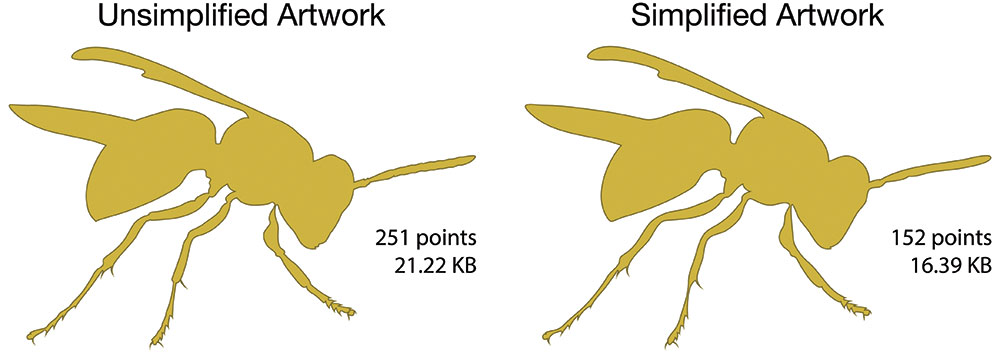
Word to the wise – be careful with just how aggressive you get with this tool. Lower Curve Precision too much, and your once carefully crafted artwork will devolve into a blob. Strike the right balance, though, and you'll reap the rewards.
Convert animated GIFs to video
We all love a good animated GIF. They effectively convey nearly any sentiment, but they can be really huge. Image optimisers such as gifsicle can help shave off excess kilobytes, but the ticket is to convert those GIFs into videos and embed them in the HTML5 <video> tag. The ffmpeg command line utility is well suited for this task:
ffmpeg -i animated.gif -b:v 512K animated.webm
ffmpeg -i animated.gif -b:v 512K animated.ogv
ffmpeg -i animated.gif -b:v 512K animated.mp4
The commands above take a source GIF (animated.gif) as input in the -i argument, and output videos with a variable bitrate maximum of 512Kbps. In a test of our own, we were able to take a 989Kb animated GIF and reduce it to a 155Kb MP4, a 109Kb OGV, and a 85Kb WebM. All video files were comparable in quality to the source GIF. Because of the ubiquity of <video> tag support in browsers, these three video formats can be used like so:
<video preload="none">
  <source src="/videos/animated.webm" type="video/webm">
  <source src="/videos/animated.ogv" type="video/ogg">
  <source src="/videos/animated.mp4" type="video/mp4">
</video>
If you decide to go this route, be sure to order your <source> tags so that the most optimal format is specified first, and the least optimal is specified last. In most cases, this means you'll start with WebM videos first, but check the output file size of each video and go with whatever is smallest first, and end with whatever is largest.
If you don't have FFmpeg or don't know what it is, check it out. It's easy to install through most operating system package managers, such as Homebrew or Chocolatey.
Lazy load with IntersectionObserver
Lazy loading images is something you might already be doing, but many lazy loading scripts use CPU-intensive scroll event handlers. Such methods contribute to sluggish interactions on a page. Older hardware with less processing power is even more prone to the ill effects of this type of code. Execution throttling does help to a degree, but it's still a messy and rather inefficient workaround for determining when elements are in the viewport.
Thankfully, the Intersection Observer API gives us a simpler and far more efficient way to determine when elements are in the viewport. Here's an example of some basic lazy loading image markup:
<img class="lazy" data-src="/images/lazy-loaded-image.jpg" src="/images/placeholder.jpg" alt="I'm lazy." width="320" height="240">Here, we load a placeholder image in the src attribute, and then store the URL for the image we want to lazily load in the data-src attribute. To top it all off, we give the <img> element a class of lazy for easy access with querySelectorAll. From there, we simply use this code:
document.addEventListener("DOMContentLoaded", function(){
  if("IntersectionObserver" in window && "IntersectionObserverEntry" in window && "intersectionRatio" in  window.IntersectionObserverEntry.prototype){
    elements = document.querySelectorAll("img.lazy");

    var imageObserver = new IntersectionObserver(function(entries, observer){
      entries.forEach(function(entry){
        if(entry.isIntersecting){
          entry.target.setAttribute("src", entry.target.getAttribute("data-src"));
          entry.target.classList.remove("lazy");
          imageObserver.unobserve(entry.target);
        }
      });
    });

    elements.forEach(function(image){
      imageObserver.observe(image);
    });
  }
});
Here, we bind code to the document object's DOMContentLoaded event. This code checks to see if Intersection Observer is supported by the current browser. If it turns out that it is, we grab all img elements with a class of lazy with querySelectorAll and then attach observers to them.
The observer contains references to the elements we're observing (entries) and the observer itself (observer). This code hinges on each observer entry's isIntersecting value. While the observed element is out of the viewport, isIntersecting returns 0. As the element enters the viewport, though, it will return a value greater than 0. It's at this point that we swap the content of the image's data-src attribute into the src attribute, and remove its lazy class. After a given image lazy loads, the observer is removed from it with the observer's unobserve method.
This process is much easier than mucking around with scroll handlers, but since Intersection Observer doesn't enjoy universal support, you may have to fall back on them. If you're the sort to grab a script and go, we've written a lazy loader that uses Intersection Observer, but also falls back to the methods of yesteryear. You can grab it here.
This article was originally published in issue 301 of net, the world's best-selling magazine for web designers and developers. Buy issue 301 here or subscribe here.
Related articles:
