Create a texture set for games in 10 steps
Discover how to make multi-purpose tiling trim textures for games.
Daily design news, reviews, how-tos and more, as picked by the editors.
You are now subscribed
Your newsletter sign-up was successful
Want to add more newsletters?

Five times a week
CreativeBloq
Your daily dose of creative inspiration: unmissable art, design and tech news, reviews, expert commentary and buying advice.

Once a week
By Design
The design newsletter from Creative Bloq, bringing you the latest news and inspiration from the worlds of graphic design, branding, typography and more.

Once a week
State of the Art
Our digital art newsletter is your go-to source for the latest news, trends, and inspiration from the worlds of art, illustration, 3D modelling, game design, animation, and beyond.

Seasonal (around events)
Brand Impact Awards
Make an impression. Sign up to learn more about this prestigious award scheme, which celebrates the best of branding.
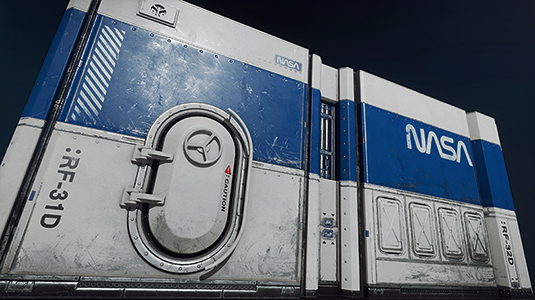
The ability to create textures is a vital skill for any video game environment artist. Coupled with the advent of physically based shading and free textures in most modern game engines, it's now possible to recreate a myriad of realistic materials and apply them to the beautiful virtual worlds we create.
An environment you hope to recreate can feature literally hundreds, if not thousands, of unique texture details. It might be possible to create textures and shaders to represent every minute detail, but for every unique texture and shader loaded into a game engine, there's an incurred memory cost.
While this might not be so important with pre-rendered scenes – the type you might see in a cutscene for example – when creating content for real-time rendering, these memory costs are very important. Too many polygons, textures and shaders in a level can translate to huge loading times when starting the game – or result in the level not loading at all!
With that in mind, an environment artist will often need to create multi-purpose textures that not only have portions that can be tiled over larger areas, but also have smaller, unique details and trim patterns.
When combined with clever modelling and UV mapping, entire environments can be textured using just one or two of these textures in conjunction with some shader variations. Here I'll create an example set of sci-fi wall panel textures and demonstrate how they can be used when texturing a 3D asset.
01. Theme and references
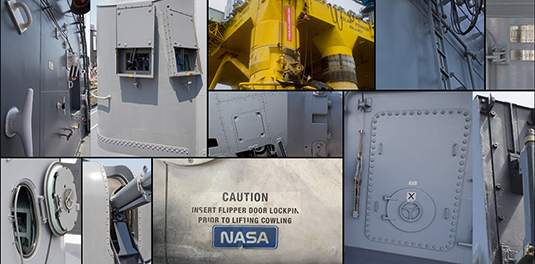
The theme of your project is likely to be set by your art director. For the purpose of this tutorial I'll be creating a texture for use on the walls of a sci-fi moon base, which will have a slightly nautical influence – just for fun! Gathering references is one of the most important steps when beginning any project and so using sites like Google, Pinterest and Flickr, I'll collect a lot of images and create a mood board to help me generate ideas.
02. Plan the texture
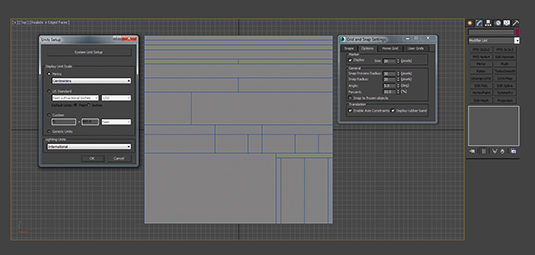
In 3ds Max I set my system units to Metric and Centimetres. I then enable Grid Snapping with spacing set to 5cm. I create a 200cm x 200cm plane, which represents the space my texture will occupy. Now I use the Quick Slice tool to slice along the grid lines and divide this plane into sections, or 'trims', that represent the different panels and details based on my reference. Include small, medium and large panels to maximise versatility of the texture.
Daily design news, reviews, how-tos and more, as picked by the editors.
03. Create a high-poly model
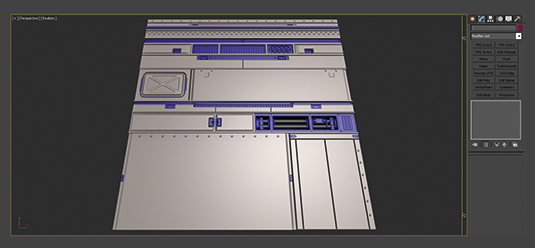
We need to create detailed meshes while studying references and replacing blockout panels. I'm creating high-res meshes using subdivision modelling in 3ds Max. This workflow involves creating a detailed mesh that accurately captures the silhouette and details of the subject, before applying the TurboSmooth modifier to smooth out the facetted polygons. The main objective is to create nice, detailed meshes from which we can capture normal and height map information.
04. Generate texture maps
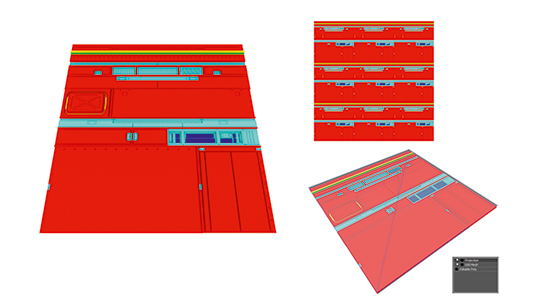
xNormal is a free program I use to generate maps. First I add my high and low poly mesh .sbm files to the corresponding tabs labelled on the right-hand side of the program interface. In the Low Poly tab I tick Use Cage and in the Baking Options tab I select Normal Map, choose an Output File location and press Generate Maps. I repeat this process to generate the ambient occlusion map, height map and vertex colour maps.
05. Texturing
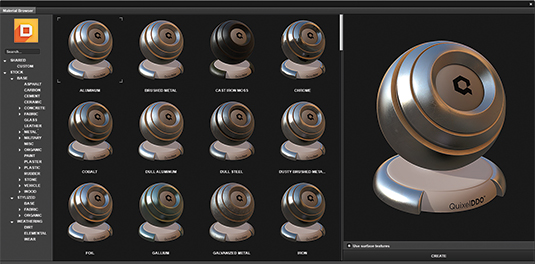
Upon loading DDO I load my textures into the appropriate slots in the Base Creator window and set the options as shown in the image (left). Press Create Base>Editor. Loading the 3D viewer shows a preview of my mesh and holding [C] will display the vertex colour ID map I generated. Shift-click on any of the colours to bring up the Material Browser window as shown in the image (right), and select and apply materials to each part of the mesh.
06. Create texture variation
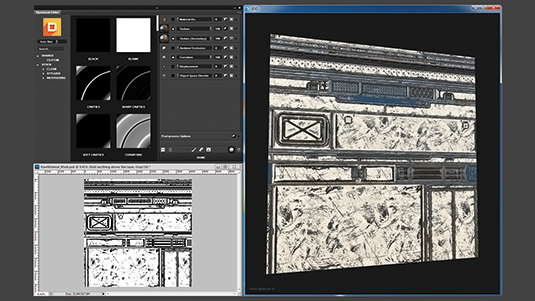
Now basic material assignments are applied, it's easy to add wear and tear to them within DDO. Click on the mask icon to bring up the Dynamask Editor and from here you can fine tune the texture outputs to your liking by choosing from a variety of masks within the editor window. Using the menus in the editor, I create a clean version of my textures, as if they were new, and another version that is worn and damaged.
Using DDO it's easy to isolate different areas in the texture to assign different colours or materials. However, rather than this one texture have lots of different coloured metal panels, I'll use a white material on all metal panels.
Later I'll create multiple shaders in CryEngine and use the tint feature to achieve varying colours. This saves creating numerous colour variations of the same texture map, which are more costly in memory than creating a duplicate shader that uses all of the same textures, with an additional shader tint option enabled.
07. Back to 3ds Max
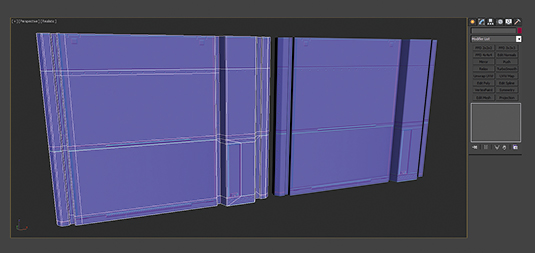
With my textures saved, I test their usability by making a small section of wall. I plug my normal map into the Diffuse slot of my applied shader. This allows me to see every geometric detail that is baked into the texture so that I can be extremely precise with my UVs. Now I cut my mesh into sections that I can UV unwrap, making sure that I line my edges up with texture details and maintain a consistent texel density.
08. Set dressing
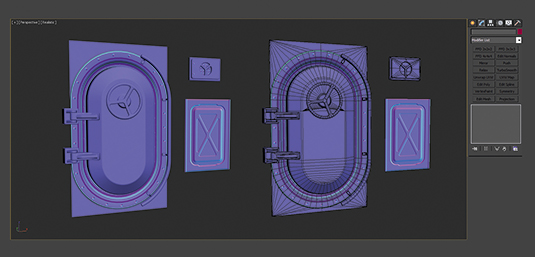
Now I've created my wall panels, I create some additional set dressing pieces which can be mapped to the larger, more plane area on the texture. I also cut some more unique panel details into the mesh to add further interest to the basic structure. Using the versatility of the texture to create an interesting base, before complimenting this with additional detail, is a sure way of creating visually interesting assets.
09. CreEngine Blendshader
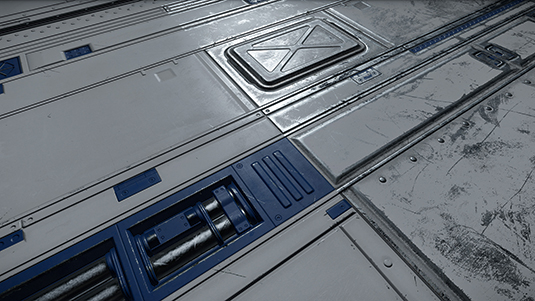
Loading my section of wall into CryEngine, I bring up the Material Editor and tick on the Blend Layer and Displacement Mapping Features in the Shader Generation Params tab. Earlier I saved damaged, as well as clean versions of my textures, so at this stage I go ahead and plug them all into the shader.
Finally, I add a greyscale texture into the Blending Map slot; I like to use just one of the grunge masks from my DDO outputted .psd files at this point. You should note that the blendshader can be controlled with the Blend Factor and Blend Falloff sliders, as well as by vertex alpha values in your mesh.
10. Final tips
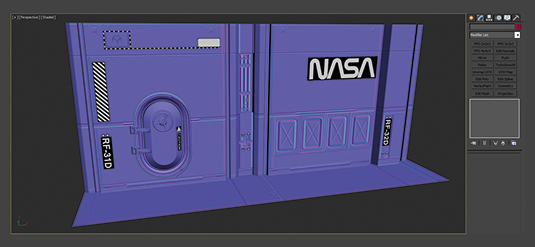
In my final image shown at the start of this tutorial, I have used two duplicate versions of my shader, coupled with a coloured tint to create the blue and dark grey painted metals. You can see the original multipurpose trim textures are extremely versatile when used correctly. Combining clever modelling, UV unwrapping and tinted shaders, it's possible to texture a huge variety of assets. I also employed additional set dressing in the form of decals to add extra detail.
This article was originally published in 3D World magazine issue 206. Buy it here.
