Introducing effects to text and typography can add a whole new perspective to the user experience on a website. But text is to be read, and getting too smart or clever with an effect can defeat the purpose of it.
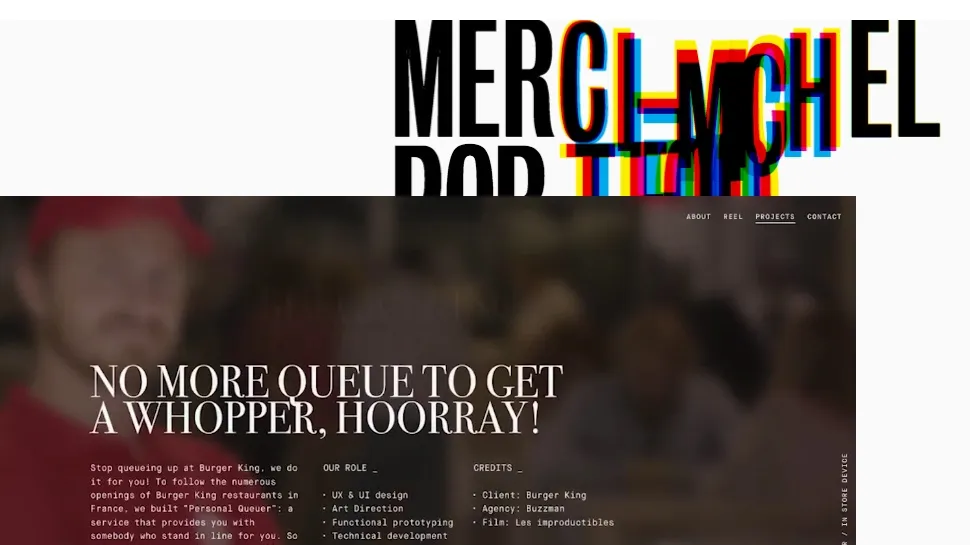
So be smart, be clever, but make sure that your kinetic typography effect actually works, just like it does on Patrick Heng's website – featured in the image above. Read on to find out how...
1. Create the intro text
Open the project files and you will see that there is the velocity.js and blast.js library. Blast splits text up, while velocity is a tween engine. There are three offset variables to make each piece of text move at different intervals.
<script>
var offset1 = 0;
var offset2 = 0;
var offset3 = 0;
</script>
2. Split the text
Using blast, each of the text characters are split into their own span element. Then the top layer of text is looped through and the offset is increased for each letter so they animate independently.
$(“h1”).blast({
  delimiter: “character”
});
function anim() {
  var $spans = $(“#top”).find(‘span’);
  $spans.each(function() {
  offset1 += 40;
3. Add velocity
Now the velocity library adds the movement and opacity so that the letters move up and fade in. Each letter is offset, and the duration and easing are set for each of the letters.
 $(this).velocity({
  translateY: -100,
  opacity: 1
  }, {
  delay: offset1,
  duration: 800,
  easing: “easeOutBack”
  });
  });
}
4. Call the action
Now the ‘anim’ function is called and this triggers the animation to begin. A ‘setTimeout’ function now staggers the second block of text that will be yellow. Again, it is triggered using velocity as in the first example.
anim();
setTimeout(function() {
  var $spans = $(“#middle”).find(‘span’);
  $spans.each(function() {
  offset2 += 40;
  $(this).velocity({
  translateY: -100,
  opacity: 0.8
  }, {
5. Move on
The delay, duration and easing are set so that the second yellow text moves correctly. Then the last piece of text which is orange is controlled in the next ‘setTimeout’ function to delay this moving a little longer before starting.
delay: offset2,
  duration: 800,
  easing: “easeOutBack”
  });
  });
}, 100);
setTimeout(function() {
  var $spans = $(“#bottom”).find(‘span’);
6. Add final letters
Now the final letters are moved into place. This gives the same effect as Patrick Heng’s site, which has layers of text moving. Patrick actually uses WebGL to move the text but this is a simpler way with DOM elements.
$spans.each(function() {
  offset3 += 40;
  $(this).velocity({
  translateY: -100,
  opacity: 0.8
  }, {
  delay: offset3,
  duration: 800,
  easing: “easeOutBack”
  });
  });
}, 150);
Learn more at Generate London

Richard Rutter has a love and fascination for typography and co-founded Fontdeck, a pioneering web font service. As a self-appointed web typography evangelist, Richard is chief organiser of Clearleft’s Ampersand web typography conferences.
At Generate London 2018, his workshop will help you create websites with engaging, appropriate, distinctive, expressive and readable web typography, which adapts for screens of all shapes and sizes. You will learn how to combine centuries-old craft with cutting-edge technology – including variable fonts – in order to design and develop the best experiences for your readers.
Over the course of a day, you will participate in hands-on activities, applying each new technique to a detailed example site which you can take back with you. This will form the perfect resource for you to refer to in the future. And if that’s not enough, every attendee will walk away with a free electronic copy of Richard’s acclaimed Web Typography book.
Don't miss out, get your ticket now
Related articles:

