Get started with geofencing on iOS
Explore the location-based services provided by the iOS Core Location framework in Kevin McMahon's guide to building and testing a geofencing-enabled application.
- Knowledge needed: Basic iOS programming
- Requires: Mac, Xcode 4.2+, iOS 5+, iOS Simulator, iOS device (optional)
- Project Time: 30-60 minutes
- Support file
Want to know how to build an app? Try these great tutorials
It has been said that context is king. Nowhere is this truer than in mobile, with apps now able to tailor tasks and content based on the user's current location. The increasingly sophisticated location-based services provided by iOS are enabling apps to go from being simply locationally aware ('I am here') to being contextually aware ('I am here, it is about to rain, and I have a meeting in 15 minutes').
To create contextually aware apps, information about surroundings needs to be obtained, and one of the main ways of accomplishing this is to leverage 'geofences': virtual perimeters around real-world locations. The ability to create and monitor geofenced regions was recently added to iOS, and this article will show you just how easy it is to integrate geofencing into your location-aware apps.
In this tutorial, we are going to build an app to notify users when they are near some prominent landmarks in my hometown of Chicago. Creating this app will allow us to explore how geofences work within the Core Location framework and show you how to test location-aware apps without leaving your chair. So pull down a copy of the source code provided, fire up your Mac running Xcode 4.2 or higher, and grab your iOS 5 device.
01. Initial setup and configuration
The basic call pattern for starting and receiving location updates from Core Location typically involves determining what location services are available and enabled, generating and configuring a location manager object, registering for location updates, and finally processing location events.
The first step in creating our app will be to generate a location manager object to provide the location services and then to immediately check to ensure that location services are enabled. Core Location has the ability to get location from just a Wi-Fi network so one can be fairly confident that any iOS device running your app has the capacity to provide the location services.
However, simply having the ability to support location services does not mean that those services are enabled. There are a number of situations where location services can be limited (for example, through lack of specific features on a device) or disabled (airplane mode). It is important to identify these situations and gracefully handle them from a user experience perspective. In our app, if location services are disabled, the user is shown an alert indicating that location services are required to use the app.

Once location service availability has been determined, a CLLocationManager object is created and configured. In addition to managing the location manager object, the ViewController class will also implement the CLLocationManagerDelegate protocol and handle location manager updates. The configuration is completed as the ViewController is assigned as the location manager's delegate.
- (void)initializeLocationManager {
// Check to ensure location services are enabled
if(![CLLocationManager locationServicesEnabled]) {
[self showAlertWithMessage:@"You need to enable location services to use this app."];
return;
}
_locationManager = [[CLLocationManager alloc] init];
_locationManager.delegate = self;
}
Daily design news, reviews, how-tos and more, as picked by the editors.

02. Configuring and starting Core Location services
With the location manager configured, we can turn to creating the geofences surrounding our Chicago landmarks and registering them for monitoring. The landmark data was encoded as an array of dictionaries and saved in a plist file included with the source code.
In order to create geofences for the landmarks and have our location manager monitor them, we will have to transform the data from the plist into an array of CLRegion objects. CLRegions are composed of three key components: the coordinate location representing the center of the geofence, the radius around that center which forms the virtual perimeter, and an identifier that can be used to name a geofence. As CLRegion areas are expressed in terms of a center point and a radius, the geofences tracked by Core Location can only be circular in shape.
Here is the code that creates the regions from the dictionaries:
- (CLRegion*)mapDictionaryToRegion:(NSDictionary*)dictionary {
NSString *title = [dictionary valueForKey:@"title"];
CLLocationDegrees latitude = [[dictionary valueForKey:@"latitude"] doubleValue];
CLLocationDegrees longitude =[[dictionary valueForKey:@"longitude"] doubleValue];
CLLocationCoordinate2D centerCoordinate = CLLocationCoordinate2DMake(latitude, longitude);
CLLocationDistance regionRadius = [[dictionary valueForKey:@"radius"] doubleValue];
return [[CLRegion alloc] initCircularRegionWithCenter:centerCoordinate
radius:regionRadius
identifier:title];
}
Now that the geofence regions are created, we need to register them with the location manager for monitoring.
- (void) initializeRegionMonitoring:(NSArray*)geofences {
if(![CLLocationManager regionMonitoringAvailable]) {
[self showAlertWithMessage:@"This app requires region monitoring features which are unavailable on this device."];
return;
}
for(CLRegion *geofence in geofences) {
[_locationManager startMonitoringForRegion:geofence];
}
}
03. Receiving location data from the service
The last piece to implement is the CLLocationManagerDelegate methods needed to handle the updates when the geofences are crossed.
- (void)locationManager:(CLLocationManager *)manager didEnterRegion:(CLRegion *)region {
[self showRegionAlert:@"Entering Region" forRegion:region.identifier];
}
- (void)locationManager:(CLLocationManager *)manager didExitRegion:(CLRegion *)region {
[self showRegionAlert:@"Exiting Region" forRegion:region.identifier];
}
- (void)locationManager:(CLLocationManager *)manager didStartMonitoringForRegion:(CLRegion *)region {
NSLog(@"Started monitoring %@ region", region.identifier);
}

04. Testing the services without leaving your chair
We just built an app that should alert us when we are near one of the Chicago landmarks we put a geofence around, and now it is time to test it. Sure, as a Chicagoan, I can load the app onto my device and visit these locations to check that it works as expected. But what if I did not live near the regions I wanted to monitor, or wanted to simulate arbitrary locations without having to visit them?
Prior to Xcode 4.2/iOS 5, the answer to those questions was, "You're out of luck," since the iOS simulator was not equipped to properly simulate location change and update scenarios. Thankfully, Apple improved location-service testability in Xcode 4.2 and iOS 5 by introducing location-playback capabilities that enabled coordinates from GPS Exchange Format (GPX) files to be fed to iOS simulator.
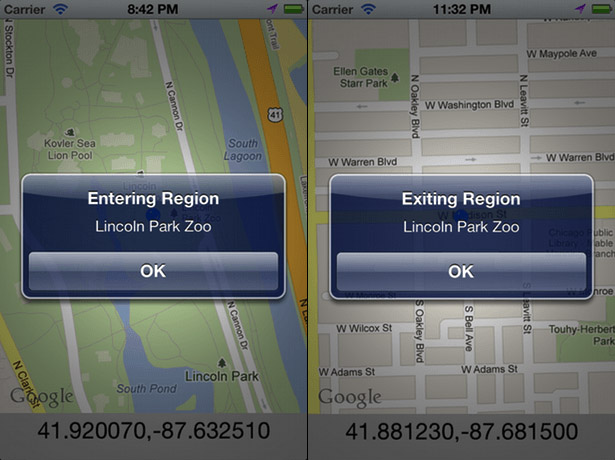
This GPX file pulled from the source code shows how the Lincoln Park Zoo is represented as a single coordinate. GPX files can also include multiple wpt tags with lat and lon attributes to simulate walking a path.
<?xml version="1.0"?>
<gpx version="1.1" creator="Xcode">
<wpt lat="41.92007" lon="-87.63251">
<name>Chicago - Lincoln Park Zoo</name>
</wpt>
</gpx>
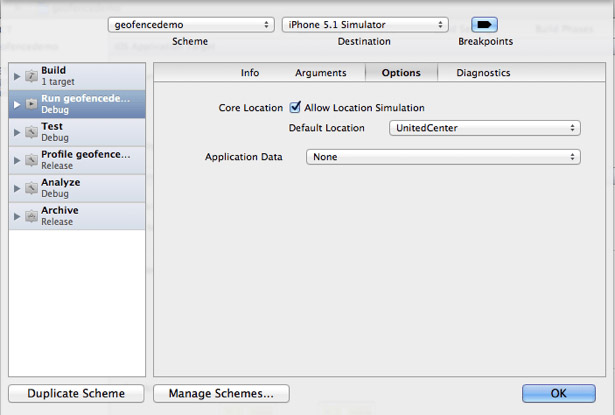
Mocking a default location for the iOS simulator when it launches can be accomplished by modifying the Run action of the Xcode scheme used to launch your app as shown here:

The drop-down list will include the preconfigured locations that Apple ships with Xcode, as well as any GPX files found in your Xcode project.

05. Summary
In this article, we have explored how geofences worked and learned about a technique that enables us to test location-aware apps from our desks. The Core Location framework is an area of iOS that is constantly being revised and improved. Hopefully this tutorial piqued your interest in the framework and will encourage you to further explore the many other location-based services offered on the platform.
Kevin McMahon is a mobile software developer at Redpoint Technologies. He lives with his wife in Chicago's Lincoln Park neighborhood, where he spends his time being underwhelmed by the local sports teams and searching for the perfect cup of coffee. www.twitter.com/klmcmahon
Liked this? Read these!
- Free graphic design software available to you right now!
- Download the best free fonts
- Free graffiti font selection
- Our favourite web fonts - and they don't cost a penny

The Creative Bloq team is made up of a group of art and design enthusiasts, and has changed and evolved since Creative Bloq began back in 2012. The current website team consists of eight full-time members of staff: Editor Georgia Coggan, Deputy Editor Rosie Hilder, Ecommerce Editor Beren Neale, Senior News Editor Daniel Piper, Editor, Digital Art and 3D Ian Dean, Tech Reviews Editor Erlingur Einarsson, Ecommerce Writer Beth Nicholls and Staff Writer Natalie Fear, as well as a roster of freelancers from around the world. The ImagineFX magazine team also pitch in, ensuring that content from leading digital art publication ImagineFX is represented on Creative Bloq.
