Implement Google Custom Search into WordPress
WordPress has a search function which has developers opinions split. Freelancer Paul Maloney shows us how to replace the search function with a super powered Google Custom Search engine
View demo: http://netmag.clientden.com/
WordPress and its search function – this is a subject that often splits the most hardcore WordPress users. Terms like “abysmal” are frequently banded about among developers, I personally defend it… to a certain level.
For smaller sites the search function does its job successfully, it’s no frills and does what it says on the tin, but for larger sites it can be like taking a spoon to a bazooka fight. So today I plan to show you how to integrate Google Custom Search into your WordPress install and harness the raw power of the world’s most powerful search solution.
Before we get into the nitty gritty I wanted to briefly cover something that has come up as an issue (of sorts) for me while replacing the search function. As we all know Google Custom Search will use Google results for your site so we need to ensure Google has good access to our content, so installing the Google XML Sitemap plugin will assist in Google’s indexing quest. The other point of note is due to the way WordPress archives work, Google may index multiple versions of your posts so you could in effect have several versions of the same article competing in your own search results, so to combat this I opted to use the All In One SEO Pack plug-in and set it up so only single posts would appear.
Not only will using these (or similar) plug-ins help your custom search work more efficiently; it’s also good SEO practice and could help you climb up those pages!
Now we can move onto the part you have been patiently waiting for, the actual implementation of Google Custom Search into WordPress.
Creating a custom search engine
First thing first, we need to visit Google Custom Search and set up our search engine. Follow this link: http://www.google.com/cse/ and you will be taken to the Google Custom Search page were you can create or manage your search engines.
Daily design news, reviews, how-tos and more, as picked by the editors.
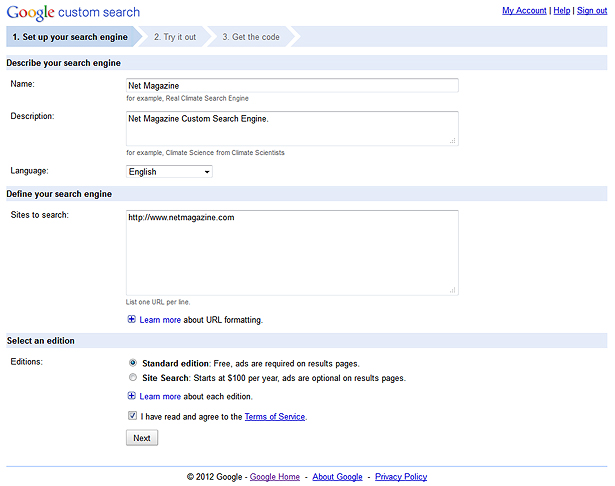
We need to give our search engine a name, description and define its primary language, then we need to give it a list of sites to search, so in our case it would just be our site, so for example: http://www.netmagazine.com.
You then need to select an edition, there is an ad supported free version or, for the more financially blessed among us, we can go for the paid version and wave goodbye to those ads.
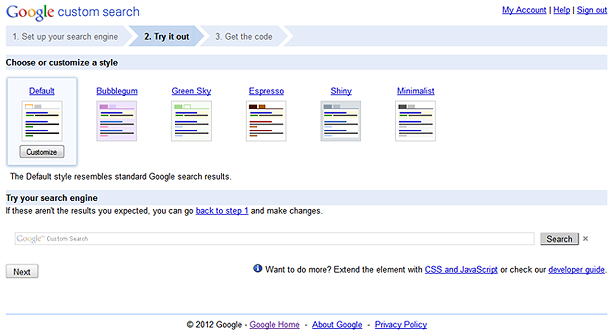
At this point Google Custom Search offers little in the way of customisation, but does offer a few themes and layouts we can use and hopefully one of those will work on our WordPress install.
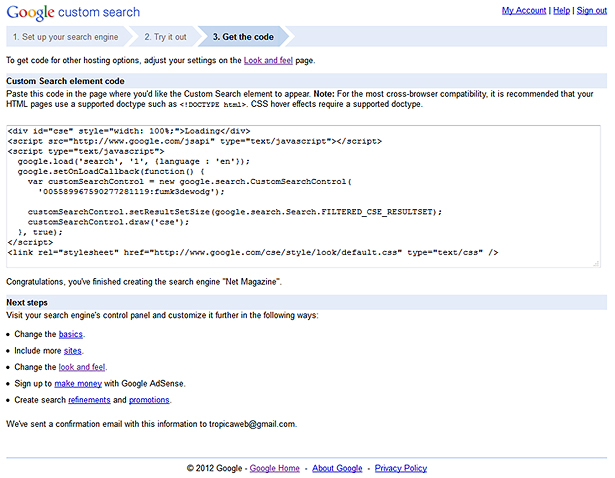
The final step over at Google is to grab our code for our custom search engine, Google recommends using a supported Doc Type such as <!DOCTYPE html> in your pages as the custom search uses some CSS hover effects.
Below our code Google also offers some further options that you can use to customise the custom search a little further, which in this case we will need to do.
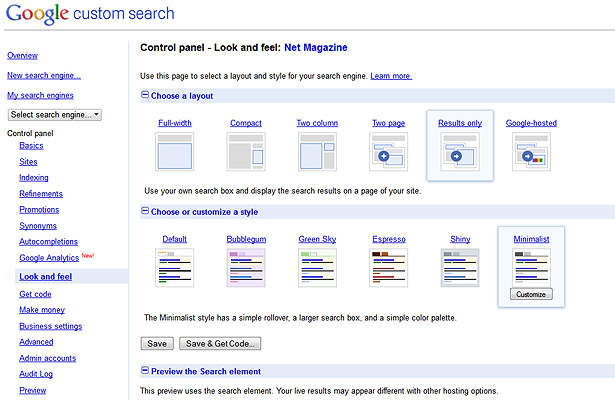
Hit the change the look and feel link and you will be presented with some layout and style options. We will need to use the Results only layout as we will be using our own search box. Tthe style is totally up to you. Once that is done, hit the Save & Get Code button and we can then finish this part off by grabbing our code.
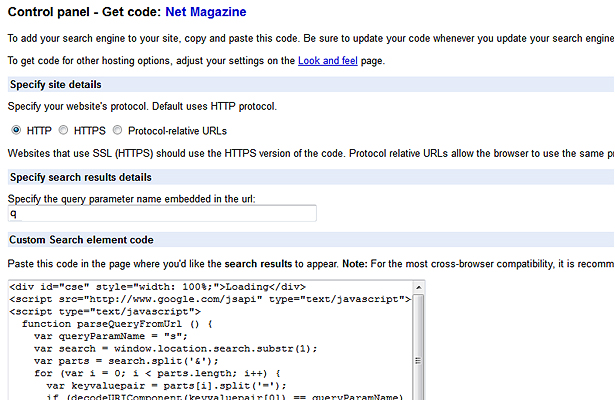
You will need to specify your site details such as HTTP/HTTPS and specify the search result details – we should use “q”, which is the default Google search query parameter.
Our code is now ready to use in our WordPress install, so keep it in a safe place for the time being.
Building the results page
To get the custom search in place of WordPress’ in built search function we are going to use a custom page template (you can read more about these here: http://codex.wordpress.org/Pages#Page_Templates).
At the beginning of a custom page template you must define your custom page name so it can be used by WordPress, so we will name our template googlesearch.php and place this at the top of our custom page:
<?php/*Template Name: Google Search*/?>The file name and template name can of course be altered and named to anything you wish.
Once that is in place, you can continue to build the rest of your page. For this tutorial I will be using the TwentyEleven theme and using the page.php as a base to work from, which looks a little something like this:
<?php/** * The template for displaying all pages. * * This is the template that displays all pages by default. * Please note that this is the WordPress construct of pages * and that other 'pages' on your WordPress site will use a * different template. * * @package WordPress * @subpackage Twenty_Eleven * @since Twenty Eleven 1.0 */get_header(); ?> <div id="primary"> <div id="content" role="main"> <?php while ( have_posts() ) : the_post(); ?> <?php get_template_part( 'content', 'page' ); ?> <?php comments_template( '', true ); ?> <?php endwhile; // end of the loop. ?> </div><!-- #content --> </div><!-- #primary --><?php get_footer(); ?>That gives us our base to work with, but we need to add the code from Google and remove the things we don't need from the standard page template.
We don’t need the content or comments part so they can be removed, and then you can add your search code so you end up with something like this:
<?php/*Template Name: Google Search*/?><?php get_header(); ?> <div id="primary"> <div id="content" role="main"> <?php while ( have_posts() ) : the_post(); ?><div id="cse" style="width: 100%;">Loading</div><script src="http://www.google.com/jsapi" type="text/javascript"></script><script type="text/javascript"> function parseQueryFromUrl () { var queryParamName = "q"; var search = window.location.search.substr(1); var parts = search.split('&'); for (var i = 0; i < parts.length; i++) { var keyvaluepair = parts[i].split('='); if (decodeURIComponent(keyvaluepair[0]) == queryParamName) { return decodeURIComponent(keyvaluepair[1].replace(/\+/g, ' ')); } } return ''; } google.load('search', '1', {language : 'en', style : google.loader.themes.MINIMALIST}); google.setOnLoadCallback(function() { var customSearchControl = new google.search.CustomSearchControl( '005589967590277281119:fumk3dewodg'); customSearchControl.setResultSetSize(google.search.Search.FILTERED_CSE_RESULTSET); var options = new google.search.DrawOptions(); options.enableSearchResultsOnly(); customSearchControl.draw('cse', options); var queryFromUrl = parseQueryFromUrl(); if (queryFromUrl) { customSearchControl.execute(queryFromUrl); } }, true);</script> <?php endwhile; // end of the loop. ?> </div><!-- #content --> </div><!-- #primary --><?php get_footer(); ?>*Notice the code is used inside the loop (codex.wordpress.org/The_Loop).
We can now upload that new file which I have called googlesearch.php to our theme folder.
Creating the search page
Now the bulk of the code is done we need to create a new page through the WordPress wp-admin, I have called my page “Search Results.”
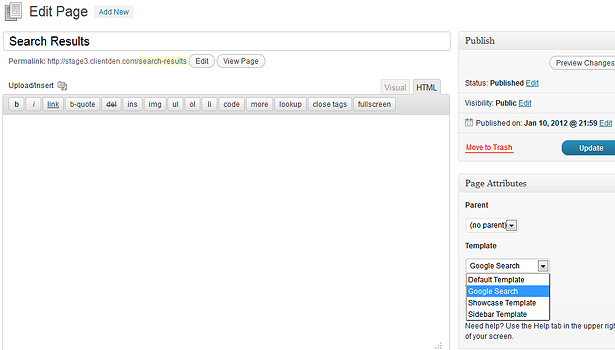
You will see my page has no content as Google will supply that for us, but the main thing we need to do here is change the template to our custom page template. In this case we need to select the Google Search template from the drop down on the right. Once we have done that hit Publish.
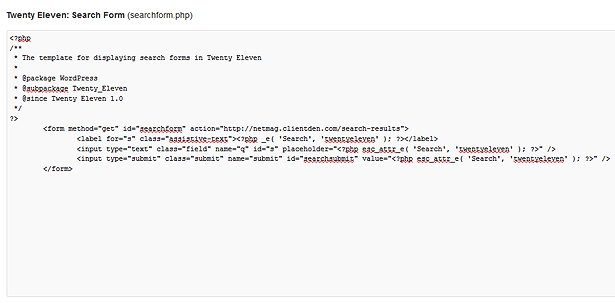
We will also need to alter one other snippet of code. In searchform.php we need to alter the name field from s to q, and the form action to the URL of our new results page (in my demos case: action=”http://netmag.clientden.com/search-results”). Once that has been changed we're ready to go.
Tweaking our custom search engine
If all goes well, we now have a custom search engine that displays our WordPress’ results on our search-results page.
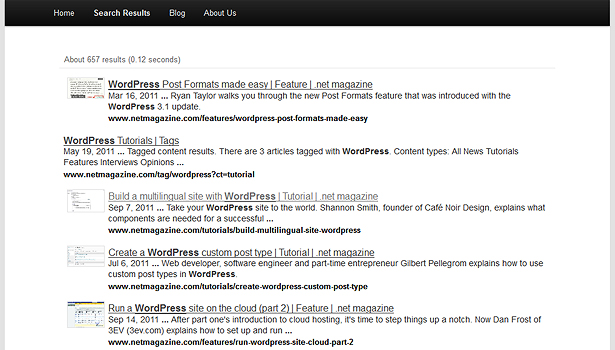
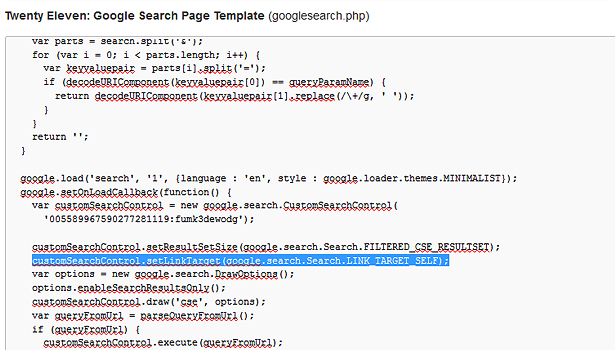
You might notice when you hit a link from your results page, it opens in a new window which is not ideal, so if we want to change this, we can add an extra snippet to our googlesearch.php page:
If we add:
customSearchControl.setLinkTarget(google.search.Search.LINK_TARGET_SELF);between the following:
customSearchControl.setResultSetSize(google.search.Search.FILTERED_CSE_RESULTSET);var options = new google.search.DrawOptions();so we get this:
customSearchControl.setResultSetSize(google.search.Search.FILTERED_CSE_RESULTSET); customSearchControl.setLinkTarget(google.search.Search.LINK_TARGET_SELF); var options = new google.search.DrawOptions();Your search results will now open in the same window, which in most cases will be the desired result.
Google offers further steps for customisation, such as applying your own stylesheet and using image search with your results but I will allow you to dig into those in further depth at your leisure.
Conclusion
While this is a solution that will favour many, it does have a few downsides. New posts might take a few days to get indexed and results can change, so popular pages might rank higher than newer articles and so on… That being said if you are managing a content heavy site and the inbuilt search feature doesn’t cut the mustard, this is probably right up your street.

Thank you for reading 5 articles this month* Join now for unlimited access
Enjoy your first month for just £1 / $1 / €1
*Read 5 free articles per month without a subscription

Join now for unlimited access
Try first month for just £1 / $1 / €1

The Creative Bloq team is made up of a group of art and design enthusiasts, and has changed and evolved since Creative Bloq began back in 2012. The current website team consists of eight full-time members of staff: Editor Georgia Coggan, Deputy Editor Rosie Hilder, Ecommerce Editor Beren Neale, Senior News Editor Daniel Piper, Editor, Digital Art and 3D Ian Dean, Tech Reviews Editor Erlingur Einarsson, Ecommerce Writer Beth Nicholls and Staff Writer Natalie Fear, as well as a roster of freelancers from around the world. The ImagineFX magazine team also pitch in, ensuring that content from leading digital art publication ImagineFX is represented on Creative Bloq.
