Photoshop is a perfect example of the whole being greater than the sum of its parts, of which there are many; an overflowing treasure trove of tools, adjustments and filters. It’s constantly evolving, with regular updates improving the user experience and making it more accessible to a wider audience. As a consequence, it’s easy to miss out on some of the less obvious new features and overlook old ones that have been updated.
If you think you could do with a skills refresh when it comes to Photoshop, we've got you covered. These ten tips will help you get to grips with the latest version of Photoshop CC, opening up new creative horizons and speeding up your workflow.
If you are in the learning zone and want to keep going, head over to our selection of the best Photoshop tutorials the internet has to offer. Or if you're looking for a standalone image editing app, some of these powerful alternatives to Photoshop might better suit.
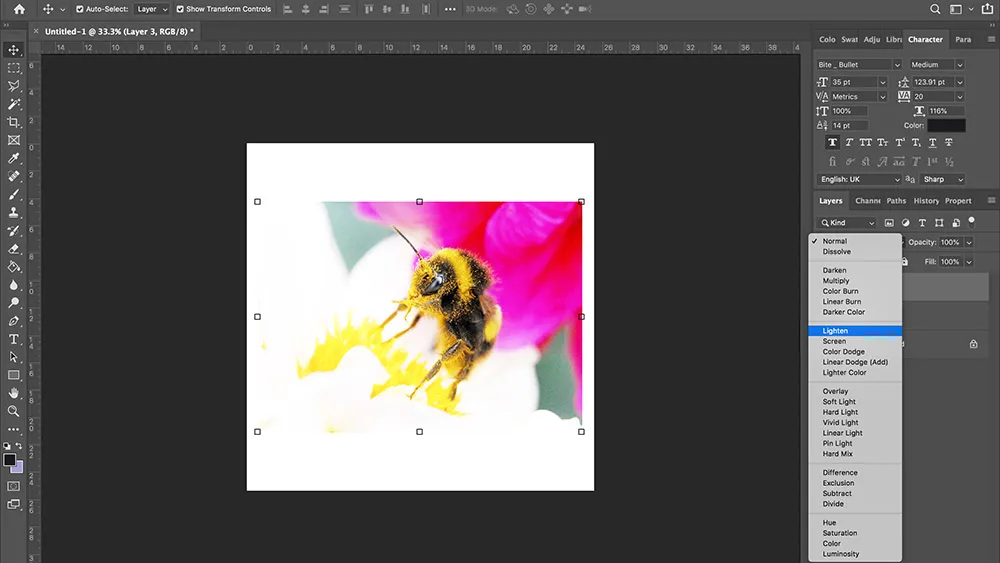
01. Live blend mode preview
Switching blend modes is a quick way to dramatically alter an image, but it can be an inexact science, drawing a little on experience and a requiring a lot of experimentation. Previous iterations of Photoshop have required the user to cycle through different blend modes in order to view the effect on the image, either clicking through the scroll-down list or using the Shift +/- keys.
But Photoshop CC is equipped with the blend mode preview function, which makes it possible to hover the cursor over any of the blend mode options for a live preview of the effect, on the canvas, before eventually clicking on the desired option. It also leaves a strip of unaffected pixels at the bottom of the canvas, showing the original image for direct comparison.
02. Match Font

Once the magical world of typefaces has sucked you in and taken hold, you’ll find yourself noticing them wherever you go; shop signs, train stations, restaurant menus, ancient manuscripts. The Match Font function is to fonts what Shazam is to music, analysing the text in an image and deducing what font is being used.
Use the marquee tool to select the text in an image, activate Type > Match Font and let technology take care of the rest. Match font will provide you with a list of fonts similar to the one selected, separating them into those already installed on your system and others available for download from Typekit (Adobe’s font library). This will also be a good tool to use if a client ever asks you to alter a pre-made design or recreate one from scratch.
03. Content Aware Fill
Another great addition to CC is the updated Content Aware Fill. To be perfectly frank, earlier versions of this function were a hit-and-miss affair, producing several unwanted effects, such as spawning extra limbs and warping horizons beyond recognition.
The latest version of CC puts the user back into the driving seat, giving them at least some control over the process. After selecting the unwanted content and clicking on Content Aware Fill, you are presented with a green box, which highlights the parts of the image to be sampled from when creating the fill. You can then use a brush to add or subtract from the box, refining the parts to be sampled to improve the eventual output.
04. Symmetry mode

One tool certain to reflect the current trends in design is Paint Symmetry. First introduced in Photoshop CC 2018, the Paint Symmetry tool allows you to create mirrored, symmetrical patterns with the brush, pencil and eraser tool. The already generous list of symmetry modes has recently been improved with the addition of the Radial and Mandala options.
Access Paint Symmetry by clicking on the butterfly icon at the top of the screen, selecting your tool and creating a symmetry plane. As well as being used to draw directly onto the canvas, they can also be implemented when painting to reveal or hide a mask.
05. Maths in number fields
With most of your fingers already tied up in shortcuts, you won’t have many left to count with. This is where Photoshop’s new maths function steps in, making it possible to do basic calculations without having to resort to a calculator or using the Dashboard. It’s a function that has long been available in other applications, but sadly missing from Photoshop. It really is as simple as writing your sums out in any number field, using standard mathematical symbols, and pressing enter. This will be a major time-saver when making proportional changes, such as working out canvas or image sizes. A great addition to the application.
07. Undo
Do or do not, there is retry. The October 2018 release made ‘multiple-step undo’ the default mode, performed using Edit > Undo or ‘Command + Z’. You can set the number of undo steps in the Preference Panel > Performance, which can go up all the way up to one thousand.
As helpful as this is, undo can be a clumsy option to rely solely on, so here are a few alternatives to reverse actions and revert back to previous versions: Time travel is possible with the History panel, which allows you to view all the recent states of an image and jump between them. It also allows you to create a new document from any one of those states. File > Revert will revert the document to the last saved version, while the History Brush tool allows you to restore parts of an image to the last saved version.
08. Batch
With over a trillion photos being taken every year, and rising, the prospect of processing images in batches has become a more attractive proposition. Photoshop offers a range of assembly-line-style actions, found under File > Automate, including adding vignettes and shadows, as well as creating Panoramas and HDR.
The real value of batching comes when you set-up and use your own Actions, allowing you to perform blanket edits across a large number of images; changing colour space, resolution or cropping. When this is complete, you can open any specific image to make finer, bespoke alterations.
09. Refine edge
Hard, straight lines are easy to draw with the pen tool, but plenty of images contain less well-defined edges, which appear jagged or blurry, such as the hair on a person’s head. A quick and easy method for dealing with this is the Refine Edge tool.
This can be accessed by roughly selecting the area you wish to affect and clicking the ‘Refine Edge’ option at the top of the interface. It’s then a case of playing around with the settings, having selected an appropriately contrasting background, until you’re satisfied with the selection. Then click OK and use it for its intended purpose.
10. Select focus area
There are many ways to select objects in Photoshop, including the wand, marquee and colour selection, but few people realise you can select an area based on the field of focus in the image. All you need to do is choose Select > Focus to bring up a dialogue box, where you can refine the selection and use a brush to manually add or remove areas. Once you’re happy with your selection, you get a choice of outputs, such as selection, new layer and layer mask. This works well on images with clearly defined focus distances and shallow depths of field.
Lead image: Adobe
Related articles: