How to resize an image in Photoshop
Discover how to resize an image in Photoshop without compromising quality.
Sign up to Creative Bloq's daily newsletter, which brings you the latest news and inspiration from the worlds of art, design and technology.
You are now subscribed
Your newsletter sign-up was successful
Want to add more newsletters?

Five times a week
CreativeBloq
Sign up to Creative Bloq's daily newsletter, which brings you the latest news and inspiration from the worlds of art, design and technology.

Once a week
By Design
Sign up to Creative Bloq's daily newsletter, which brings you the latest news and inspiration from the worlds of art, design and technology.

Once a week
State of the Art
Sign up to Creative Bloq's daily newsletter, which brings you the latest news and inspiration from the worlds of art, design and technology.

Seasonal (around events)
Brand Impact Awards
Sign up to Creative Bloq's daily newsletter, which brings you the latest news and inspiration from the worlds of art, design and technology.
Knowing how to resize an image in Photoshop is a fundamental skill for designers. Whether you're uploading an image to the web or preparing it for print, it's important to get the size correct. Luckily Photoshop offers plenty of tools to help you perfect your picture size. Although the process can be a bit of a minefield if you haven’t attempted it before.
In this beginner's Photoshop tutorial, we will examine how to resize an image in Photoshop. We'll address the dangers involved, and explain some methods that will help you deal with them. As well as covering how to manipulate canvas size and image size, we'll also cover resampling, cropping, and how to edit an individual layer. (See our piece on image file formats if you need help in this area.)
Want to learn more about Photoshop? See our roundup of the best Photoshop tutorials.
How to change Canvas Size
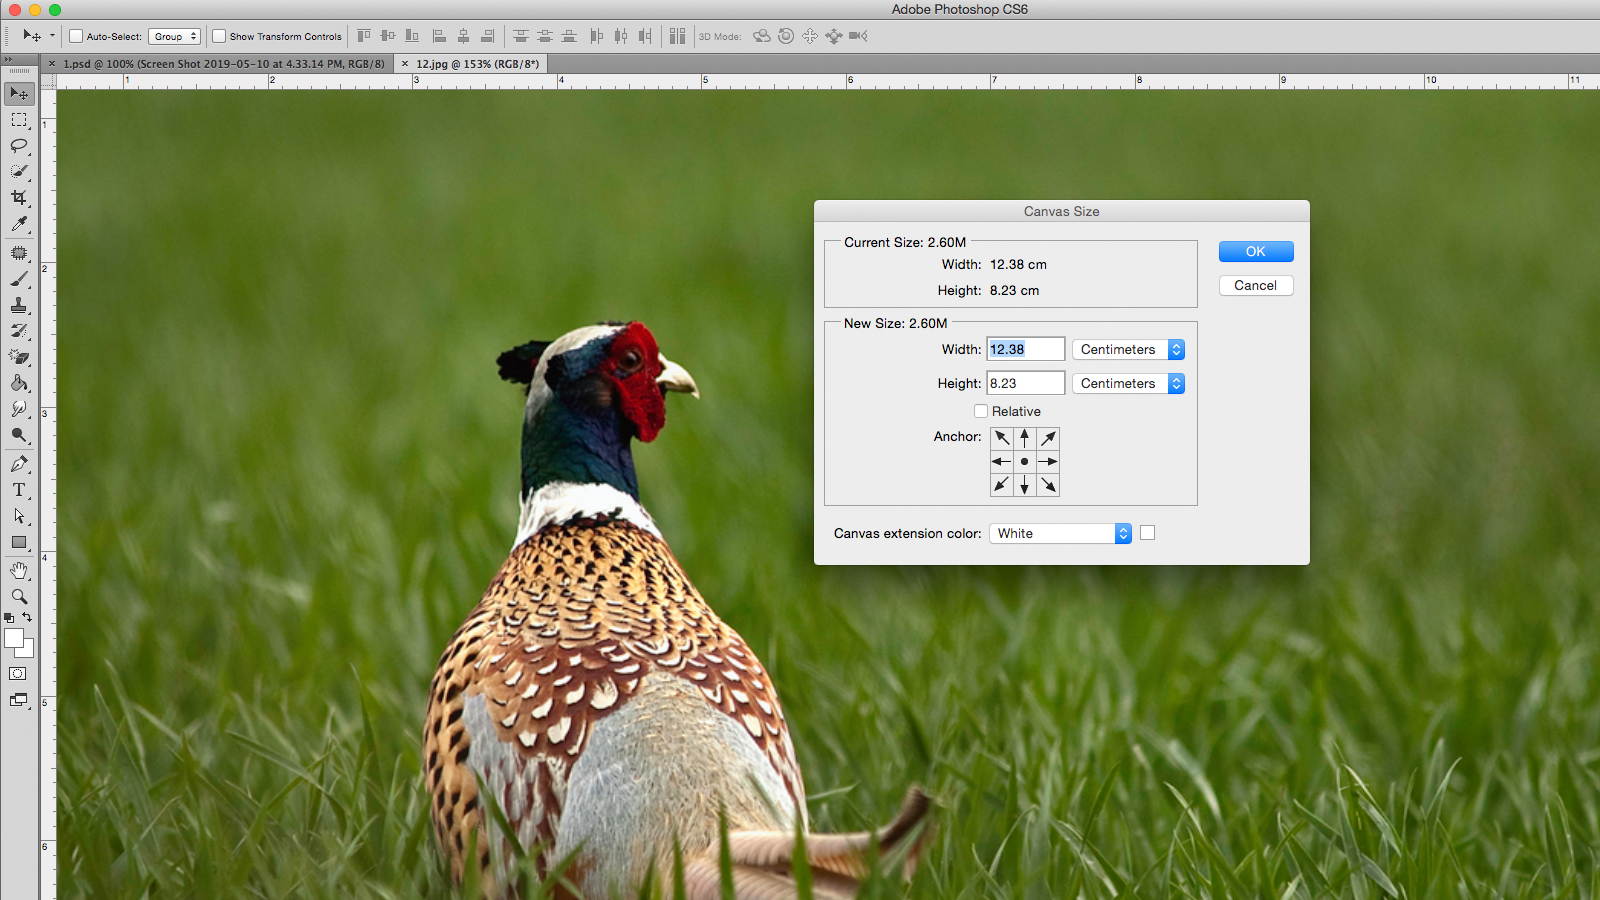
Perhaps the simplest and least problematic method of resizing a Photoshop document is to change the size of the canvas itself. In doing this, the image content will remain the same size while the boundaries around the asset change.
Increasing the canvas size will add transparent or coloured pixels around the image, depending on whether your layer is locked or not. Decreasing the canvas size will crop into the image, removing image data from around the edges.
You can make these adjustments by going to Image > Canvas Size in the Menu bar. The dialogue window lets you enter new values for both the width and height of the canvas, offering a range of measurement units to suit your purpose; you should be using pixels for digital, and inch/centimetre for print.
The canvas anchor point is automatically set to be centred, adjusting the canvas size uniformly around the whole image, but can be moved if you wish to add or remove pixels from any particular edge. By selecting the Relative checkbox you will be able to add or takeaway an equal number of pixels from around the current canvas size. Photoshop CC also allows you to do calculations inside all number fields.
Sign up to Creative Bloq's daily newsletter, which brings you the latest news and inspiration from the worlds of art, design and technology.
Use Trim and Reveal All
Trim and Reveal All are both functions that affect canvas size, without having to enter the Canvas Size dialogue window. Trim removes unwanted areas of transparent pixels or background pixels of a specified colour. In a similar fashion to using the Canvas Size dialog window, the transparent option will only be visible when your layers are unlocked.
Reveal All will resize the canvas to show any content that exceeds the document boundaries. Both of these can be found under Image in the menu bar, but should only be viewed as quick fixes that offer limited control over the process.
If all this seems too complicated, you can always just create a new document with the correct dimensions (File > New and choose your dimensions) and place your image into it, moving it around until it fits. Changing canvas size can be helpful when making graphics in Photoshop, but is less useful when altering the actual size of an image. For that you will need to use Image Size.
Adjust Image Size in Photoshop
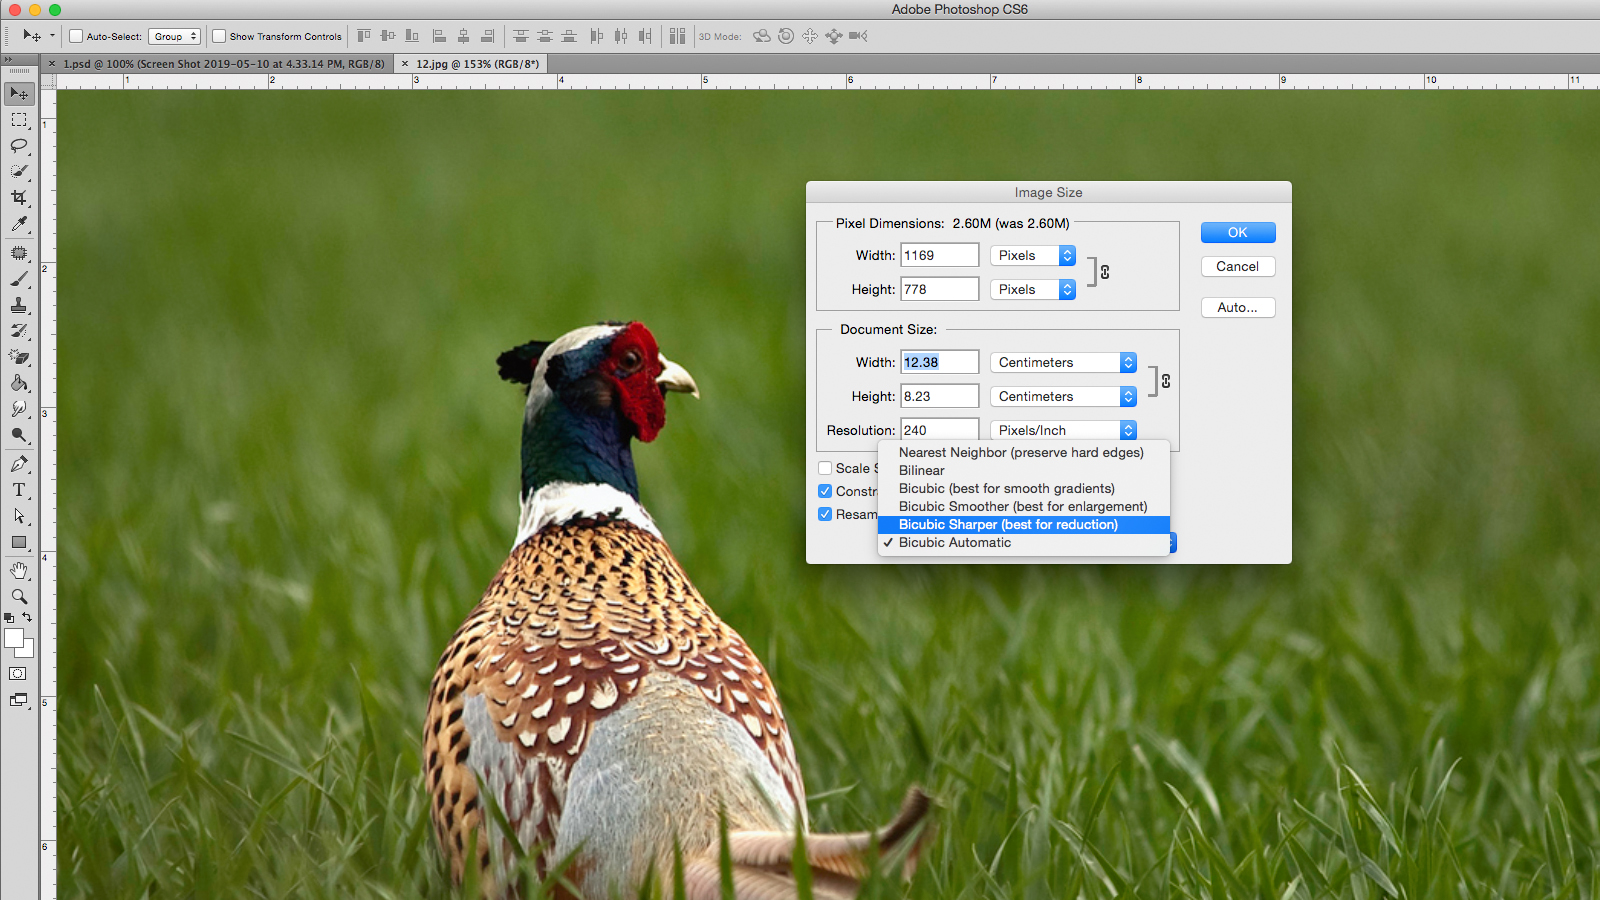
The sensible choice for resizing an image in Photoshop is the appropriately named Image Size, found under Image > Image Size in the Menu bar. But before jumping straight into this, you should first try to familiarise yourself with the idea of resolution and why it matters.
When resizing an image, your aim should be to change the image size without compromising on resolution. You’ll probably already have a vague idea that resolution is something to do with the detail in an image. The confusion arises when you begin to talk about resolution in terms of pixel density, displayed in Photoshop as ppi (pixels per inch).
Image resolution in Photoshop
A higher resolution means a sharper image, right? Well actually it all depends on the resolution of the image relative to its size; as the size of the image increases, the relative ppi will decrease. This is especially important in printing, where ppi defines how many dots of ink are used per inch (often referred to as dpi).
For example, imagine a one-inch by one-inch image, with a resolution of 100 ppi. Increasing the size of this image to ten-inch by ten-inch will decrease the ppi to 10. If you go on to use the image at that size, there will only be ten pixels per inch and it will appear pixellated and have jagged edges. The general rule is that you can make an image smaller without having any major issues, but you will encounter problems when making it larger.
When sending an image to print, a dpi of 300 is recommended, although this depends on the quality of the image and the size you’re printing to. A 300dpi image is suitable for an A4 page, but you can get away with using a lower dpi for a billboard, since people will be viewing it from further away.
For digital images, the most important number is the number of pixels in the image rather than density. A 500px x 500px image will always be 500px x 500px, no matter what the pixel density is.
To test this effect, make sure resample is turned off at the bottom of the Image Size dialogue window. You will now notice that changing the height, width or resolution will alter the other two values proportionally; the total number of pixels in the image has not changed. If you type your desired resolution into the number field, the resulting width and height show the maximum size your image can be used at.
Resampling an image
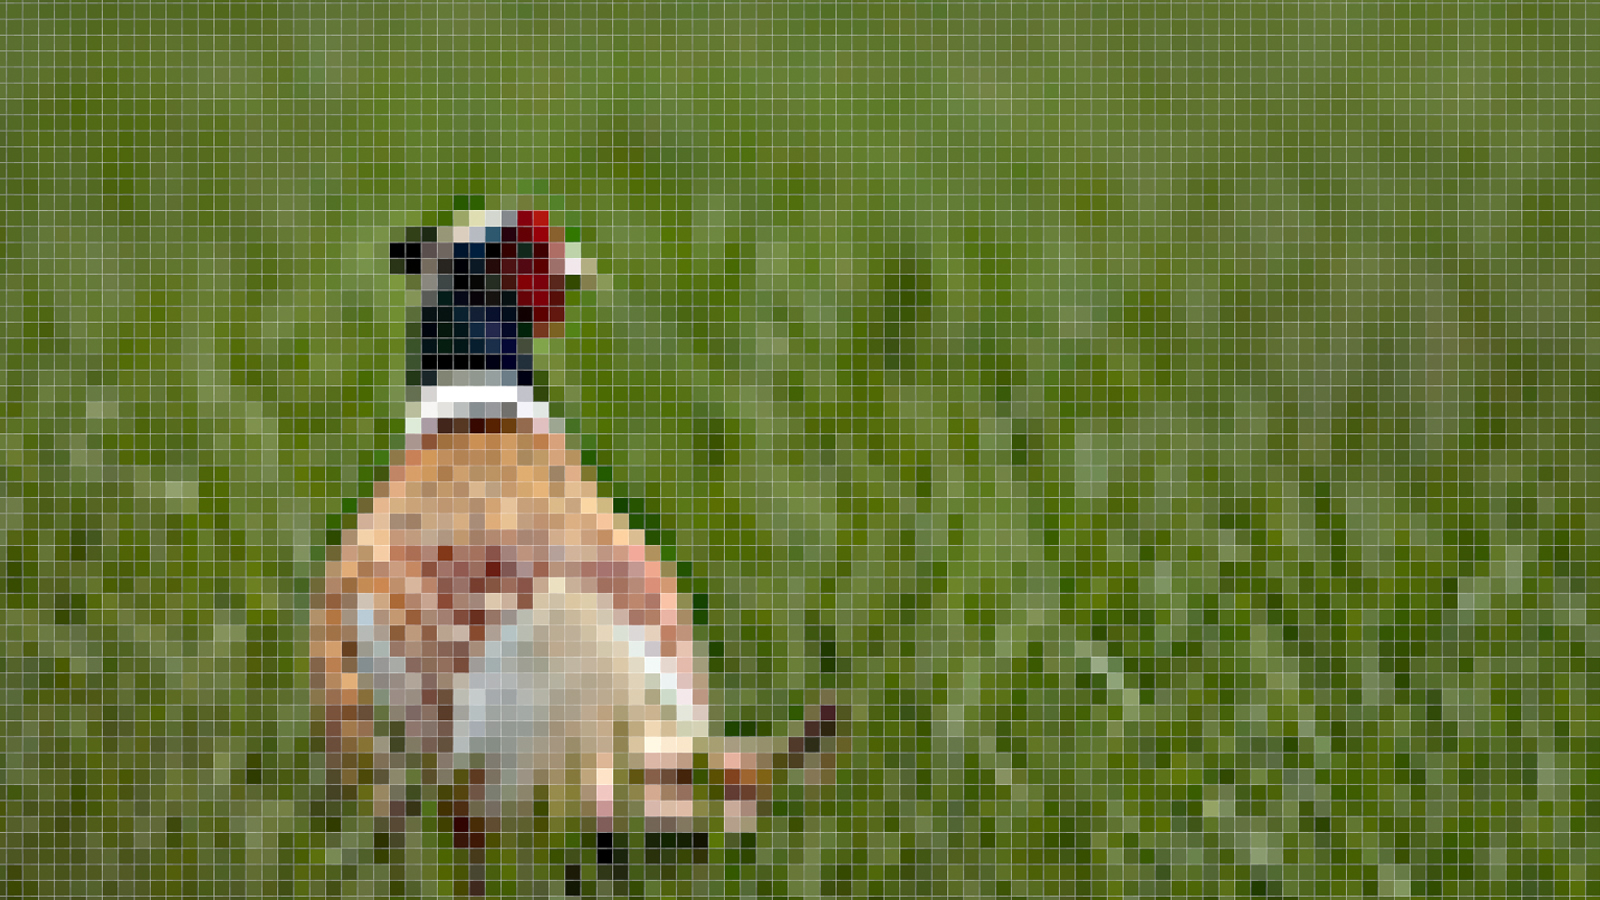
Enlarging an image without losing resolution is the white whale that all designers are chasing. That's because there is no enhance button that magically removes pixilation and sharpens an image. In reality your best hope is the resample function.
Resampling changes the pixel dimensions of an image by actually adding or deleting pixels. It does this through a process called interpolation, which analyses the original pixels and creates new ones, essentially by making an educated guess.
You can turn resample on at the bottom of the Image Size dialogue window. This time when you alter the width or height it will not affect the resolution at all. This is because Photoshop is filling in the missing pixels to retain the same resolution at the larger size.
Turning Constrain Proportions on means the width and height will remain at a fixed ratio, preventing you from squishing or distorting your image. You might find that doing your upscaling in steps works better than doing it in one big jump.
Resampling is generally not a good idea, since you will lose clarity and sharpness from the image
When performing the upscale, make sure you have selected the correct resample method from the drop down menu at the bottom of the Image Size dialogue window. There are two options clearly marked for reduction and enlargement, the Bicubic Sharper and Bicubic Smoother.
The 2018 update of CC (see our review of the latest Photoshop CC) introduced us to Preserve Details 2.0 Upscale, a new algorithm for upscaling images. It is not yet an official part of Photoshop, so if you wish to try it out, you will need to turn it on in Preferences > Technology Preview > Enable Preserve Details 2.0 Upscale. You will then need to locate this as a resample method in the Image Size dialogue window.
Resampling is generally not a good idea, since you will lose clarity and sharpness from the image, but is the best of a bad world if you have no other options.
There are a few tricks you can use to alleviate the resulting softness. After the resampling is finished, duplicate the layer and add a High Pass filter, found under Filter > Other > High Pass. Turn this new layer onto soft light in blending modes and it will add sharpness and contrast to the image. You can also try using an Unsharp Mask on the original layer, found under Filter > Sharpen > Unsharp Mask.
Crop images in Photoshop
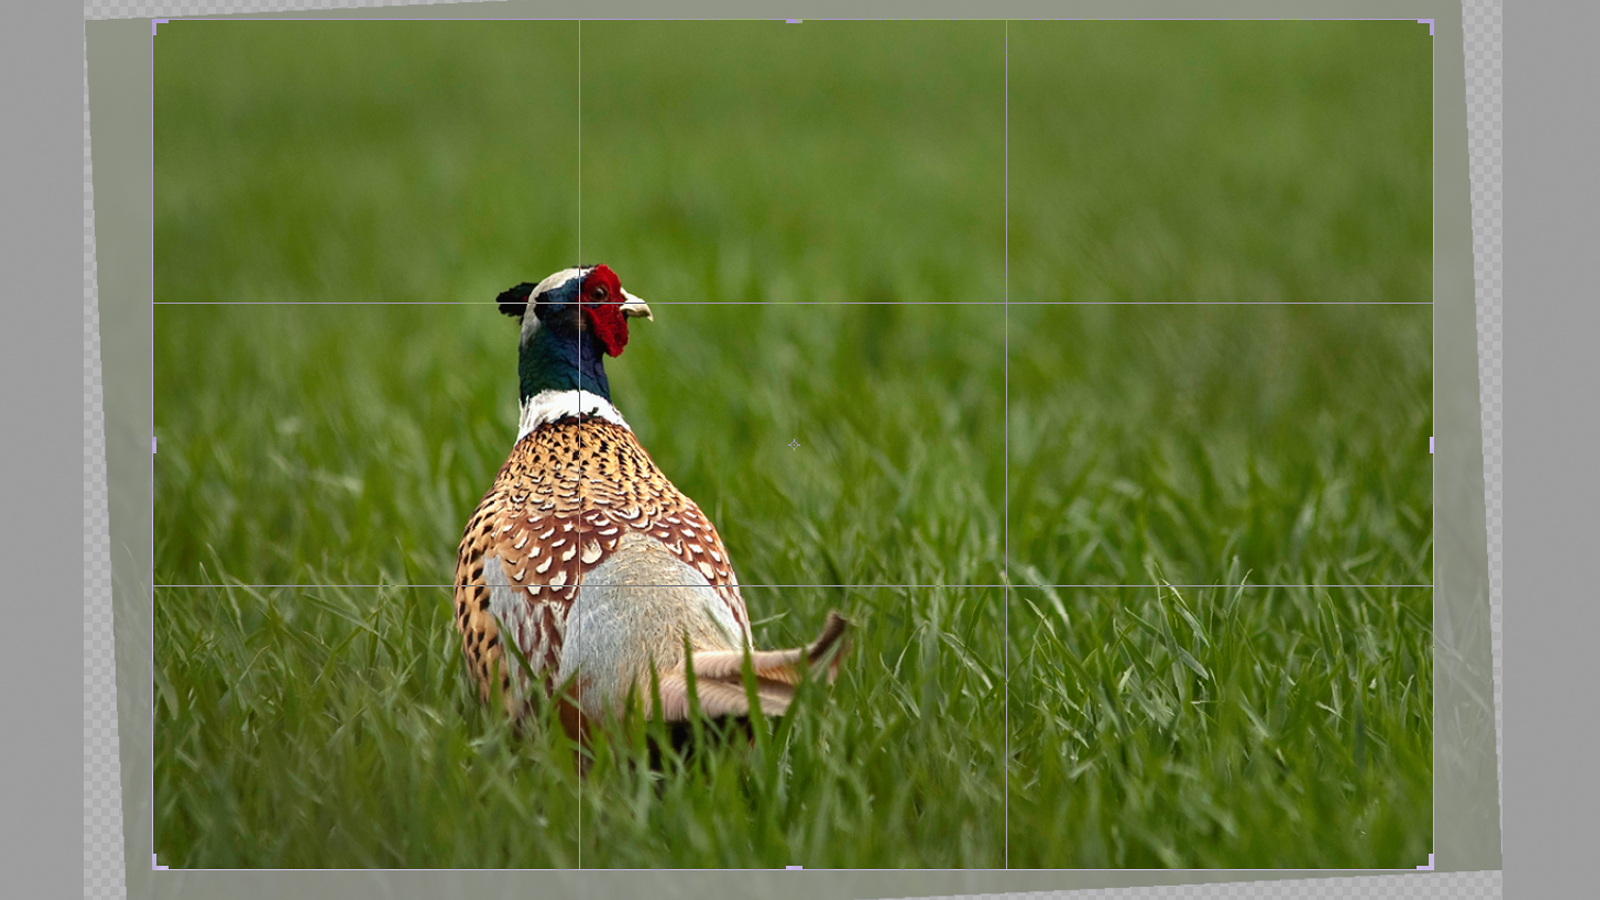
Sometimes you may be happy with your image size, but want to focus in on a specific area to improve the overall composition. To do this, you need to use the Crop tool.
Select the Crop tool in the toolbar or with the C shortcut (this is one of many Photoshop shortcuts). The crop borders will appear around the image, allowing you to drag the edge and corner handles to adjust the fit. Holding down the Shift key down will ensure your crop retains the same aspect ratio as the original image.
Alternatively you can set a specific ratio in the number field on the menu bar. Clicking just outside the frame will let you rotate the crop and straighten the image. You can also draw a new crop box straight onto the canvas by clicking and holding over the image.
When you’re happy with the crop either press enter or double-click to go back to normal edit mode.
Resize a single layer
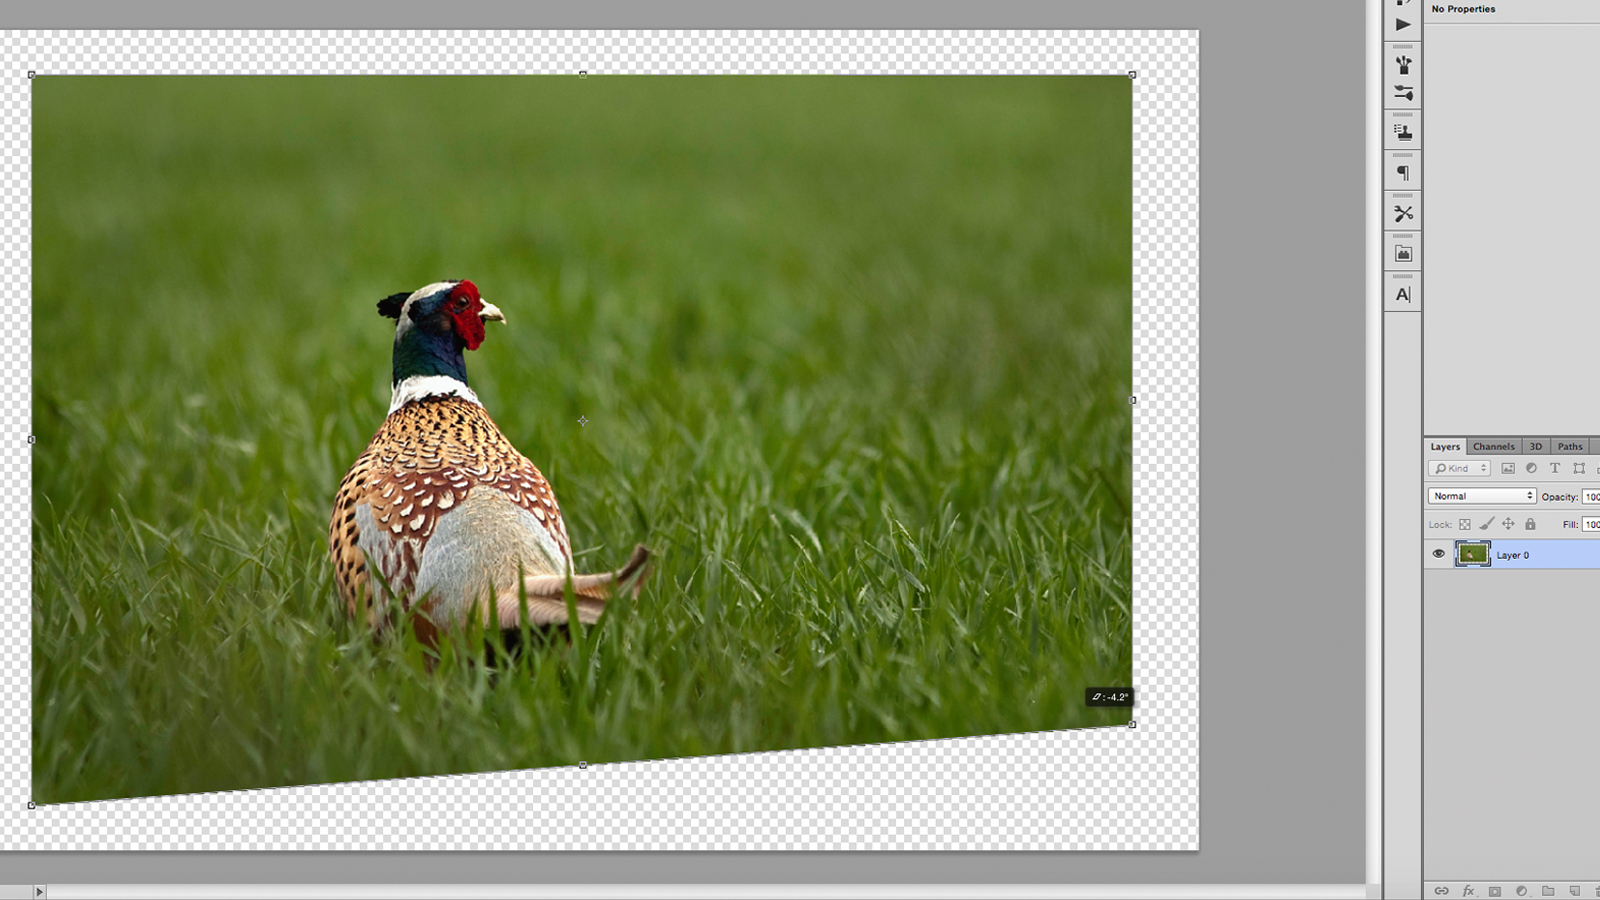
Instead of changing the entire image, Photoshop also lets you edit individual layers. Select the layer you wish to resize and go to Edit > Free Transform or press cmd + T.
The transform box has the same controls as a crop box; use the handles to scale up or down, click outside to rotate, and hold shift to scale proportionally. By holding the cmd key you will be able to move individual corner points around and distort the image. Double-click or press enter when you’re happy.
There are more creative options for resizing your layer under Image > Transform, such as Warp and Perspective. You should bear in mind that enlarging a single layer has the same pixellation problems as changing the entire image size, unless your layer is a vector graphic. Other tools that could be used to change the layer size are the marquee tool, to literally select and delete areas of content, or the mask tool to hide areas.
[Images: author's own]
Related articles:

Matt has worked for various publishing houses and design agencies, covering studio photography, video production, editorial design, branding, illustration and motion graphics. He currently works for Future PLC with brands such as T3, Woman&Home, Marie Claire, Music Week, TechRadar, Golden Joysticks, Cycling Weekly, Brand Impact Awards, Horse&Hound and Tech&Learning. In the past he has designed titles including Mac|Life, IQ, Bow International, Drummer, iDrum, Acoustic, Clay Shooting, Sea Fishing and GunTradeNews. He has experience across the full Adobe Suite and is currently spending a lot of time creating projects in Blender and After Effects.
