Even a seemingly complex process like drawing a hand can be simplified, with the right drawing techniques and tricks. Using shapes and working with negative space will create a foundation for your drawing, to help you to draw better hands.
The exercise outlined in the following steps is one that you can try at home, drawing your own hand (using a mirror) or a friend's. It could just as easily be applied to a chair, a plant or anything that presents trapped shapes and negative spaces. It will help you to exercise one of the most helpful skills you can develop when making observational drawings – objectivity.
Your preconceptions of what you think a hand, chair or plant look like can stop you looking clearly at the subject in front of you. By simplifying what you see into abstract shapes, you can start to make clearer, more objective observations and learn how to draw more realistic subjects.
For the pencil drawing techniques displayed in this tutorial, I used Derwent Graphic HB pencils for the pale underdrawing, overlaid with a sharp 3B pencil. You'll also need a pencil sharpener and an eraser.
Click on the icon at the top right of the image to enlarge it.
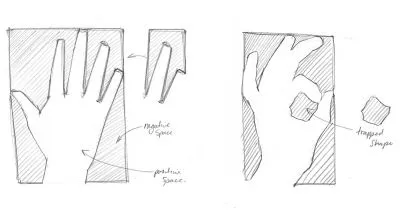
01. Sketch negative spaces

When you are simplifying a three-dimensional subject into a two-dimensional drawing, you are essentially mapping its shape on the surface of the page.
Sometimes you might find it helpful to stop focusing on the ‘positive’ shape of your subject and instead look at the shapes surrounding it – the negative spaces. Sometimes these shapes will have boundaries on all sides – this is what I mean by trapped shapes – and sometimes you’ll need to create boundaries for them.
02. Create an underdrawing

Pose your hand, or ask your model to hold a position, and start your drawing off with a loose, light, intuitive sketch in HB pencil.
Simply look and draw what you see in less than a minute, keeping your marks energetic and allowing you time to look over your subject without agonising over the specifics of proportion.
03. Set limits

Using the initial sketch as a rough guide, mark out top, bottom, left and right limits to your drawing. This will ensure you don’t lose your drawing off the edge of the page and will help you to establish a sense of scale.
04. Make a box

Use the limits to construct a box around your subject. Imagine your subject within a box – what dimension would that box be? Short and squat, or long and thin? Portrait or landscape format?
05. Carve big shapes

Now look for the big shapes that make up your hand – keep your marks rough and angular. Work as if you were carving the hand out of wood, making straight cuts to rough out the form of your subject before carving in the detail.
06. Insert negative spaces

Maintaining your simple marks, draw the triangular wedges of negative space between the fingers. Try not to draw the fingers at all – concentrate on the shapes themselves and let the rough shapes of the digits appear as you draw.
07. Erase the outline

Once you have a rough, angular drawing established on the page, in HB pencil use your eraser to lightly rub out the lines of your drawing, leaving them faintly visible to guide you as you draw.
08. Redraw the hand

Using the faint underdrawing as a guide, redraw the hand from observation in 3B pencil.

As you draw, use the negative spaces to check the proportion of your evolving drawing – do the negative spaces in your drawing look the same shape as the spaces between the fingers of the hand you are drawing?

Think of the spaces like jigsaw puzzle pieces – they should fit with the positive space to make the final, resolved image.
09. Elaborate on the lines

Refine the drawing, using a lighter, playful line to delineate the shapes within the hand and reaffirming the outline of the fingers. Think about how you might capture the tension in the hand, or suggest pressure where fingertips are pressed against surfaces.
Related articles:

