Build a portfolio with ExpressionEngine
We all need a place to show off our good work. Here, Ryan Irelan of mijingo.com talks you through the process of building a simple portfolio website using ExpressionEngine 2
This article first appeared in issue 214 of .net magazine - the world's best-selling magazine for web designers and developers.
As web workers, we need to have a portfolio that puts on display our website designs and development projects. One of the best CMSes for handling this type of content is ExpressionEngine 2. Its flexible data containers (‘channels’) and customisable input fields enable you to use it to power just about any data-driven website.
Install ExpressionEngine
To follow along with this tutorial, you’ll need a licensed copy of ExpressionEngine 2. If you don’t already have a copy, you can purchase it at the ExpressionEngine website.
EllisLab (the company behind ExpressionEngine) used to offer a free version but that is no longer the case with ExpressionEngine 2. There are several different licences available, including an inexpensive ‘Freelancer License’, which enables you to build a website (such as a portfolio) for your business.
Installing ExpressionEngine is very simple using the install wizard that comes with the application. For a guided tutorial on installing ExpressionEngine, I’ve created a free 16-minute video detailing everything you need to know on how to install ExpressionEngine.
If you’re brand new to ExpressionEngine and want to get up to speed quickly, I’ve also assembled an eight-episode series of training videos that walk you through creating an ExpressionEngine website from beginning to end. Learn more at mijingo.com.
What we'll build
Our sample site for this tutorial is Appleseed Design Studios, run by fictional designer Johnny Appleseed. The site is very basic. There are two different views: the homepage and the project view. The homepage is an overview of recent work, with a large recent project at the top and some secondary projects below.
Daily design news, reviews, how-tos and more, as picked by the editors.
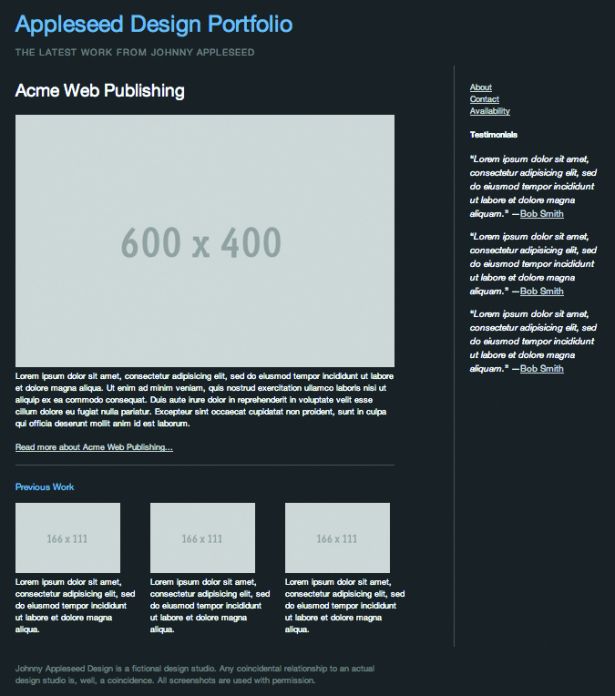
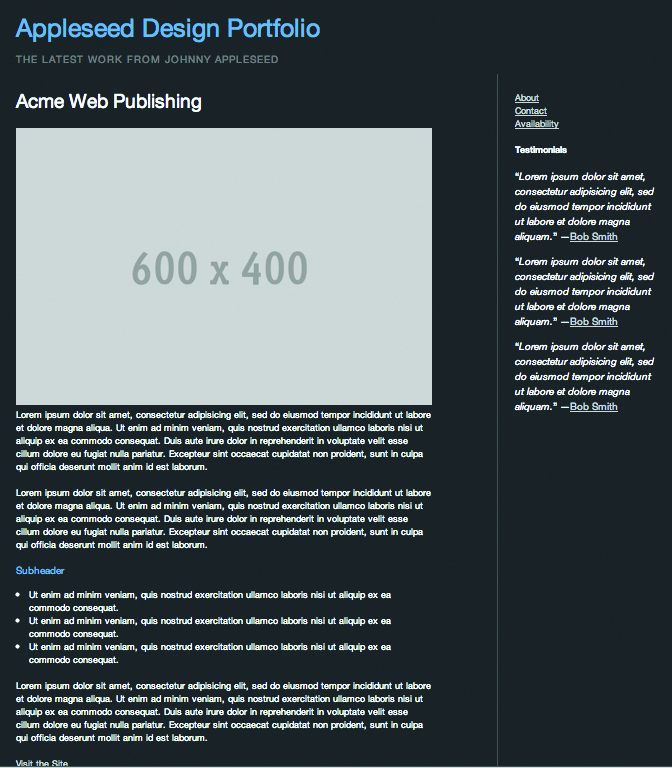
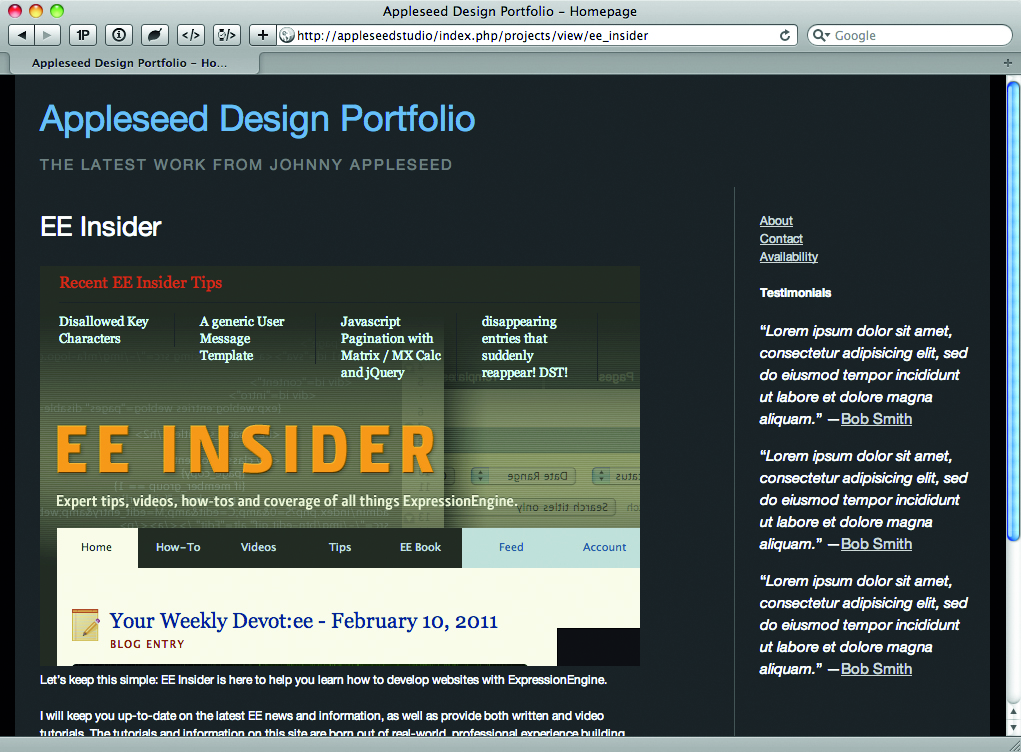
All of the projects listed lead to their own project view page. The project view page contains a large screenshot of the website and a full write-up about the project, its challenges and goals. On the right-hand side of all pages is a small navigation leading to some secondary pages and client testimonials.
Content channels
The first step in every ExpressionEngine site build is to create the channels to hold our content. Our website will have two channels to start with (we can always add more later as we enhance the site): projects and testimonials.
In the ExpressionEngine control panel, select the Admin button at the very top, hover over Channel Administration and then choose Channel Management. If you have a fresh install of ExpressionEngine 2, you shouldn’t see any channels listed. Click the grey Create New Channel button at the top right. We want our Full Channel Name to be Projects and the Channel Name set as projects. The lower-case name we’ll use in our templates when displaying the project entries using the Channel Entries tag pair.
Click Submit to create the channel. There is one more channel we need to create for the testimonials that are listed on the sidebar of the site. The process is the same as before; call the Full Channel Name Testimonials and the Channel Name testimonials.
With that done, you should now have two channels listed on the Channel Management page. One last thing to do: under Channel Management, choose Channel Preferences for each channel. Open the Channel Posting Preferences section and toggle Automatically turn URLs and email addresses into links? to No. This setting prevents ExpressionEngine from trying to create hyperlinks with URLs in our custom fields. Now we’re ready to create the custom fields that we’ll use to populate our channels with content.
Publish forms
Publish forms in ExpressionEngine are made up of custom fields. These fields are what we use to enter the content for each our channel entries. Custom fields are bundled together into groups and a custom field group is assigned to a channel.
Select the Admin button again, hover over Channel Administration and then choose Custom Fields. Before we can create any custom fields we need to first create a custom field group. Click the grey button at the top right to create a new field group. The first field group we want to create is for the Projects channel. I like to keep my channel names and field group names the same, so it’s easy to know which channel belongs to which field group. Name the field group Projects and click Submit to create it.
Let’s take a look again at the site design to determine what kind of data we need to input for a project. Looking at the view.html template, we see that we need a title, a large image, some description text that explains what the project was and our work on it and, finally, a URL of the live website so we can link up the Visit the Site text. On our homepage we also need to display a shorter description text, so we’ll need a field for that. That's a total of five fields but we only have to create four because every channel entry in ExpressionEngine requires a title, so we get that field automatically.
Upload destination
The first field we want to create is for the large screenshot image. Before we can create the custom field, however, we have to create an upload destination – a place where the images are uploaded to – for the screenshots. Click on the Content button at the top of the control panel and choose File Manager. On the right, under File Tools, choose Create New Upload Destination. Fill out the form, providing a descriptive name, valid server path (you can use the /images/uploads directory that already exists) and URL. The directory in which you want to save the images must already exist, so be sure to create it on your server first.
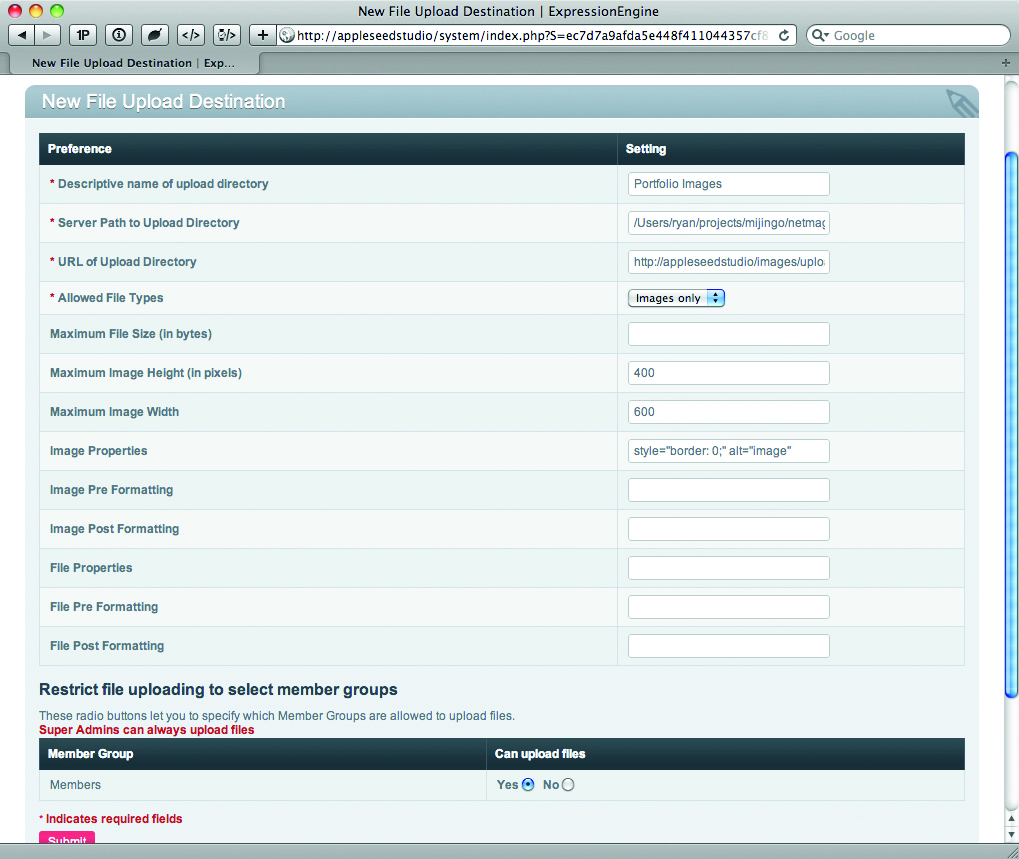
We want to set a few more preferences, including only allowing images and setting the Maximum Image Height to 400 and the Maximum Image Width to 600. With that set, click Submit to create the new file upload destination. Now we can get back to creating our custom fields.
Click Add/Edit Custom Fields to access the Projects field group. Click on Create a New Custom Field at the top right and you should see a form. There are several settings for each field. We’ll walk through this one together and then you’ll do the others on your own.
Custom fields in ExpressionEngine can be different field types. There are common field types such as input fields and textareas but you can even have a relationship field or file field for uploading files or images. In fact, for our project image we want to use the File field type. Select it from the list.
The field label is the form label that appears next to the field in the publish form. We want this name to be as clear as possible. Let’s use the label Project Image. The field name is how we’ll reference this field in our templates; this has to be a single word but can contain an underscore or dash. I prefer to namespace my fields by using a prefix with the name of the channel. This makes it easier to remember which fields belong to which channels. Input project_image for the field name.
For the field instructions, briefly describe what should be entered into this field. Every project has to have an image, so we want to set the field as required. We can leave the Field Display order set to 1 so the field will display first, after the title field.
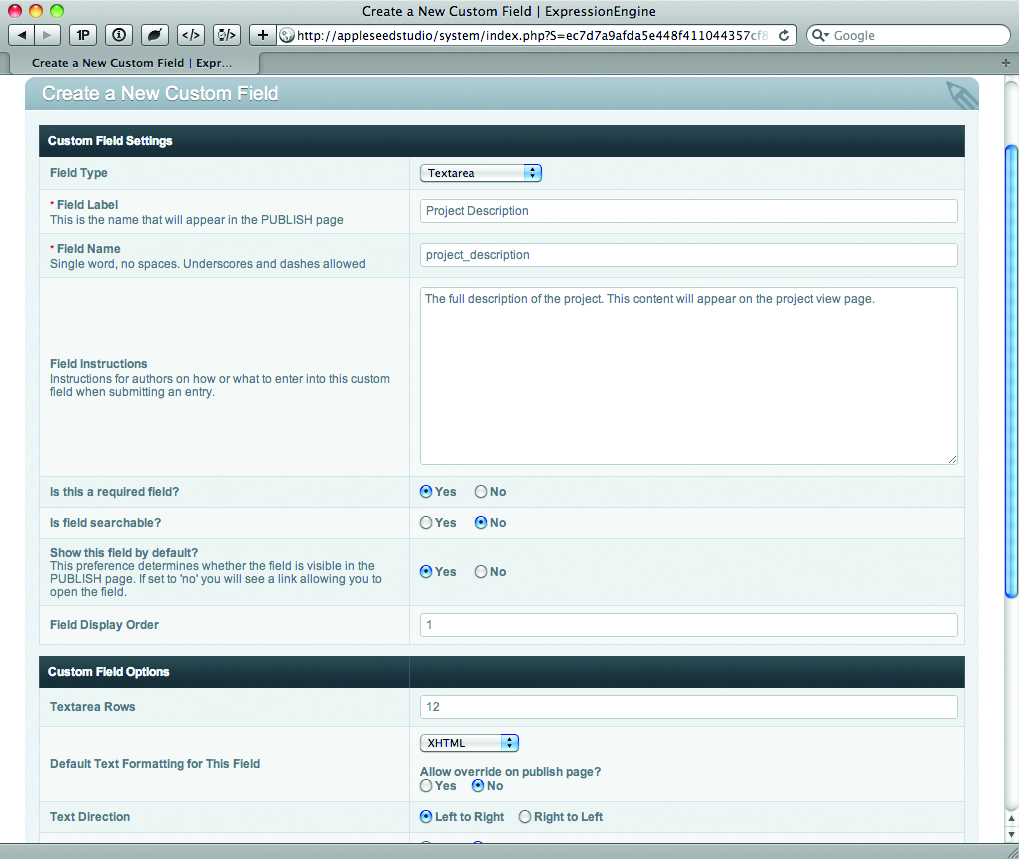
There’s one more setting at the bottom under the Custom Field Options area. When using the File field, we have some control over the type of file that is allowed to be uploaded. The two settings are Any and Image. We want to restrict this field to only images, so we’ll choose Image. Press Submit to save the field. We still have to create the project description field, project snapshot field (for use in the Previous Work area of the homepage) and the website URL field. Here are some suggestions.
- Project DescriptionField Type: TextareaField Label: Project DescriptionField Name: project_descriptionRequired: YesTextarea Rows: 12
- Project SnapshotField Type: TextareaField Label: Project SnapshotField Name: project_snapshotRequired: YesTextarea Rows: 3
- Project Website URLField Type: Input FieldField Label: Project URLField Name: project_urlRequired: NoDefault Text Formatting: None
To use a custom field group it must be assigned to a Channel. Go to the Admin button, hover over Channel Administration and choose Channels. Next to the Projects channel, click on Edit Group Assignments. For the Field Group option, choose Projects and then click Update to complete the assignment. Now, if you choose the Content button, hover over Publish and choose Projects you should be able to see the publish form for our Projects channel. On your own, create the custom field group and custom fields for the Testimonials channel. We’ll use the Title field that ExpressionEngine automatically creates to store the name of the person giving the testimonial. We still need a field to hold the actual testimonial and one to hold a URL to the person who gave that testimonial.
Here are some suggestions for the other fields:
- Testimonial CopyField Type: TextareaField Label: Testimonial CopyField Name: testimonial_copyRequired: YesTextarea Rows: 6Formatting: None
- Testimonial URLField Type: Input FieldField Label: Testimonial URLField Name: testimonial_urlRequired: YesDefault Text Formatting: None
Using the Publish Form, go ahead and add four projects entries and a handful of testimonials to your site. We’ll need these entries in the next section when we start working on our templates.
Templates
Before we can start bringing our site to life, we need to first create the templates. Click on the Design button at the top and then choose Template Manager under Templates.
Before we can create templates we need to first create a template group to house them. When possible I like to keep my template groups organised by channel. The first template group we need is for projects. Click on the New Group button to create a new template group. In keeping with our naming convention, we’ll name this template group Projects. Leave the rest of the form as-is and then click Submit to create the group. You should see the group selected and a template called index. ExpressionEngine automatically creates an index template for every template group. Even if we don’t use it, which we won’t for this tutorial, the template is required and cannot be deleted.
We also want to create a template group called Site. When creating this group we want to make sure we check the option to make the index template the site’s homepage. You should now have two template groups: Projects and Site. We need to create one template inside of Projects called view. This template will be what ExpressionEngine will use to show the individual project pages. The index template in the Site group will be our homepage.
With our setup complete we’re now ready to bring our site to life. To get started you’ll need to have the static templates (index.html and view.html) for this article at hand. Also, make sure you’ve uploaded the css directory containing the site CSS to your server.
Let’s start with the homepage. Copy the contents of the index.html into the index template in the site group. Load the site homepage in your web browser and you should see the static template. We’ll start with the large project at the top of the page. Find the div with the id of featured-site. The featured site is just the latest entry in our Project channel. We want to wrap a Channel Entries tag pair around everything inside of that div. Our code will look like this:
<div id="featured-site">{exp:channel:entries channel="projects" limit="1" dynamic="no"}<h3>{title}</h3><a href="{title_permalink='projects/view'}"><img src="{project_image}"alt="{title}" /></a>{project_description}<p><a href="{title_permalink='projects/view'}">Read more about{title}...</a></p>{/exp:channel:entries}</div>Next we want to light up the Previous Work area, which holds the three previous projects. We need to make sure we don’t include the project that’s at the top of the page. To do that we’ll use the offset parameter, which enables us to skip a set number of entries before displaying the ones we want.
Look at the static HTML: you’ll notice the last list item has a class of last. This is so the three-column layout will render properly. We only use one instance of the list item markup in our template because EE loops through and prints it out for each entry. To add the class to the last list item, we need a conditional to check the count of the current entry and the total results. We’ll compare them and if they match, we know it’s the last result. Our code should look like this:
<div id="previous-work"><h4>Previous Work</h4><ul>{exp:channel:entrieschannel="projects" limit="3" offset="1"dynamic="no"}<li{if count == total_results} class="last"{/if}><a href="{title_permalink='projects/view'}"><img src="{project_image}" /></a><p>{project_teaser}</p></li>{/exp:channel:entries}</ul></div>Before we move to the project’s view template, let’s first light up the testimonials in the sidebar. The testimonials are marked up as a simple unordered list, so we need to wrap a single list item in our Channel Entries tag pair and pull in the last three testimonials. We have to use the dynamic="no" parameter so ExpressionEngine will display the entries regardless of the URL.
{exp:channel:entries channel="testimonials" limit="3" dynamic="no"}<ul id="testimonials"><li>“<em>{testimonial_copy}</em>” —<ahref="{testimonial_url}">{title}</a></li></ul>{/exp:channel:entries} 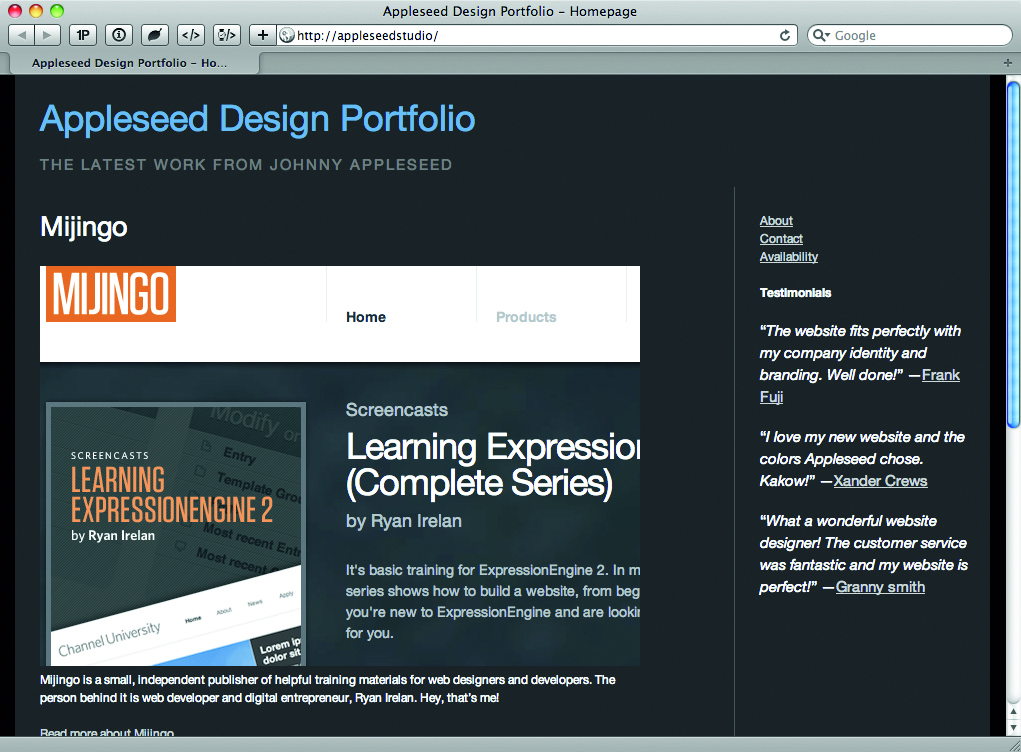
With that done we can now turn our attention to the project view template, which is located in our projects template group. Open up the static template view.html and copy the contents into the view template in ExpressionEngine.
We only need to add one bit of code to the view template to make it display the portfolio entry we clicked on from the homepage. ExpressionEngine will display the entry based on the URL so we can use this one template for every entry in our Project channel. The code for the main section of our page (inside the portfolio-site div) will look like this:
<div id="portfolio-site">{exp:channel:entries channel="projects" limit="1"}<h3>{title}</h3><a href="{project_url}"><img src="{project_image}" alt="{title}" /></a>{project_description}<p><a href="{project_url}">Visit the Site</a></p>{/exp:channel:entries}</div>If you click on a project from the homepage of the site, it should load the view page for that project.
We have our basic portfolio site done but there are still some refinements you can do on your own. The three pages in the site navigation on the right side still need to be created. My suggestion is that you use the Pages module in ExpressionEngine to create those pages.
You also might want to break up your templates into reusable parts. The sidebar, the markup inside of the head tag and the footer are all reused on every page of the site. Create an embed template (expressionengine.com/user_guide/templates/embedding_templates.html) for each piece of the template so you only have to edit that markup once.
Portfolio site examples
To inspire you and demonstrate what can be done with ExpressionEngine, let’s take a look at some examples of portfolio sites built on ExpressionEngine 2.
First is Philip Zaengle’s site for his freelance business (www.philipzaengle.com). He’s using a similar Recent Work area on the homepage to highlight his latest projects. Hover over each image to access more information about a project and click on View the Project to go to the project view page. To the right, on the project view page, Phillip details the technology and tasks involved in building the site.

Another excellent example of a portfolio site running ExpressionEngine 2 is Stookstudio, a Belgium-based web design and development studio run by Erwin Heiser. Navigate to the Work section of his website and you’ll see a portfolio of his work in the form of case studies. Each case study consists of a short description of the work involved and a series of screenshots.
For more examples of portfolio sites (and other websites) built with ExpressionEngine, visit the official showcase site Show-EE. Do you have something to share yourself? Submit it to Show-EE.

The Creative Bloq team is made up of a group of art and design enthusiasts, and has changed and evolved since Creative Bloq began back in 2012. The current website team consists of eight full-time members of staff: Editor Georgia Coggan, Deputy Editor Rosie Hilder, Ecommerce Editor Beren Neale, Senior News Editor Daniel Piper, Editor, Digital Art and 3D Ian Dean, Tech Reviews Editor Erlingur Einarsson, Ecommerce Writer Beth Nicholls and Staff Writer Natalie Fear, as well as a roster of freelancers from around the world. The ImagineFX magazine team also pitch in, ensuring that content from leading digital art publication ImagineFX is represented on Creative Bloq.
