Master version control with Git
With Git creeping ahead as the version control software of choice, now’s the time to get to grips with it. Github’s Scott Chacon explains how
Daily design news, reviews, how-tos and more, as picked by the editors.
You are now subscribed
Your newsletter sign-up was successful
Want to add more newsletters?

Five times a week
CreativeBloq
Your daily dose of creative inspiration: unmissable art, design and tech news, reviews, expert commentary and buying advice.

Once a week
By Design
The design newsletter from Creative Bloq, bringing you the latest news and inspiration from the worlds of graphic design, branding, typography and more.

Once a week
State of the Art
Our digital art newsletter is your go-to source for the latest news, trends, and inspiration from the worlds of art, illustration, 3D modelling, game design, animation, and beyond.

Seasonal (around events)
Brand Impact Awards
Make an impression. Sign up to learn more about this prestigious award scheme, which celebrates the best of branding.
This article first appeared in issue 215 of .net magazine - the world's best-selling magazine for web designers and developers.
Git is an open source, distributed version control system that’s used to manage projects such as the Linux kernel, Android, the Ruby on Rails framework and hundreds of thousands of other open source and proprietary set-ups, large and small.
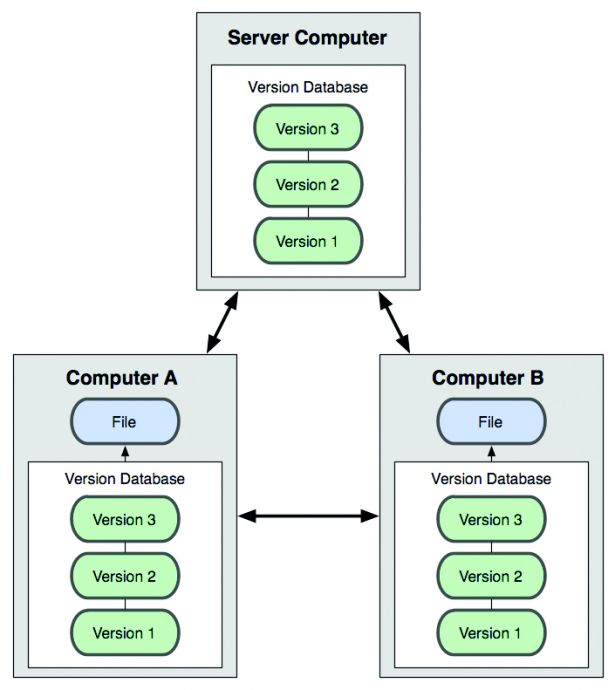
So what makes it so special? Why not just use, or keep using, Subversion? The answer is that Git is a distributed version control system, which means that when you get a copy to work on (called a ‘clone’ in Git), you get a full copy of the whole database on the server. This means that there’s no single point of failure for your version control system. If the disk on the server crashes, everyone working on the project has a complete backup.
This also means that everything you do – from creating commits to computing differences and looking through the history – can be done entirely offline. Running commands without having to contact the server means that everything is also lightning fast, since you don’t have to access anything over the network. You simply do all of your work offline, then synchronise the databases when you happen to come back online.
The fact that it’s a distributed system also means that there really is no fundamental difference between a client and a server. Git just knows about other Git repositories that are of the same project.
You can tell it about any other Git repository, whether it’s another repository on a shared disk or the URL of one on some other server on the internet. Git can know about several of them, and you can push to, or pull from, any of them if you have the right permissions.
Finally, it opens up a few more interesting workflows than centralised systems. Instead of being limited to everyone trying to commit to the same central repository, each user can have their own writeable server and read-only access to everyone else’s repo. This enables you to do interesting hierarchical models of software collaboration.
Daily design news, reviews, how-tos and more, as picked by the editors.
Graphical Git
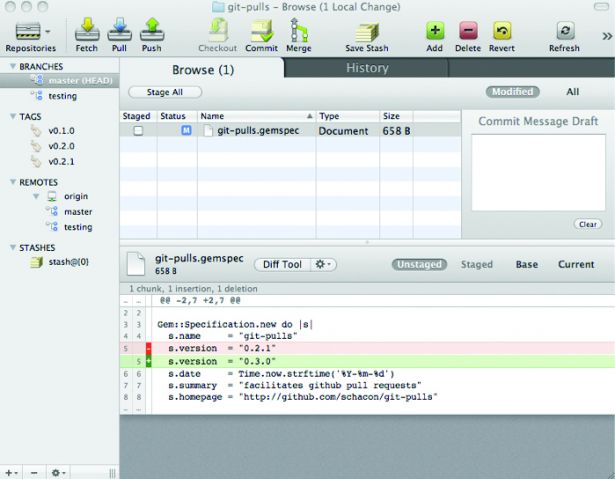
This tutorial focuses on command line usage of Git, but what about GUIs and IDE integration? Git has a lot of those too, but the concepts are the same as on the command line. Learn how to use Git on the command line and it should be pretty easy to transition to any of the graphical Git clients. Here are a few of the current ones, if you’re into that sort of thing:
Cross-platform
For tools that work in the same way on every system, check out Git-GUI or SmartGit. Git-GUI is a powerful and free Tcl/Tk program that ships with Git itself, and should be included in your installation. SmartGit is probably a nicer interface but isn’t free, starting at £43 ($69) for one user.
IDE integration
If an IDE is more your style, there are a number of integrations and plug-ins available for most of the big tools. For Eclipse, there’s the EGit team provider. It’s made some huge progress recently, so even if you’ve tried it before, be sure to check out versions 0.11 and above. IntelliJ has been shipping with Git integration with its editors (IDEA, RubyMine, etc) for some time, and can do tons of advanced stuff nicely.
Mac OS X
For the Mac, there’s Gitbox, which has a simple push-and-pull interface. It’s free for three repositories, then £24 ($39) for the full version. A more fully featured solution is Tower, which is new but becoming fairly widely used. It has a free trial and then is £39.95 ($59). Finally, there’s GitX, which is open source and also popular and fully featured; find the brotherbard fork on GitHub for the most up-to-date version.
Windows
For Windows, you’ll have two choices for Git versions: msysgit, which is a MinGW port, and cygwin. I highly recommend the former, and that’s what you’ll get if you click on the Windows icon on git-scm.com. For a shell extension, try Git Extensions rather than TortoiseGit. It works well and even comes with a basic Visual Studio plug-in.
Command line control
Version control is often thought of as a necessary annoyance, but in reality it’s an important and powerful aid that you should think of as you would a good editor or any other power tool. It may take a while to learn how to use it, but the time it will save you is worth the investment. This article will introduce the Git version control system, which is quickly replacing software such as Subversion and Perforce in the open source and corporate environments. We’ll walk through all the commands you need to know to get up and running with Git on the command line.
Installation and initialisation
So, let’s start playing with Git. The first thing we need to do is install it. Just go to git-scm.com and click the appropriate icon to download an installer. It should be fairly easy and straightforward. The first thing we’re going to want to do is set up your user credentials. You only have to do this once per machine you’ll be working with Git on, but since Git writes commit data locally first, you have to tell Git who you are. Do this by running the git config command to tell Git your name and email address:
$ git config --global user.name "My Name" $ git config --global user.email my@email.comOnce this is set, when you start committing, Git knows who you are. Now let’s initialise a repository. To walk through the tutorial with me, get a copy of the sample source code above.
Now we’ll walk through adding this project to Git and making some commits. The first thing you should do after you open the archive you’ve downloaded is to initialise the directory as a Git repository. The command for this is git init. You can run this in any directory and instantly make it into a Git repository. Once that’s done, add content with git add [file]. Finally, commit the snapshot of content with git commit:
$ git init Initialized empty Git repository in /opt/sample/.git/ $ git add * $ git commit -m 'initial import' [master (root-commit) 0180689] initial import2 files changed, 6 insertions(+), 0 deletions(-) create mode 100644 stats.rb create mode 100644 stopwords.txt 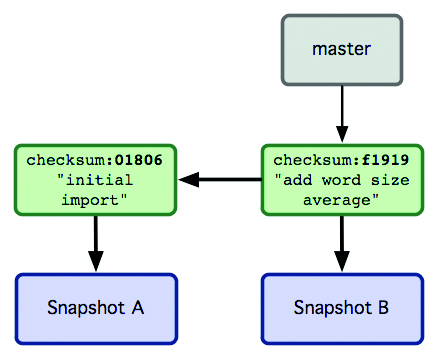
Basic project snapshotting
At this point, a single snapshot of our project is committed. Let’s change something in our code and see how to create a second snapshot. If you run the stats.rb ruby script, you should get output like this:
$ ruby stats.rb Number of words: 119We’ll add code that gives us the average word size and commit that change as a new snapshot. If we modify the file to add that functionality, Git gives us a few tools to see what’s happening in our project. The first interesting command is git status. If we run that after we’ve modified our file, Git will tell us that our file has changed on disk from our last commit. I like using the -s flag, which tells Git to give us shorter output:
$ git status -s M stats.rbIf we actually run the script, we can see that the change we’ve made works. We can now see the average word size from our sample file:
$ ruby stats.rb Number of words: 119 Average word size: 3.64705882352941Now we want to commit this change. We need to run git add again on the content we want to bring in to our next commit. Unlike in Subversion, git add isn’t just to add new files to the repository, it’s also used to add content in the working directory to the next snapshot, so you have to run it on a file every time the contents change. The “add” means “add this to our next commit”. So run it again and then run git commit to record the new snapshot of content:
$ git add stats.rb $ git commit -m 'add word size average' [master f1919f0] add word size average1 files changed, 3 insertions(+), 0 deletions(-)Branching and merging
One of the great advantages Git has over most version control systems people are used to is that it has amazingly easy branching and merging tools. It’s so simple to merge branches together, even over and over again, that many developers who use Git will create a branch for every ticket, story or topic they’re working on. You can have dozens of active branches at a time and merge them together at will.
Let’s say you want to add a new feature to this project – a count of how many of the words in the file start with a vowel.
Create a branch for the feature, work on the feature in that branch, then merge it into the ‘master’ branch.
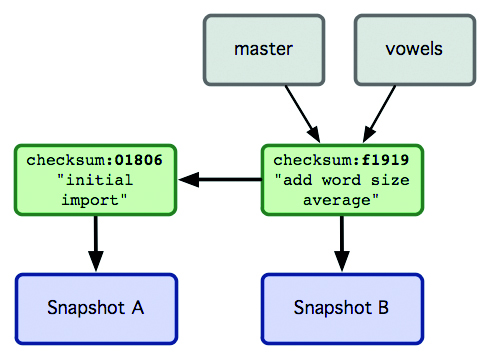
When you start a project with git init, it gives you an initial branch to work on called master.
This isn’t really any different to any other branch, except that the init process creates it by default, so most Git projects keep it as their main branch. We’ve been working while on this branch, so both of the commits are now on it.
We can see what branches we have by running git branch with no other arguments:
$ git branch * masterThe star means that we’re currently on that branch. Now let’s create a new branch to work on, called ‘vowels’. You can do that by running git branch vowels.
Now we can switch to that branch by running git checkout vowels. Notice that the checkout command here is very different to the one in Subversion. It essentially means ‘switch to this branch’.
$ git branch vowels$ git checkout vowelsSwitched to branch 'vowels'$ git branchmaster* vowelsSo we’re now on the vowels branch. Any work we do on this is going to be kept in the context of this branch; it won’t affect where we left the master branch context.
We’re now free to do whatever we want without worrying about messing up any other work.
Also notice that branching and switching is done in a single directory. All of your branches will live in one directory; there’s no need to have one copy of the project per branch. This makes creating and switching between branches lightweight and fast, so you’re likely to do it more often.
Now we add the feature and commit it while in our new vowels branch:
$ (edit edit edit) $ ruby stats.rb Number of words: 119 Average word size: 3.64705882352941 Words that start with a vowel: 37$ git status -sM stats.rb$ git commit -a -m 'add count of vowel-started words'[vowels 063c8da] add count of vowel-started words1 files changed, 4 insertions(+), 0 deletions(-)Notice that we didn’t have to run git add because I used the git commit -a option. This is a shortcut that simply runs git add on all our modified files automatically.
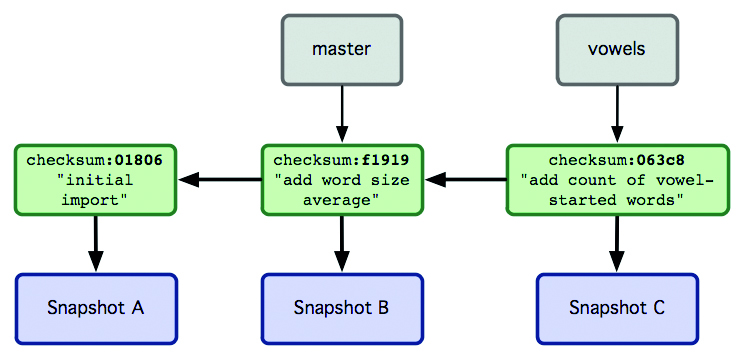
Now, if we switch back and forth between our branches, the files are changed to match what the snapshot of the last commit was on each branch. We can see the functionality of our script revert when we switch back to the master branch:
$ git checkout master Switched to branch 'master' $ ruby stats.rb Number of words: 119 Average word size: 3.64705882352941Now we can merge that work into our master branch, with the git merge command:
$ git merge vowels Updating f1919f0..063c8da Fast-forwardstats.rb | 4 ++++1 files changed, 4 insertions(+), 0 deletions(-) $ ruby stats.rb Number of words: 119 Average word size: 3.64705882352941Words that start with a vowel: 37We’ve now merged the work of our topic branch into our main branch.
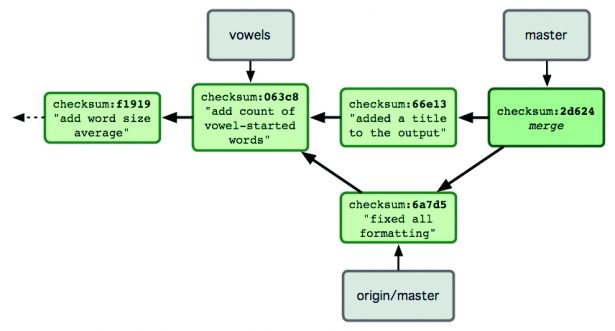
Sharing your project
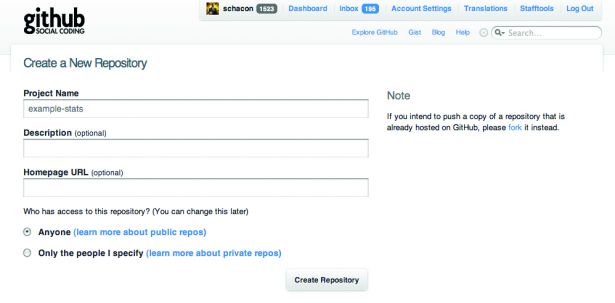
Now that we have this amazing project, you’ll want to share it with the world. To share our project, we simply have to create a repository on another server, add it as a remote and then push to it.
Create a GitHub user account if you don’t have one, then make a new repository. You can now add that repository as a remote to your project, using git remote add [alias] [url], and push your branch up with git push [alias] [branch]:
$ git remote add origin https://github.com/schacon/example-stats.git$ git push origin masterTo https://github.com/schacon/example-stats.git* [new branch] master -> masterNow everything in the master branch is online, and we can point people to the project so that they can download it and work on it themselves.
Collaborating on a Git project
Let’s say you want to collaborate with someone else on this project. If you give them the URL of the project and add them as a collaborator, which gives them commit access to it, then they can clone it, work on it and push it back.
To get a copy of a project from a URL, run git clone [url]:
$ git clone https://github.com/schacon/example-stats.gitCloning into example-stats...$ cd example-stats/$ lsstats.rb stopwords.txtNow we can work on the project and commit locally, then run a git push command when we’re ready to share all the work by pushing it back up to the server. Add a title to the output of the script and push it back up:
$ (edit edit edit) $ git commit -am 'added a title to the output' [master f3cd591] added a title to the output1 files changed, 3 insertions(+), 0 deletions(-) $ git push origin masterTo https://github.com/schacon/example-stats.git! [rejected] HEAD -> master (non-fast-forward)Oops – our push got rejected. This happens when someone else we’re working with has pushed in the meantime. Git won’t do server-side merges as Subversion will, so if anyone else pushes anything since you last pushed or cloned, Git makes you merge it locally before you can push again. We can do that with the git pull command. This will run a git fetch, which pulls down all the work on the server that we don’t have yet, and then run a git merge to combine that work with our own:
$ git pull origin master From https://github.com/schacon/example-stats* branch master -> FETCH_HEADAuto-merging stats.rbstats.rb | 2 +-1 files changed, 1 insertions(+), 1 deletions(-)It’s now merged in the work on the server, so we can try pushing again:
$ git push origin master To https://github.com/schacon/example-stats.gitfba990e..c91f0b8 master -> masterNow the work is on the server so other people can see it.
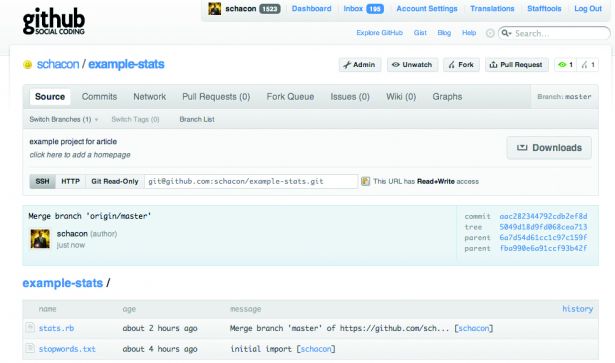
Those are some of the basics of getting started with Git. To learn more, see
gitref.org or read Pro Git online at progit.org.

The Creative Bloq team is made up of a group of art and design enthusiasts, and has changed and evolved since Creative Bloq began back in 2012. The current website team consists of eight full-time members of staff: Editor Georgia Coggan, Deputy Editor Rosie Hilder, Ecommerce Editor Beren Neale, Senior News Editor Daniel Piper, Editor, Digital Art and 3D Ian Dean, Tech Reviews Editor Erlingur Einarsson, Ecommerce Writer Beth Nicholls and Staff Writer Natalie Fear, as well as a roster of freelancers from around the world. The ImagineFX magazine team also pitch in, ensuring that content from leading digital art publication ImagineFX is represented on Creative Bloq.
