Create a stylised HDR portrait with Photoshop
Give your portraits an eye-catching stylised finish using the HDR Toning command in Photoshop CS6 - we show you how, in just three easy steps!
Sign up to Creative Bloq's daily newsletter, which brings you the latest news and inspiration from the worlds of art, design and technology.
You are now subscribed
Your newsletter sign-up was successful
Want to add more newsletters?

Five times a week
CreativeBloq
Sign up to Creative Bloq's daily newsletter, which brings you the latest news and inspiration from the worlds of art, design and technology.

Once a week
By Design
Sign up to Creative Bloq's daily newsletter, which brings you the latest news and inspiration from the worlds of art, design and technology.

Once a week
State of the Art
Sign up to Creative Bloq's daily newsletter, which brings you the latest news and inspiration from the worlds of art, design and technology.

Seasonal (around events)
Brand Impact Awards
Sign up to Creative Bloq's daily newsletter, which brings you the latest news and inspiration from the worlds of art, design and technology.
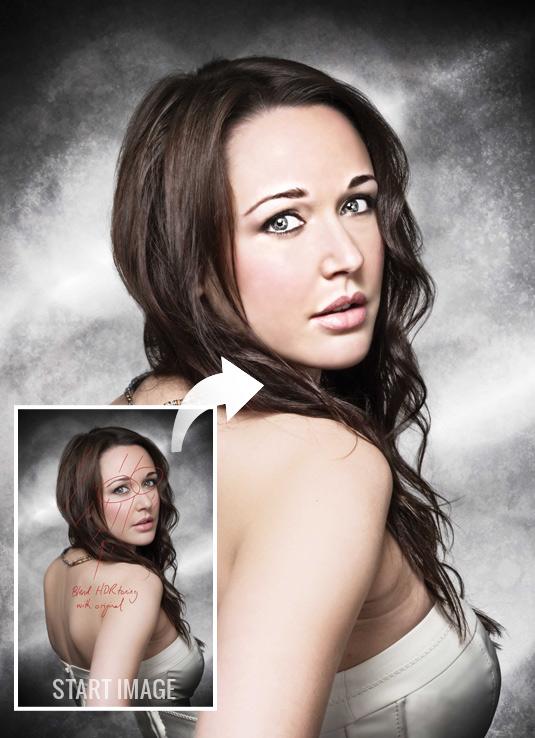
The HDR Toning command in Photoshop CS6 can be used to give an image a stylised HDR effect. You’d be forgiven for thinking it should only be used on landscapes, but in fact it can also give portraits an eye-catching stylised finish.
- You'll need Photoshop CS5 or higher for this tutorial.
The HDR Toning command will only work on a flattened document, but for greater flexibility we’d like the effect on its own layer, with the original image underneath. So we need to work around the problem by making a duplicate document.
We’ll show you how here. The effect will tease out detail in the shadow areas, so once it’s applied, you may find that you need to use other retouching techniques such as spot removal and skin smoothing to perfect the look.
Now just follow these three simple steps to create a stylised portrait using HDR Toning...
Click here to download your start image
01. Make a new document
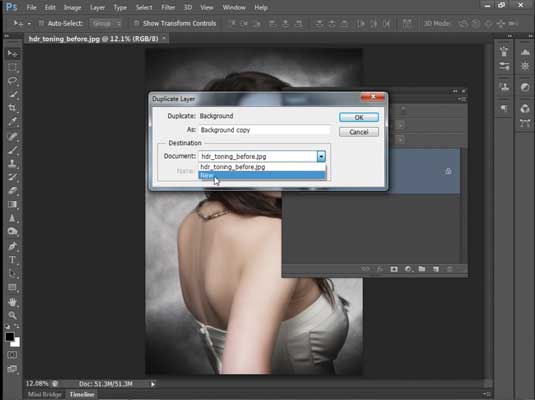
Open your start image, then go to the Layers Panel. Right-click the Background Layer and choose Duplicate Layer.
In the Duplicate Layer Dialog Box, choose Destination New and hit OK. Make sure that you’re working on the new untitled document, then go to Image>Adjustments>HDR Toning.
02. Apply HDR effects
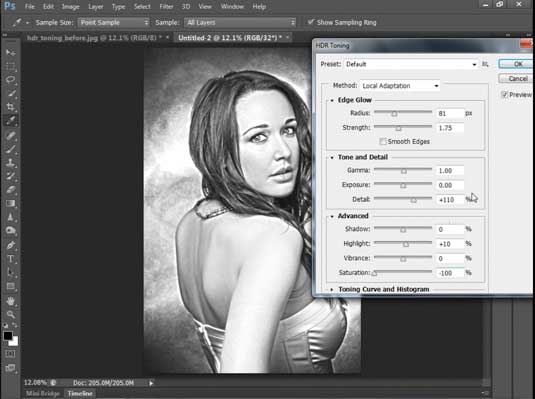
In the HDR Toning box, set Radius 81px, Strength 1.75, Detail 110%, Highlight +10%, Saturation -100%, then hit OK. Next right-click the layer in the Layers Panel and choose Duplicate Layer again. This time, set Destination: ‘hdr_toning_before.jpg’ and hit OK. Go to the ‘hdr_toning’ image.
Sign up to Creative Bloq's daily newsletter, which brings you the latest news and inspiration from the worlds of art, design and technology.
03. Blend with the original
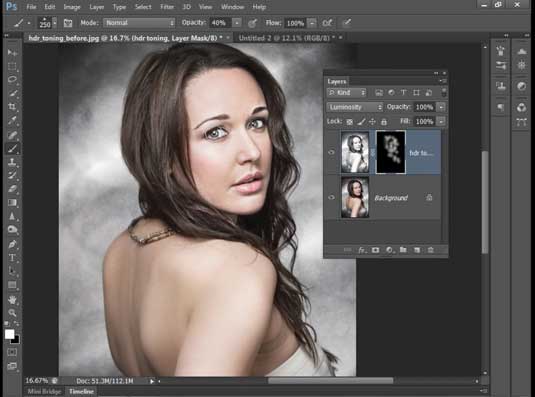
Go to the Layers Panel and change the Blend Mode of the top layer to Luminosity. Next, hold down Alt and click the Add Layer Mask icon at the bottom of the panel. Grab the Brush tool and paint with white at 40% Opacity to gradually reveal the stylised effect over the face.
Get Practical Photoshop magazine!
This tutorial first appeared in Practical Photoshop magazine, the number one magazine for lovers of photography and image-editing. Whether you're looking for digital darkroom tips, or want to get creative, you should definitely check it out!
Now check out our massive list of 101 Photoshop tutorials!

The Creative Bloq team is made up of a group of art and design enthusiasts, and has changed and evolved since Creative Bloq began back in 2012. The current website team consists of eight full-time members of staff: Editor Georgia Coggan, Deputy Editor Rosie Hilder, Ecommerce Editor Beren Neale, Senior News Editor Daniel Piper, Editor, Digital Art and 3D Ian Dean, Tech Reviews Editor Erlingur Einarsson, Ecommerce Writer Beth Nicholls and Staff Writer Natalie Fear, as well as a roster of freelancers from around the world. The ImagineFX magazine team also pitch in, ensuring that content from leading digital art publication ImagineFX is represented on Creative Bloq.
