How to organize your desktop
Nathan Segal guides you through the challenge of desktop clutter with the help of two pieces of software.
If you have had your computer for a while, you have probably installed many programs. If you've chosen the default installation the program added a shortcut icon to your desktop. Eventually, if you have many programs, that can become unwieldy and interfere with your ability to find important programs. In this article we look at two solutions to the desktop clutter, Nimi Places and Stardock Fences.
Nimi Places
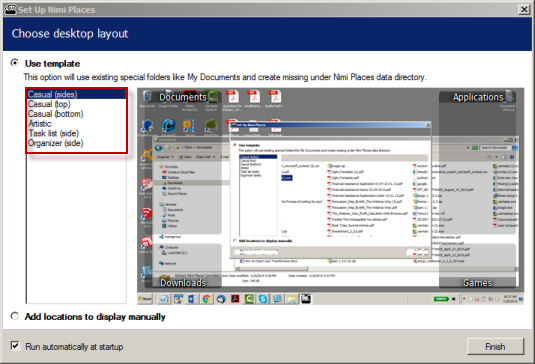
When you install Nimi Places you see the screen above. At top-left, is the radio button 'Use Template' which is set by default.
Directly under that are your layout options which are Casual (sides), Casual (top), Casual (bottom), Artistic, Task List (side), and Organizer (side).
At the bottom of this screen shot, you have the option 'Add Locations to display manually'. Directly below that is the header 'Run automatically at startup'. It is enabled by default.
Once you have decided on a layout, click the Finish Button at bottom-right to accept. I chose the Casual (sides) layout.
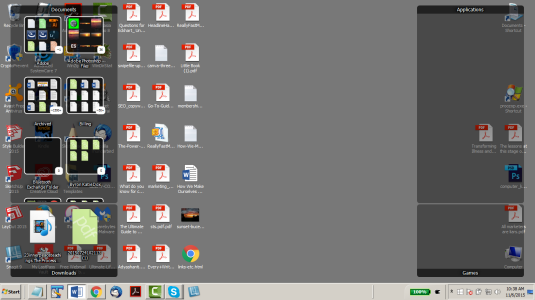
The layout appears on your screen, pre-populated with popular documents and Favorites. To organize your desktop, simply drag the icons into the appropriate folder.
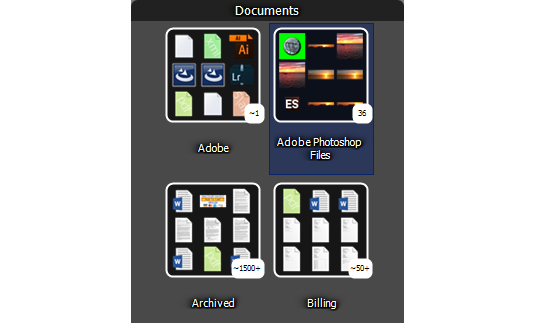
Here is an example of one of these containers.
Daily design news, reviews, how-tos and more, as picked by the editors.
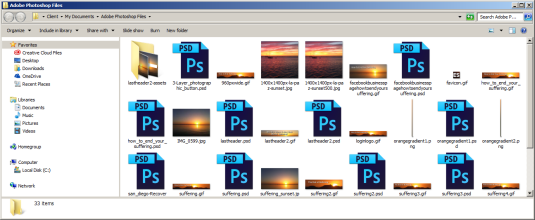
Clicking on any icon within a container will open a window which contains all the relevant files. Above is an example of the Adobe Photoshop Files section on my laptop.
If a container is too large for your desktop, click at the edge of the top, sides or bottom. Sizing arrows will appear and you can change the shape of the container. If you want to move the entire container, click on the header and a cursor with a four-pointed arrow will appear and you can move it.

If you want to change the container name, double-click on the header and the Rename Container dialog box will appear. Enter the new name and click on Apply.
Note: You won't find instructions on your computer. Those are available on the Nimi Places website. One annoying thing about the instructions is they are text only for the most part with no accompanying screen shot. There is also a Help section (essentially one long scrolling page), again without screen shots. Another section contains screen shots of various program options.
To control the various containers, right-click within a container or on the title.

If you click within the container, you will see the menu above. The arrows to the right bring up additional menu options.
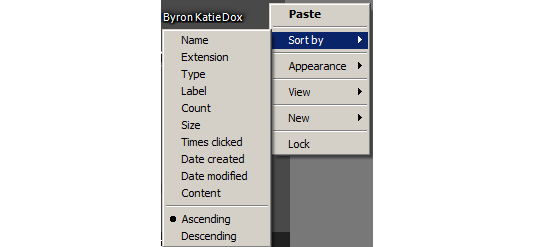
An example is the Sort by. When you click on that heading it brings up multiple options. And this is only the beginning. There are many more options, more than we can list here.

In addition to the inner container controls, there are controls for the header. As you can see, the main thing to be aware of is the ability to rename the container. Another way to do so is to double-click on the container name as mentioned earlier.
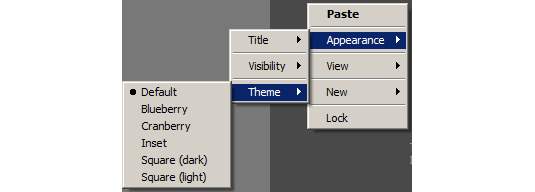
When we began this article we chose a default layout. If you want to change the look and feel of an individual container, right click in the container, then choose Appearance: Theme. This will bring up a list of theme options with the one you've selected. To change the look and feel, click on a different name.
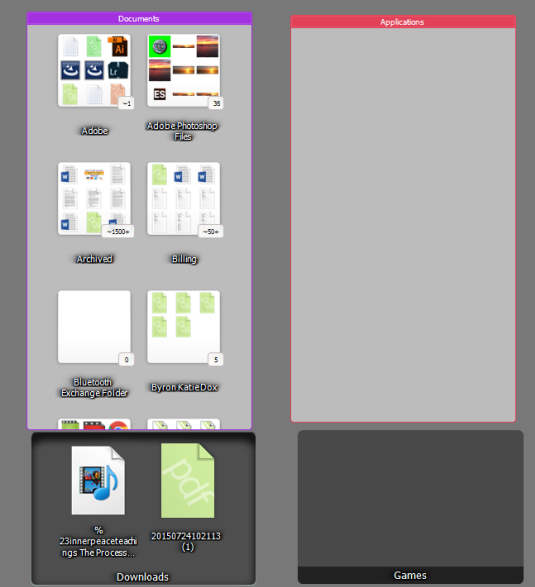
Here's what the desktop looks like with some different options. And there's a lot more you can do, with container size, icon size, visibility, and more.
If you need to uninstall the software, you won't be able to do it in the usual way. To make sure the software uninstalls properly, follow these instructions.
Stardock Fences
Next, we look at Stardock Fences. Unlike Nimi Places, Fences is a commercial program which retails for $9.99 and comes with a 30-day free trial.
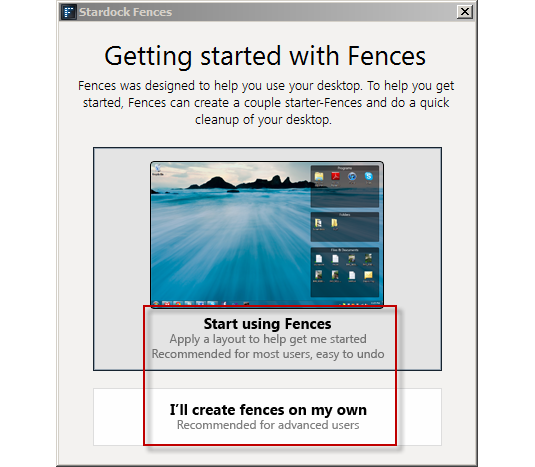
When you launch Fences, you see the dialog box above, which allows you to start using Fences or to create your own layout. I chose the default option. The program will ask you for a valid email address and will send you a message which you must verify before you can start using the software.
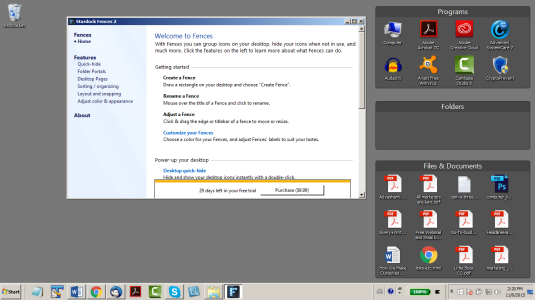
Once you do so you'll see the following screen where your programs and documents are automatically added into 3 fences and the software instructions appear on your desktop.

When you move your mouse cursor over a Fence, some options appear in the header. When you click on the icon at top left, you see the menu above. Your options are:
- Rename Fence
- View: Exclude Fence from Quick Hide and view by 20, 40, 60, 80, and 100% opacity.
- Sort Fence by: Options are Name, Type, Date Created, etc.
- Organize: Place all new icons in this Fence by default and Manage sorting rules
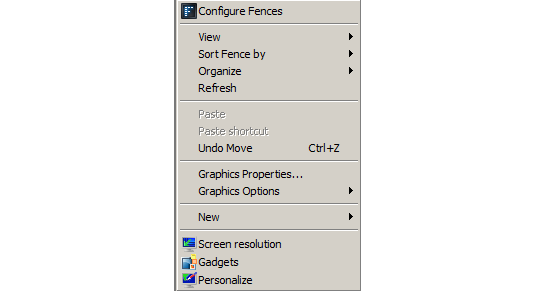
Right-clicking inside a Fence brings up the pop-up above. When you click on the Configure Fences heading, the instructions appear.
One Caveat: If you double-click on your desktop at any given time, all your icons and the Fences will disappear. A dialog box will appear which tells you what is going on. To bring the icons and Fences back, double-click on the desktop again. While this option can be useful, it can quickly become irritating.
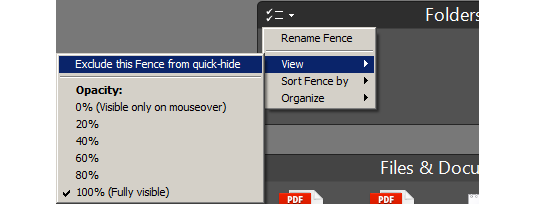
To prevent the Fences and icons from disappearing, hover your mouse over the header in a Fence. In the drop down icon at top-left, click on View: Exclude this Fence from quick-hide.
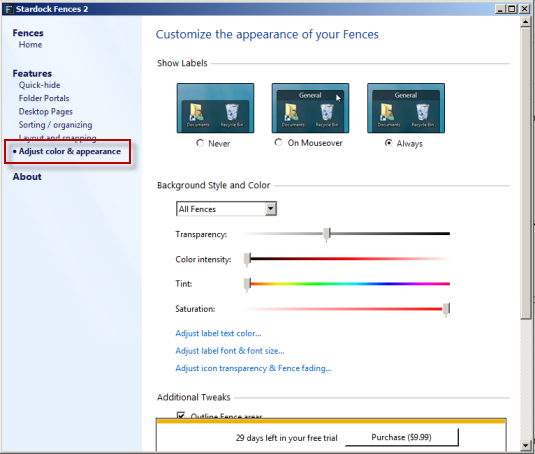
In the instructions pane, you can access other options. As an example, if you click on Adjust Color and Appearance in the menu on the left, you see the options above, which allow you to choose label options and experiment with background styles and color.
Other configuration options:
- To arrange the icons, drag them from one Fence to another.
- To move a Fence, move your cursor over the header, which will change into a cursor with 4 arrows. Click and drag your Fence to its new location.
- If you want to change the size of a Fence, hover your cursor over any edge. An arrow with 2 points will appear. Drag to resize the Fence.
- Like Nimi Places, you can change the size of icons.
Conclusion
Of the two programs Stardock Fences was the easiest to use. The instructions were clear and it was easy to configure. Nimi Places offers many options, but it is not the easiest program to understand. On the positive side, it is free.
Words: Nathan Segal
Nathan Segal has been working as a Technical Writer for 16 years. You can learn more about his work at NathanSegal.org.
Like this? Read these!
- Adobe updates Creative Cloud in milestone 2015 release
- Photoshop tips, tricks and fixes to try today
- The best photo editors

The Creative Bloq team is made up of a group of art and design enthusiasts, and has changed and evolved since Creative Bloq began back in 2012. The current website team consists of eight full-time members of staff: Editor Georgia Coggan, Deputy Editor Rosie Hilder, Ecommerce Editor Beren Neale, Senior News Editor Daniel Piper, Editor, Digital Art and 3D Ian Dean, Tech Reviews Editor Erlingur Einarsson, Ecommerce Writer Beth Nicholls and Staff Writer Natalie Fear, as well as a roster of freelancers from around the world. The ImagineFX magazine team also pitch in, ensuring that content from leading digital art publication ImagineFX is represented on Creative Bloq.
