Discover how to create a stunning sci-fi city scape.
Creating an apocalyptic sci-fi city scene in 3D art is something artists might shy away from doing because of the vast complexity of the subject, 3D models and textures needed. But with smart ways to tackle it, it is certainly doable.
There are many different paths you can choose to achieve the final visualised image you have in mind. In this tutorial, I‘ll shed some light on the process I used to make this night-time scene. I try not to limit myself too much with a strict and predetermined workflow, or the software I use. My workflow may differ minimally to vastly depending on the project I’m working on. Software packages are just different tools that help you to get things done.
Most of my projects start with a concept sketching stage in 2D, but this time I started in 3D. If you’re interested in 3D concepting, I strongly recommend Jama Jurabaev‘s Intro to 3D Concept Design course on Learn Squared.
Procedurally generating a city can vastly speed up the initial stage of finding a good concept, camera position and composition. You don‘t need to worry about getting the perspective of your 2D buildings right; in 3D you can simply reposition your camera and instantly have a completely different picture.
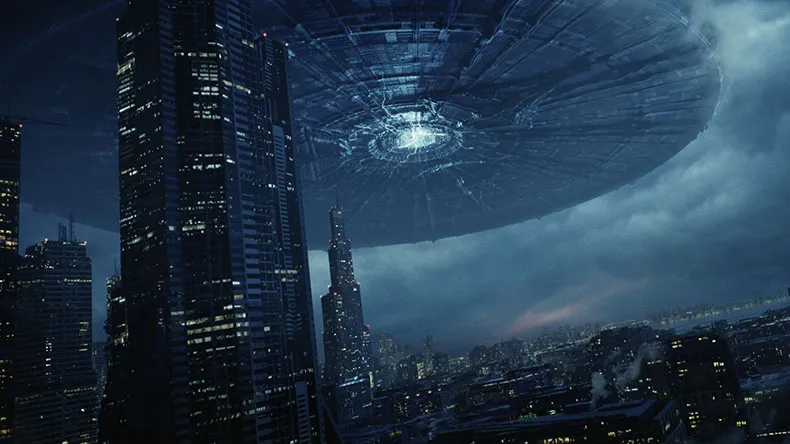
As I already have a pretty good picture in mind of what I wanted to do – an apocalyptic, Independence Day-inspired scene – I start with hunting for reference. If all you want is reference pictures, Google is a good place to start, but if you intend to use those references in some way or another in your picture (textures, and so on), you should look for royalty-free images. Pixabay and Textures.com are a big help there.
I use a procedural approach to model the buildings. The lower buildings are all displaced planes. I hand-paint a few displacement maps of single buildings with Photoshop and convert them into brushes. This method allows me to quickly ‘paint’ displacement maps for entire city blocks. These blocks can then be instanced to give the illusion of a highly detailed city. The higher buildings are roughly modelled with no attention to topology. We will add details later.
The texturing and shading is done (partially) procedurally. I compile several pictures of cities to texture atlases. I then map, shade, alter and randomly distribute those textures with Blender’s powerful node system. For every diffuse map I plug in, the shader network automatically generates a specular- and bump-map. Not a single building is manually UV-unwrapped – all are box-mapped with some random shifting of the coordinates.
Get the Creative Bloq Newsletter
Daily design news, reviews, how-tos and more, as picked by the editors.
I compile light texture atlases the same way I did the diffuse textures of the buildings. The mapping is also done the same way except blocking the textures on faces, which point upwards to avoid having lights on the roof. Distributing them randomly means they often don‘t match up perfectly to the diffuse textures. There is definitely a trade-off between being fast and flexible, and probably having to fix some things in post-production.
The base of the ship is a really simple model, which I then UV-unwrap, subdivide and displace with a displacement map I find in a Blender forum thread. The UVs are all rectangular and not rotated so the displacement follows the round form of the ship. With such a set up you can shift and scale the UVs to model the ship with displacement maps in real time. This is an extremely fast and intuitive way of doing greeble-like surfaces.
Now the fun part begins. This is where all the work comes together. First, bundle all the buildings into separate groups that feed particle systems. By doing this, you can change the random seed of a particle system and shuffle through randomly generated cities to find an arrangement that you like. This is the power of 3D concepting – you can generate several layouts in a really short amount of time.
The scene is lit entirely with a HDR image. There are numerous places on the internet that provide high-resolution HDRs these days. HDRs have two major advantages for 3D concepting; they render extremely fast and give you realistic lighting with a click of a button. I pick a few that I then import into Blender to quickly test out a few lighting scenarios. Cycles, Blender’s modern built-in viewport renderer, makes this a breeze.
Beside doing a beauty render, I also render out several passes for compositing. These include, ID passes so I can quickly select individual buildings; Z-depth passes to simulate the atmosphere; Normal passes for eventual relighting; and, of course, several light passes. The beauty render needs around 20 minutes in 4K to be reasonably noise free. The additional passes are ready in a fraction of that time.
With the already prepared and rendered passes, the compositing is really straight forward. I usually work from the background to the foreground. The sky sets the mood. With the Z-depth pass I‘m able to give the image a nice atmosphere. The light passes are then added on top and blended between them, depending on which light pass looks best on the buildings.
10. Add details
Fixing is easier than adding every single detail
Now comes the payback for not doing things properly before rendering. But most of the time fixing things in post is far less work than having to model every little detail and care about every pixel in the render. In this stage, I blend the spaceship with the clouds, add red lights on the roofs, add cranes, chimneys, antennas, the electric lightning below the ship and the smoke between the buildings. And generally fix everything that wasn‘t perfect!
11. Finalise the scene
Recreate a camera lens to finish off the image
The final step is to replicate the effects of a real camera’s lens and film; to make the scene look as it would have looked if it had been shot in the real world. So, I slightly blur the scene, add bloom, lens distortion, a slight chromatic aberration, vignetting, film grain, and finally give it a cinema-like colour grading. I love this part. This is when everything you worked on blends together to form something real. It‘s like magic.