How to rig a character for posing in Maya
Set up the controls you need to make your model move, with the help of digital artist Antony Ward.
When working on any scene, it's important to take the time to pose your characters. Rendering your creations in the standard da Vinci pose will work for basic portfolio pieces, but won't give the person viewing them an insight into their personalities. Adding a physical pose and facial expression will make your image more appealing while also giving viewers an insight into your character’s story.
Here, with the help of a few joints, constraints and blend shapes, I'll show how you can easily give your character the ability to express emotion. Not only will you have the skills to pose the body and face, but you'll also be able to animate them. See our Maya 2013 review for more on the software.
01. Create your skeleton
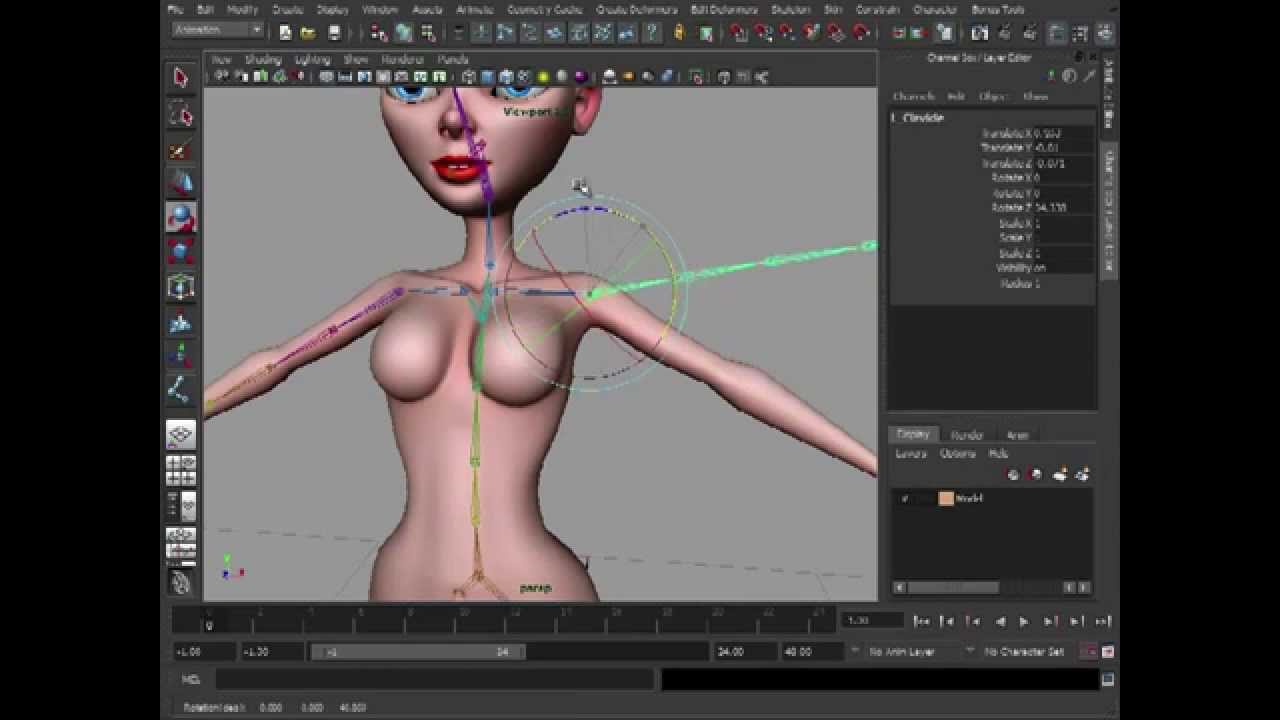
In order to manipulate your character, you must first create something to move, which will in effect deform your model. A simple joint hierarchy will be perfect for this. Press 4 to switch your viewport to wireframe mode; this will allow you to see your joint placements more easily.
Article continues belowThen go to Skeleton > Joint Tool and open the options. For now you are simply going to use the default settings, but as you can see there are a number of ways you could adjust how you create your joints, and set options like their axes and degrees of freedom. If you are using Maya 2013, you can enable the Symmetry option to help generate both sides of the skeleton at the same time. However, I will leave this option disabled for readers using older versions of Maya.
Pivot points
Work your way around the left-hand-side of the model, placing joints at major pivot points around the body. Start with the left arm, before adding in joints for the hand and fingers. You may also want to include extra joints at the bicep and wrist to ensure these areas deform correctly. Remember, your wrist isn't a simple ball and socket: when you twist your hand the radius and ulna bones roll together, giving a gradual rotation along your forearm.
We add the extra joint at the bicep for a similar reason. When you twist your upper arm, the muscles of your arm makes it look like this area is also twisting around the bicep area. Next add a Root joint - which will be at the character’s waist - and work your way up to the head before creating joints for the leg, foot and jaw. When done, simply parent the thigh joint to the root, and the shoulder to the clavicle to turn it into a single skeleton hierarchy.
02. Check your axes
Now you have one side of your skeleton, it's important to check how it actually rotates before you move on to create the opposite side and bind it to the model. One of the main areas to investigate is the rotational axis in each joint.
Sign up to Creative Bloq's daily newsletter, which brings you the latest news and inspiration from the worlds of art, design and technology.
Each rotational axis dictates how the joint will rotate around its pivot when manipulated. When adjusted, you are in effect editing the pivot so that the X, Y and Z axes point exactly where you want them to. This is important as misaligned axes can cause huge problems.
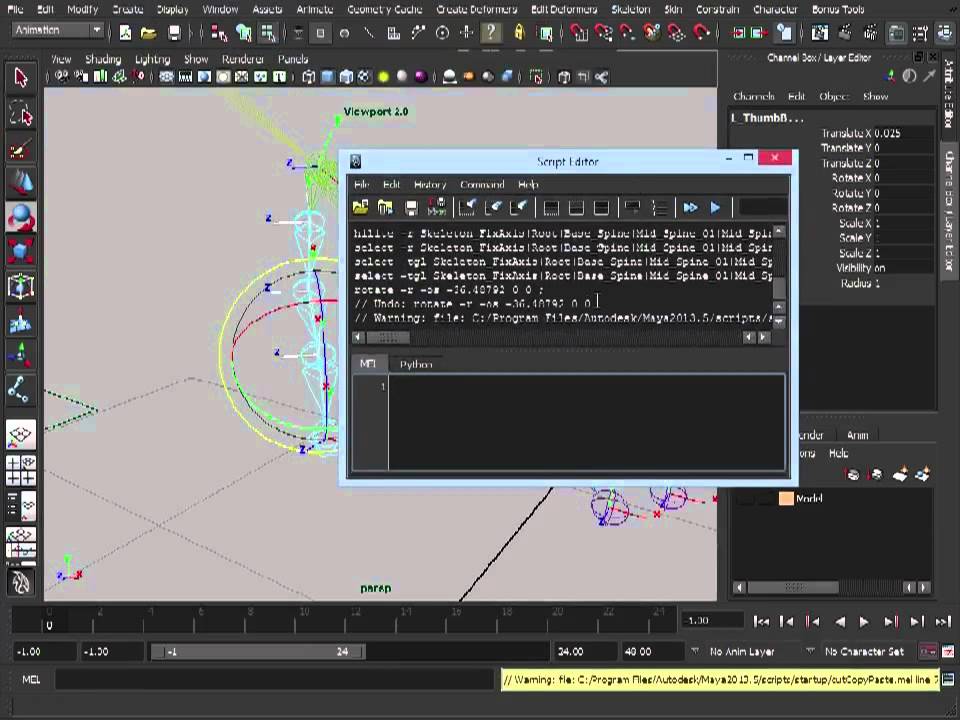
To edit the rotation axes on your skeleton, select the Root joint and also the hierarchy - go to Edit > Select Hierarchy - so you have all the joints selected. Now go to Display > Transform Display > Local Rotational Axes to see how yours are currently looking.
Adjusting joints
If you do find some joints that need adjusting, like the wrist, fingers and possibly the spine, go to Skeleton > Orient Joints and open the options. C If you remember, these options were also available when you were creating your joints, but this will allow you to edit each axis individually depending on your needs.
As mentioned, the default settings should work well, with the primary axis being the one that points down the bone, and the secondary attempting to point up. For the wrist though you may find that the orientation will attempt to point down a particular finger, whereas it should be central. To rectify this quickly, use the Orient Joint to World option.
03. Complete the skeleton
With one half of the skeleton complete, you can now quickly mirror the left side in order to generate the right. Before you do, go through and rename each joint correctly while also adding an L_ prefix.
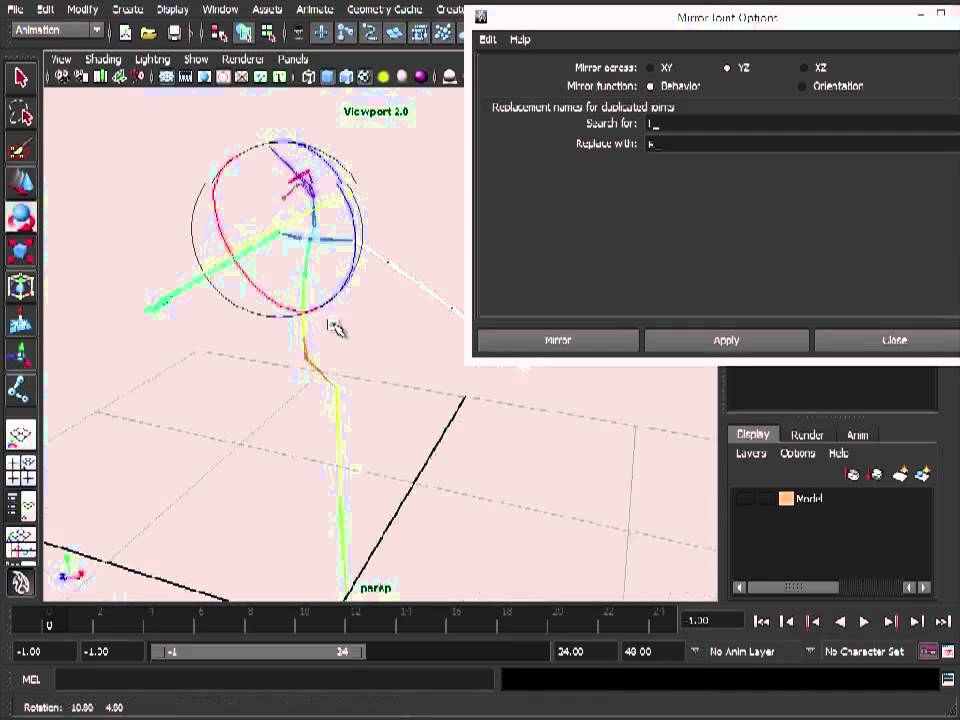
Select the left clavicle and open Skeleton > Mirror Joints. This is quite a simple tool, and depending on the way you created your skeleton, you may need to try a few options before you get a correct right-hand side. Start by mirroring across the Y and Z axes.
The Mirror Function you choose will also depend on your personal preferences, but Behaviour will mirror the joints and also flip the orientation and rotational axes - in effect, mirroring the behaviour. Orientation will keep the same rotational axes, making it easier to copy animation between sides.
Maya will also replace your L_ prefix with R_ so you don't get joints with clashing names. With the arm mirrored, repeat the operation on the leg to complete your skeleton.
04. Binding
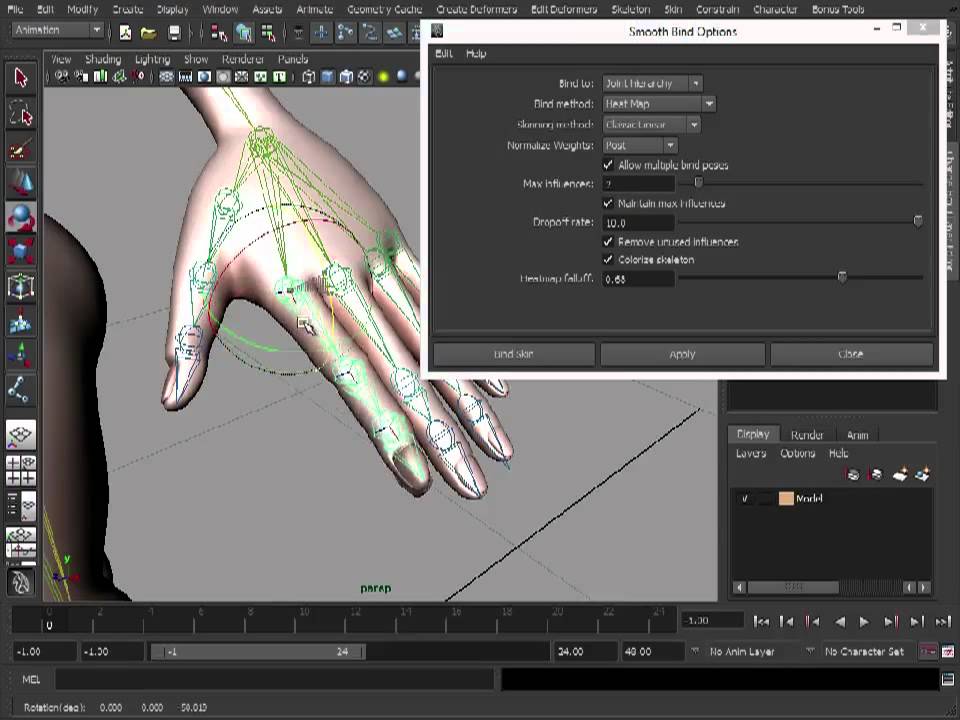
Your skeleton is now ready, so let's connect it to your model. Select both the model and the skeleton's root joint, and go to Skin > Bind Skin > Smooth Bind and open the options. Again, if you are using a more recent version of Maya you will find the Heat Map Binding Method will give you a much nicer default bind, meaning fewer clean-ups later on. For older versions the default settings will work for you here, with the Bind Method set to Closest Distance.
The only other adjustment I would recommend would be to set Max Influences to 2 or 3, which will restrict how many joints are able to influence each vertex. Setting Dropoff Rate to around 10 will also give you a tighter falloff, which will be easier to manage and work with.
05. Adjusting joint influence
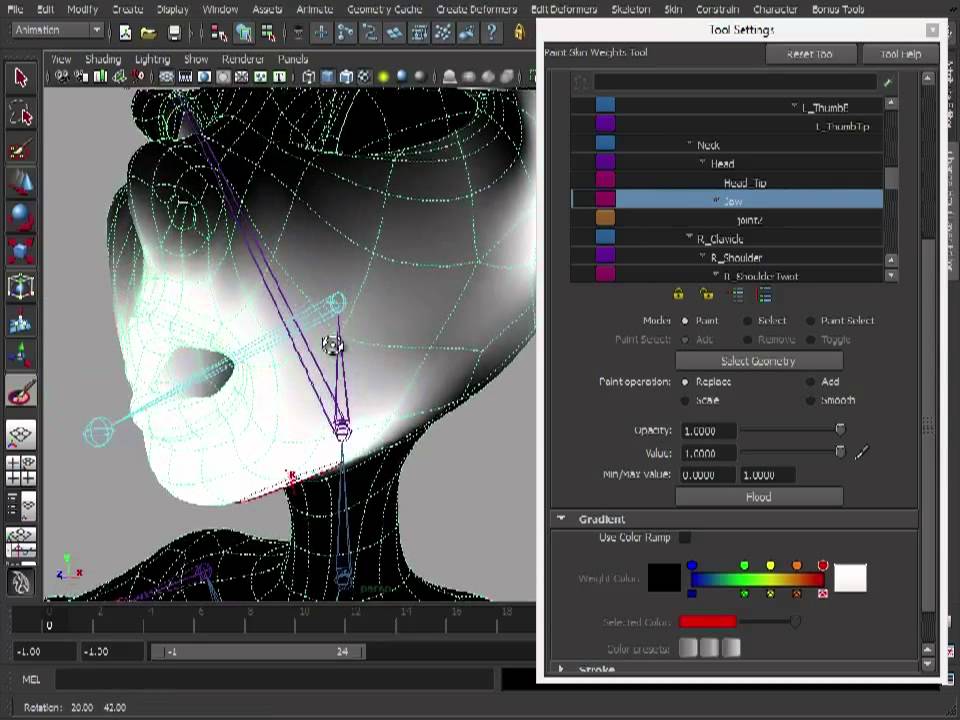
Now your model is moving with the skeleton, but you will find she isn’t deforming very well. Try rotating her head, or even her jaw and arms, and you will see the problem. The default bind is just a starting point, so now you need to go in and adjust each joint’s overall influence. It sounds like a long and tedious job, but Maya has a nice, intuitive way to handle weight adjustment.
Select the model and go to Skin > Edit Smooth Skin > Paint Skin Weights and open the settings. The tools options may appear intimidating, but you only need to focus on a few initially: you can experiment with the rest once you know the basics.
You will also notice that your model will now be black, with a greyscale around the selected joint that illustrates the weighting falloff. All you are going to do now is select your brush type from the top, specify a joint to work on under the Influence tab, and then select your painting operation. Stick to Replace in the beginning, which will just replace the values with the ones you are painting.
Opacity and Value
The last sliders to adjust are Opacity and Value. Value is the actual amount you will be physically painting onto the model: 1 will be a 100% influence, and 0 is no influence. Opacity allows you to adjust how much each brush stroke will paint, so in a way this is a percentage of the Value. With all that in mind you can now work your way around the model, correcting those deformation errors, and making sure her head and jaw move separately.
The best approach when painting weights is to pose the character first so you can see the issues as you work. You can also speed up your workflow if the character is symmetrical by focusing on the left side, and then using Skin > Edit Smooth Skin > Mirror Skin Weights to copy the weighting information across quickly.
06. Rigging the legs
Now the model is bound and weighted, but in its current state this character would be difficult to pose or animate. Trying to create a walk cycle, with each foot planting correctly on the ground, would be extremely difficult. To make your job simpler, you need to add a layer of controls on top of the skeleton; a bit like the strings on a marionette, these will drive the joints in a more intuitive way.
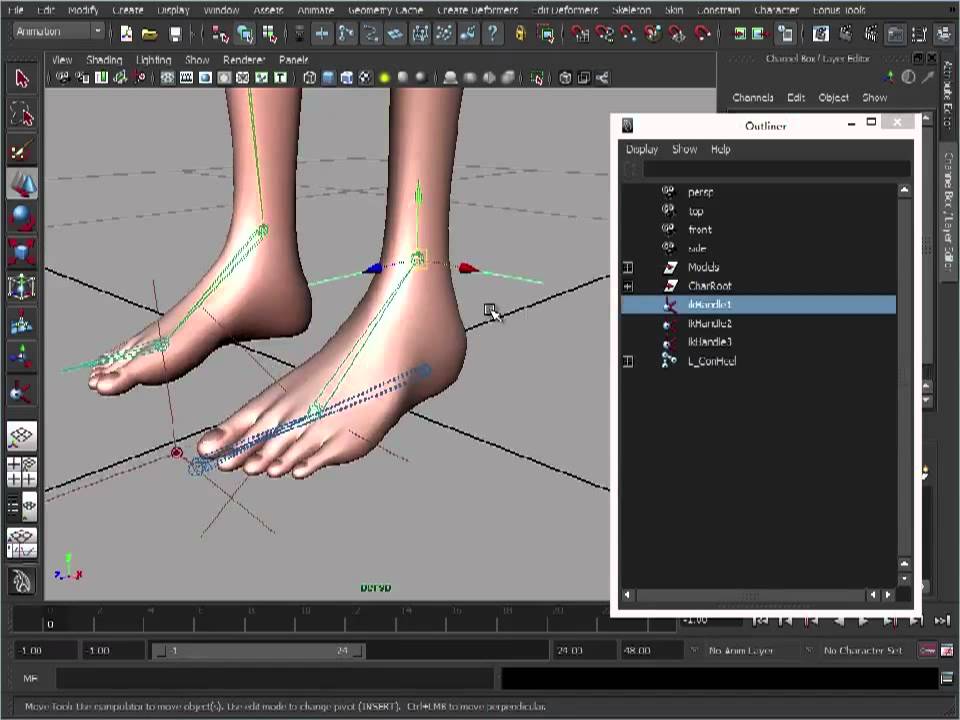
Let's look at planting those feet first, and to start you will create a Reverse Foot. A Reverse Foot is a copy of the existing foot joints, but reversed to make animating each movement and foot placement easier. Before you create the main controller, you should apply three IK handles running down the leg and to the tips of the toes.
Rotation of the knee
First create an IK handle from the hip to the ankle. This must be set as an ikRPsolver - which is a Rotation Plane solver - and will allow you to gain control over the rotation of the knee. Create a second handle from the ankle to the ball of the foot, and a third from the ball to the tips of the toes. These last two should be ikSCsolvers, as you don’t want them to inadvertently rotate.
With those in place, you can now duplicate your foot joints and un-parent them from the main skeleton hierarchy. Next, duplicate the toe joint and move this back to where the heel would be. At this point the new joint will be parented to the ball joint – you will need to adjust this so it is parented to the toe.
At present this doesn’t look like a reversed version of the original foot, not until you select the heel and go to Skeleton > Reroot Skeleton. This will reorder the hierarchy, reversing the foot. Parent each IK handle to the corresponding joint on the reverse foot. Now when you move the Reverse Foot, the foot that is bound to the model will follow, and will happily bend as you rotate the joints.
Final step
The final step is to add an extra control that will allow you to lock and adjust the position of the knee. Just like the foot, you first need an icon to control the knee – a curve-based solution would work well, but for now a simple locator will do. Position this directly out in front of the knee joint.
With it still selected, add the leg IK handle to the selection and go to Constraint > Pole Vector to restrict the knee rotation to the locator/icon. Now when you move the locator, the knee will follow.
07. Rigging the arms
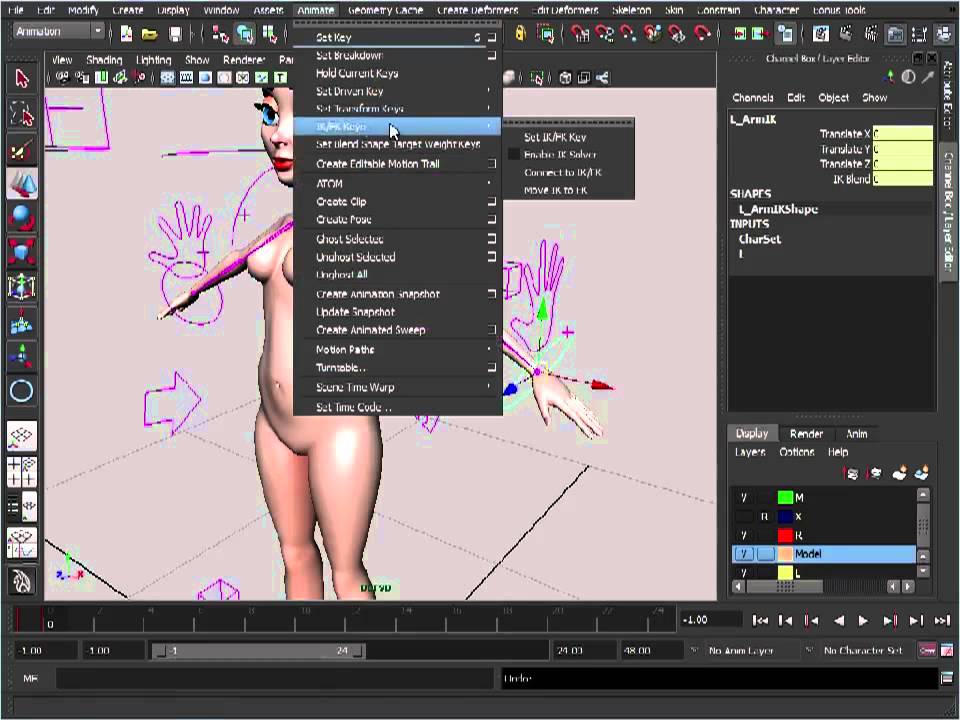
Let's move up to the arms next and add an easier solution for controlling them. Just like you did with the feet, you are going to add a simplified master controller on top of the arms, so that you use three joints rather than the existing five.
Duplicate your arm joints and delete the fingers. You can raise the arm to make it easier to work on. Un-parent this new control arm, and also use the Skeleton > Remove Joint tool to strip out the bicep and wrist rotation joints.
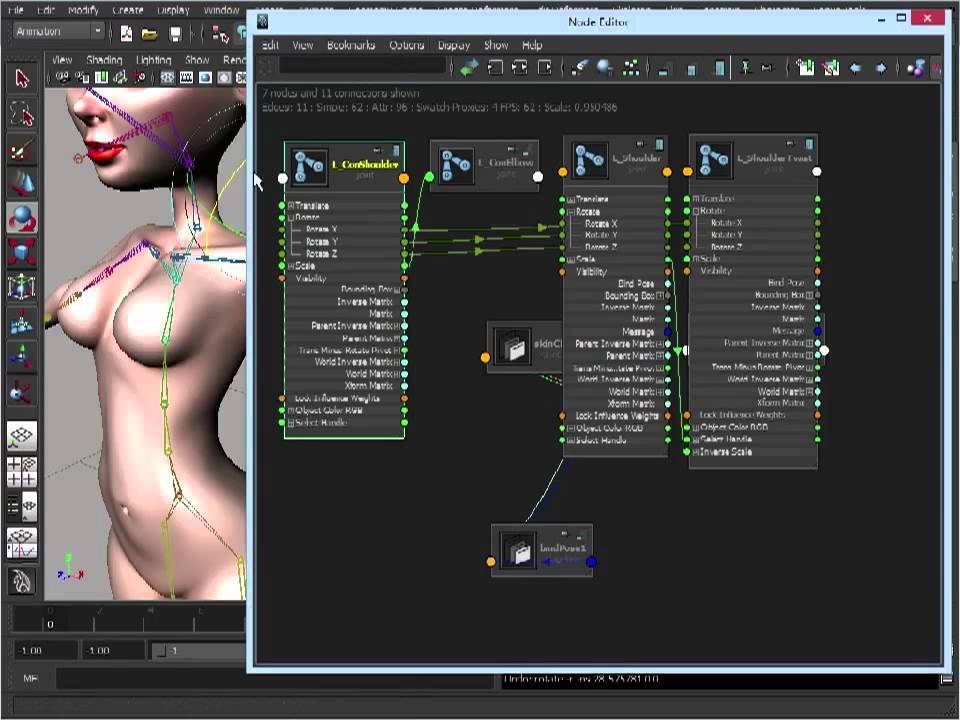
What you have now is a simpler arm and, with the help of the Node Editor, you can wire this directly to the skinned arm so it has complete control. Go to Window > Node Editor. Select your shoulder joint on your control arm and the skinned shoulder joint, and graph them
in the Node Editor. This will show you the selected nodes and any connected nodes.
Node Editor
Rearrange the Node Editor a little so that you have the three main joints in view - Main Shoulder, Control Shoulder and Shoulder Twist - and click on the blue boxes at the top of each node to expand the attributes.
The next step is select the circle next to each attribute and connect it directly to another. To do so, click and drag the Rotate Y attribute on the control shoulder onto the Rotate Y of the main shoulder. You can also do this for the Rotate Z attribute.
Twist the arm
Next connect the Rotate X attribute to the Rotate X attribute on the shoulder twist joint. Now if you rotate the control arm you will see that the main arm will move with it - but more importantly you will see that when you twist the arm, it doesn't twist from the shoulder. Instead it moves from the bicep rotate joint.
The final step is to ensure that this new control arm moves with the actual rig. To do this, select the main skeleton's shoulder and then the control shoulder. Now go to Constrain > Point which will lock the control arm's position to the main shoulder.
What you may notice is that as the rig moves, the control arm will not keep the same orientation as the main arm. This is because you used direct connections, which feed off the attribute values. To fix this, simply break the connections on the shoulder’s Rotate Y and Rotate Z attributes, and instead use an Orient Constraint to control the orientation on those two attributes.
08. Extra controllers
Now you have seen how to rig your arms and legs, these simple steps will allow you to pose your character quickly and easily. However, what if you want to add more controls to other areas of the character?
These could be as simple as a direct connection - like you did with the arms - or perhaps you might want to use Constraints or Set Driven Keys to add slightly more complex controls.
Hands can be time-consuming to pose as you would need to select each joint and apply a rotation, so you could apply a few quick controllers here too. The key is to have a simple, intuitive rig, and ideally one that is separated from the actual skeleton with no controls lying inside its hierarchy, so you can easily bake the animation onto the skeleton for export if you need to.
09. Pulling faces
Your model can now be moved and posed quickly and easily, but without a set of facial expressions she will still seem a bit wooden. Animating a face can be approached in a number of ways: for instance, joints can be used in conjunction with Set Driven Keys to achieve any number of poses, but these may also feel stiff.
Blend shapes - or morph targets as they are also known - are versatile and easy to set up, plus they can give a more organic feel to your animation. To create a blend shape, simply ensure your rig is in its default, bound position and create a copy of the main model.
Make sure Reflection is enabled in your Move Tool settings so you can work on both sides at once as you model, and create your first expression. First close her eyelids to create a blink - this is a standard and always needed blend shape.
Create a copy
Because you created both sides at the same time, you can generate two blend shapes from this single model. Create a copy of your first blend shape and move it to one side, then roughly select the vertices that were edited on one side of each head.
If you look in the Channel Box you will now see the option CVs (Click to Show). Opening this will show you the X, Y and Z coordinates of each vertex. Zeroing out the selected vertices will essentially reset that side of the face. Repeat this on the other model, but on the opposite side of the face. You now have two blend shapes, a left blink and a right blink, meaning you can control each side independently.
Continue generating more blend shapes to cover your initial needs, focusing on key expressions such as joy, anger, surprise etc, and break these down into eyebrow, eye and mouth shapes.
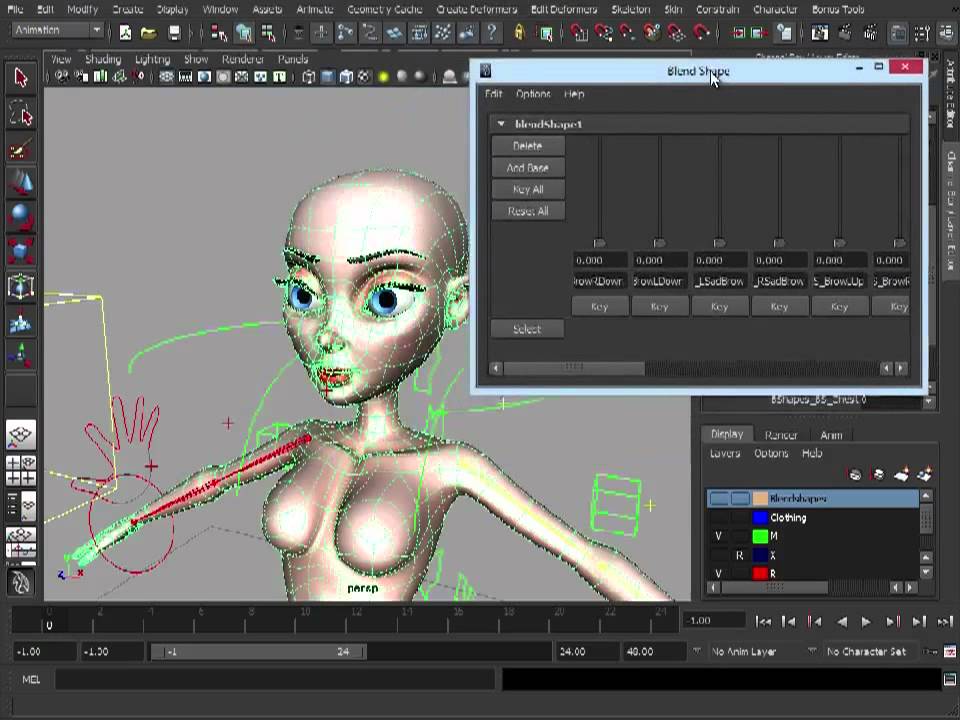
When they are all created, select the blend shapes and add your skinned model to the selection. Go to Create Deformers > Blend Shapes and open the options. Keep your settings the same - although you can add a name if you like - but switch to the Advanced tab.
Blend shapes
Because you are adding your blend shapes after the model has been bound to the skeleton, you will need to change the Deformation Order to Front of Chain. This will ensure the blend shapes will evaluate after the skeleton’s influence. If you don’t do this, when you enable a blend shape the whole model will be treated as a blend shape, rather than just the vertices you adjusted.
To edit and animate your blend shapes once you have created them, simply go to Window > Animation Editors > Blend Shape. You can now adjust each slider and combine each blend shape in order to generate an unlimited amount of facial expressions.
As a final step it's important to work your way around the rig and lock any attributes that are not meant to be editable. Doing this now will ensure that your rig is solid, and won't break easily if passed to other animators.
Words: Antony Ward
Liked this? Read these!
- Maya tutorials: awesome projects to try today
- Best 3D movies of 2013
- Top FREE 3D models

The Creative Bloq team is made up of a group of art and design enthusiasts, and has changed and evolved since Creative Bloq began back in 2012. The current website team consists of eight full-time members of staff: Editor Georgia Coggan, Deputy Editor Rosie Hilder, Ecommerce Editor Beren Neale, Senior News Editor Daniel Piper, Editor, Digital Art and 3D Ian Dean, Tech Reviews Editor Erlingur Einarsson, Ecommerce Writer Beth Nicholls and Staff Writer Natalie Fear, as well as a roster of freelancers from around the world. The ImagineFX magazine team also pitch in, ensuring that content from leading digital art publication ImagineFX is represented on Creative Bloq.
