CS6: The Creative Pro's Guide
Discover what's new in the CS6 Master Collection – from Photoshop to InDesign to Illustrator to After Effects. Plus, discover how to use some of the incredible new tools…
Sign up to Creative Bloq's daily newsletter, which brings you the latest news and inspiration from the worlds of art, design and technology.
You are now subscribed
Your newsletter sign-up was successful
Want to add more newsletters?
Photoshop CS6: The Creative Pro's Guide
Adobe's flagship image-editing tool hits version 6 – and brings a new interface along with a raft of creative tools…
When you first open Photoshop CS6 there's one thing you notice: the dark, charcoal grey interface. But the improvements in the application run much further than just its appearance – there's a raft of features under the hood. But, as far as the interface is concerned it seems like a radical departure from Photoshop's standard grey interface. It does look slicker though – and if at any point you want to go back to the old colours, just go to Preferences>Interface and adjust the Colour Theme there.
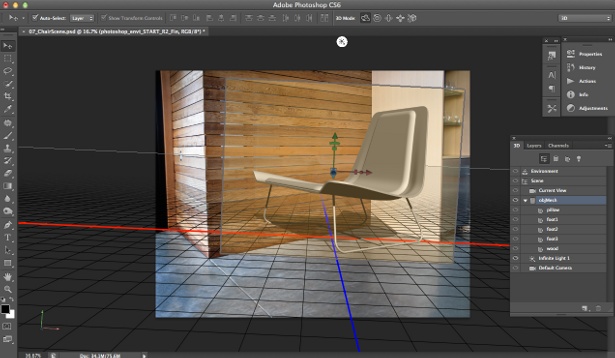
For designers, there are a number of exciting enhancements – and right up there are the 3D tools in Photoshop CS6 Extended. The 3D workflow has certainly been simplified with 3D panels, tools and a new 3D workspace appearing when you either create a new layer from a 3D file (Photoshop supports 3D Studio, OBJ and more) or extrude a layer to create a 3D shape. Photoshop replicates the look and feel of such an app as Cinema 4D – so it's familiar and easy to use. So, it's now much easier to position your 3D objects in your compositions using the Perspective Grid option in the Vanishing Point filter as a ground plane. And the simplified Properties panel houses all the options you need for adjusting texture, lighting and environment controls, with on-screen handles adding extra customisability.

Additionally, when you Ctrl/Right-click on a 3D object you're presented with options for editing that object and its material. Those wanting to create 3D text will be happy, too, as improved bevelling options, better lighting controls and the ability to quickly switch camera views makes it easier than ever to add and adjust extruded type. The new Cage control enables you to select faces and edges and adjust scaling, rotation and position, and you can quickly alter mesh, cap, deform, and coordinate settings in the Properties panel.
Article continues belowA basic 3D text workflow would be as follows: First, create your text using a suitable font. Next, go to 3D>New Extrusion from selected layer. Up pops Photoshop's 3D controls. now, either use the Properties panel or Ctrl/Right-click the object itself to bring up options. Using the Materials section, you can define the material, shine, diffuse, roughness, bump and so on. Switching to the next set of options – Mesh – you can choose a shape present and specify extrusion depth, the latter something you can also do in the next set of options – Deform. In the Deform options you can also taper and twist your extrusion and in the Cap options you can specify the bevel. There's loads of options and it makes 3D text easier than ever before.
On the subject of text, Photoshop's type tools have received some nice enhancements, with paragraph and character styles topping the list. Finally Photoshop has some proper text controls – and finally you can keep text consistent across multiple documents by using these styles. To create a new style, simply set your text how you want it to appear across your documents, select it and in the Paragraph Styles panel (Window>Paragraph Styles) go to the flyout options and choose New Paragraph Style. Double-click the style that appears in the panel and edit it in the dialog that appears, adjusting composition, justification, hyphenation and basic character formats. Similar to InDesign. A new type rendering engine displays text more clearly – especially when dealing with smaller point sizes.
Photoshop CS6's vector tools have had a facelift, with vector shapes now appearing on their own layer rather than being a fill with a vector mask creating the shape. You can use the Path Operations drop down in the tool options bar to add combine, subtract, intersect and exclude shapes (pretty much like you could do in CS5.5, but the options have been moved). Snap To Pixel and Align Edges options enable you to align vectors precisely. So, what more could you add to Photoshop's layer functionality that's in there already? Well, a new search system – enabling you to filter results by kind, effect, name, mode, attribute or colour – makes it easy to find layers in a complex document. For instance, using the 'Kind' filter, you can choose to only show pixel layers, vector layers, adjustment layers, type layers or shape layers – or a combination. To turn off filtering, hit the small switch at the top-right of the Layers panel.
The Crop tool has had somewhat of a makeover as well – and works slightly differently to the Crop tool of old. When you select an area to crop, you now move the canvas behind the crop marquee (rather than the cropping area itself) before you apply the crop. You can rotate the image behind the crop area as well, and it offers a lot of flexibility. What's more, the Crop tool now works non-destructively. Just make sure the Delete Cropped Pixels box is unchecked in the Tool Options bar and when you crop, all of your pixels are retained.
Sign up to Creative Bloq's daily newsletter, which brings you the latest news and inspiration from the worlds of art, design and technology.
If you want to adjust the crop slightly, just use the move tool to move your image around within the newly-cropped area. You can also use new Golden Ratio, Golden Spiral, Diagonal and Triangle compositional grid overlays, as well as the previous Grid and Rule of Thirds options. The Straighten tool in the tool Options bar helps fix crooked horizons (for example) and the new Perspective Crop tool – found in the same flyout as the Crop tool – enables you to quickly straighten and crop an image by using an adjustable marquee.
Photoshop, in CS5, introduced some interesting 'Content-Aware' tools enabling you to go 80/20 when retouching images (i.e. Adobe's tools will take you 80 per cent of the way there, you do the rest). With CS6 Photoshop expands on this with the Content-Aware Move tool. You'll find it in the same flyout as the Healing Brush and Spot Healing Brush tools. Once selected, draw a marquee around the object you want to move and drag it to the desired area. If you need more control, select the object using Photoshop's selection tools and then with the marquee active, use the Content-Aware Move tool to drag. Using the Adaption options – which control how the patch is blended with the image and how much of the patch surround is included in the process – you can fine-tune the results.
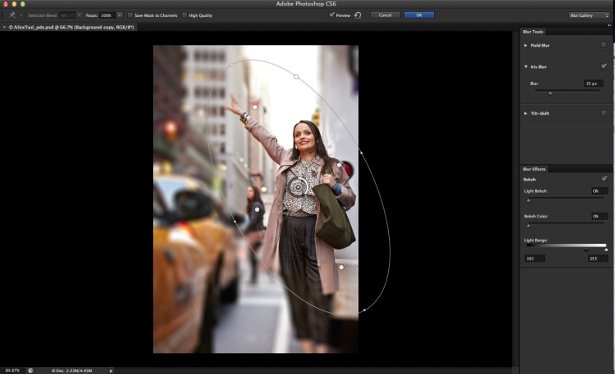
New blur effects in Photoshop CS6 may sound like a gimmicky extra, but they work very differently to the common blur filters. The three new filters – housed in what's called the Blur Gallery – are Iris, Tilt-Shift and Field Blur. These, running off the GPU on newer systems, enable you to preview and change the blur on-screen using handles and dials. For extra control, use the sliders that appear when you launch the blurs from Filter>Blur. And the use of the GPU is interesting in this release. The new Mercury Graphics Engine harnesses the power of your GPU when using such tools as Liquify, Puppet Warp, Crop and Transform. The result? A much smoother and fluid process – especially when working with large files in Liquify.

So what's left? Well, there's an Adaptive Wide Angle filter for tweaking images shot with fish-eye or wide-angle lenses, Adobe Camera Raw 7 and some enhancements to the auto correction tools found in Curves, Levels and Brightness and Contrast. There's also new background save and Auto-recovery – and you can set up a duration for auto save in the preferences (5, 10, 15, 30 minutes or one hour). There's also some updates to the painting toolset – mainly the fact you can now draw using pencils and pastels with 'erodible tips' – meaning as you draw the pencil wears away and the shape of the tip changes. You can customise the rate of wear ion the Brush panel.
There's also a new Airbrush tip option for recreating spray-can effects. And finally, there's new video functionality. A new, and familiar timeline-based editing environment enables you to import a huge range of video formats, add stills, add transitions, effects, pans, zooms and more. You can use adjustment layers to enhance clips – or with keyframes to add effects over time. And to add a transition between clips, hit the transition button in the Timeline panel and drag and drop the transition you want. It's pretty easy to set everything up as well – if you're importing video from your DSLR it will appear in the Timeline (Window>Timeline), but you can also create video from still images by hitting the Creative Video Timeline button in the Timeline when you have a static document open. It makes Photoshop a much more versatile tool – and great for quickly editing DSLR video projects.
Photoshop CS6 is a great upgrade – a number of top-quality enhancements and some excellent new features make it one of the best releases for a long time.
Bonus content! Check out CreativeBloq's Photoshop CS6 review!
Next up: Illustrator CS6

The Creative Bloq team is made up of a group of art and design enthusiasts, and has changed and evolved since Creative Bloq began back in 2012. The current website team consists of eight full-time members of staff: Editor Georgia Coggan, Deputy Editor Rosie Hilder, Ecommerce Editor Beren Neale, Senior News Editor Daniel Piper, Editor, Digital Art and 3D Ian Dean, Tech Reviews Editor Erlingur Einarsson, Ecommerce Writer Beth Nicholls and Staff Writer Natalie Fear, as well as a roster of freelancers from around the world. The ImagineFX magazine team also pitch in, ensuring that content from leading digital art publication ImagineFX is represented on Creative Bloq.
