Build a tile-based HTML5 game
Tiles can work for a variety of games. Dan Neame shows you how to build a tile-based HTML5 game that will run on various browsers.
In this tutorial, I'll be showing you how you can create 2D tile-based games using HTML5. With the game area defined by a simple map, we'll look into making playable 'agents' to walk around the level, see how to extend these agents into 'mobs' using pathfinding and learn how to render the game to the screen with different types of Renderer. From desktop PC to mobile phone, by splitting up responsibilities appropriately you can create flexible games that will work on any device with a browser.
The source code/demo for the tutorial can be found here. This includes everything in the tutorial and allows for easy extension for your own games.
Rendering choices
We'll start with how to use multiple canvas elements to draw the game area, though SVG or even DOM nodes can also be used for rendering your HTML5 games. Choosing the right technology depends on how you want the game to work.
If you're working with bitmaps, then canvas is usually the best choice because it provides a consistent API that performs well cross-browser. All modern browsers support it, including browsers on mobile devices. As far as IE goes, only versions 9 and upward have native support, though there is a polyfill that patches support for IE7 and 8 hosted on Google Code called ExplorerCanvas. SVG is better for games that use vector graphics and has similar browser support to the canvas tag.
DOM/CSS is best used for games with simpler animation. One benefit that both SVG and DOM/CSS have over canvas is that you can bind event listeners directly to the rendered elements. With a canvas, you'll have to calculate which element is being clicked on. Fortunately, it's not a concern for this tutorial because the game won't need to respond to mouse events.
Maps
First, let's set up our level. Maps enable you to define the game area programmatically, creating walls with unwalkable tiles. These can be represented in their simplest form by 1s and 0s in a 2D array - here 0 is a walkable tile and 1 is a wall:
var map = [
  [1,1,1,1,1,1,1,1,1,1,1,1,1,1,1,1,1,1,1,1,1,1,1,1],
  [1,0,0,0,0,0,1,1,0,0,0,0,0,0,0,0,0,0,0,0,0,0,0,1],
  [1,0,0,0,0,0,0,0,0,0,0,0,0,0,0,0,0,0,0,0,0,0,0,1],
  [1,0,0,0,0,0,0,0,1,1,1,0,0,0,0,0,0,0,0,0,0,0,0,1],
  [1,0,0,0,0,0,0,0,1,1,1,1,1,0,0,0,0,0,0,0,0,0,0,1],
  [1,0,0,0,0,0,0,0,0,0,1,1,1,1,1,1,0,0,0,0,0,0,0,1],
  [1,0,0,0,0,0,0,0,0,0,0,0,1,1,0,0,0,0,0,0,0,0,0,1],
  [1,0,0,0,1,1,0,0,0,0,0,0,0,0,0,0,0,0,0,0,0,0,0,1],
  [1,0,1,1,1,1,1,0,0,0,0,0,0,0,0,0,0,0,0,0,1,1,1,1],
  [1,0,0,0,0,0,0,0,0,0,0,0,0,0,0,0,0,0,1,1,1,1,1,1],
  [1,1,1,1,1,1,1,1,1,1,1,1,1,1,1,1,1,1,1,1,1,1,1,1]
];
From the code above, we can see that the game area has walls all around the edge as well as a few obstacles in the middle. You can use this type of map as the basis for collision calculations, as well as for rendering the game to the screen.
Daily design news, reviews, how-tos and more, as picked by the editors.
Rendering the map
In order to render your map you'll need a Renderer object, which will be responsible for rendering one layer of the game. Using multiple layers is easier and faster than using a single layer as it means you won't have to redraw the background every time a character moves.
The MapRenderer draws to a reference from the game map and the canvas element. It then clears the map and iterates over each tile in order to draw to the canvas at the tile's X and Y coordinates. Any tiles with a value of 0 are skipped; we'll just let the background show through. The MapRenderer extends a base Renderer object and adds a custom draw method. This allows the game to share the majority of the Rendering logic between the MapRenderer and a CharacterRenderer, which we'll define later.
MapRenderer.draw and MapRenderer.drawTile
draw: function(){
  var self = this;
  this.context.clearRect(0, 0, this.w, this.h);
    this.context.fillStyle = "rgba(255,0,0,0.6)";
  _(this.map).each(function(row,i){
    _(row).each(function(tile,j){
      if(tile !== 0){ //if tile is not walkable
        self.drawTile(j,i); //draw a rectangle at j,i
      }
    });
  });
},
drawTile: function(x,y){
  this.context.fillRect(
    x * this.tileSize, y * this.tileSize,
    this.tileSize, this.tileSize
  );
}
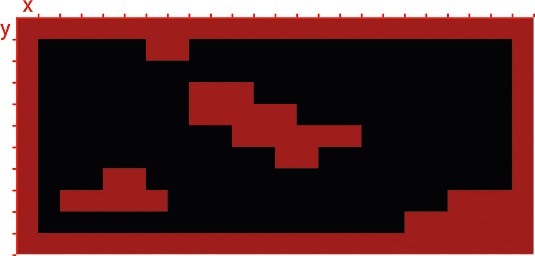
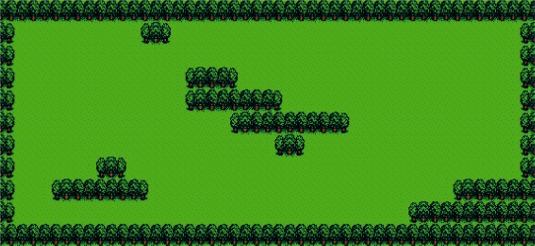
While iterating, if the tile to draw is unwalkable, then the MapRenderer executes drawTile, passing the tile coordinates to draw at. drawTile then draws a rectangle on the canvas with tileSize width and height at x * tileSize, y * tileSize pixels on the screen. Multiplying coordinates and dimensions by the tileSize enables us to translate from game coordinates to screen coordinates. When run, it produces the render shown below.
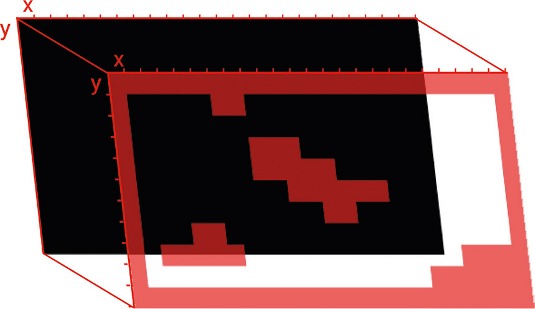
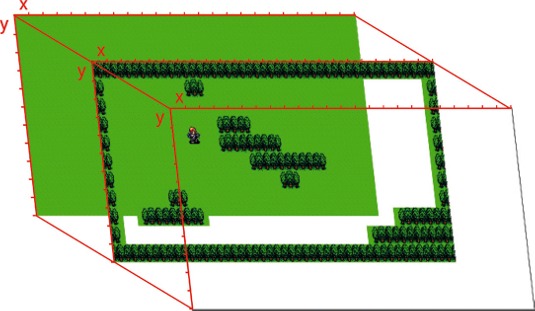
The black background is just a solid black square made using the CSS background property, which will be replaced by an image later. This layer can be any block level element you like. A div should be sufficient. Absolute positioning of the background and the canvas to top:0 and left:0 will allow you to stack them with z-index declarations, or simply the order they arrive in the DOM.
Improving the render
We have a simple representation of our game area, but it looks pretty basic at the moment. So next, we'll look at using images instead of canvas drawRect. Let's turn our background into something that resembles grass using CSS. This is as straightforward as applying a background property to the first layer:
.background-canvas {
background: url('../img/grasstile.png');
}
Improving the rendering of the walls implies we're going to alter the map. Instead of just using 1s to represent the walls, we can use 1s, 2s and 3s to represent different images.
var map = [
  [1,1,1,1,1,1,1,1,1,1,1,1,1,1,1,1,1,1,1,1,1,1,1,1],
  [3,0,0,0,0,0,2,3,0,0,0,0,0,0,0,0,0,0,0,0,0,0,0,2],
  [3,0,0,0,0,0,0,0,0,0,0,0,0,0,0,0,0,0,0,0,0,0,0,2],
  [3,0,0,0,0,0,0,0,2,1,3,0,0,0,0,0,0,0,0,0,0,0,0,2],
  [3,0,0,0,0,0,0,0,2,1,1,1,3,0,0,0,0,0,0,0,0,0,0,2],
  [3,0,0,0,0,0,0,0,0,0,2,1,1,1,1,3,0,0,0,0,0,0,0,2],
  [3,0,0,0,0,0,0,0,0,0,0,0,2,3,0,0,0,0,0,0,0,0,0,2],
  [3,0,0,0,2,3,0,0,0,0,0,0,0,0,0,0,0,0,0,0,0,0,0,2],
  [3,0,2,1,1,1,3,0,0,0,0,0,0,0,0,0,0,0,0,0,2,1,1,1],
  [3,0,0,0,0,0,0,0,0,0,0,0,0,0,0,0,0,0,2,1,1,1,1,1],
  [1,1,1,1,1,1,1,1,1,1,1,1,1,1,1,1,1,1,1,1,1,1,1,1]
];
In the new map, 0 represents a walkable tile as before (transparent), 1 represents a continuous wall image, 2 represents the left edge of a wall and 3 represents the right edge of a wall.
Using sprites in a tileset
Now we have a more detailed map, we can improve our drawTile method in our Renderer to use what's called a sprite sheet. You may have heard of these before when writing CSS: a sprite sheet is a single image that contains all of the images you need for your user interface. They are commonly used on the web to save on HTTP requests. Making your own graphics can take time if you aren't familiar with graphics packages. Pre-made sprite sheets for this tutorial were sourced from www.spriters-resource.com.
When used with the canvas tag, sprite sheets can also improve performance. It's quicker to sample from a cached canvas than it is to draw from separate image objects.
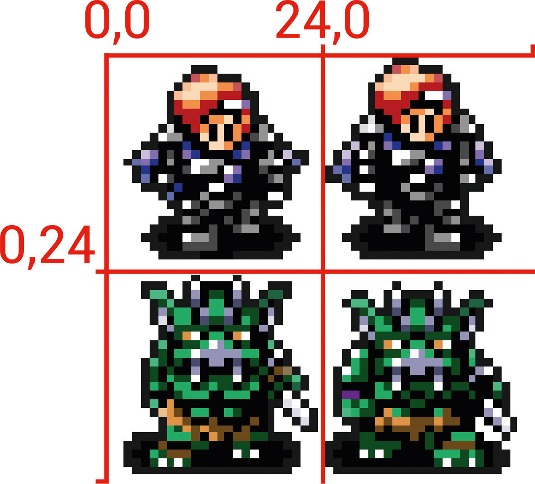
In order to know which part of the sprite to sample for the different tiles, we need a tile specification, which can be defined as a property of the Renderer. The tile specification is a hash containing the X and Y coordinates of the graphics on the sprite sheet. For example, our background tiles have the following tile specification:
{
  '1': {x: 0 , y: 0},
  '2': {x: 48, y: 0},
  '3': {x: 24, y: 0}
}
The image for our '1' tile is at 0,0 in the sprite sheet, '2' is at 48,0 and '3' is at 24,0 (as shown in the image below). We'll need a new object to hold the sprite and its tile specification, which we'll name Tileset. It will be responsible for loading the sprite into an image element and loading the tile specification JSON via Ajax, as well as providing methods to access the data.
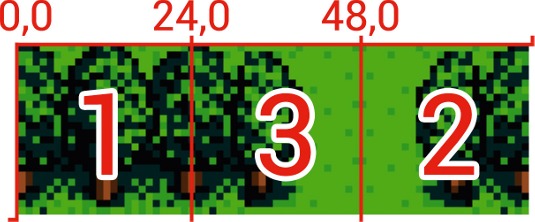
An instance of the tileset can then be passed to new agents and to the MapRenderer for use with drawing tiles. The drawTile method, responsible for drawing a single tile in our base Renderer will now look like this:
drawTile: function(sprite, singleTileSpec, x, y){
  this.context.drawImage(
    sprite,
    singleTileSpec.x, singleTileSpec.y, this.tileSize, this.tileSize, // source coords
    Math.floor(x * this.tileSize), Math.floor(y * this.tileSize), this.tileSize, this.tileSize // destination coords
  );
}
The other methods can remain the same. We just need to change drawTile so it accepts a sprite as well as details of where to sample. Now that we are using the sprite from the tileset, the render of our game area looks much nicer.
Making an agent
For the player, we need to create an agent object to handle the position of the player as well as hold a reference to their tileset. Unlike the MapRenderer, which only has one tileset, the CharacterRenderer will need to pass different sprites for render on from the agent they are rendering. All agents will share their own canvas layer, just as we did with the game area and background.
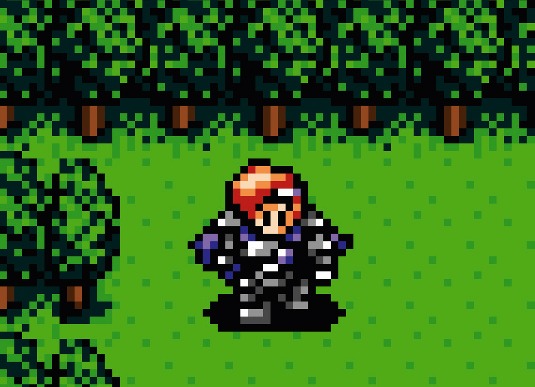
In order to render the character, we'll draw them in the same way as we drew the walls in the previous section. A tile specification will define the player sprites' positions on a sprite sheet. The draw method is a little different to the draw method in our MapRenderer:
CharacterRenderer.draw:
draw: function(){
  var self = this;
  this.context.clearRect(0, 0, this.w, this.h);
  _(this.agents).each(function(agent){
    self.drawTile(
      agent.getSprite(),
      agent.getTileSpec()[agent.getTileId()],
      agent.position.x,
      agent.position.y
    );
  });
}
In the above method, the player's sprite, tile specification and position are passed from the player agent to the drawTile method. The getSprite method returns a reference to the agent's sprite from its tileset. getTileSpec along with getTileId return the specification for the player agent's current tile.
The agent's position is stored as X and Y coordinates, which, unlike tile positions, can be fractions, to allow for smooth movement around the map.
Handling user input
Now we can render a map with a player in it, but we can't interact with our player. Deciding on how to interact presents a slight problem: keyboard input is the easiest to wire up, but tablets and mobiles don't have keyboards. We could use touch or mouse events, but what if the player has a gamepad rather than a mouse? The solution is to make an object that listens to all three and provides a unified interface.
Joystix will first check for connected gamepads using Marcin Wichary's gamepad.js support object. If the user has moved the thumbstick on their gamepad, Joystix executes its onMove callback. Similarly, if a button has been pressed on the gamepad, Joystix executes its onButtonPress callback. This enables us to have Joystix input move the Agent around. For example, in our game.js file, we call a doMove method on the Agent when Joystix detects movement.
If no gamepad is detected, Joystix next uses Seb Lee-Delisle's JavaScript multi-touch game controller. This works by drawing a thumbstick wherever the user touches (and holds) the screen on the left, and a fire button if they touch the right side of the screen. The same onMove and onButtonPress callbacks are fired by Joystix, so the player agent doesn't need to care where the input is coming from.
If there's no gamepad and no touch, then Joystix will listen for WASD or arrow key press events. The Space and Enter keys act as the fire button.
The Joystix source is bundled with the files for this tutorial, or can be accessed on GitHub.
Collision management
We can move our player agent around, but he walks right over all the walls. We're going to need an object that can handle collision detection. Collision detection can be complicated, depending on the type of game you're making. There are many different bounding box and line intersection algorithms to choose from - and these can be tricky to master. Fortunately, for tile-based games, it's much easier. We can just set a tile as walkable or unwalkable and prevent movement into them.
For our CollisionManager we need to know what the game map looks like, where the player is and where they want to go. It then checks to see if the new position is walkable and, if so, returns their new position. If the tile is unwalkable, the CollisionManager returns the original position.
function CollisionManager(options){
  this.map = options.map;
}
CollisionManager.prototype.getPosition = function(isY, x, y, intent){
  var newPosition = isY ? y : x,
    tryPosition = isY ? Math.floor(y+intent) : Math.floor(x+intent);
  if(isY && !this.map[tryPosition+1][Math.floor(x)+1]){
    newPosition = y+intent;
  }else if(!isY && !this.map[Math.floor(y)+1][tryPosition+1]){
    newPosition = x+intent;
  }
  return newPosition;
};
Keeping collisions managed by one object reduces the coupling between user input and the player, and allows for easier extension or modification later. Having the CollisionManager return their new position rather than returning whether a collision occurred or not means that the agents don't need to worry about what happens when they hit a wall. All the agents need to know is where they end up.
You'll notice that the first argument passed to the getPosition function is called isY and that getPosition only returns a single value. This allows us to handle the Y and X movement separately. If the agent hits a wall then they'll slide along it rather than getting stuck to it.
Extending agents into enemies
The next thing to make for our game is the enemies. The enemies will be agents, just like our player, except they won't respond to user input. Instead, the Mob object will extend the Agent object and add a chooseAction method, which replaces user input with some simple artificial intelligence (AI).
The mob will also take a reference to the player position in its constructor. The targetAgent is the agent that the mob should walk towards:
Mob.js
return Agent.extend({
  constructor: function(options){
    this.targetAgent = options.targetAgent;
    Agent.prototype.constructor.call(this,options);
  },
  chooseAction: function(){
    var dx = this.targetAgent.position.x - this.position.x,
      dy = this.targetAgent.position.y - this.position.y,
      moveX = dx*0.03,
      moveY = dy*0.03,
      absX = Math.abs(moveX),
      absY = Math.abs(moveY);
    moveX = absX/moveX * Math.max(absX,0.05);
    moveY = absY/moveY * Math.max(absY,0.05);
    return {x:moveX, y:moveY};
  }
});
chooseAction picks a position from the enemy that's closest to the player, capped to a maximum of +/-0.05 distance away in either X or Y to stop it moving too fast. This means the enemy will walk towards the player on each tick of the game engine.
Apart from this change, our enemies have all the same methods and properties as our player agent and can be handled in the same way by our CharacterRenderer and CollisionManager. The only difference is that, where user input defines where the player wants to go, we'll need to run chooseAction in order to get the coordinates that define where the mob wants to go.
The mobs have their own tileset, which uses the same sprite as the agent, but uses a different tile specification to reference enemy images on the sprite rather than player.
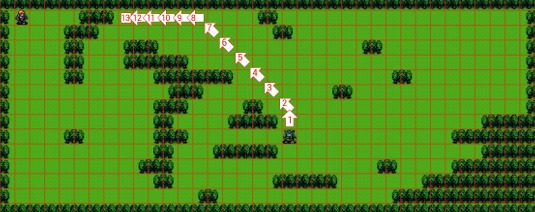
With a slightly larger map, the path our enemy will take if the player does not move is shown overleaf. Note that by the time it moves into the thirteenth tile, the enemy gets stuck behind the line of trees. Every turn, it will try to move in a straight line towards the player, which, by this point, is straight into a tree.
Pathfinding
Our enemy isn't one of the sharpest tools in the box at the moment, and walks straight into walls. It would be much better if he could walk around them instead. In order to do this, we're going to need to use a pathfinding algorithm.
We'll be using the A* algorithm, which is very accurate as well as being reasonably fast. First, we're going to add a new method to our mob: getAStarMovement.
getAStarMovement: function(){
  var map = this.getWalkableMap(),
    path;
  map[Math.floor(this.position.y)][Math.floor(this.position.x)] = 's';
  map[Math.floor(this.targetAgent.position.y)][Math.floor(this.targetAgent.
  position.x)] = 'g';

  path = astar(map,'manhattan',true);
  if(path && path.length>1){
    return {
      x: path[1].col,
      y: path[1].row
    };
  }
  return this.position;
}
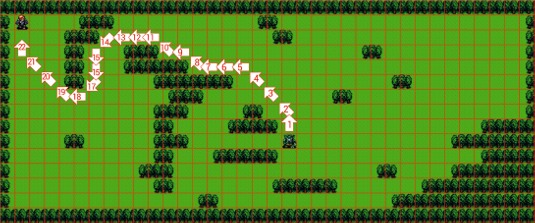
A* requires a walkable map, which we can generate from our collision map. Anything but a 0 is defined as an unwalkable tile, and any 0s are set as walkable tiles. We then add an s to mark the start point and g to mark the goal (the player's position). The path taken is generated by the A* algorithm, and the first entry in the path is returned as the next move to take.
chooseAction then uses getAStarMovement in order to determine which tile to move into in order to follow the optimal path calculated by A*:
chooseAction: function(){
  var nextMove = this.getAStarMovement(),
    dx = nextMove.x - this.position.x,
dy = nextMove.y - this.position.y,
The A* algorithm used is bundled with the files for this tutorial. It's based on Matthew Trost's 'A-Star Pathfinding Algorithm'.
In conclusion
In this tutorial we've built a tile-based HTML5 game that will run on a wide variety of browsers. We've looked at how a 2D array can be turned into a game area, how we can populate it with enemies and a player, and how we can control those agents in a variety of ways.
You don't just have to make a roguelike game: tiles can work for a wide variety of games and the source code should serve as a good base for many. Have fun!
Words: Dan Nearne
This article originally appeared in net magazine issue 245.

The Creative Bloq team is made up of a group of art and design enthusiasts, and has changed and evolved since Creative Bloq began back in 2012. The current website team consists of eight full-time members of staff: Editor Georgia Coggan, Deputy Editor Rosie Hilder, Ecommerce Editor Beren Neale, Senior News Editor Daniel Piper, Editor, Digital Art and 3D Ian Dean, Tech Reviews Editor Erlingur Einarsson, Ecommerce Writer Beth Nicholls and Staff Writer Natalie Fear, as well as a roster of freelancers from around the world. The ImagineFX magazine team also pitch in, ensuring that content from leading digital art publication ImagineFX is represented on Creative Bloq.
