Create your own brushes in Photoshop
It's easier than you think to create your own Photoshop brushes. We walk you through the process, in nine simple steps.

It's much easier than you might think to create your own brush in Photoshop. And once you have made your brush there are a swathe of settings you can change to give some great effects. This feature has been available since before Photoshop CS although some of the brush settings have been added since.
You’re going to start by creating your brush. In this tutorial you can use the brush you’ve created to add some decorations to a Christmas tree. So you’ll learn how to create a Christmassy star you can turn into a brush, which you can then use to add streamers of stars to the tree. Then you can have another go, creating a brush from a bauble we’ve also supplied.
Download the tree and bauble for this tutorial here
01. Set up a new document

Start a new document that is 500 pixels square with a white background. Select the Polygon Tool and make sure Shape is selected in the Options bar. Choose how many sides (in other words, points) you want and click the drop-down to select Star and define the indent (how pointy the star will be).
02. Draw your star
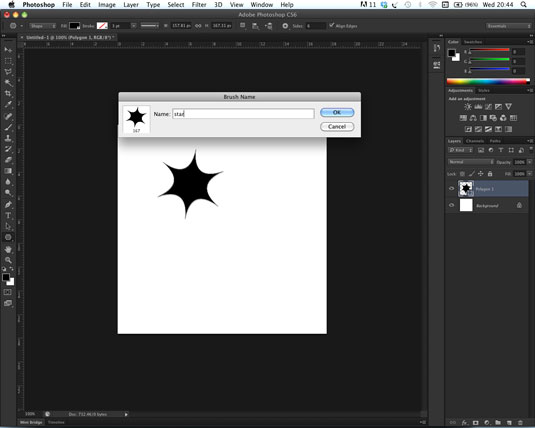
Make sure your foreground colour is black and click and drag to draw your star. It doesn’t matter how large it is since you’ll be able to resize it once it’s a brush. Go to Edit > Define Brush Preset and give your brush a name before clicking OK.
03. Try your brush out
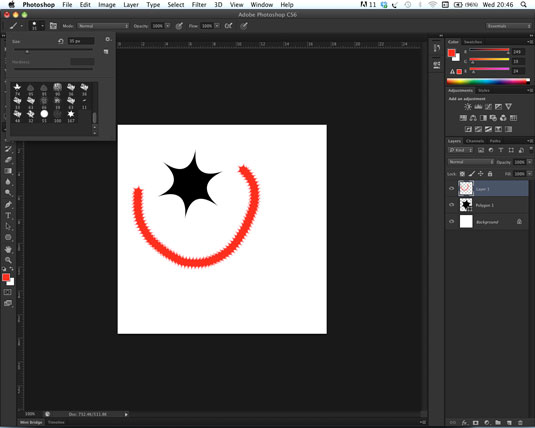
Go to the Brush tool (press B) and click the Brush Preset picker in the Options bar at the top. You can change the size of your brush but not the hardness. You can also press [ and ] to make your brush smaller and larger respectively. Making the original brush black just means the brush is solid, not that it only paints in black, so choose the foreground colour you want to paint with. Create a new layer and click and drag to try a brush stroke.
04. Changing the spacing
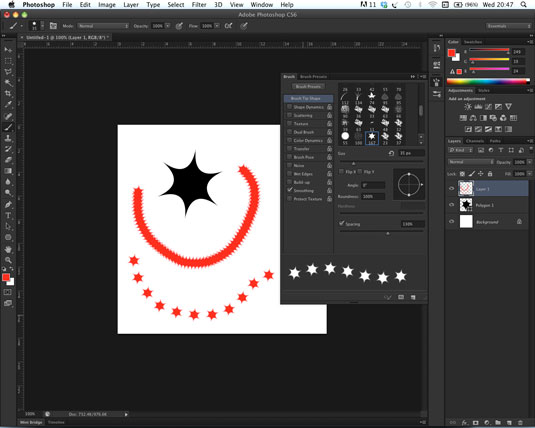
You’ll find the stars are indistinguishable so you’ll need to change the spacing. Go to the Brush panel (press F5) and click Brush Tip Shape where you can change the spacing to one you like. Try another brush stroke to see the effect.
Daily design news, reviews, how-tos and more, as picked by the editors.
05. Painting multi-coloured stars
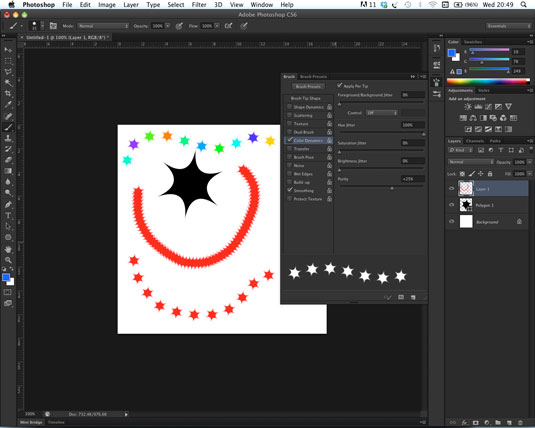
A single coloured star is a little boring so in the Brush panel go to Color Dynamics and change the Hue Jitter to 100%. You could also increase the Purity a little to create more intense colours. Have another go at painting and you should find the stars are multi-coloured.
06. Creating a faded star
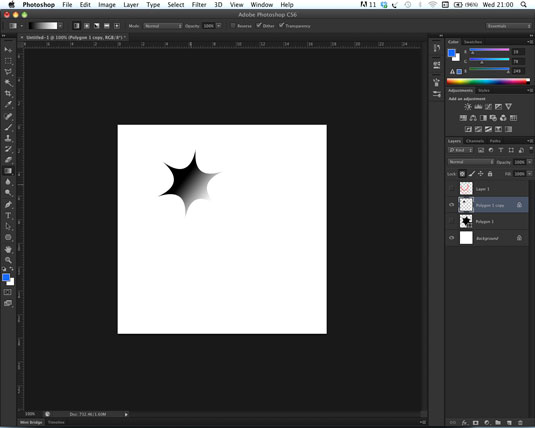
Now you have the hang of this you could try creating a new star brush that fades out on one side. Select your Shape layer and go to Layer >Duplicate Layer. Then Right-click and select Rasterize so you can add a gradient. Lock the Layer Transparency and select the Gradient tool (press G) and make sure you have the black to white gradient in the Options bar. Click and drag across the star so one edge fades to white.
07. Creating a faded star brush
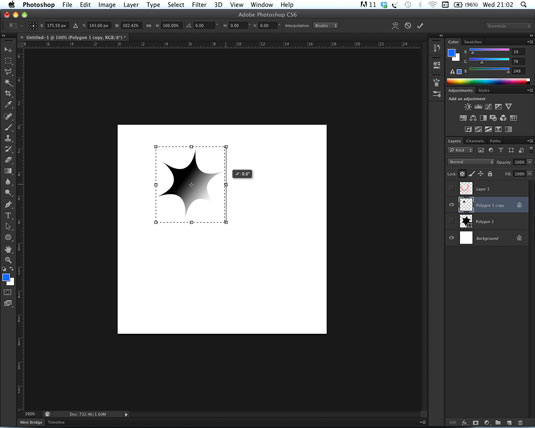
Now you need to define the area of your document that you want to turn into a brush so use the rectangular marquee tool to select your faded star (remember you can use Select>Transform Selection if your rectangular marquee doesn’t fit when you first create it). Now go to Edit>Define Brush Preset, type in a name and click OK.
08. Trying out your brush
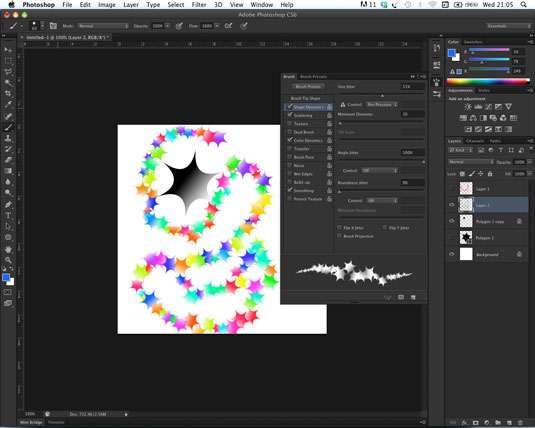
Go to the Brush tool (press B), check your settings in the Brush panel and try out your new brush. You’ll notice that where the star shape you used for your brush faded to white the brush fades to becoming see-through.
09. Decorating the Christmas tree
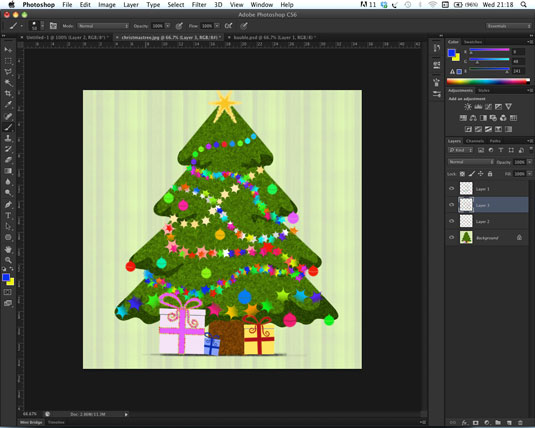
You should be ready to start decorating the Christmas tree. Open christmastree.jpg and create a new layer for each stream of stars. You can also open bauble.png to create a bauble brush and try painting both streams of baubles and clicking once for a single bauble. Try out other brush settings for more interesting effects, particularly Size and Angle Jitter and Scatter.
Words: Susannah Hall is an Adobe Certified Expert and a writer for Computer Arts
Like this? Read these!
- 15 creative Christmas commercials to inspire you
- Christmas designs: Classic vectors for your seasonal projects
- 110 must-have Christmas gifts for creatives
Let us know how you get on with the tutorial in the comments box below!

The Creative Bloq team is made up of a group of art and design enthusiasts, and has changed and evolved since Creative Bloq began back in 2012. The current website team consists of eight full-time members of staff: Editor Georgia Coggan, Deputy Editor Rosie Hilder, Ecommerce Editor Beren Neale, Senior News Editor Daniel Piper, Editor, Digital Art and 3D Ian Dean, Tech Reviews Editor Erlingur Einarsson, Ecommerce Writer Beth Nicholls and Staff Writer Natalie Fear, as well as a roster of freelancers from around the world. The ImagineFX magazine team also pitch in, ensuring that content from leading digital art publication ImagineFX is represented on Creative Bloq.
