Fast masking in Photoshop: 5 pro tips
Creating masks in Photoshop can be a real time-drain. Here are 5 ways to speed things up.
Sign up to Creative Bloq's daily newsletter, which brings you the latest news and inspiration from the worlds of art, design and technology.
You are now subscribed
Your newsletter sign-up was successful
Want to add more newsletters?
Masking is a term used to describe the process of removing part an image from the background in Photoshop. You can then use the masked object in another composition.
Masking can be quite complex and time consuming, especially if the foreground image intermingles with the background (as with fur or hair). Here are five ways to speed things up.
01. Add a high-contrast layer
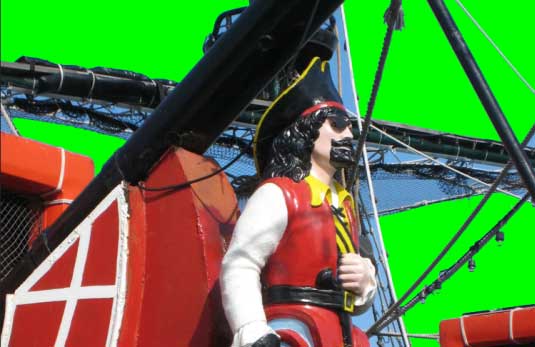
Before you begin, save a copy of the original image. If anything goes wrong with the copy you have a backup. And when you begin the masking project, make a copy of the background layer. This also preserves the original image.
Article continues belowWhen working on the mask, add a high-contrast layer (RGB: 0,255,0) beneath the image you're masking. This will help to define the edge and will also show holes in your mask. You can see how the green high contrast mask works in the mask above.
02. Use the Magic Wand Tool

One of the simplest forms of masking is to use the Magic Wand Tool. This works well with large patches of sky or backgrounds of similar colour. To mask an image like the one above, make sure you copy the background layer and create a high contrast layer underneath.

In the copied background image, select the Magic Wand tool from the left toolbar. This will bring up the tools for the Magic Wand in the top toolbar. Set the Sample Size to 3 by 3 Average, the Tolerance to 40 (the default is 32), Anti-alias enabled and Contiguous enabled.
Note: When you enable anti-aliasing it creates a transition at the edge of the mask so it will help to blend into the background of a new image, but sometimes this isn't enough and feathering or refining the edge will be needed (more on that soon).
Sign up to Creative Bloq's daily newsletter, which brings you the latest news and inspiration from the worlds of art, design and technology.
For now, hold down your Shift key, and begin clicking in the sky. It should only take a few clicks to select the entire sky. (Holding down the Shift key allows each click to be added to the selection.)
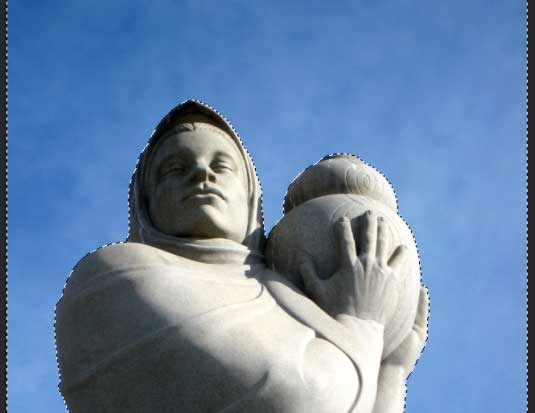
The next step is to go to Select>Inverse (Ctrl+Shift+I).
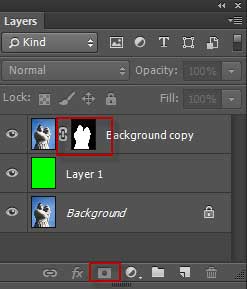
In the Layers panel, click on the Add Vector Mask icon at the bottom of the panel. This creates a mask for our image.
At this point the image could be considered finished but one potential problem remains, which is the edge of the image.
If the edge is too sharp, the image will look like it's pasted into a new scene and won't appear natural.
To fix that problem we make use of feathering, which softens the edge of the image and makes some of the pixels semi-transparent. This allows for a gentler transition into the background.
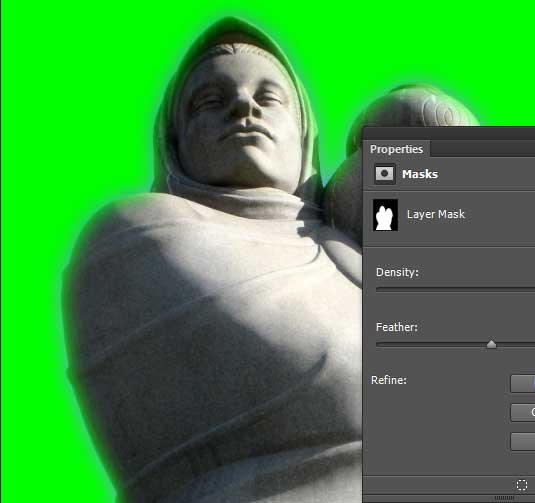
In the Layers panel in the previous screen shot, click on the mask icon in the Background copy layer. This opens the Properties dialog box. To soften the edge, drag the Feathering slider to the right. In this case I've set it at 30 pixels, which is a high setting, but it clearly shows the feathering as a 'ghosting' around the edge of the image.
03. Use the Quick Selection tool
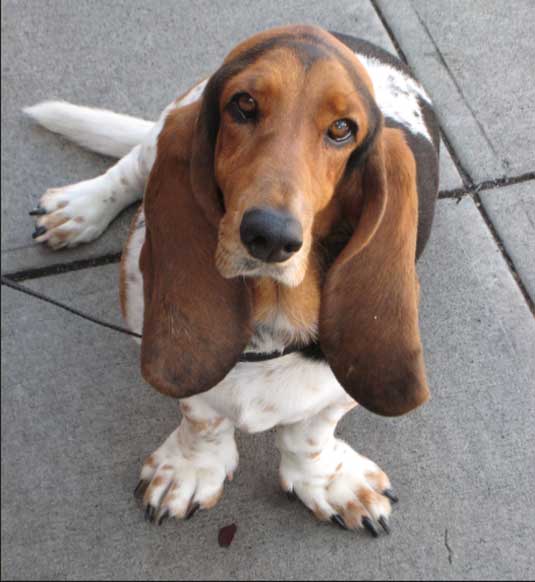
Another way of creating masks is to make use of the Quick Selection tool. Unlike the Magic Wand it doesn't have a tolerance. What it does have is a brush size which can be controlled by the brackets on your keyboard.
This time around we're going to mask this friendly Bassett Hound. As with all the other images, make a copy of the original image and use a high contrast layer below it. Now we're ready to start masking.
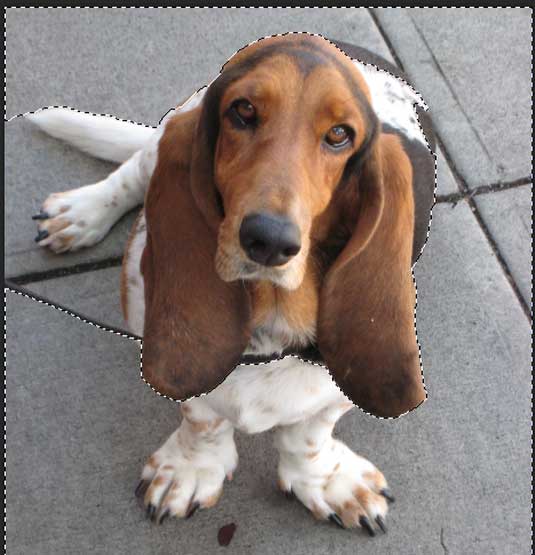
Select the Quick Selection tool, set the brush size to 30 and start dragging the brush around the image. You'll notice that it's quite easy to mask and you'll also see that some areas, like the ones below the ears are not selected. To adjust the mask, click on the Alt key, which creates a negative selection, go inside the mask where the ears are and move the selection outwards. You might find this to be a bit clumsy and if that's the case, zoom in and reduce the size of the brush.
Once you're satisfied with the mask, go to Select>Inverse (Ctrl+Shift+I). After that, go to the layers panel and click on Add Layer Mask.
After that, you can further refine the mask and any necessary feathering by clicking on the Add Layer Mask icon in the Layers panel.
04. Use Refine Edge
Another way of fine tuning the mask is to work with the Refine Edge option. This applies to both the Magic Wand tool and the Quick Selection tool.

To activate it, click on the Refine Edge button on the main toolbar.
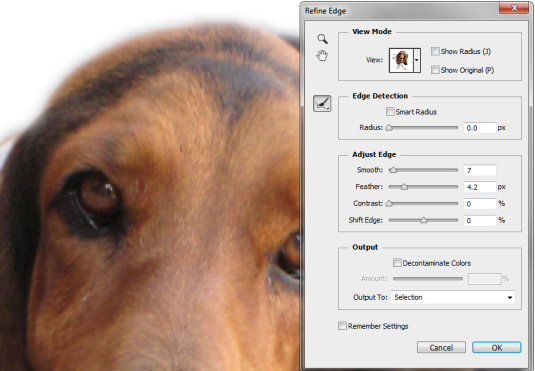
This brings up the Refine Edge dialog box. Here, you have a large amount of control over the edge. A setting of 4.7 pixels was used for the Feather and 7 for Smooth. In the screen shot you can see the effect on the edge of the mask. Click OK to accept your changes.
05. Use the Color Range Command

Occasionally you'll have an image that's difficult to mask. An example is removing the background behind a tree. A great solution is the Color Range dialog box. To access it, click on Select>Color Range.
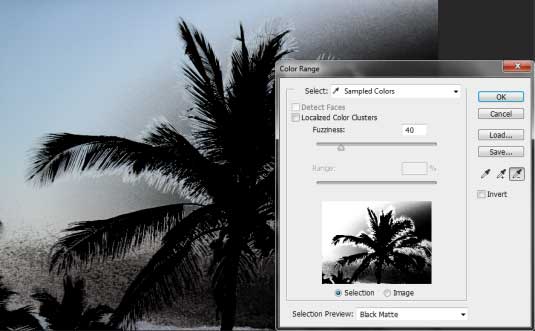
As a starting point, set the Fuzziness setting at 40, then below the preview box, set the radio button to Image and from the Selection Preview popup, click on Black Matte. By doing this, what you see in the preview box will be reflected in the actual image, allowing you to fine tune the mask.
To add to the selection, select the plus eyedropper, and click in the preview area of the dialog box or in the image itself. To remove portions of the selection, click on the minus eyedropper then click in the Selection Preview or in the image. To expand the selection, drag the fuzziness slider to the right until you have the selection you desire and hit OK. This completes the selection. The Color Range command is a fast way of creating detailed masks in a hurry.
You now have a five different ways of masking and checking your masks for consistency. These techniques will save you a considerable amount of time.
Words: Nathan Segal

The Creative Bloq team is made up of a group of art and design enthusiasts, and has changed and evolved since Creative Bloq began back in 2012. The current website team consists of eight full-time members of staff: Editor Georgia Coggan, Deputy Editor Rosie Hilder, Ecommerce Editor Beren Neale, Senior News Editor Daniel Piper, Editor, Digital Art and 3D Ian Dean, Tech Reviews Editor Erlingur Einarsson, Ecommerce Writer Beth Nicholls and Staff Writer Natalie Fear, as well as a roster of freelancers from around the world. The ImagineFX magazine team also pitch in, ensuring that content from leading digital art publication ImagineFX is represented on Creative Bloq.
