How to build a sell-out stadium crowd in Houdini
A step-by-step guide to creating an arena full of cheering people in the industry-standard 3D software.
With so few online resources readily available for creating crowds, the ability to do just that in Houdini 20 was exciting for me. A crowd system is made up of characters that have a set of rules to define their appearance, animations and interactions. Such crowds are essentially animated characters attached to particles, with the movement of those characters, commonly called agents, in a crowd simulation based on an underlying particle simulation in DOPs.
Before you get stuck in, check out our Houdini guide for everything you need to know before using the industry-standard VFX package and for some detailed insight, check out our Houdini 20 review.
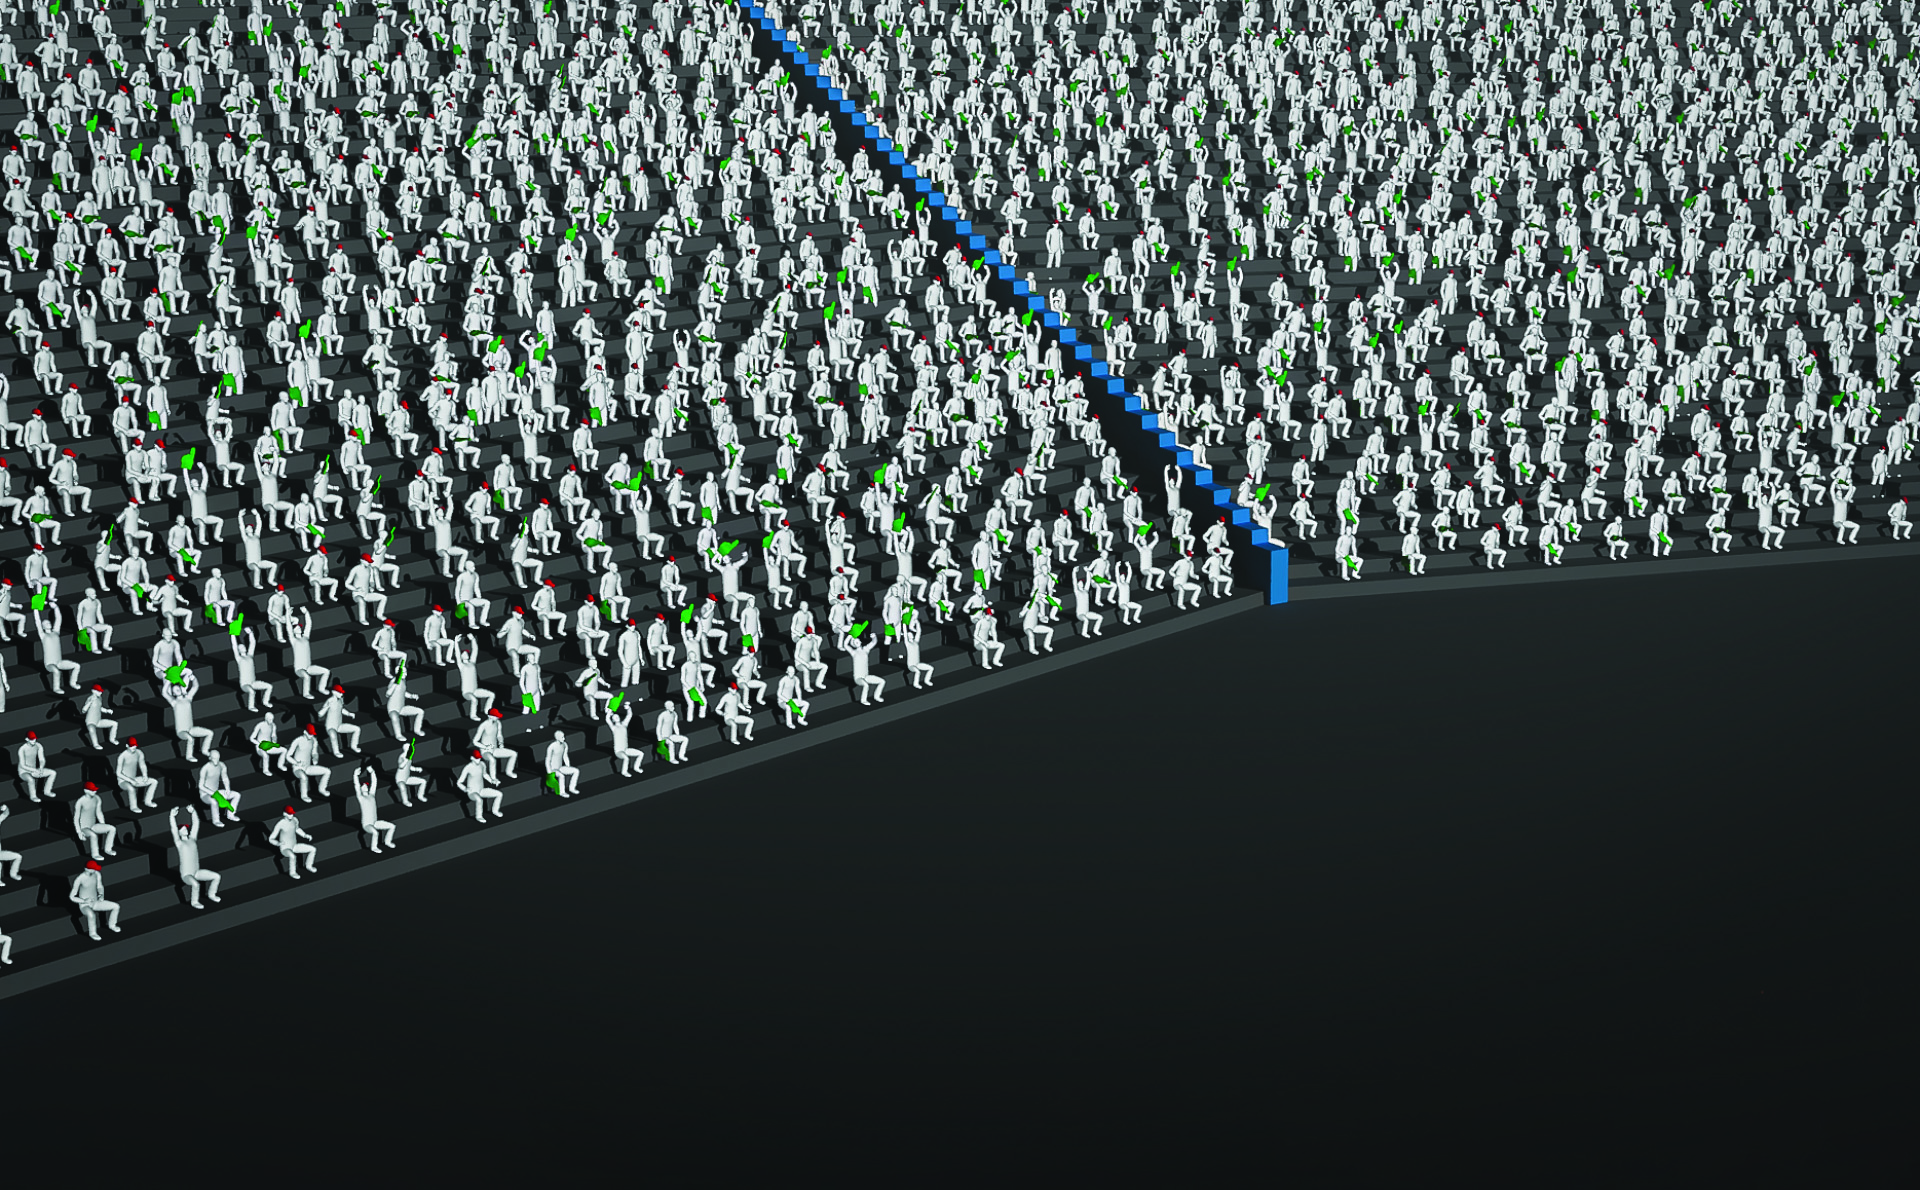
In a crowd simulation, the agents are in a particular state at any given time, such as standing, walking or running. Events can happen in a crowd simulation that change the state of the agent, for example from walking to running. These events are called triggers.
Crowd simulations require both a geometry (SOP) network and simulation (DOP) network. The geometry network is used to create and define the agents and their positions from existing models such as terrain, or in this case our stadium. A simulation network holds the logic that controls the movement of each particle, and in turn the agent attached to it. Within the DOP network, agents can interact with other dynamic elements.
It’s important to remember that when we talk about a crowd, it doesn’t only mean humans. It could be a shoal of fish or a herd of buffalo running in a field, as long as they all follow similar rules and behaviours.
This is a beginner-friendly tutorial, so there’s no prior crowd simulation experience required, but some familiarity with Houdini would be helpful. We’ll cover the basics of crowds, how to create one, and the logic behind them. We’ll also be working procedurally so we can start with a few agents to keep our performance under control, before increasing the number in the final stages.
Our goal is to develop a solid understanding of fundamentals, and pick up some useful tips and tricks for creating crowd scenes. For this we’ll build a stadium full of cheering spectators, and I’ll explain how you can model a similar stadium as well. Should you encounter any challenges, feel free to reach out to me via LinkedIn or email.
Sign up to Creative Bloq's daily newsletter, which brings you the latest news and inspiration from the worlds of art, design and technology.
01. Create the first node
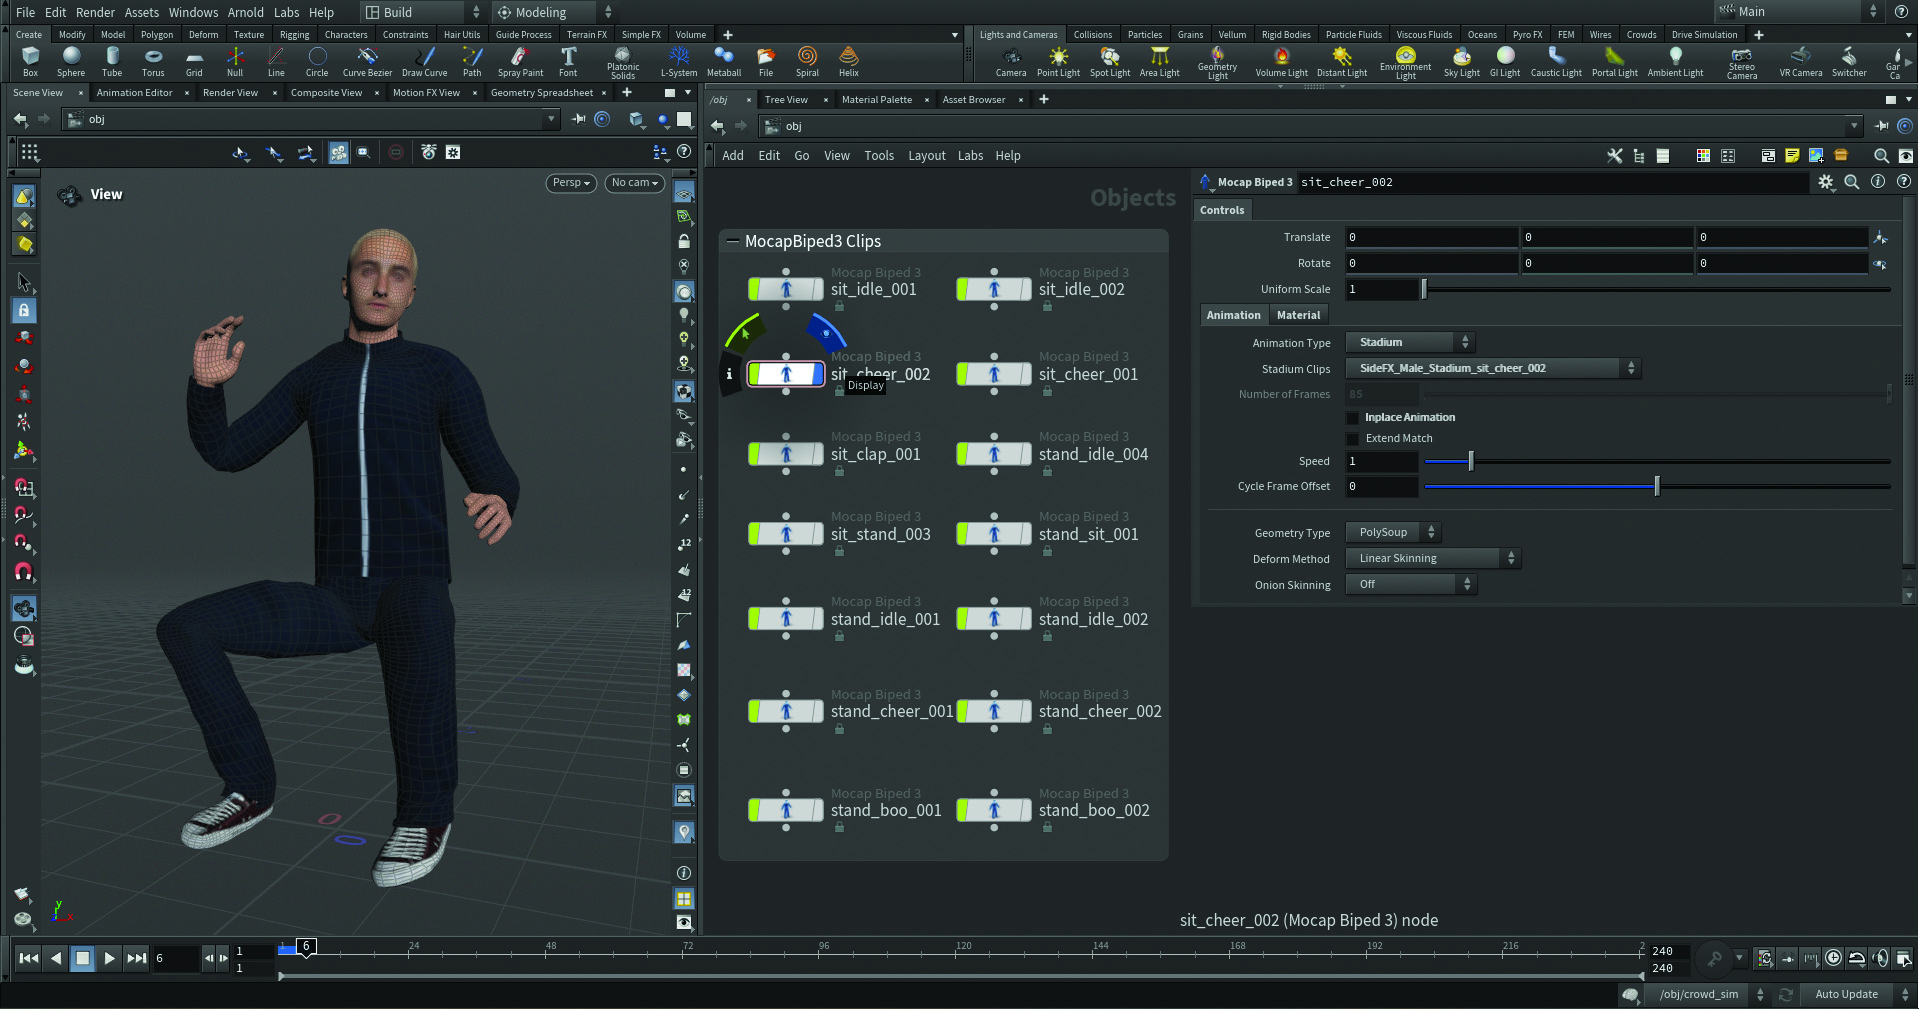
Let’s start by creating a ‘Mocap Biped 3’ node in OBJ context. This will create a character with a bunch of animations, and if you switch the Animation Type to Stadium you can start exploring some of the possibilities. After loading it in, double click on the node and dive inside. Find the ‘geo_skin’ node within and go into that. If we hold the middle mouse button on the last node, ‘skin_geo_deform’, we notice that the character is made of 9,000 points, which is definitely too many to be scattered hundreds of times in a crowd simulation.
02. Agent primitive conversion
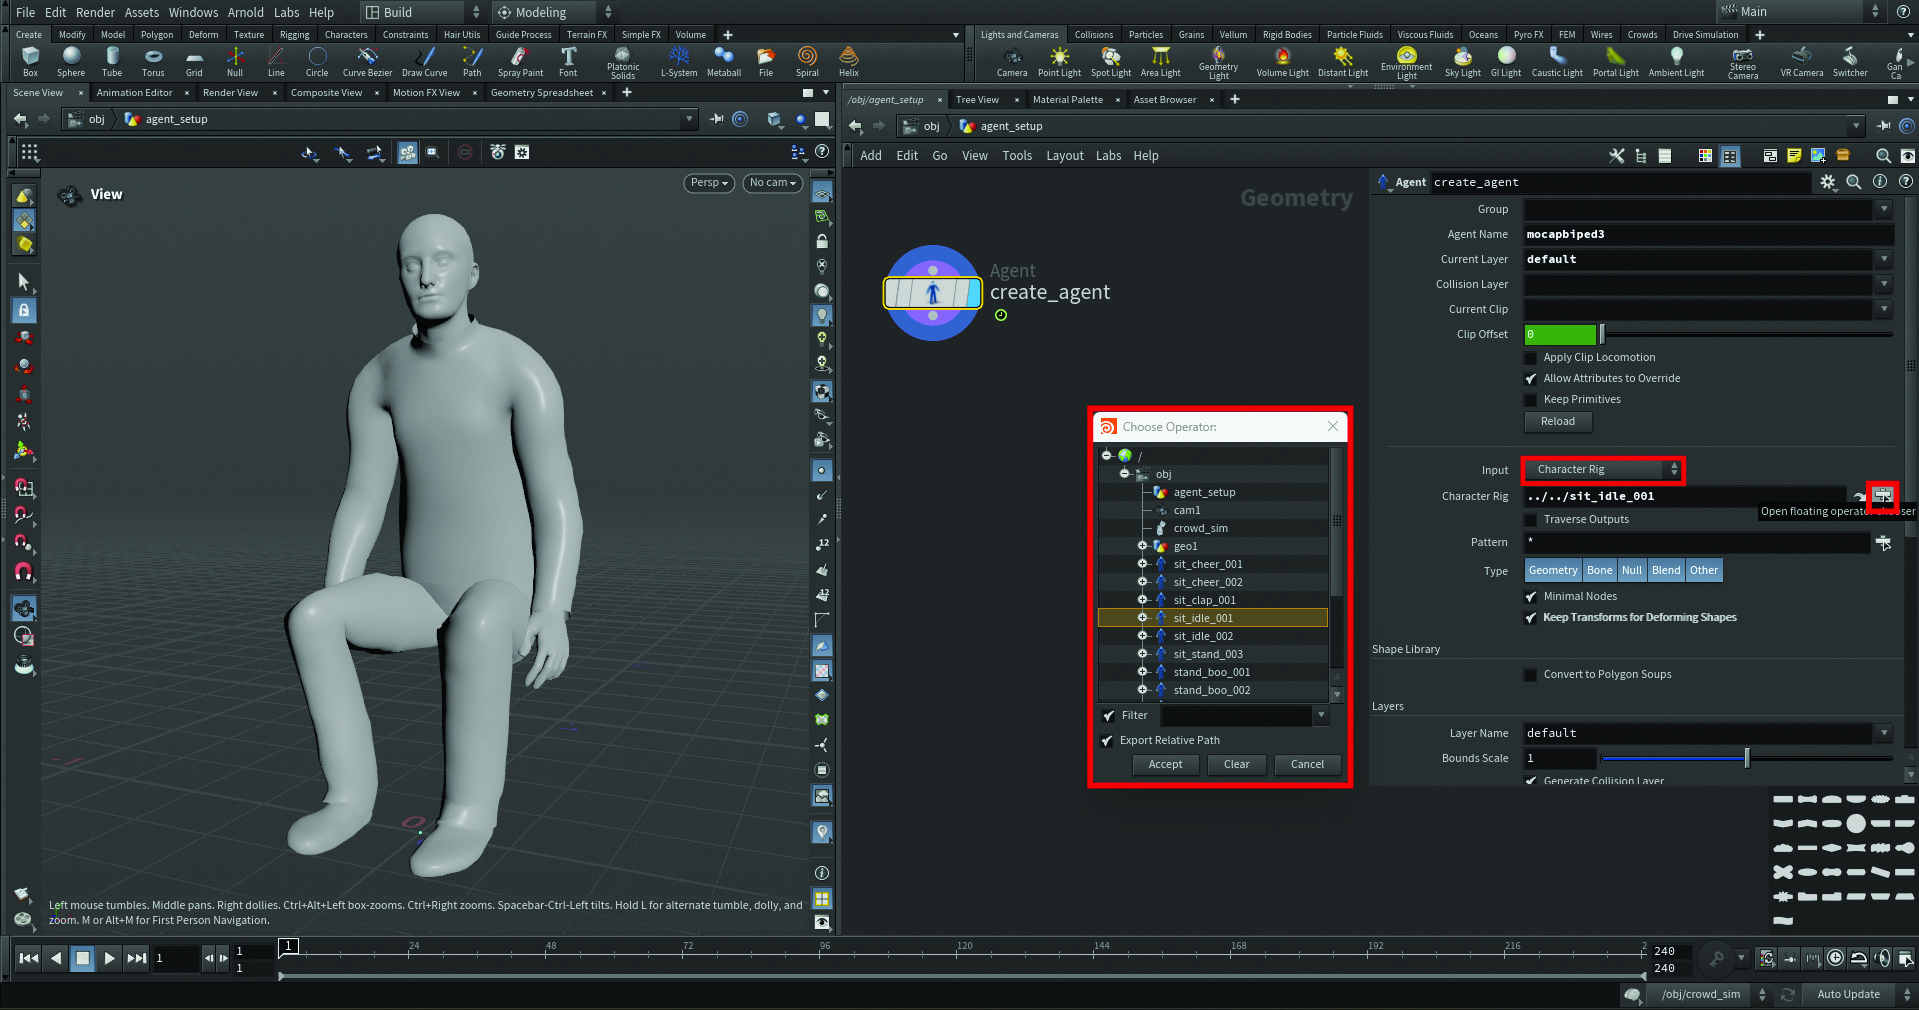
Convert the ‘Mocap Biped 3’ node into an agent primitive; a type of packed primitive typically used to represent a character in a crowd simulation. Similar to a packed primitive, agent primitives contain a single point, so can be treated as a particle in many situations. Our character will be considered as one single point instead of 9,000, improving performance dramatically. Create a Geo node and inside add an Agent node, choose Character Rig in the Input parameter and link the ‘sit_idle_001’ clip. In the Clip Name parm, type “rest”.
03. Add animations
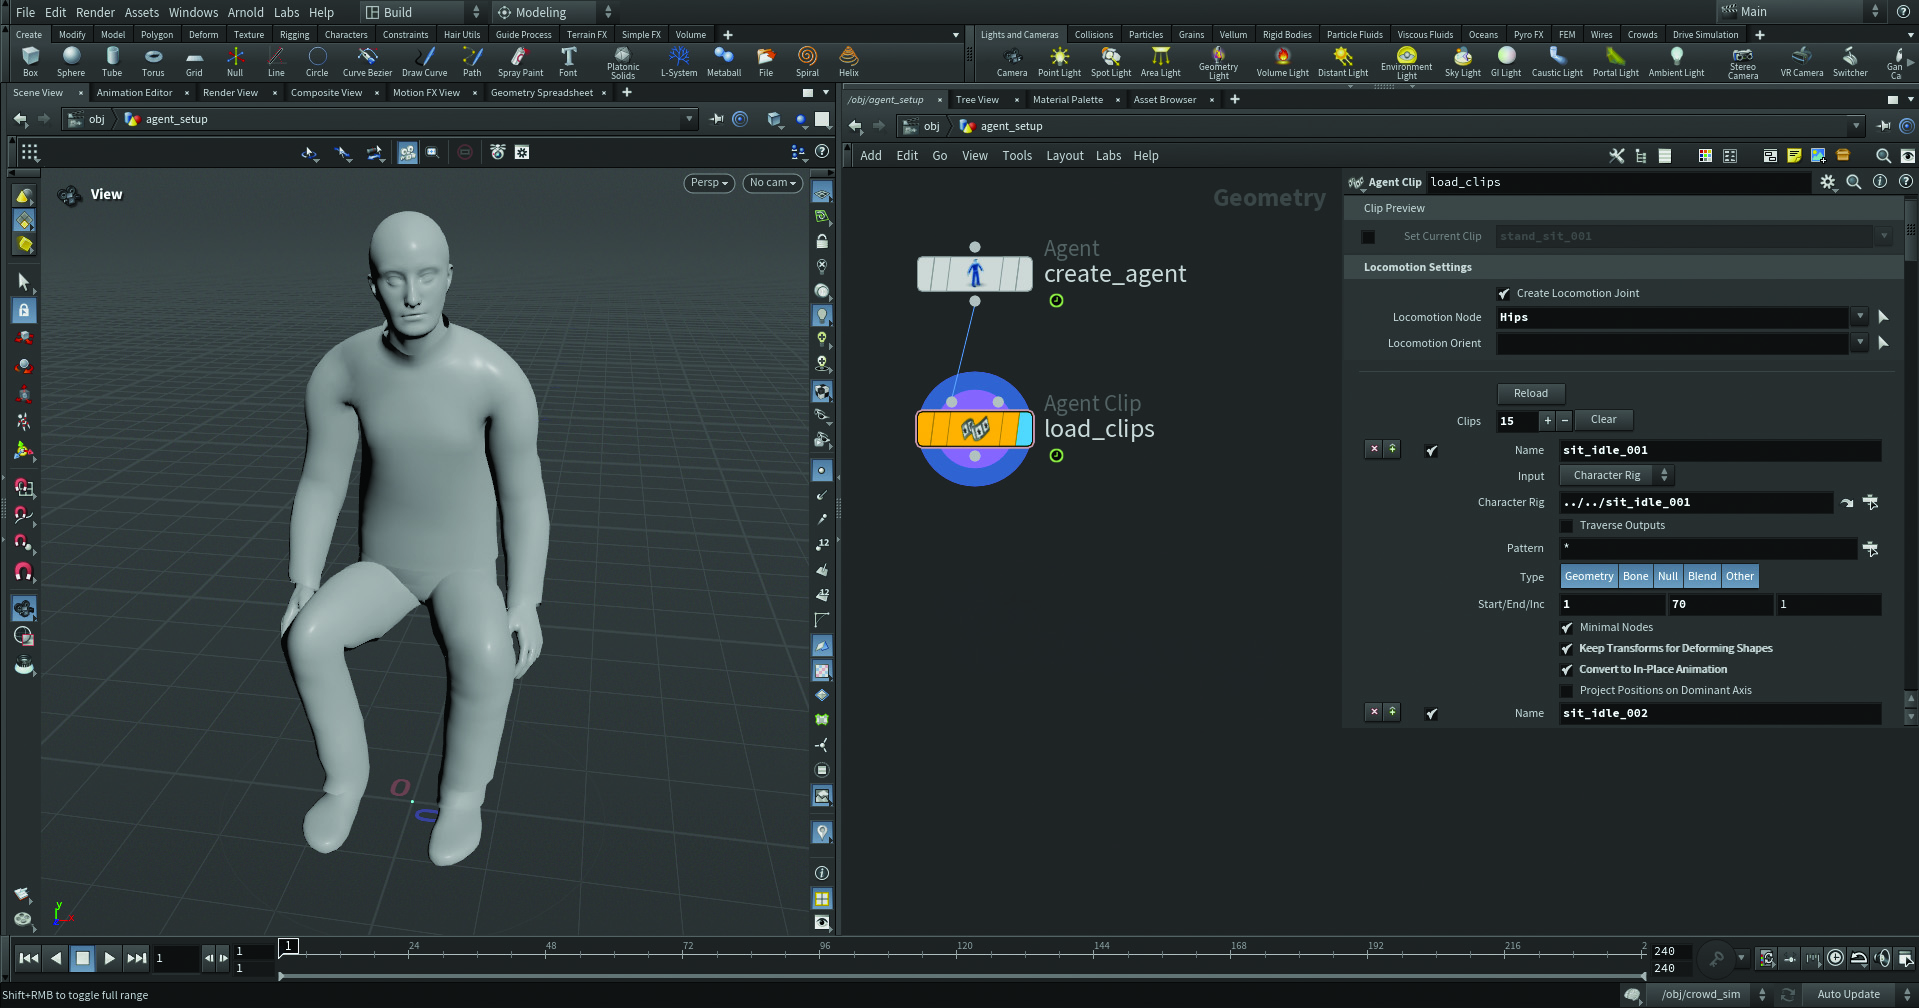
Now we have our agent, let’s give them several animations to make our crowd more realistic. Create an Agent Clip node, press the + icon, and add a new animation exactly like before, but don’t forget to check the ‘Convert to In-Place Animation’ box. Repeat the same step for all the possible animations you want to assign. Lastly, don’t forget to set the Locomotion Node to Hips.
04. Import props
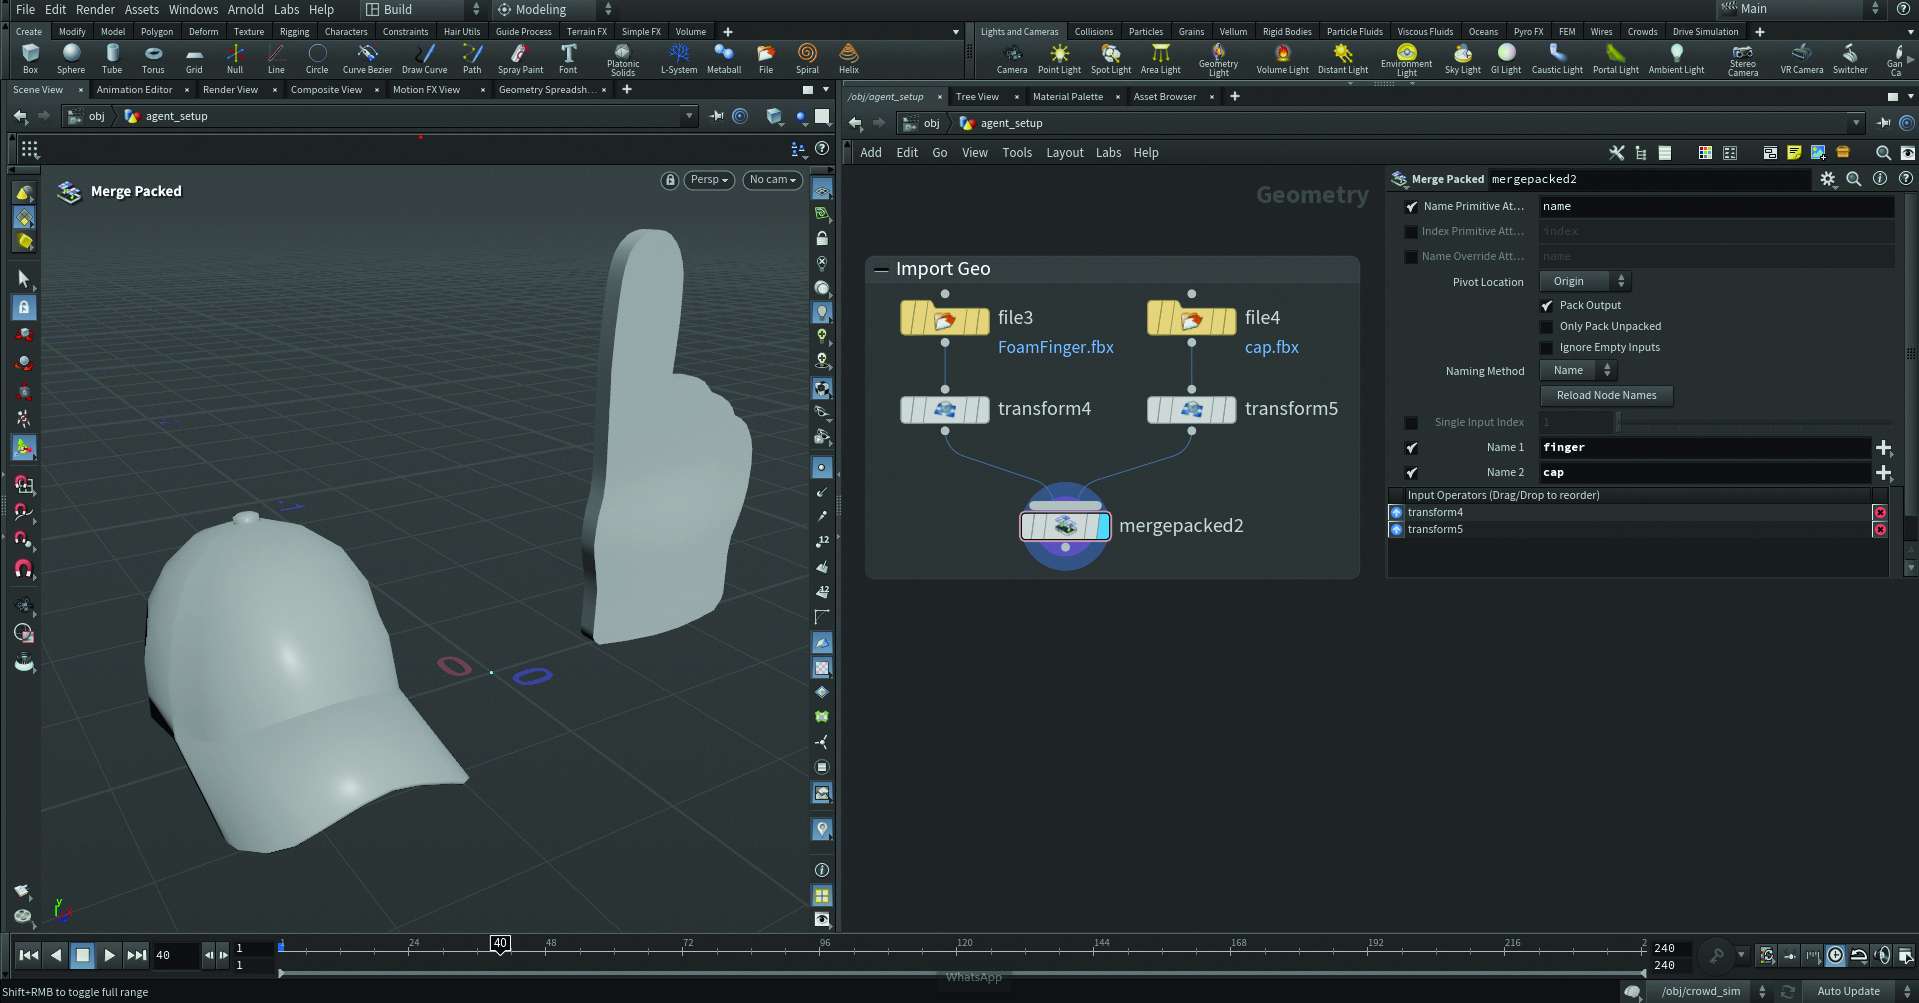
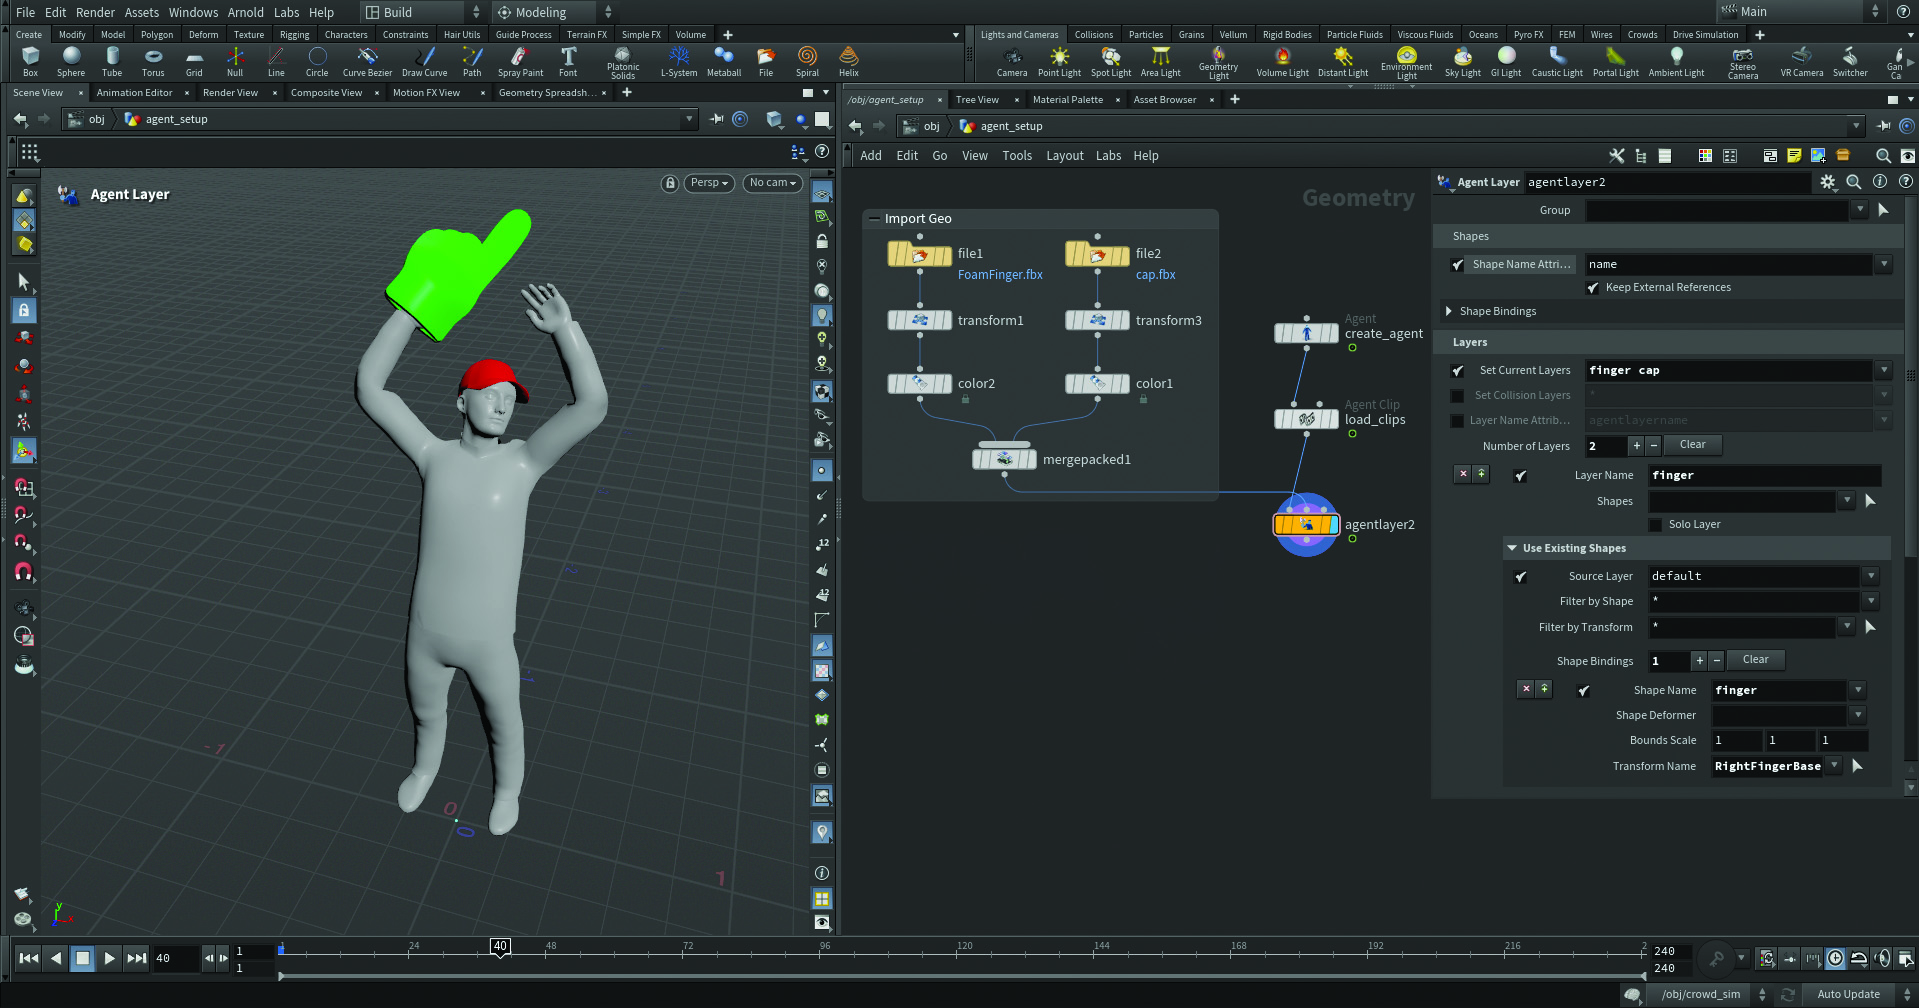
It’s time to bring in some extra items to create more variation in our cheering crowd. To do so, let’s create two File nodes and link them to our Geo from disk. I’m importing a cap and a foam hand, but you’re free to use whatever you like. Make sure to add a Merge Packed node and set the Name to give them an identity. You can use the same logic to import more geometry you might want to add to your crowd.
05. Agent layer

Now that we have our extra geometry, we can create some layers with the Agent Layer node. Once made, we need to specify at which rig bone we want to attach a certain geometry. For example, I’m attaching my foam hand to the agent’s right hand bone, so it will follow it. You might need to transform the original geometry in order to make sure it’s in the correct position/orientation. Remember to set the Shape Name Attribute to ‘name’ as shown in the image.
06. Agent definition caching
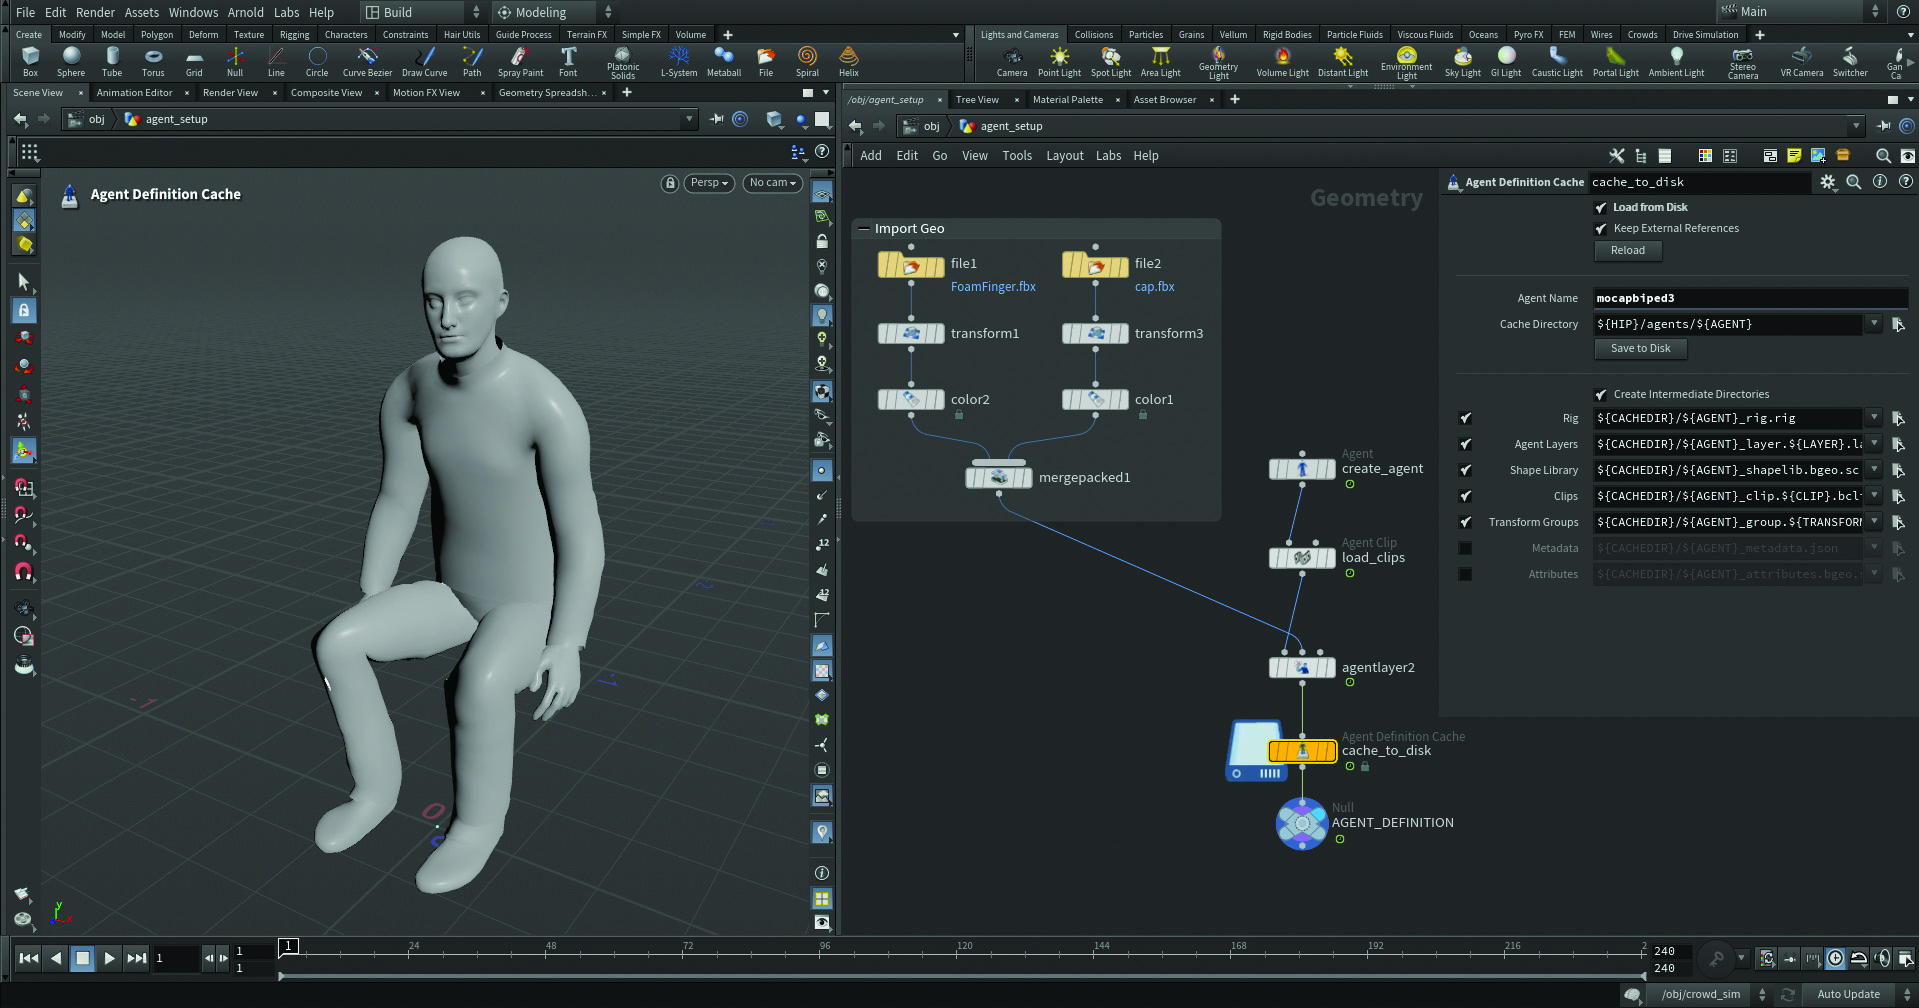
At this stage our agent has some clips and layers that we can randomise. But before doing that, we’ll cache our agent out and save the agent definition to disk. So, drop an Agent Definition Cache node, set an Agent Name, and simply save it to disk. Now when your agent goes back to their initial state, the layers and animation overrides will disappear and we’ll have our rest pose again. This doesn’t mean we’ve lost our work, but that the agent stores all of that information and is waiting for you to randomise it.
07. Smooth transitions
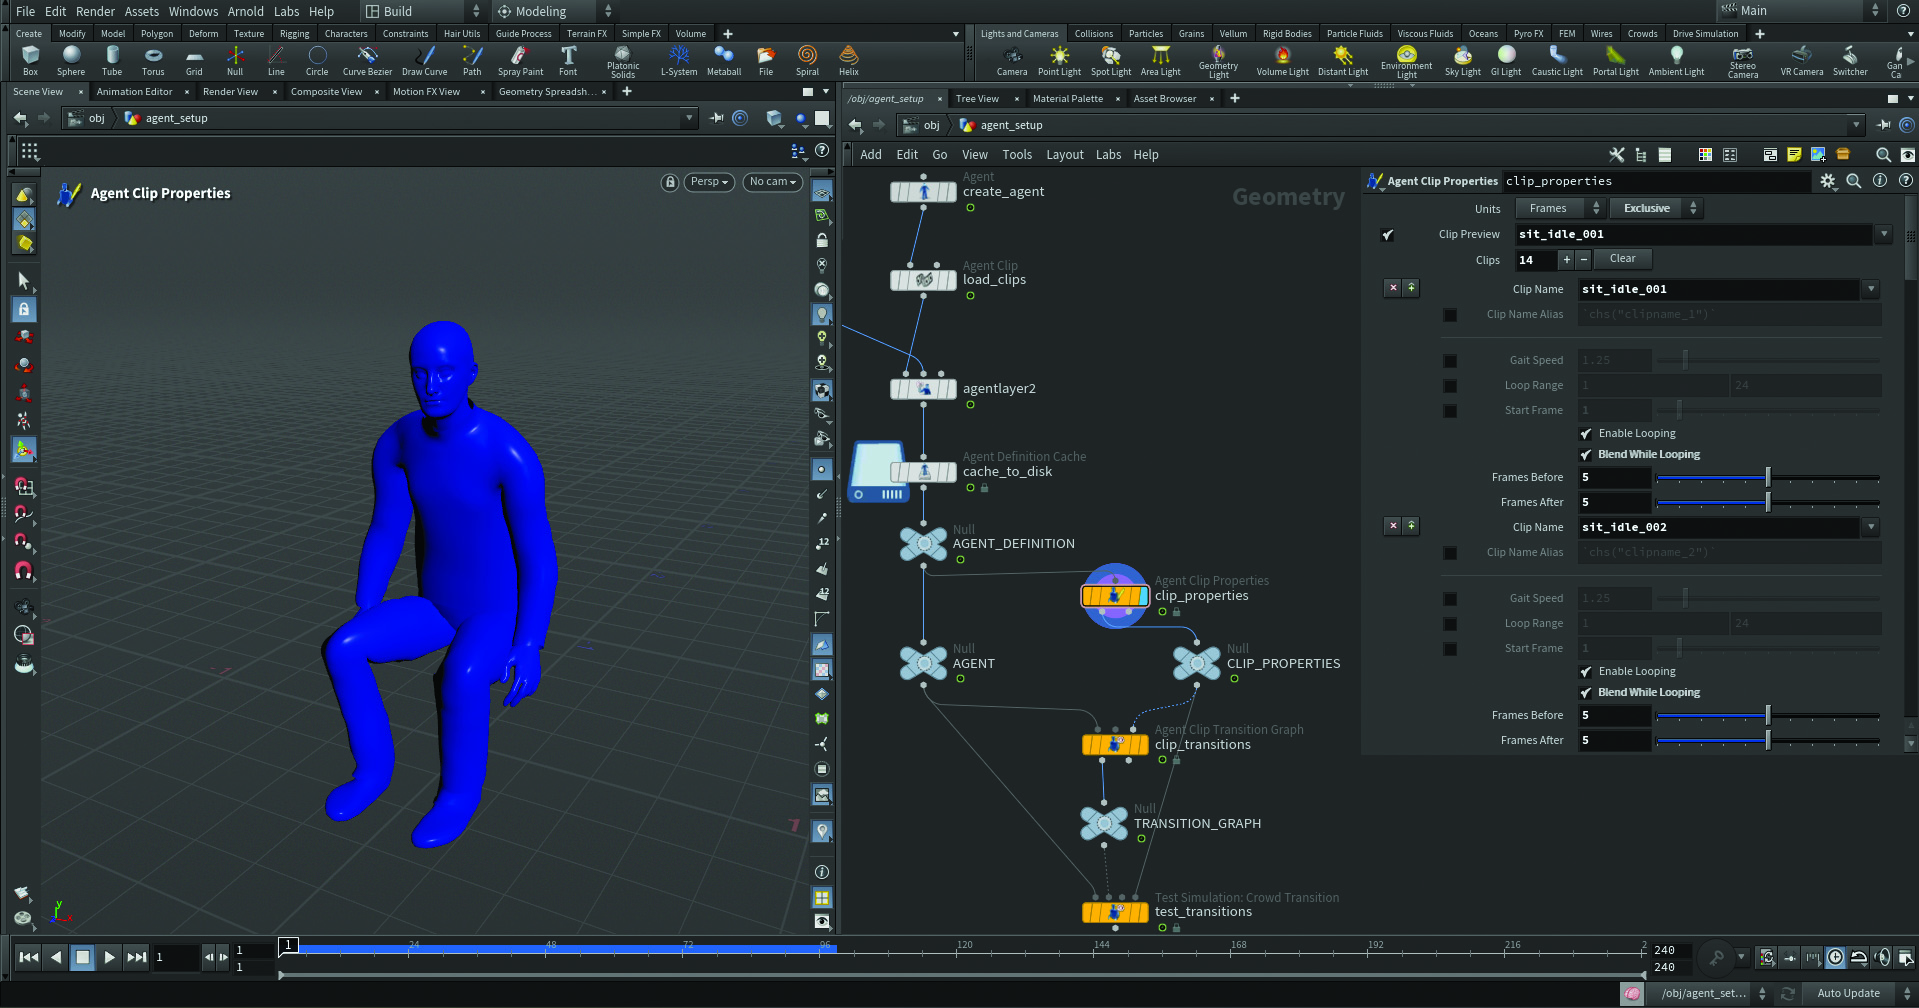
When blending between two animations you’ll probably see a small bump as Houdini doesn’t yet know how to transition them correctly. Prevent this with an Agent Clip Properties node. Specify the clip to work on in the Clip Name parameter, find the bumpy part in the timeline, and enable ‘Blend While Looping’. If this doesn’t work by default, play with the amount of blending frames.
08. Tweak Clips
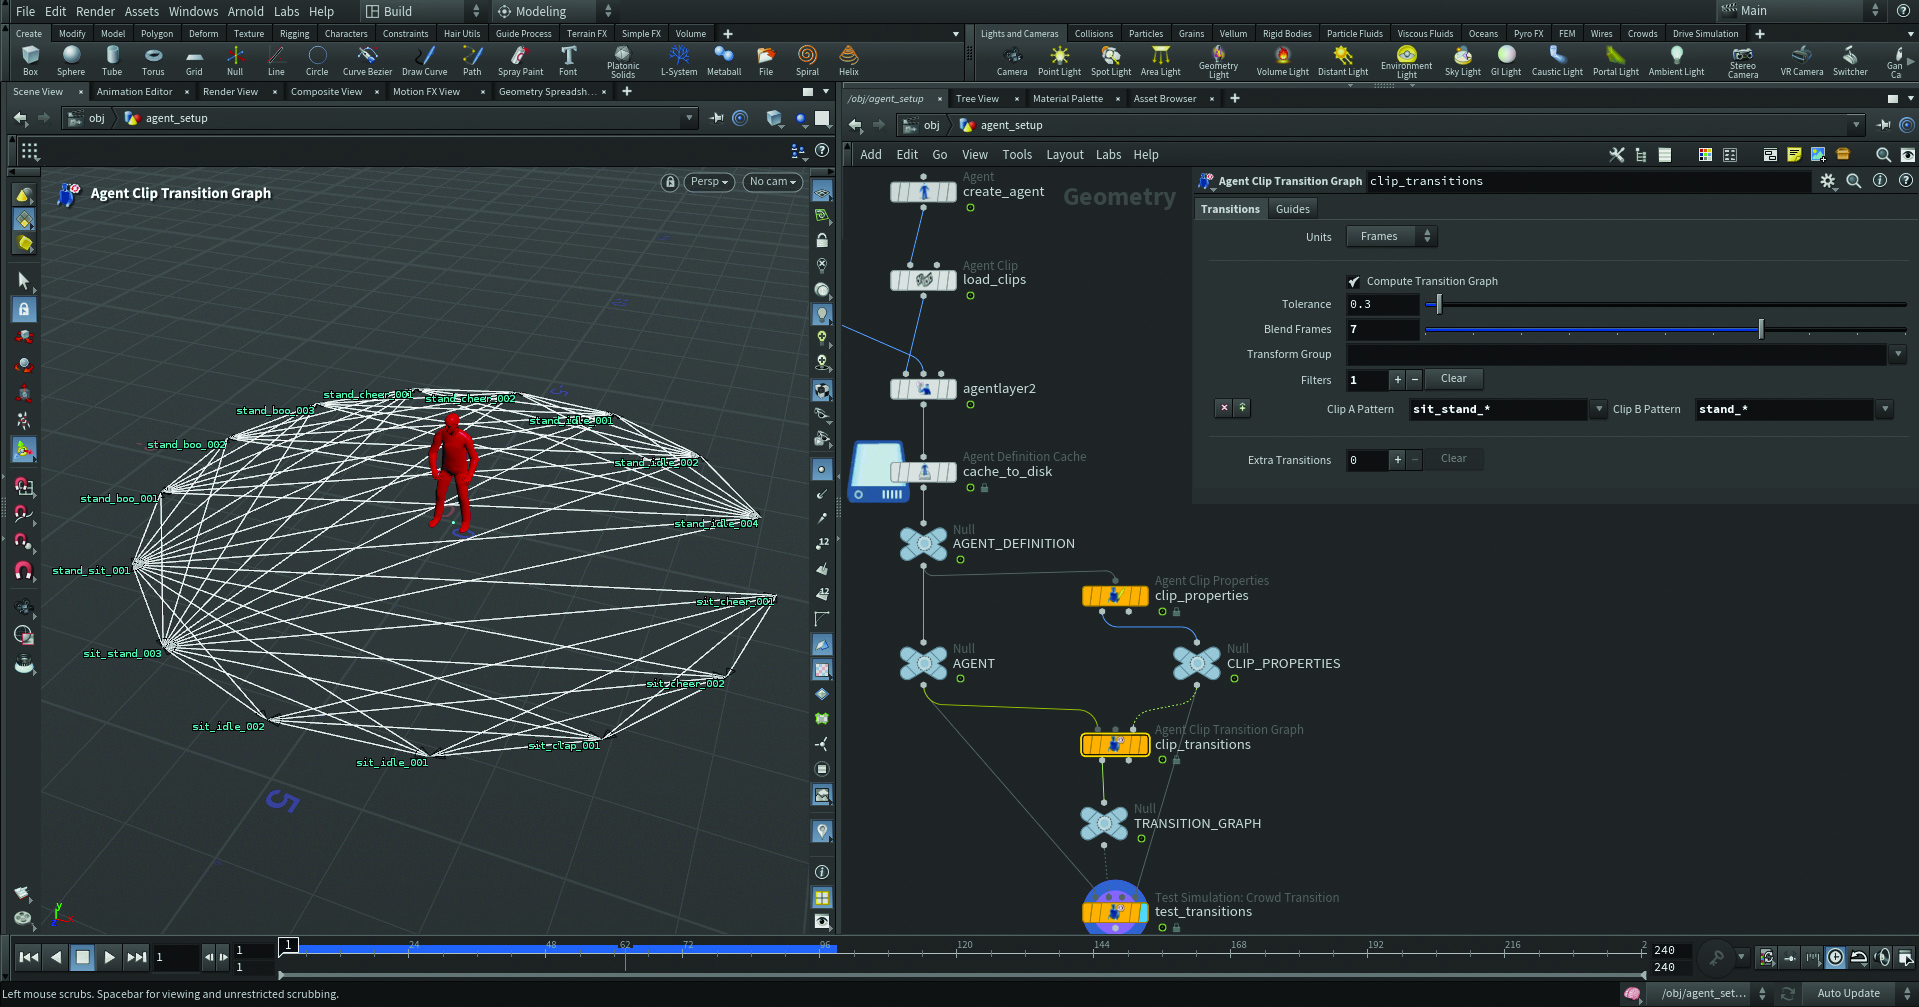
The Agent Clip Transition Graph helps manage how transitions between your animation clips are performed. It shows which clips can switch to each other, and if the source and destination clips can’t directly transition, the graph finds an intermediate clip to make it happen. A polywire network will be generated at the origin with vertices representing the clips, showing how they can blend from one to another. You can also add a ‘Test Simulation: Crowd Transition’ node, which will allow you define the start and end clips, and show you how they’ll blend together with the help of some colours.
09. Create a stadium
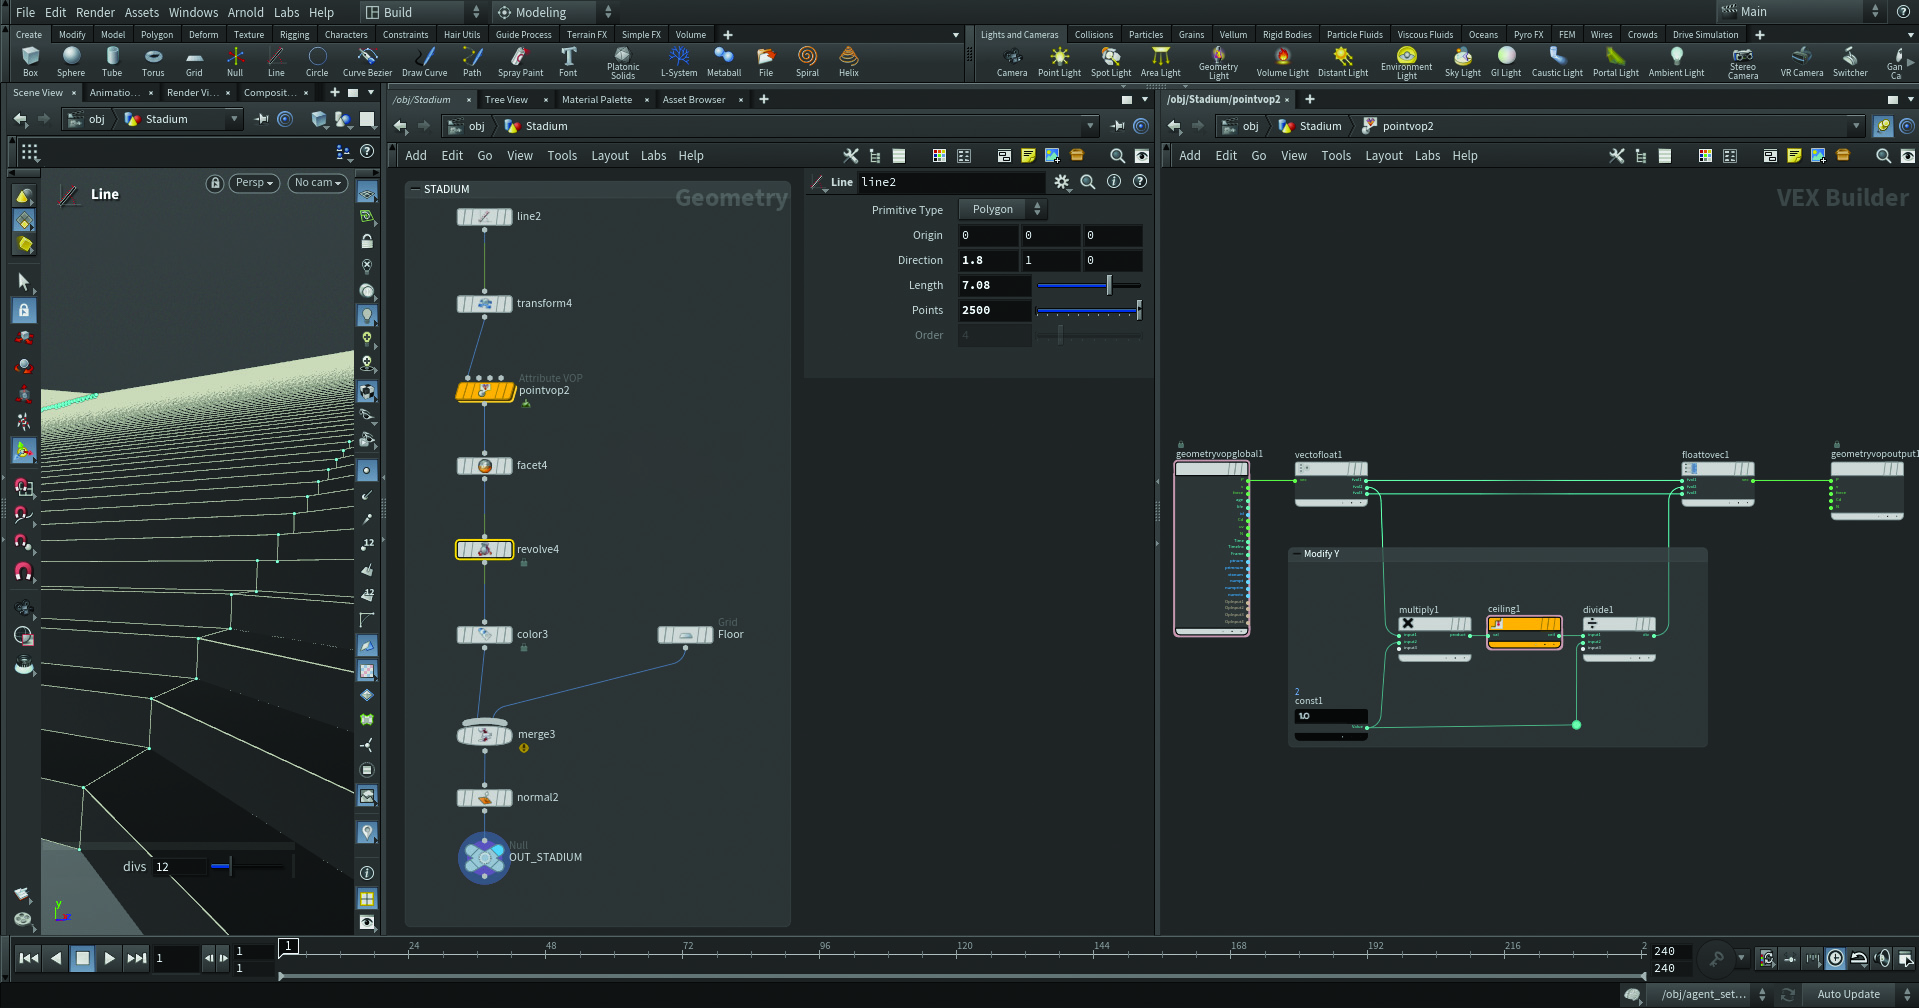
Now we can build a basic stadium to host our crowd. To do so we’ll save a little time by using some nice Houdini logic. In a new Geo node, after creating an inclined line inside a Point VOP, we can use the Ceiling node to create a stepping pattern on the Y axis, and then a Revolve node that will revolve our line around the centre of the world. Add a Transform right after the line so that by moving it, you can control the stadium’s radius. Finally, just add some colours and normals.
10. Make the centre of attention
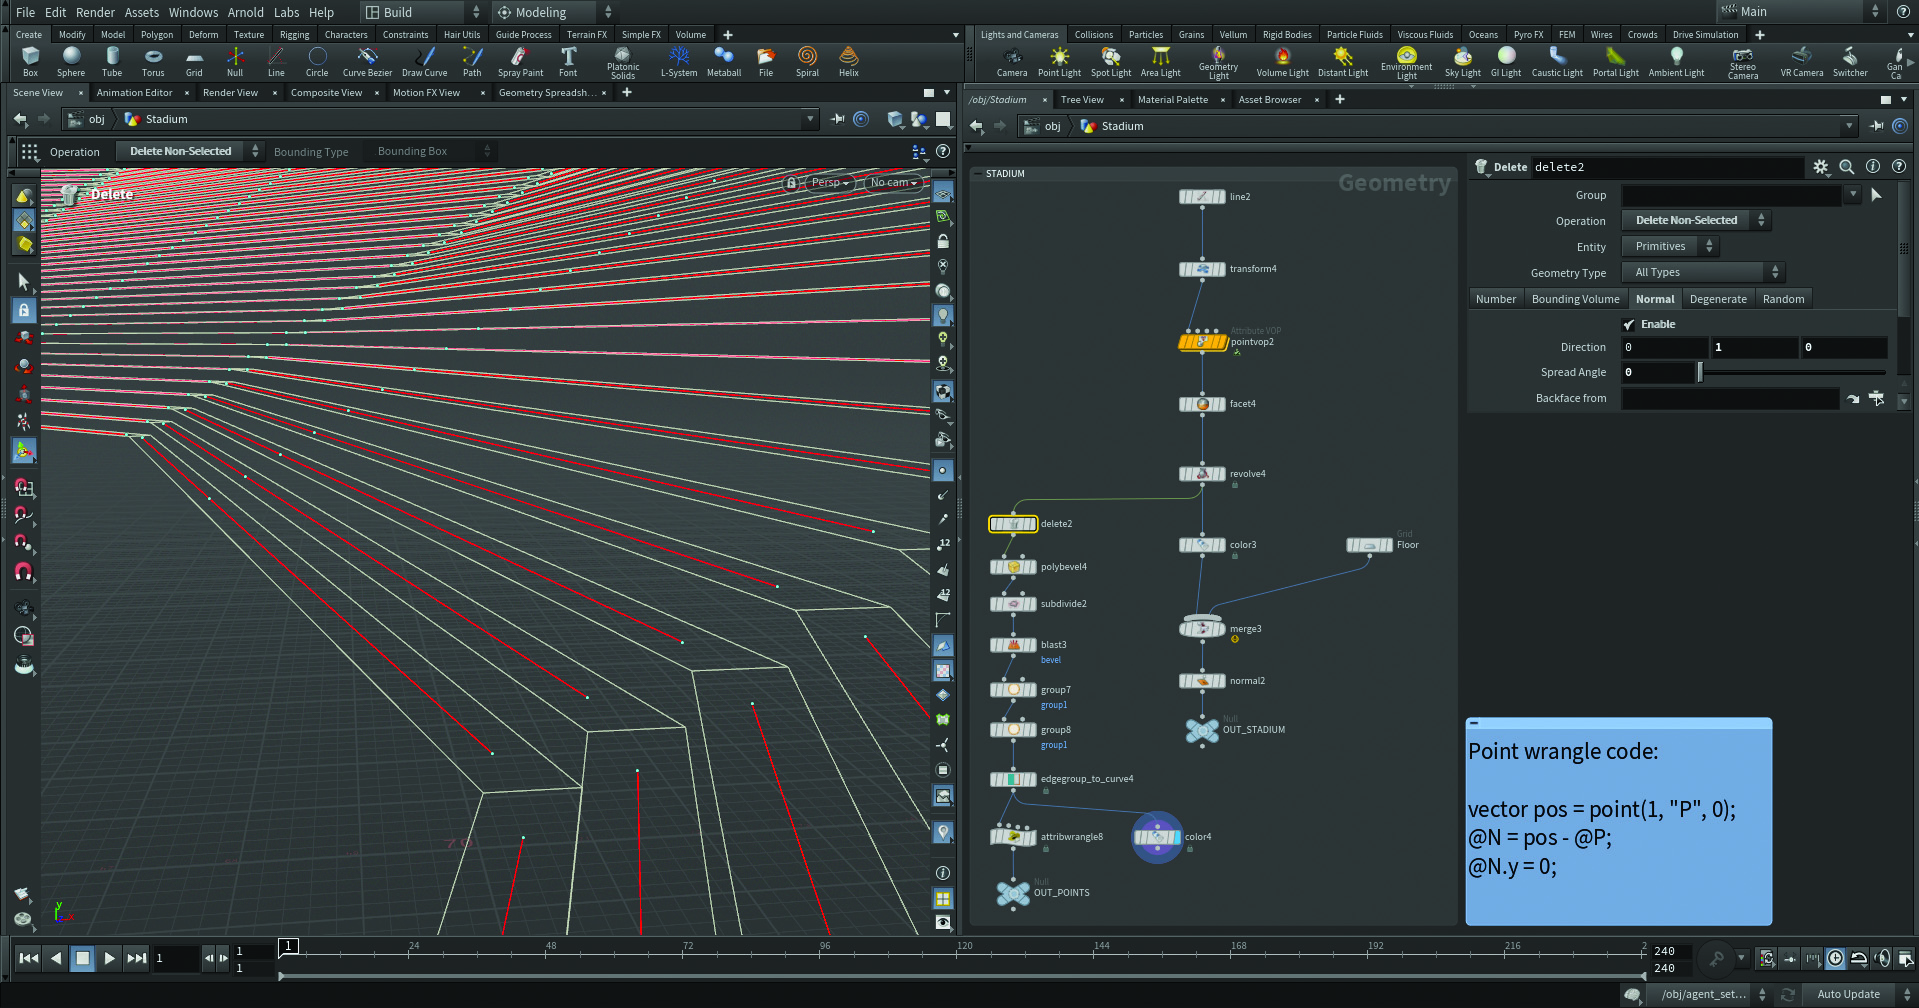
Next we need to generate some points where we can scatter our agents, which requires finding the midpoint of each step. Starting with a Delete node, we can get rid of all the vertical faces by normals, then we bevel and subdivide once to get a middle line, and lastly isolate it. The Wrangle is making sure that all the point normals face towards the centre of the world, so when we scatter our agents on top they’ll inherit the orientation from the normals and all look to the centre of the stadium. Check the accompanying video for more info.
11. Add a Crowd source node
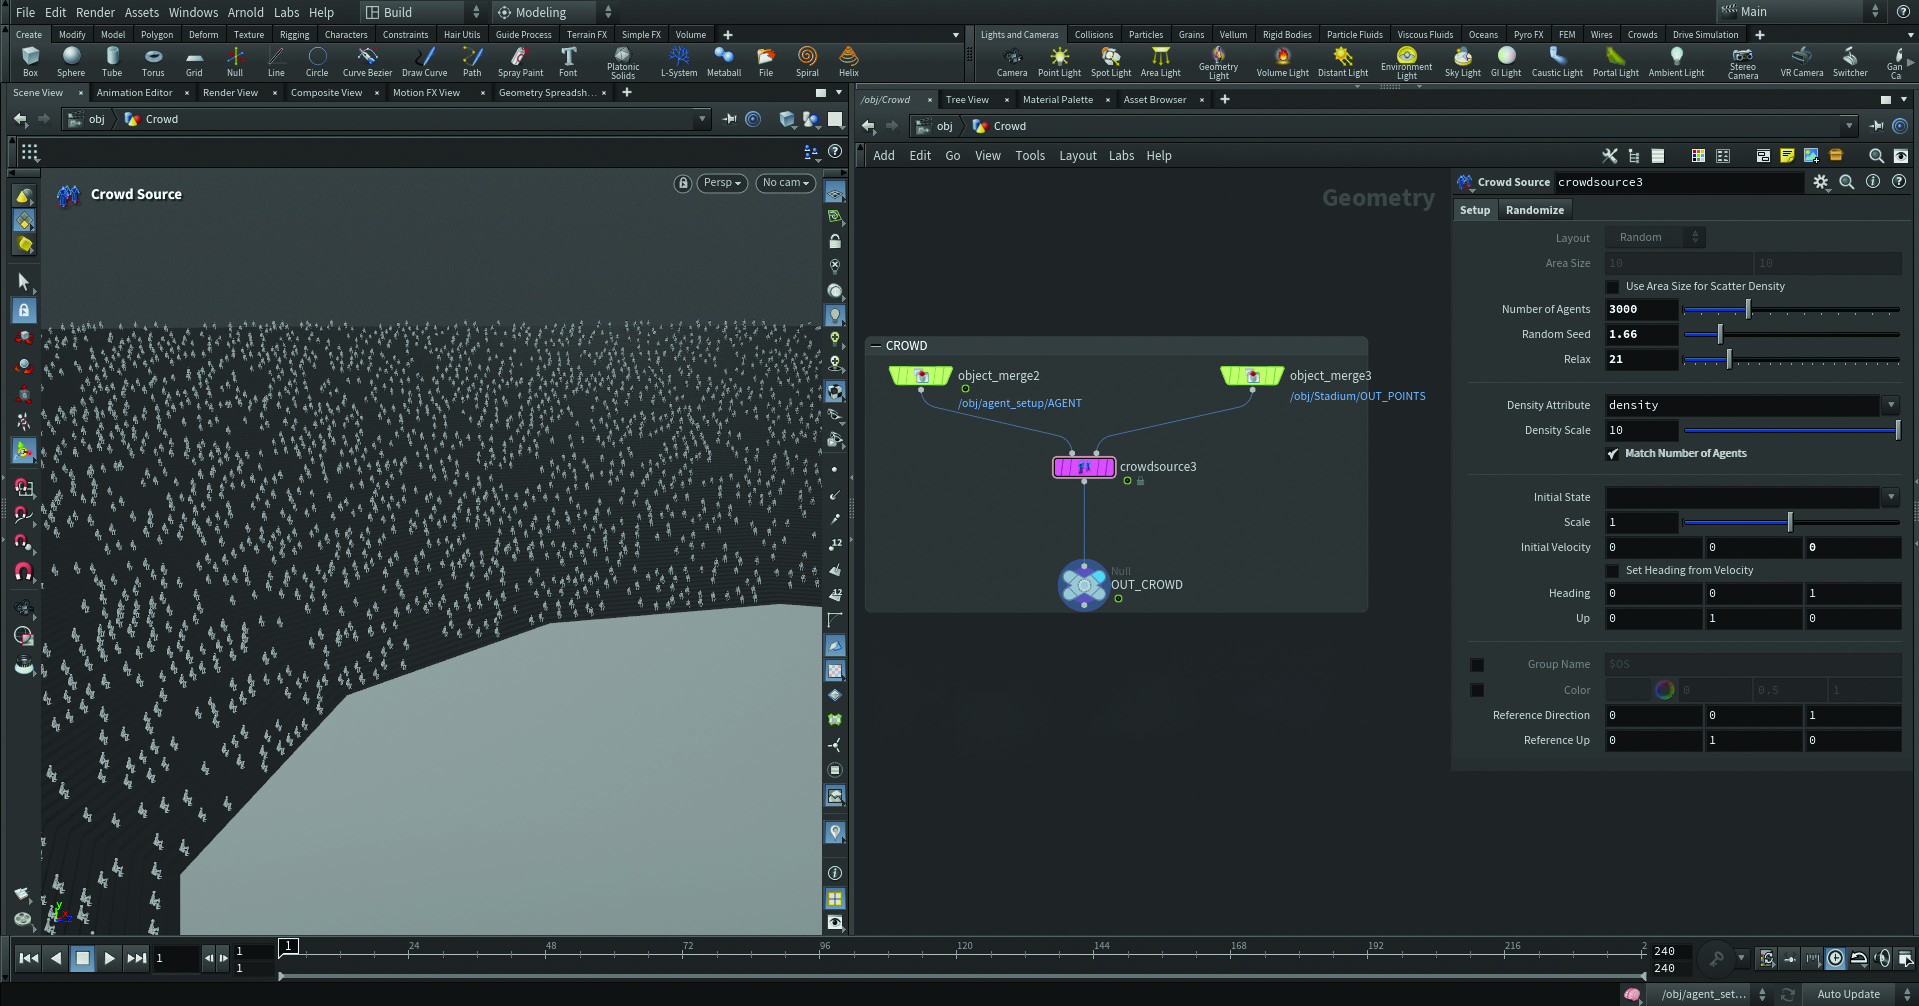
In a new Geo node, import your points and agent with two Object Merge nodes, making sure to path them correctly. Now add a Crowd Source node, change the initial state to your favourite animation and hit play to get the moving crowd. The initial state should only be used for preview, so empty it before moving on. The agents should face towards the centre thanks to our last step.
12. Crowd source randomisation
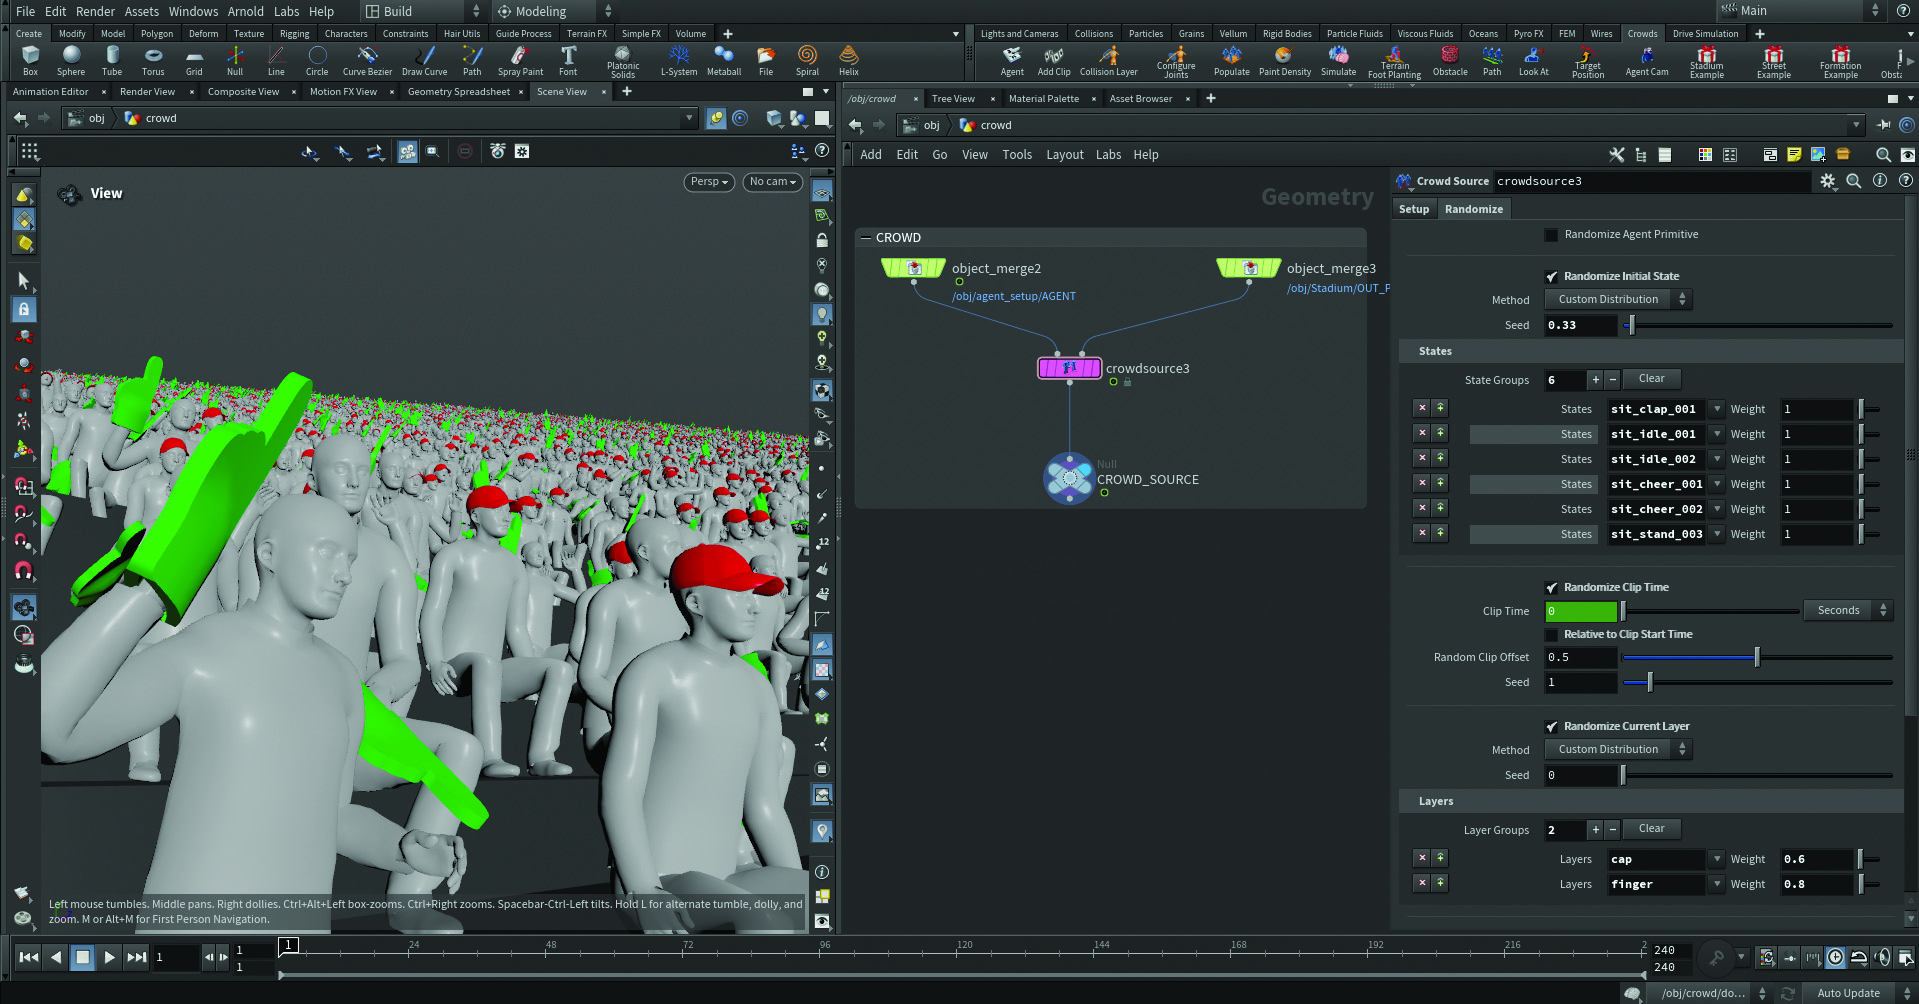
Take advantage of the full power of the Crowd Source node by using the randomisation parameters on the second tab. Start by randomising the states, choosing which ones to apply and adjusting the Weight to control how many agents exhibit that particular state. Also experiment with the ‘Random Clip Offset’ parameter to introduce additional variation in the clips’ timings among agents. To enhance the realism of your crowd simulation, don’t forget to add randomness to your layers to make it all appear more natural.
13. Dop network
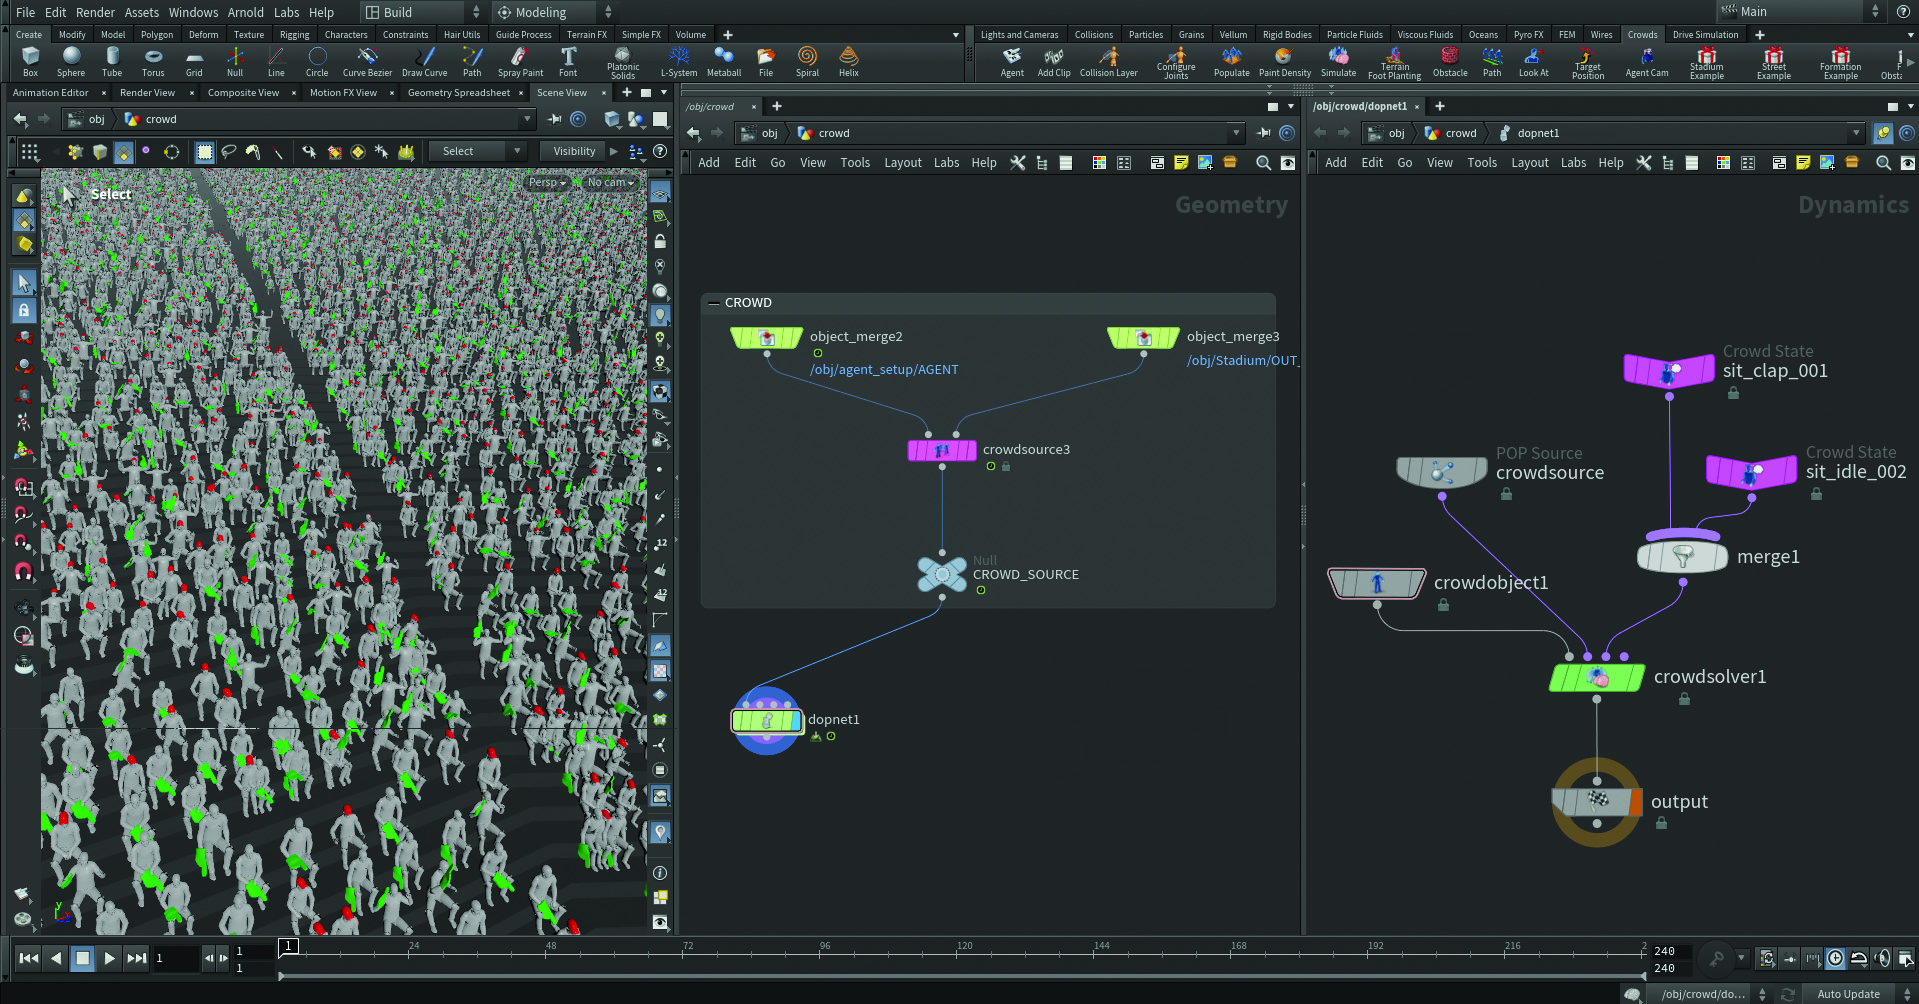
DOP networks, unlike SOPs, handle dynamic simulations such as crowd or cloth systems that compute and modify data frame by frame. Jumping to a later frame in Houdini requires recalculating the preceding frames. Be patient here, as DOPs can have a steeper learning curve than SOPs. For crowd simulations, utilise these key nodes: Crowd Object, which links the Clip Transition Graph and properties; Crowd Source, to fetch data from the Crowd Source SOP; Crowd State, to Import the animation clips; and Crowd Solver, which computes simulations and configures additional parameters.
14. From DOP to SOP
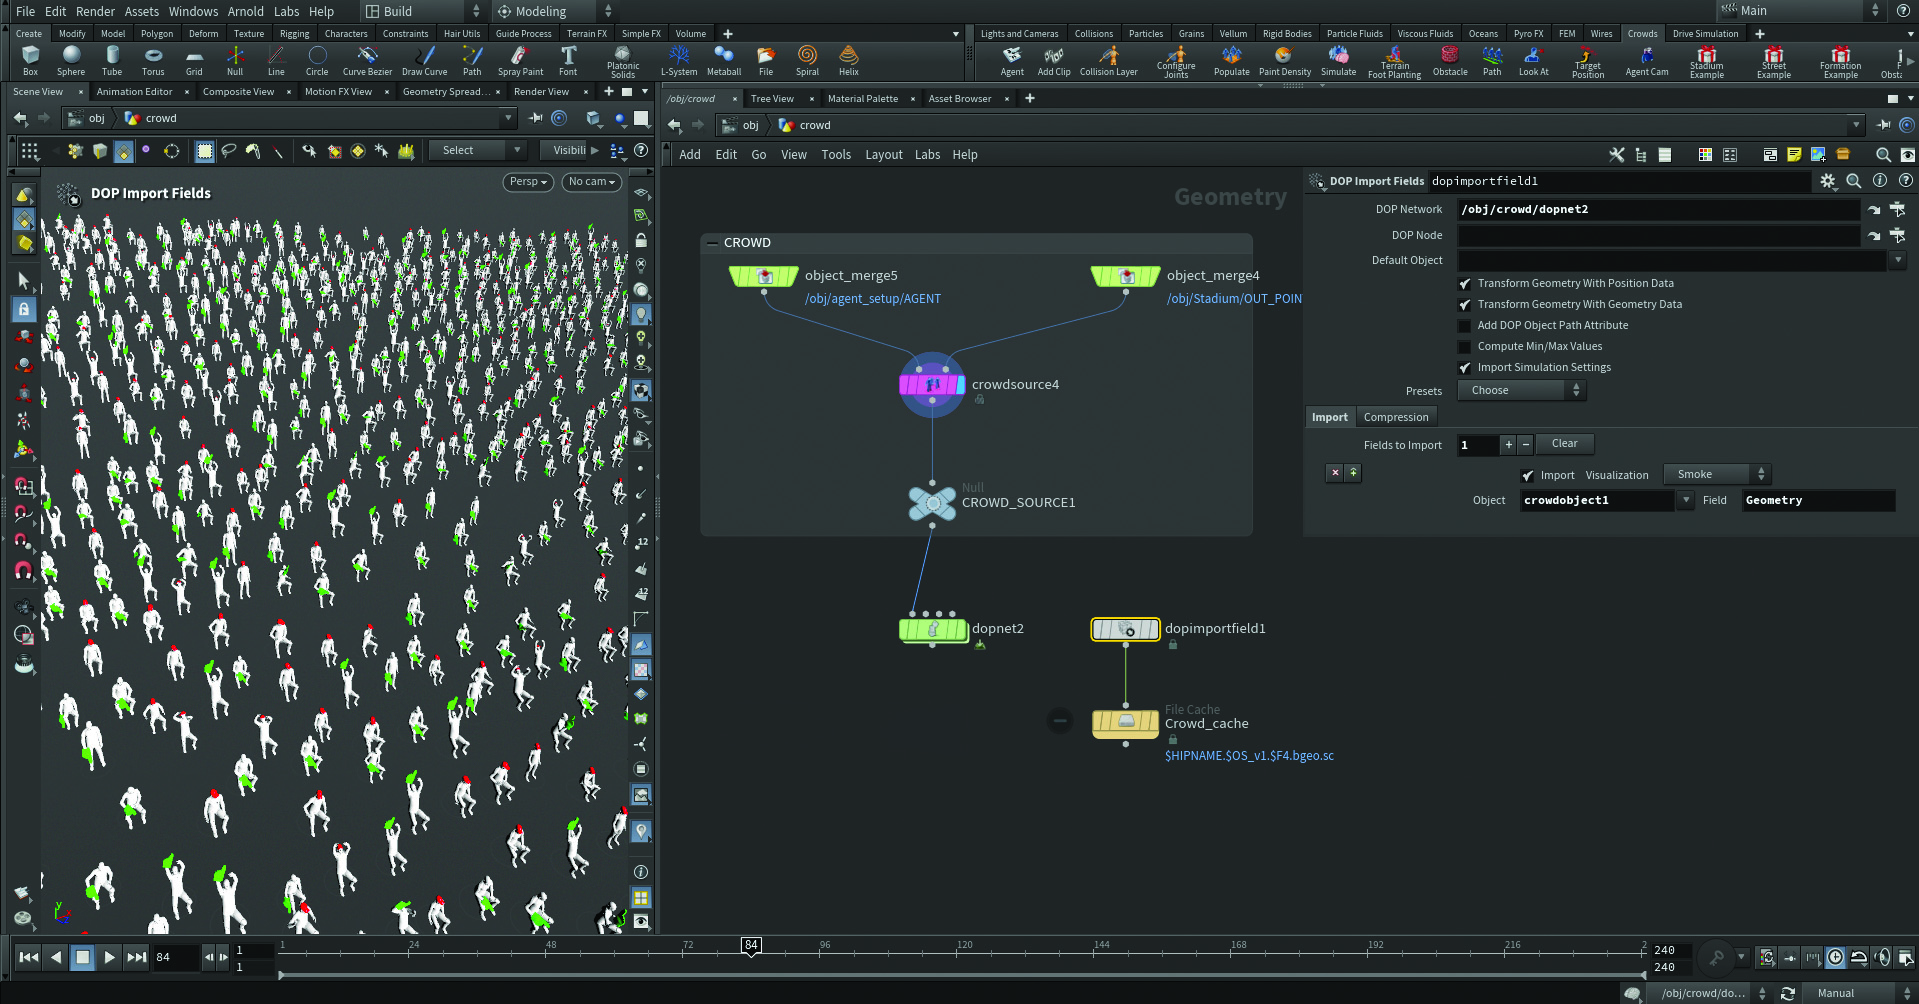
Now we need to bring our agents back to SOP. Create a ‘DOP Import Field’ node, and fetch the DOP network by adding it in the DOP Network parameter. In ‘Fields to Import’ press the + icon, then in Object write “crowdobject1”, and in Field write “Geometry”. Now your agents will appear in the Viewport! Finish up here by caching the sim to disk with a File Cache node.
15. Light your stadium scene
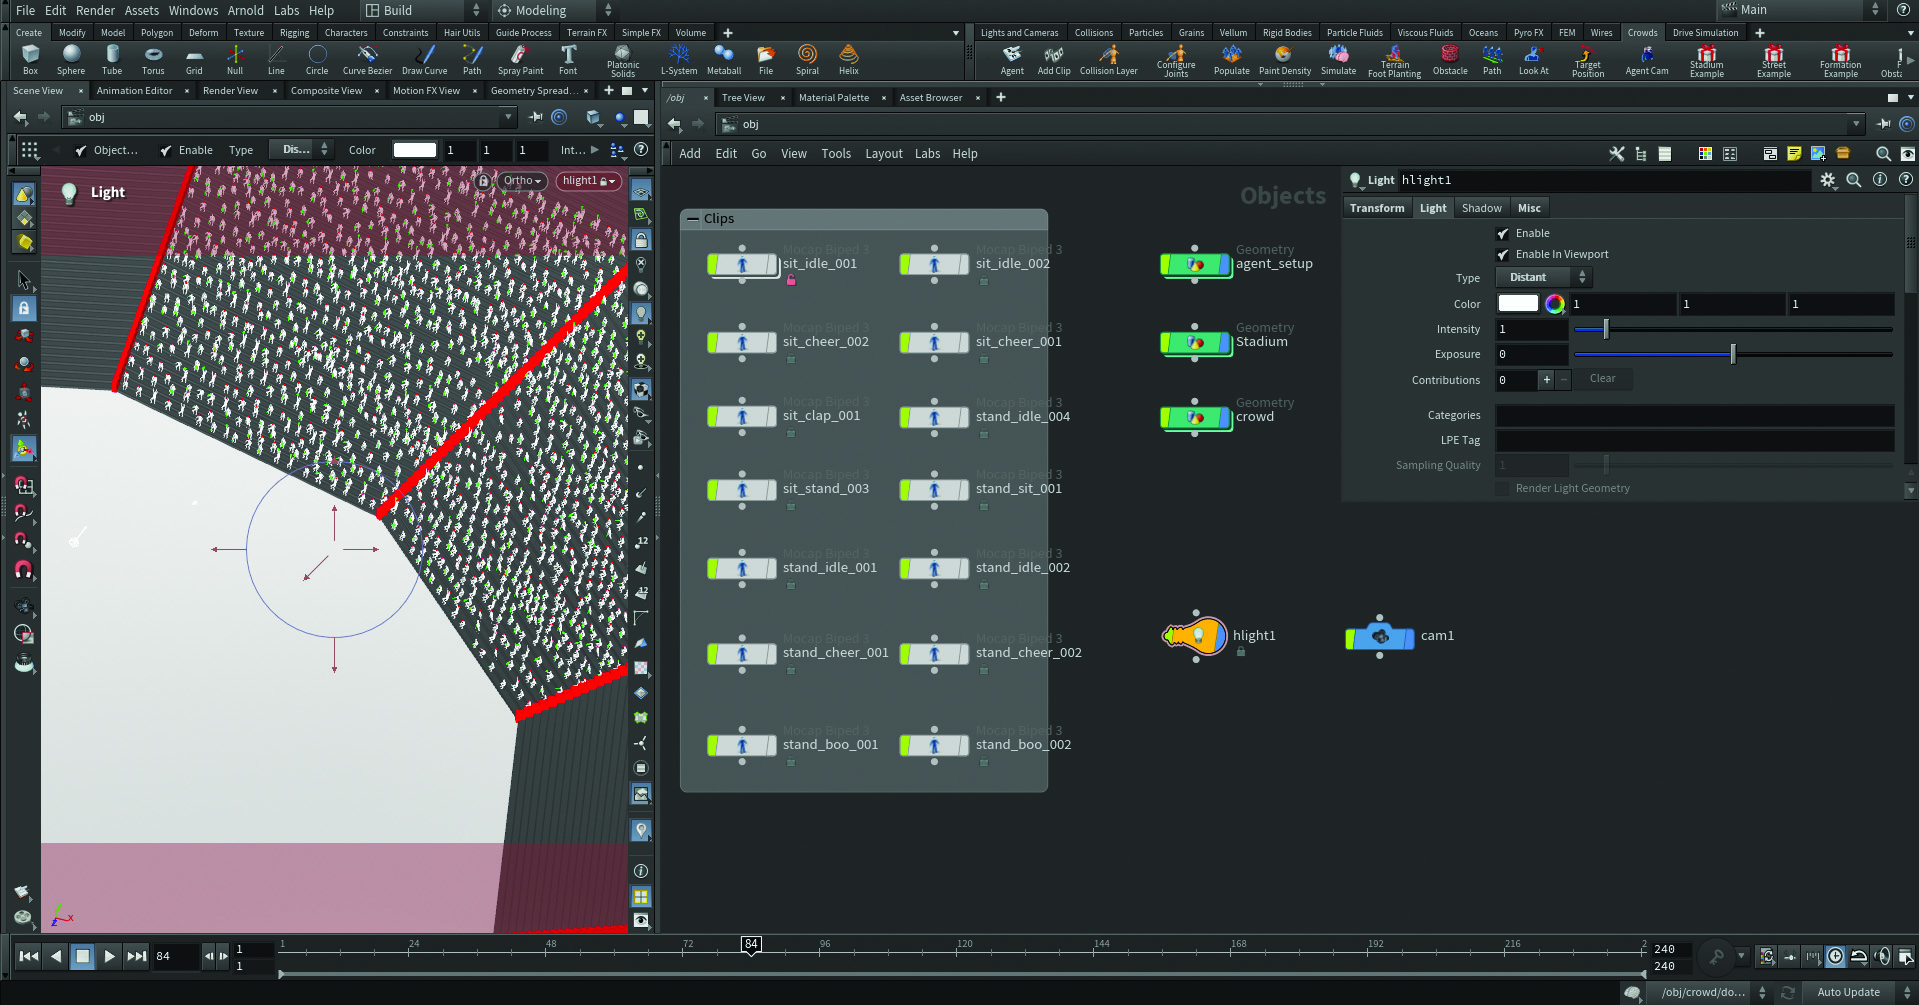
In OBJ context, start by creating a light that will simulate the sun. After creating it, set the Type to Distant, drag and drop the node into the Viewport, and lock the view. This way you’ll be able to control the light just by moving yourself around the crowd. Remember to enable light visualisation in the Viewport by clicking on the bulb icon in the toolbar to its right, and experiment with the Distant Light positioning. To soften up the shadows, you can simply add an Environment Light node and use an HDRI texture.
16. Mantra render
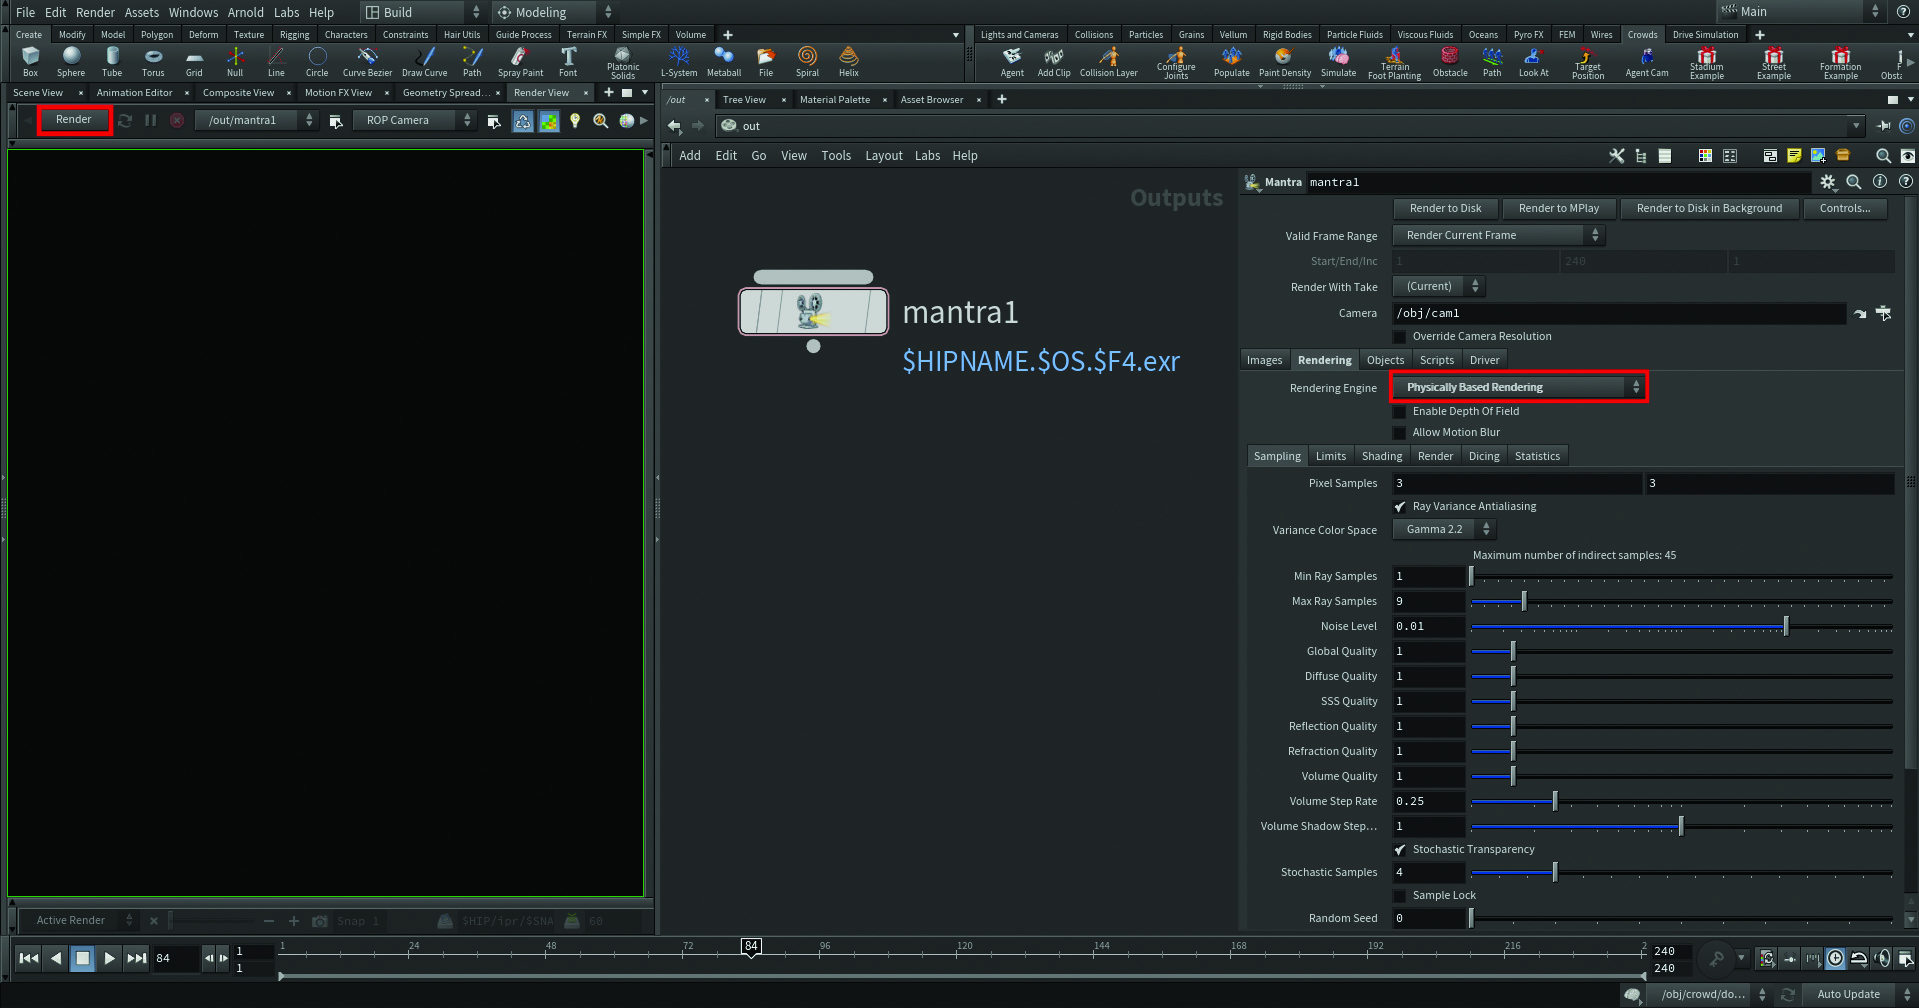
It’s time to render! First, enter the Out context in Houdini and create a Mantra node, where you can set all your render settings. Make sure the right camera is selected in the node, and click on ‘Override Camera Resolution’ to set the desired resolution directly in the Mantra node. In the Images panel you can set an export location and an image format, and then in the Rendering tab, change the Rendering Engine to ‘Physically Based Rendering’. Finally go to the Render View panel and click on Render.
This content originally appeared in 3D World magazine, the world's leading CG art magazine. 3D World is on sale in the UK, Europe, United States, Canada, Australia and more. Limited numbers of 3D World print editions are available for delivery from our online store (the shipping costs are included in all prices). Subscribe to 3D World at Magazines Direct.

Mario is a an Adobe Certified Professional in Photoshop, Premiere Pro, and After Effects. He is also a Houdini specialist, and has three years of experience in photography and two years in the VFX / animation industry.

