Creating realistic water drops in Blender
Blender expert Mattias Lind talks us through the creation of realistic raindrops.

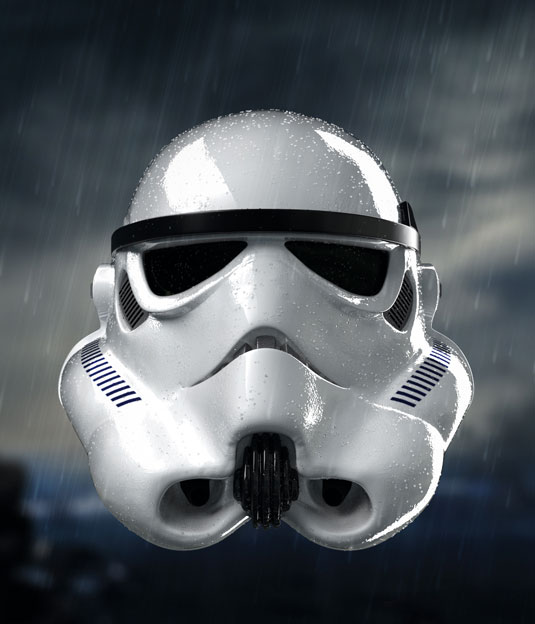
In this Blender tutorial, I'll walk you through my process for creating realistic water droplets. First we need to create the water droplets. So, start by creating a sphere and scale it on the Y axis so that it is about 50 per cent as tall as it is wide. Now, add a glass shader in Cycles, change the IOR to 1.325, and move the object to another layer.
Next it's time to add the particles, so select your helmet model (mine's a recent Stormtrooper fan art) and add a new particle system. Click on Emitter and change it to Hair.
Change from Path to Object under the Render tab, and select the name of the drop-object you created earlier. Under the Children tab, select Interpolated and change Display to 5 and Render to about 10. If the drops look too large, go to the layer of your drop model and scale it down.
Realistic result
To gain a more realistic result, we need to have the drops look spread out in an uneven manner, so in order to make the drops look more realistic, we need to randomise their position and scale. Experiment with the Random, Size and Clump settings under Children so that they look naturally scattered.
The next bit of process is to set up the lighting. Use an HDR image for realistic lighting and reflections, or rig the light in the scene using planes with emission shaders. In my scene, I used both in order to have more control over the highlights in the reflections.
Words: Mattias Lind
This article originally appeared in 3D World issue 187.
Daily design news, reviews, how-tos and more, as picked by the editors.

The Creative Bloq team is made up of a group of art and design enthusiasts, and has changed and evolved since Creative Bloq began back in 2012. The current website team consists of eight full-time members of staff: Editor Georgia Coggan, Deputy Editor Rosie Hilder, Ecommerce Editor Beren Neale, Senior News Editor Daniel Piper, Editor, Digital Art and 3D Ian Dean, Tech Reviews Editor Erlingur Einarsson, Ecommerce Writer Beth Nicholls and Staff Writer Natalie Fear, as well as a roster of freelancers from around the world. The ImagineFX magazine team also pitch in, ensuring that content from leading digital art publication ImagineFX is represented on Creative Bloq.
