How to create camera tracks with MatchMover
Mocap tracker Rebecca-Louise Leybourne shows how to do an essential job for film and TV that few will notice.
Sign up to Creative Bloq's daily newsletter, which brings you the latest news and inspiration from the worlds of art, design and technology.
You are now subscribed
Your newsletter sign-up was successful
Want to add more newsletters?
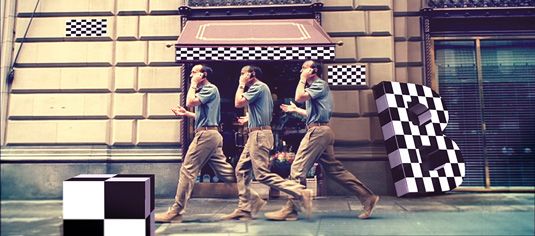
Despite being completely invisible to the viewer if done correctly, matchmoving is one of the most important parts of the film and television visual effects pipeline. Almost every TV programme or movie today has some form of CG element placed into real-world footage, so having a good working knowledge of a matchmoving software package can only be beneficial for your work and your CV.
MatchMover is Autodesk's straightforward and cost-effective camera-tracking application. Here, I'll show you how to create invisible effects with this software.
01. Automatic tracking
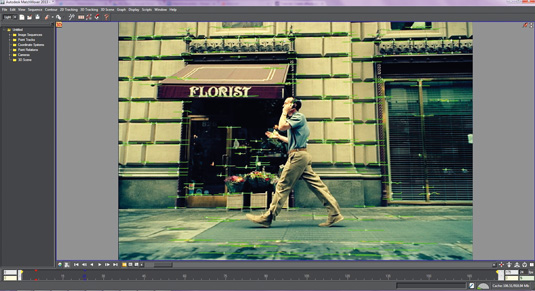
First, load your file sequence: select File>Load Sequence
or click the Load Sequence icon on the toolbar. Locate your image sequence, and select the first image: the rest of the images will load as long as they’re all named correctly.
I always like to manually track a scene for much more accurate results, but MatchMover comes with some pretty decent automatic settings, which, if you're lucky, will give you a matchmove good enough not to need changes or tweaks.
To select an automatic track, click 2D Tracking>Automatic Tracking, or click the Automatic Tracking icon. Depending on how long your image sequence is, and the number of tracks that are being created, an automatic track can take a couple of minutes. The longest part of the process is the solving for camera option, because this takes all the information from everything in the scene and creates a virtual camera that should mimic the movements of the real-life camera on the set.
Once this process is finished, you should have a scene with a fair number of green tracks, and maybe some yellow ones, following various points in your environment. The colours indicate the quality of the tracking, where green indicates good and yellow fair. Red indicates bad tracking. Any red tracks should be deleted.
02. 3D space
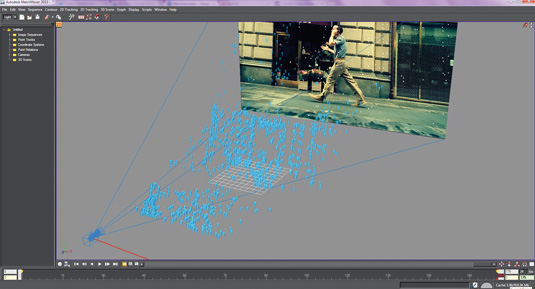
Navigating in MatchMover's 3D mode is not as easy or as fluid as other 3D software packages. To examine your 3D tracking, you have options to pan, dolly, orbit and roll. When orbiting the camera, the 3D view automatically orbits around the selected 3D object, point cloud, or camera.
Sign up to Creative Bloq's daily newsletter, which brings you the latest news and inspiration from the worlds of art, design and technology.
As you navigate around your 3D scene, you should be able to recognise the different elements of your scene made up from the blue cones. To see the workspace through the computed camera with the image in the background, select View>Lock on Camera, or press C. Through this view you should see the blue cones stick to parts of your environment and follow the movement of the camera.
Once you're happy that your automatic track has been successful, you can go on to render and export the tracked image sequence and camera data to a file format you can open in your favoured 3D animation or compositing program.
03. Manual tracking points
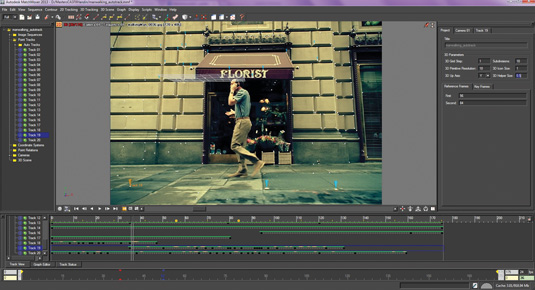
Manually adding tracks into a scene gives MatchMover the most information possible about what’s in the environment to help create the solve. Some scenes are filmed with markers to provide a selection of places throughout the scene to add manual tracks.
To create a new track, select 2D Tracking>New Track, or click the New Track icon. Your cursor will change to a crosshair while in the workspace. As you hold down and click the desired area to add your track to, you can use the magnifier window to help precisely position the location of the new point. Then release the mouse button to create the track point. This will create a window with a label, Track 01.
With the track point still selected, select 2D Tracking>Track Forward/Backward, depending on where you are on your timeline, or click the icon to run 2D tracking for your point. After the point-tracking process is complete, its trajectory line will appear in your scene.
Depending on how successful the placement of the track was, the line will either appear green, yellow or possibly red, or with segments of all three colours. As with automatic tracking, you're aiming for a full green line throughout the entire scene. However, if there are little segments of yellow, these can usually be left in without affecting the overall matchmove too much, as long as the track
04. Correct bad tracking
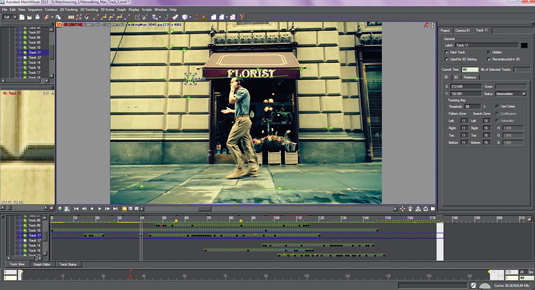
You can correct yellow and red segments of a sliding track by manually
adjusting the point positions where the track has drifted significantly, then re-running the tracking process. It only takes one bad track to completely throw off the accuracy of your scene.
Go to a frame in which the track drifts, then click and hold the tracking point in the workspace and move it in the direction that will improve the tracking. Continue to use the magnifier window that appears around the point to help you adjust the point's position.
When you release the mouse button, MatchMover will clear the end of the trajectory, which will need to be tracked forwards or backwards once more for MatchMover to calculate a new trajectory for the track.
Once you're happy with the tracks throughout your entire image sequence, you can run the calibration by selecting 3D Tracking>Solve For Camera or by clicking the Solve For Camera icon.
05. Export your tracks
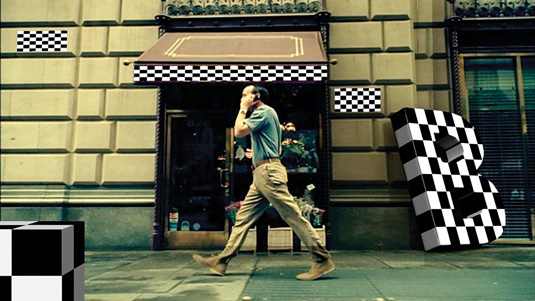
Select File>Export. Name your file and select the format you require.
I'm taking my work into Maya 2013, so I would choose Maya (*.ma). The export options for Maya give you a default setting that exports your cameras, 3D points and the distortion grid, but these can be unticked if you don't want them.
Since you haven't selected what you want to export in your scene, you'll need to change the Points option to All Tracks That Match. If you're exporting a manual track, you'll notice that you only have hard tracks to export, but options for hard and soft tracks can also remain ticked. You can export good, fair or bad tracks. If you're exporting an automatic track, but you haven't already deleted any red 2D tracks, untick this option.
Finally, you want the option of Animate to affect your camera and not your scene. Your First Frame Index and Points Scale can remain as default. Click Save and import into Maya to see your results, ready to add your CG elements.
Rebecca-Louise Leybourne is a mocap tracker at The Imaginarium. She works on stage with real-time and head-mounted cameras.
This article originally appeared in 3D World issue 168.
Liked this? Read these!
- ZBrush tutorials: ways to paint and sculpt in 3D
- Top free 3D models
- Best 3D movies of 2013

The Creative Bloq team is made up of a group of art and design enthusiasts, and has changed and evolved since Creative Bloq began back in 2012. The current website team consists of eight full-time members of staff: Editor Georgia Coggan, Deputy Editor Rosie Hilder, Ecommerce Editor Beren Neale, Senior News Editor Daniel Piper, Editor, Digital Art and 3D Ian Dean, Tech Reviews Editor Erlingur Einarsson, Ecommerce Writer Beth Nicholls and Staff Writer Natalie Fear, as well as a roster of freelancers from around the world. The ImagineFX magazine team also pitch in, ensuring that content from leading digital art publication ImagineFX is represented on Creative Bloq.
