How to create realistic 3D hair and fur
CG artist Rouhollah Toghyani shows how to model a cute creature with fluffy hair and fur ready for animation.
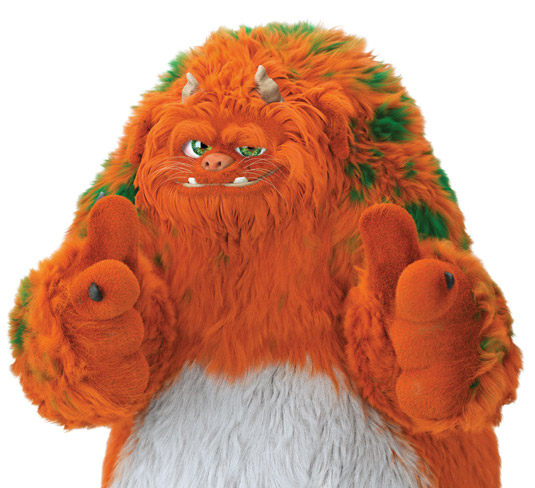
Creating realistic and pleasing hair and fur is, artistically and technically, one of the biggest challenges in CG. The artist tries to create a believable hairstyle or fur based on concepts or whatever references they have to hand.
I want to create a hair system that can easily be used in different animation scenes and keeps its integrity with the character. It must also meet the requirements of the project when it comes to dynamics and collisions.
In this tutorial I will be using Yeti, a hair plug-in for Maya, but
the principals are applicable to any software and pipeline. I am going to create hair and fur for a cute monster that I designed, modelled and textured myself. I will treat it as a character for an animation project and not just a still image, so I will try to consider all the technical issues that may occur on a project.
First steps
When I am going to reproduce a real-world phenomenon like hair in CG, the first step is to study it: what is the average hair count on a real human (or animal) similar to my CG character? How do hair strands interact with each other in different conditions – wet, oily or dry?
The next step is to analyse the character and choose the best hair solution, applying segmentation based on hair length and density, and defining hair flow. These two steps are the most common, and important, steps in all pipelines.
Finally one rule of thumb: everything is relative – there are no absolute values, and there is always some degree of randomisation. Variety is the key to achieving natural-looking hair.
01. Studying hair
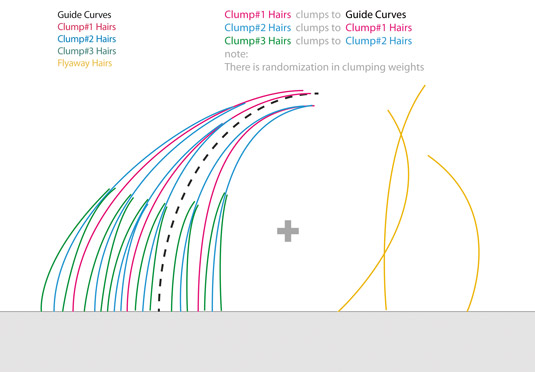
Usually there is logic behind the organic look of natural objects. If you want to recreate nature, the first step is to find and then copy that logic. Study Leonardo da Vinci's notebook and drawings: his power to theorise and draw diagrams from what he observed in nature is inspiring.
Sign up to Creative Bloq's daily newsletter, which brings you the latest news and inspiration from the worlds of art, design and technology.
Here I made a diagram for how to recreate hairs in 3D. It illustrates why and how clumping and sub-clumping are important in creating a realistic hairstyle.
02. Hair flow and segmentation
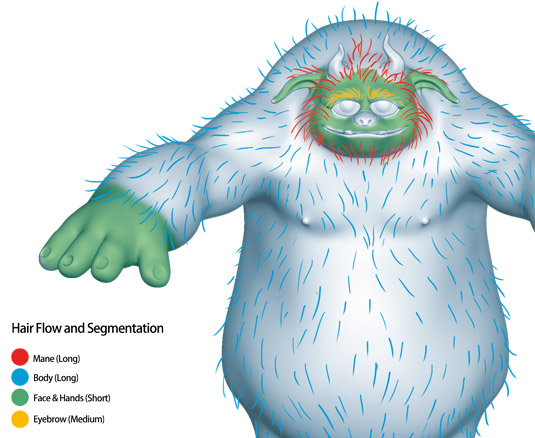
Dividing hairs into separate parts is essential in my pipeline. There are advantages to this approach – for example, it helps you to be more organised and focus on each part. Also it allows you to be selective about dynamics for only the areas that need them.
Because short hair needs higher counts to cover up a surface, it’s reasonable to divide them into separate parts and manage hair counts independently. I also define hair flow within an overpaint sketch.
03. Grooming short hairs
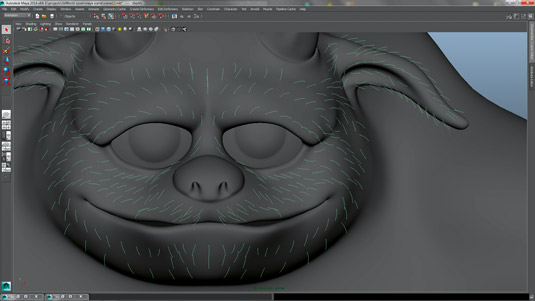
Grooming involves creating guides at necessary positions and in the right direction. By default, Yeti plants guides at vertex points but I can put them everywhere over the surface too. I plant guides where they are needed, and not on every vertex.
As I progress with creating my guides and their flow, I give them some bend too. The guide's length also determines the length of the hair strands, so I make some variation in length for better results.
04. Grooming long hairs
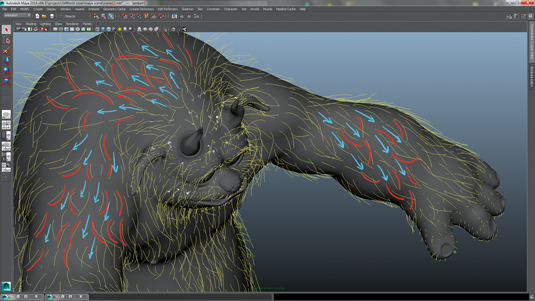
Grooming long hair is the same as for short hair, in regards to where the guides should be placed and their flow. But long hair needs more variation in form and curvature. Bend direction and flow direction
are two different things.
Guides with the same flow direction may have different and even opposite bend directions. I use the different tools provided in the Groom Node attribute for applying flow and bend directions.
05. Setting up short hairs
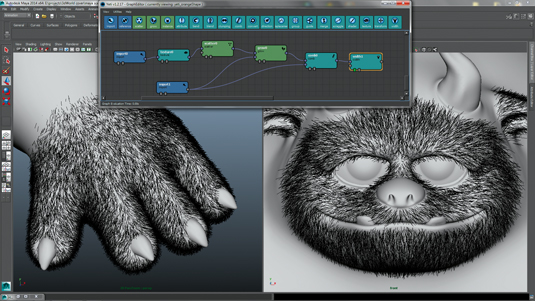
I paint a density map based on my hair segmentation for short hairs over the face and hands. I think Yeti's node-based approach is one of the best things about it. I use the short hairs I have already created and groomed to define the hair length and combing. I apply some randomisation to the weight of the Comb and Clump Nodes, and add a value for flyaway hairs in the Clump Node.
06. Setting up long hairs
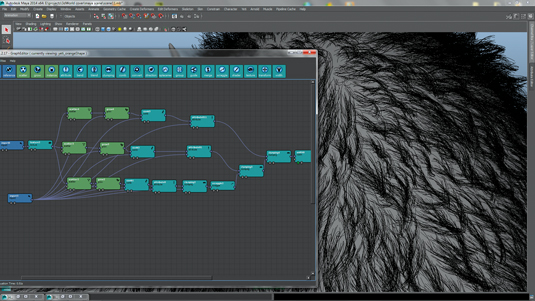
Here you can see in action what I explained before. I use the long hair groom setup to determine hair length, then comb and clump the first set of hairs. The second hair set is combed using Groom and clumped into the first hair set.
Finally, the last hair set is combed using Groom and clumped into the second hair set. I apply some randomisation in comb and clump weights and add some flyaways for more variation and a natural look.
07. Painting attributes
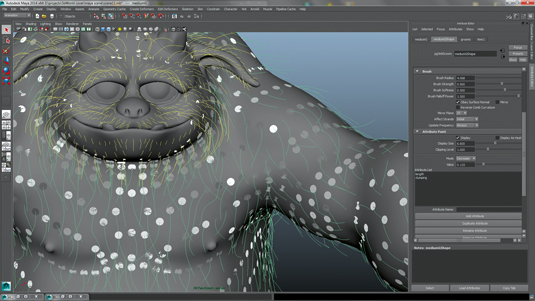
Yeti has a great option for painting weight maps inside Maya called Attribute Paint. I use this option to paint weight maps and control clumping weights in the hair setup, which helps to increase variety and create more natural-looking hair.
The Groom Node contains tools and options for painting an attribute over the white circles at the base of each guide. By painting a value, the circle's colour changes to its equivalent grey.
08. Corrective grooming
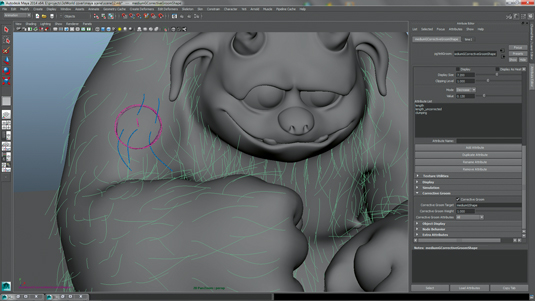
When I am finished grooming and setting up hairs in Yeti's Graph Editor, it’s time to do some test renders. I like to try other poses and check out how my hair setup looks when the model deforms.
My grooming and hairstyle in the T-posed character may seem to look good, but there is no guarantee they'll work for different poses. Yeti allows me to do corrective groomings over the main groom in order to achieve the best style in any pose.
09. Hair colour
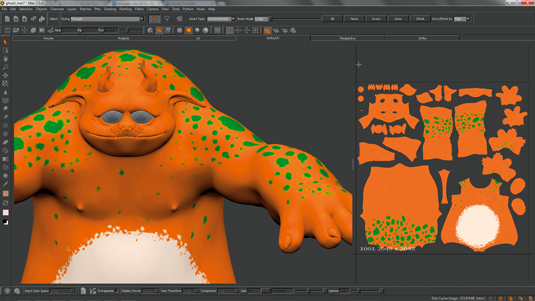
I always try to be bold in choosing colours for my colour palette. I like to use complementary colours in high saturations within a well-balanced composition. Before I start texture painting, I do lots of overpaints in Photoshop and try different colour combinations, hues and patterns. I always consider the hair length, because if I paint very fine details for long hair, there is a chance of completely missing them or getting a weird-looking image at the render stage.
10. Shading and rendering
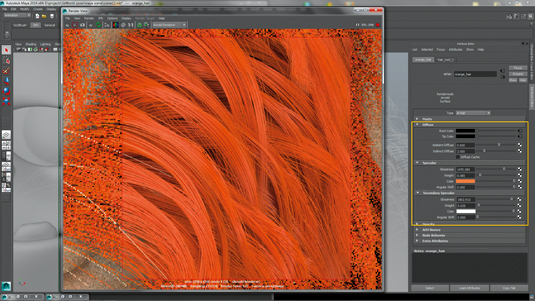
I use Arnold for rendering because of its physically accurate algorithm and fast rendering for hair and fur. Arnold's hair shader, like most of its equivalents, has options for root and tip colour, and I assign them the colour map I've painted.
For primary specular I use a colour with a low weight and glossiness to reproduce light scatter inside each strand. The secondary specular has white colour with more weight and glossiness for creating light reflections
Words: Rouhollah Toghyani
Rouhollah Toghyani is a CG artist based in Iran. With a background in traditional art, he currently works in the video game and animation industries as a 3D character and concept artist. This article originally appeared in 3D World issue 181.

The Creative Bloq team is made up of a group of art and design enthusiasts, and has changed and evolved since Creative Bloq began back in 2012. The current website team consists of eight full-time members of staff: Editor Georgia Coggan, Deputy Editor Rosie Hilder, Ecommerce Editor Beren Neale, Senior News Editor Daniel Piper, Editor, Digital Art and 3D Ian Dean, Tech Reviews Editor Erlingur Einarsson, Ecommerce Writer Beth Nicholls and Staff Writer Natalie Fear, as well as a roster of freelancers from around the world. The ImagineFX magazine team also pitch in, ensuring that content from leading digital art publication ImagineFX is represented on Creative Bloq.
