How to extract leaf textures with Photoshop
Capturing textures from leaves with Photoshop and using them in your 3D models can seem daunting. Cirstyn Bech-Yagher explains the theory and gives a step-by step.
When it comes to extracting vegetation textures, clean edges and speed-to-pipeline are what it’s all about. A good way to boost speed without sacrificing quality when creating your cutouts, is to use Photoshop’s Quick Select and Refine Edge combo: Together, they're capable of saving you time, not to mention pennies – mastering these two could save you the cost of a plug-in.
The combo's efficiency lies in how they complement each other: A 'thinking' tool, the Quick Selection tool lets you brush to select. It then roughly calculates what to include or discard as you go, adjusting your selection accordingly by finding similarities surrounding your stroke before excluding non-matching edges. You then brush to refine your selection.
This approach eliminates the need for painstaking Lasso-selections, eraser-brushing, or contrasting colour paint-overs, as the items you want to mask out take shape almost by themselves.
Once you've defined your cutout, chances are you'll have remnants of blended colour in the innermost nooks and crannies, especially if you're working with fronds or serrated leaves. Fix this through the Refine Edge dialog. Refine Edge is a collection of tools which enable you to clean and smooth your selection's edges by brushing out the details you don’t want. Once you're done brushing, you define how the final cutout’s edges will interact with their (new) background via the select slider.
With the theory covered, here's our step-by step guide to extracting textures...
01. Setting up your work file
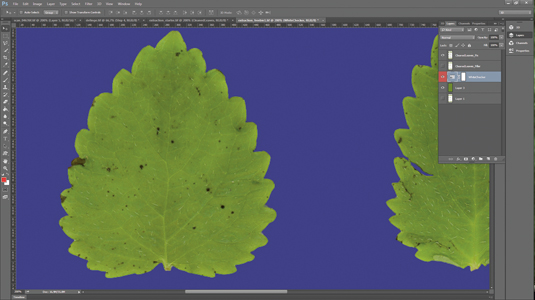
Set up your file first: Create a new layer. Fill it with a green from the leaf to avoid rendertime halos. Put a Hue/Saturation Adjustment Layer over, using the colour-slider as an edge-checker before duplicating the original layer on top of it. Before you start, remember Quick Select 'reads' dark edges better than light ones, so these may need extra brushwork.
02. Basic masking and cleaning
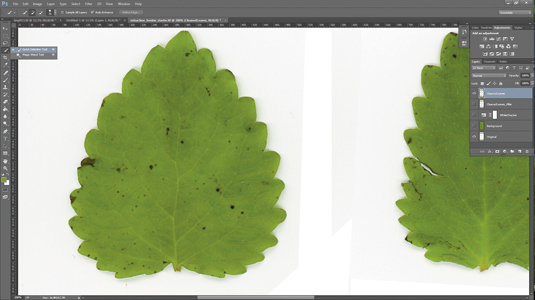
Open 3DW_QuickSelect_QnA_Start_Texture.tif. With the CleanedLeaves layer active, pick Quick Select from the Magic Wand flyout in the Toolbar. In the Options bar, set your brush to 75-100 pixels, and check AutoEnhance for smoother edges. Staying on the white, drag your brush around the leaves. Brush and hold down [Alt] to add any left-outs. Press Delete.
Daily design news, reviews, how-tos and more, as picked by the editors.
03. Clean up stragglers
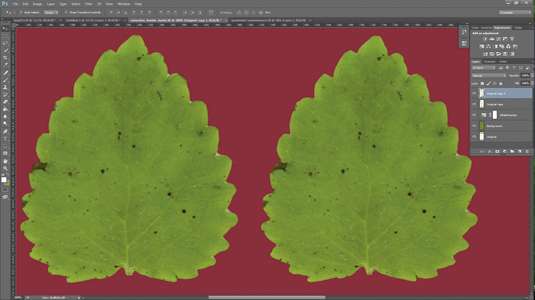
Instead of contracting your selection by one pixel and deleting it to clean your edges, use Deselect, and Layer>Matting>Defringe at 2-5 pixels for a less damaging result. When working on, for example, serrated leaves or fronds, chances are you’ll still have nooks and crannies in need of cleaning up. Reactivate your selection, and press Refine Edge from the Select Menu or Option bar.
04. Set up the Refine Edge tool
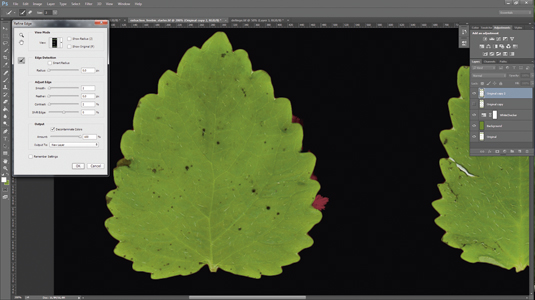
In View mode, select On Black from the dropdown. Give the Refine Radius tool a 2 pixel radius. Set Decontaminate Colours to 100 to reduce the remaining colour overflow. Set the Smooth Slider to 2. Refine and add to your final selection by brushing with the Refine Radius brush. Tweak with the slider tools and Output to New Layer before pressing OK.
Words: Cirstyn Bech-Yagher
Cirstyn Bech-Yagher is a freelance CG artist and educator, with over a decade’s experience in 3D art. Her clients include AMD and DAZ 3D. Follow her on Twitter a @cirstyn.
Like this? Read these!
- Photoshop tips, tricks and fixes to try today
- Free Photoshop brushes every creative must have
- Free Photoshop actions to create stunning effects
- The best Photoshop plugins

The Creative Bloq team is made up of a group of art and design enthusiasts, and has changed and evolved since Creative Bloq began back in 2012. The current website team consists of eight full-time members of staff: Editor Georgia Coggan, Deputy Editor Rosie Hilder, Ecommerce Editor Beren Neale, Senior News Editor Daniel Piper, Editor, Digital Art and 3D Ian Dean, Tech Reviews Editor Erlingur Einarsson, Ecommerce Writer Beth Nicholls and Staff Writer Natalie Fear, as well as a roster of freelancers from around the world. The ImagineFX magazine team also pitch in, ensuring that content from leading digital art publication ImagineFX is represented on Creative Bloq.
