How to rig a biped in Cinema 4D
By the end of this tutorial you will have the ability to rig a character, complete with bones, joints and controllers - Rob Redman shows you how.
There are a few tasks in 3D that give many people cause for distress, with the highest ranking of them being UV unwrapping and rigging. While the concepts may seem initially intimidating the actual processes involved are not that difficult and in this tutorial I will get you up and running with Cinema 4D's rigging tools.
The obvious place to start is with a human, as that is both the most recogniseable (and therefore easiest to spot flaws with) and most asked for. For ease of this introduction we will start simply but the steps taken to rig a basic character are the same as for something more complex. The main difference will be the number of components the rig is comprised of and the time it takes to complete.
I'll start off with a basic figure but you could just as easily use any other, even the mannequin that ships with Cinema 4D. I'll take the process as far as hands and feet to save space here but the procedure is the same for adding fingers, toes or other elements, such as wings or a tail.
Step 01
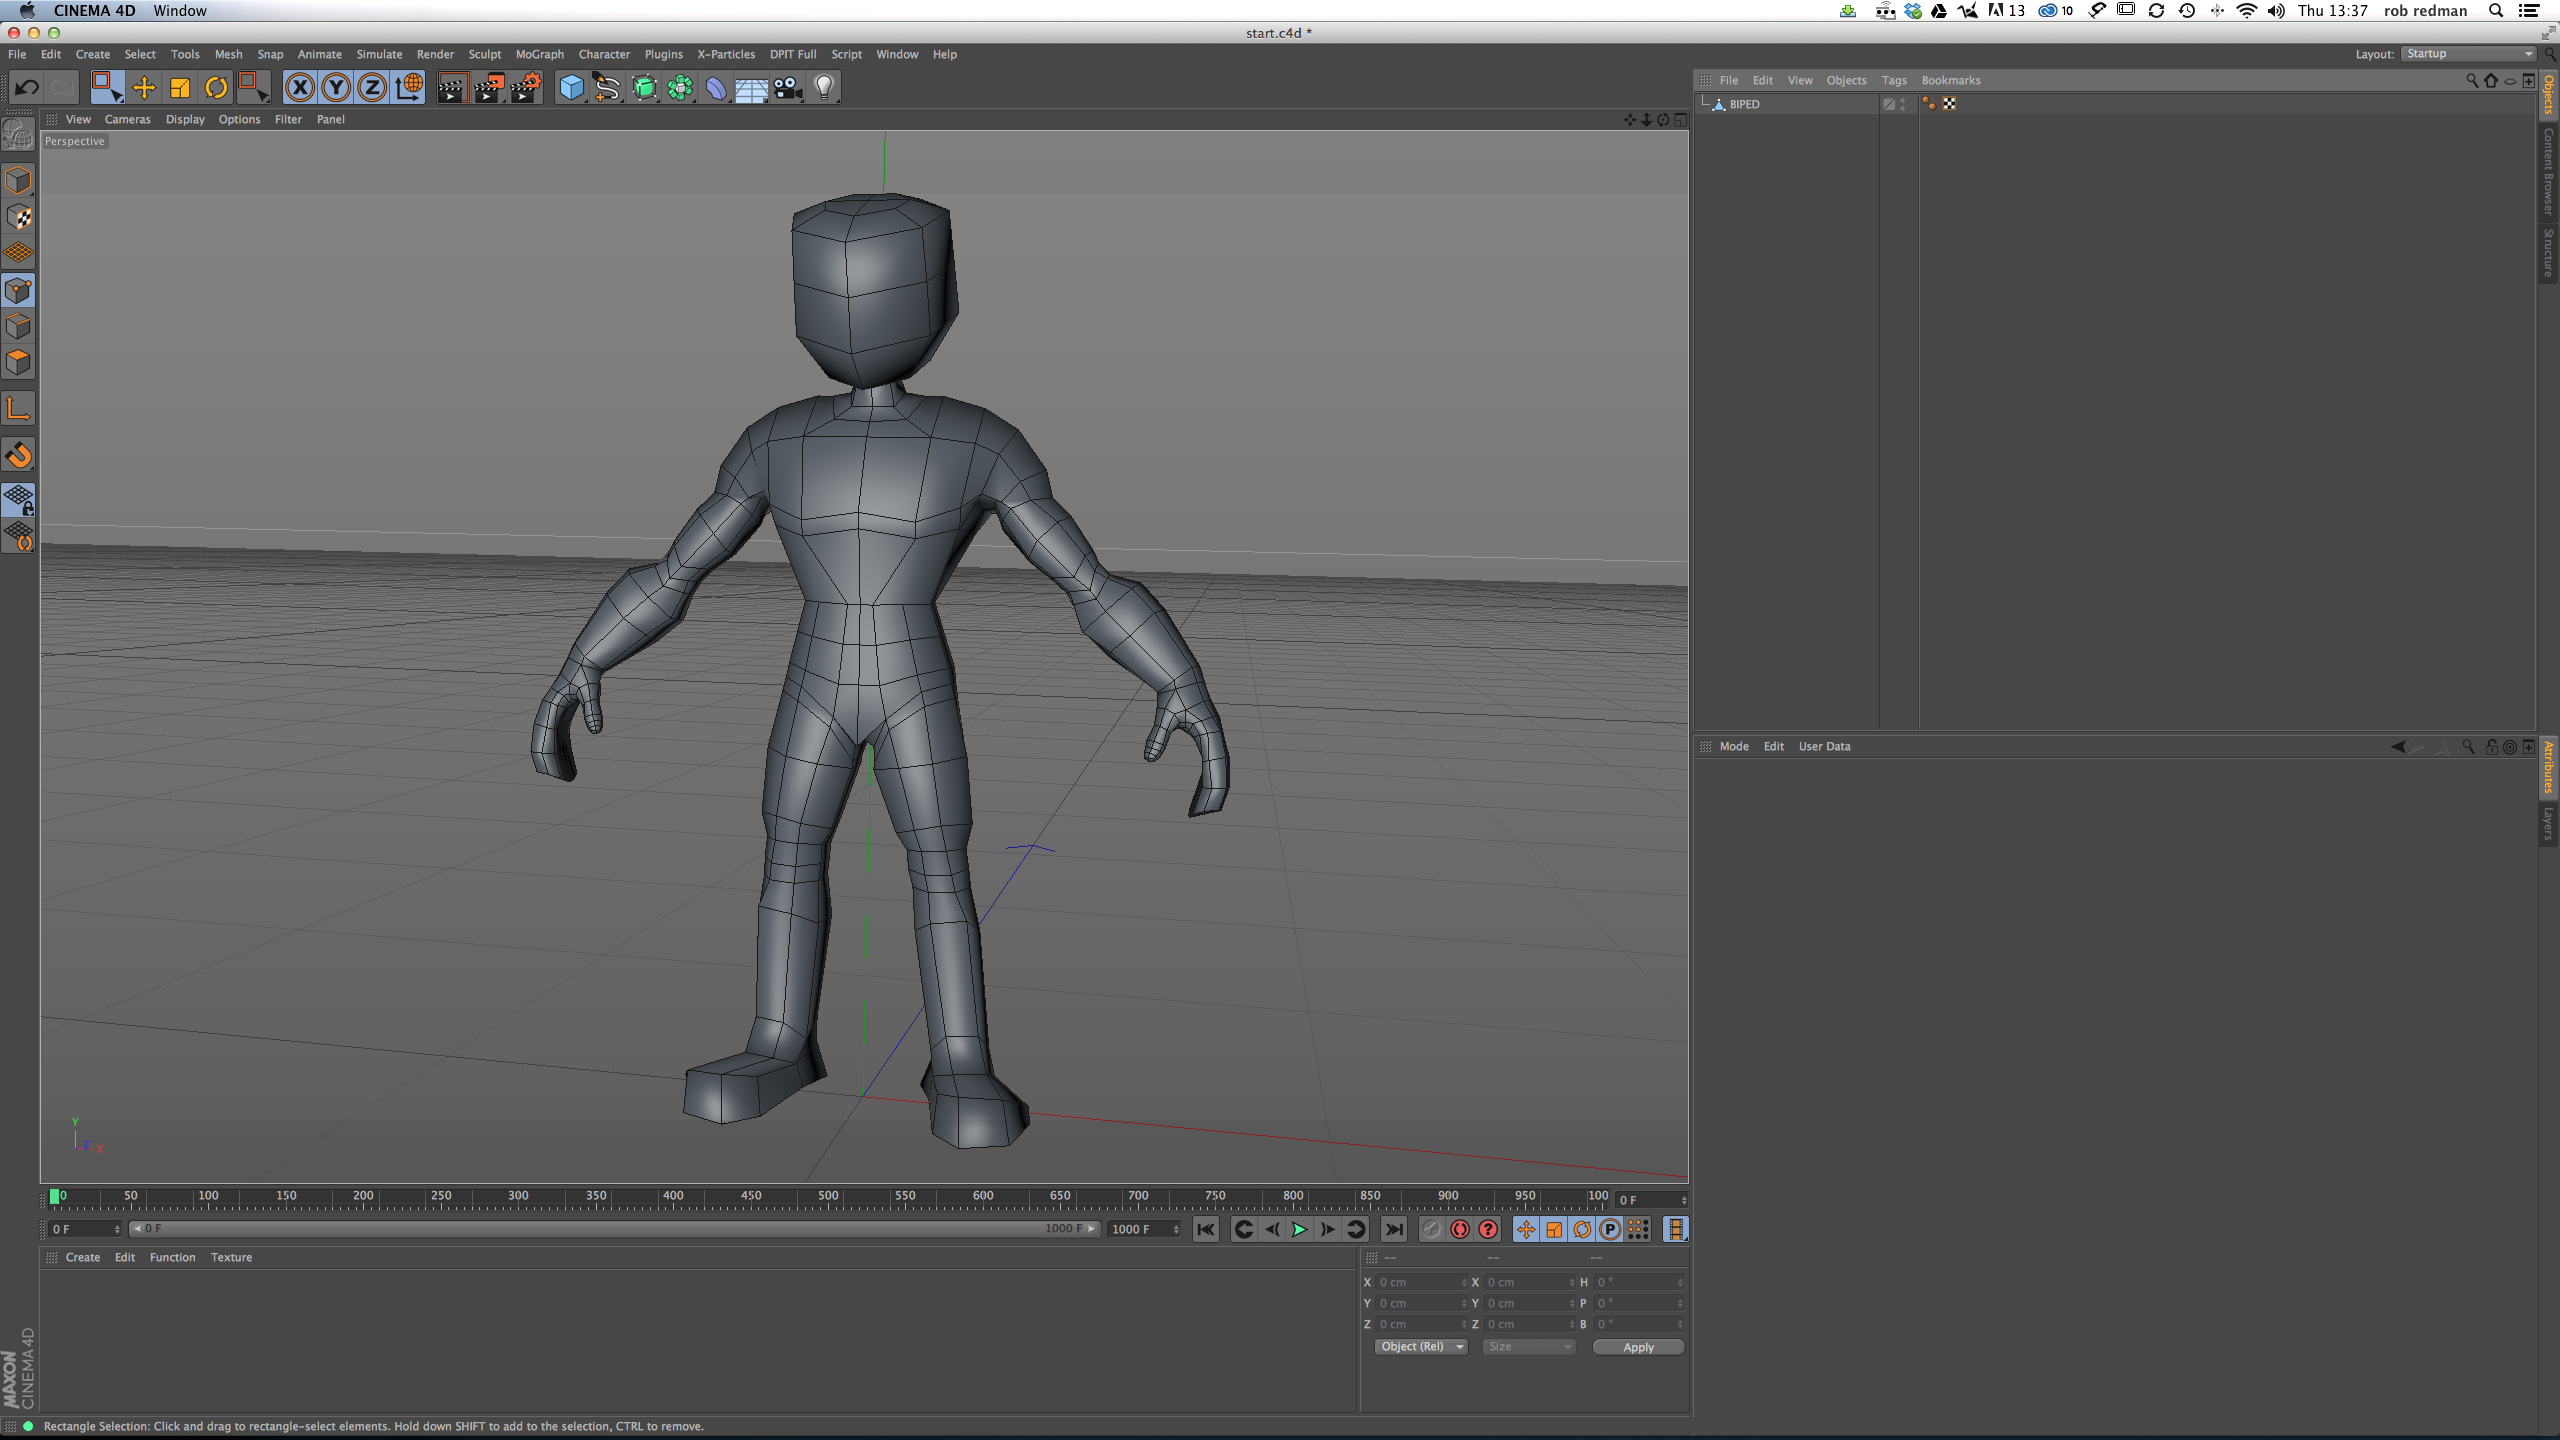
Load up your figure to be rigged. I find it best with simpler setups to start with a model that is all one mesh, so if yours is made from multiple parts, select them all and, in the object manager, right click then choose connect and delete.
Step 02
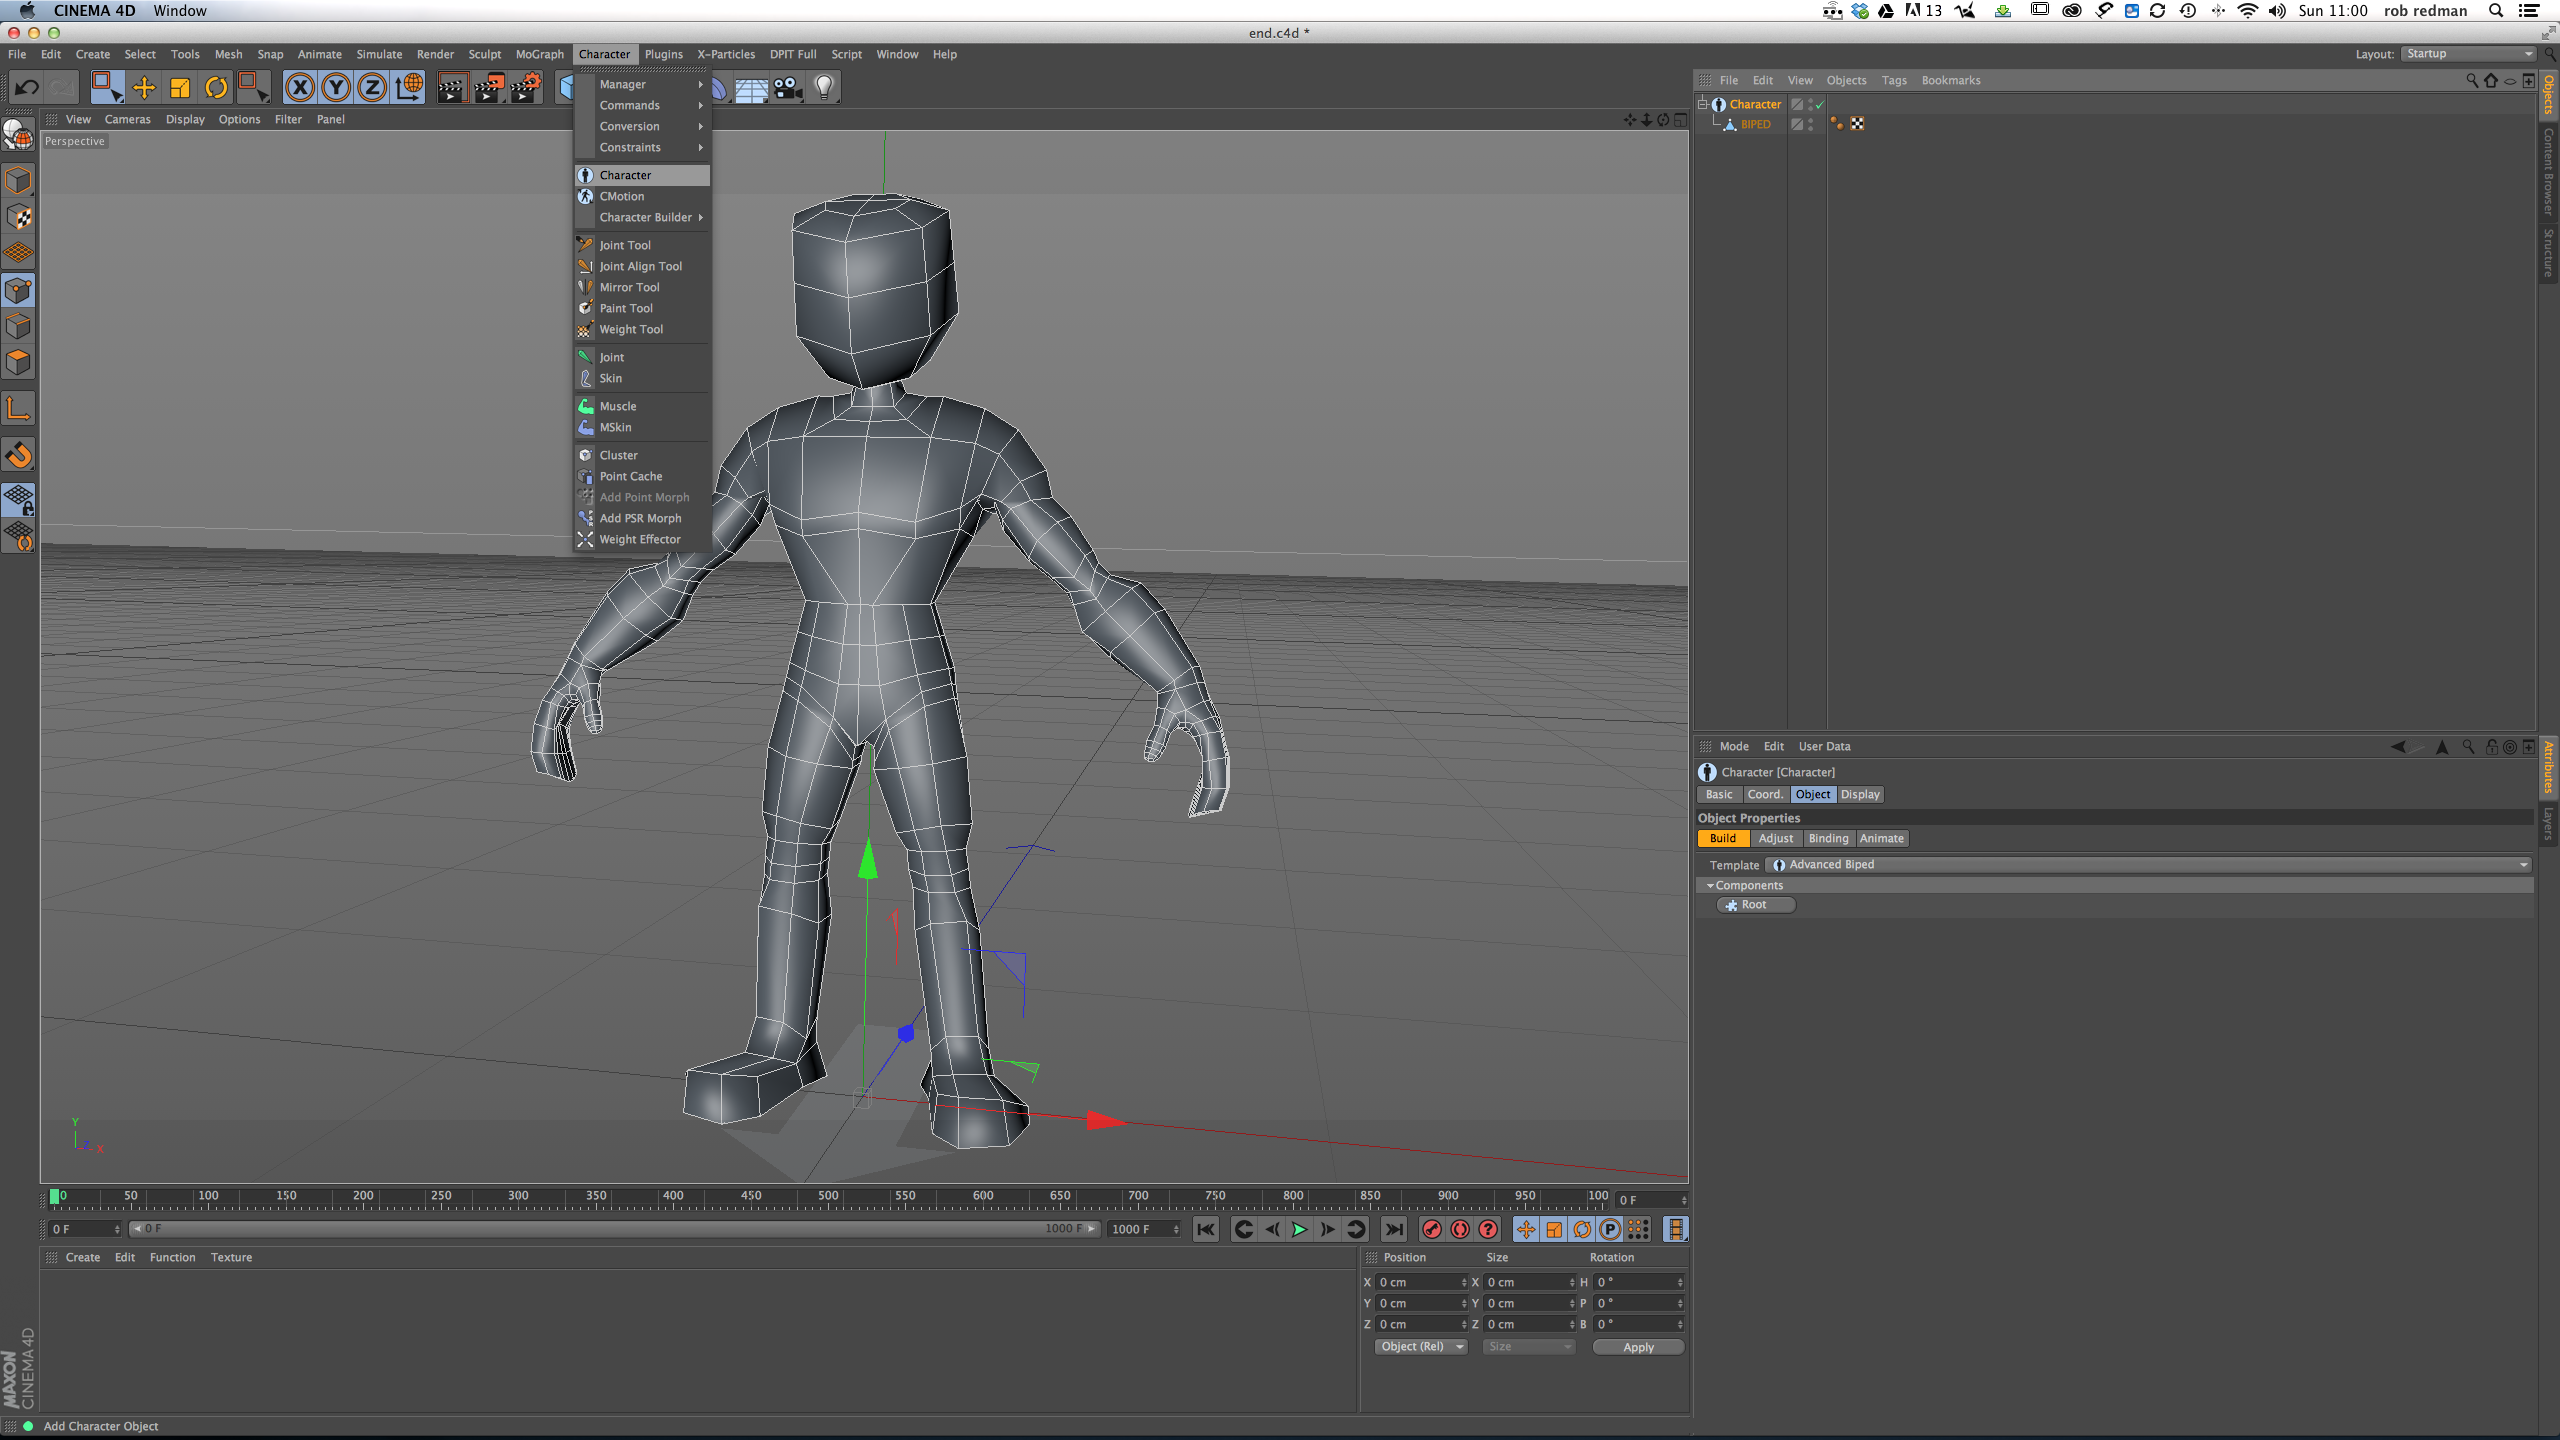
Now we need to enable the Character tool, so select your model and, while holding Alt choose 'Character' from the Character menu. Holding Alt makes your mesh a child of the new character object, keeping your hierarchy organised.
The character object doesn't do much in itself but you will see an arrow facing down the Z axis at the feet of your model. What it does do is house the tools we will use to create our rig and make the process as simple as possible.
Step 03
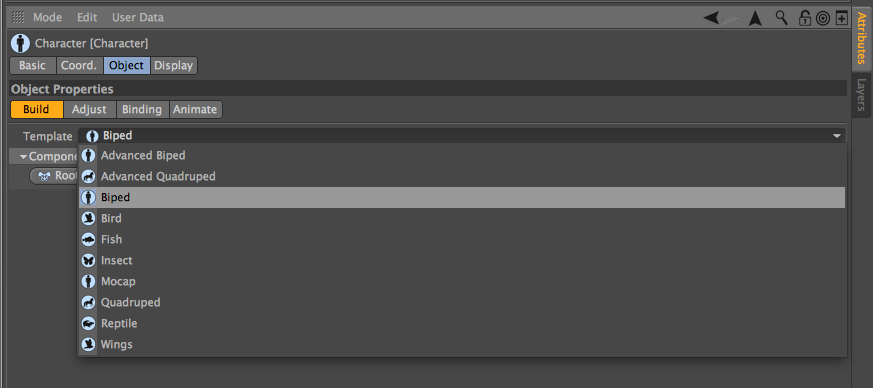
Now we need to define our figure type. Click on the dropdown menu and you will see a group of character types. For this example we will work with a simple biped but you can see there are many options including birds and fish.
Daily design news, reviews, how-tos and more, as picked by the editors.
Step 04
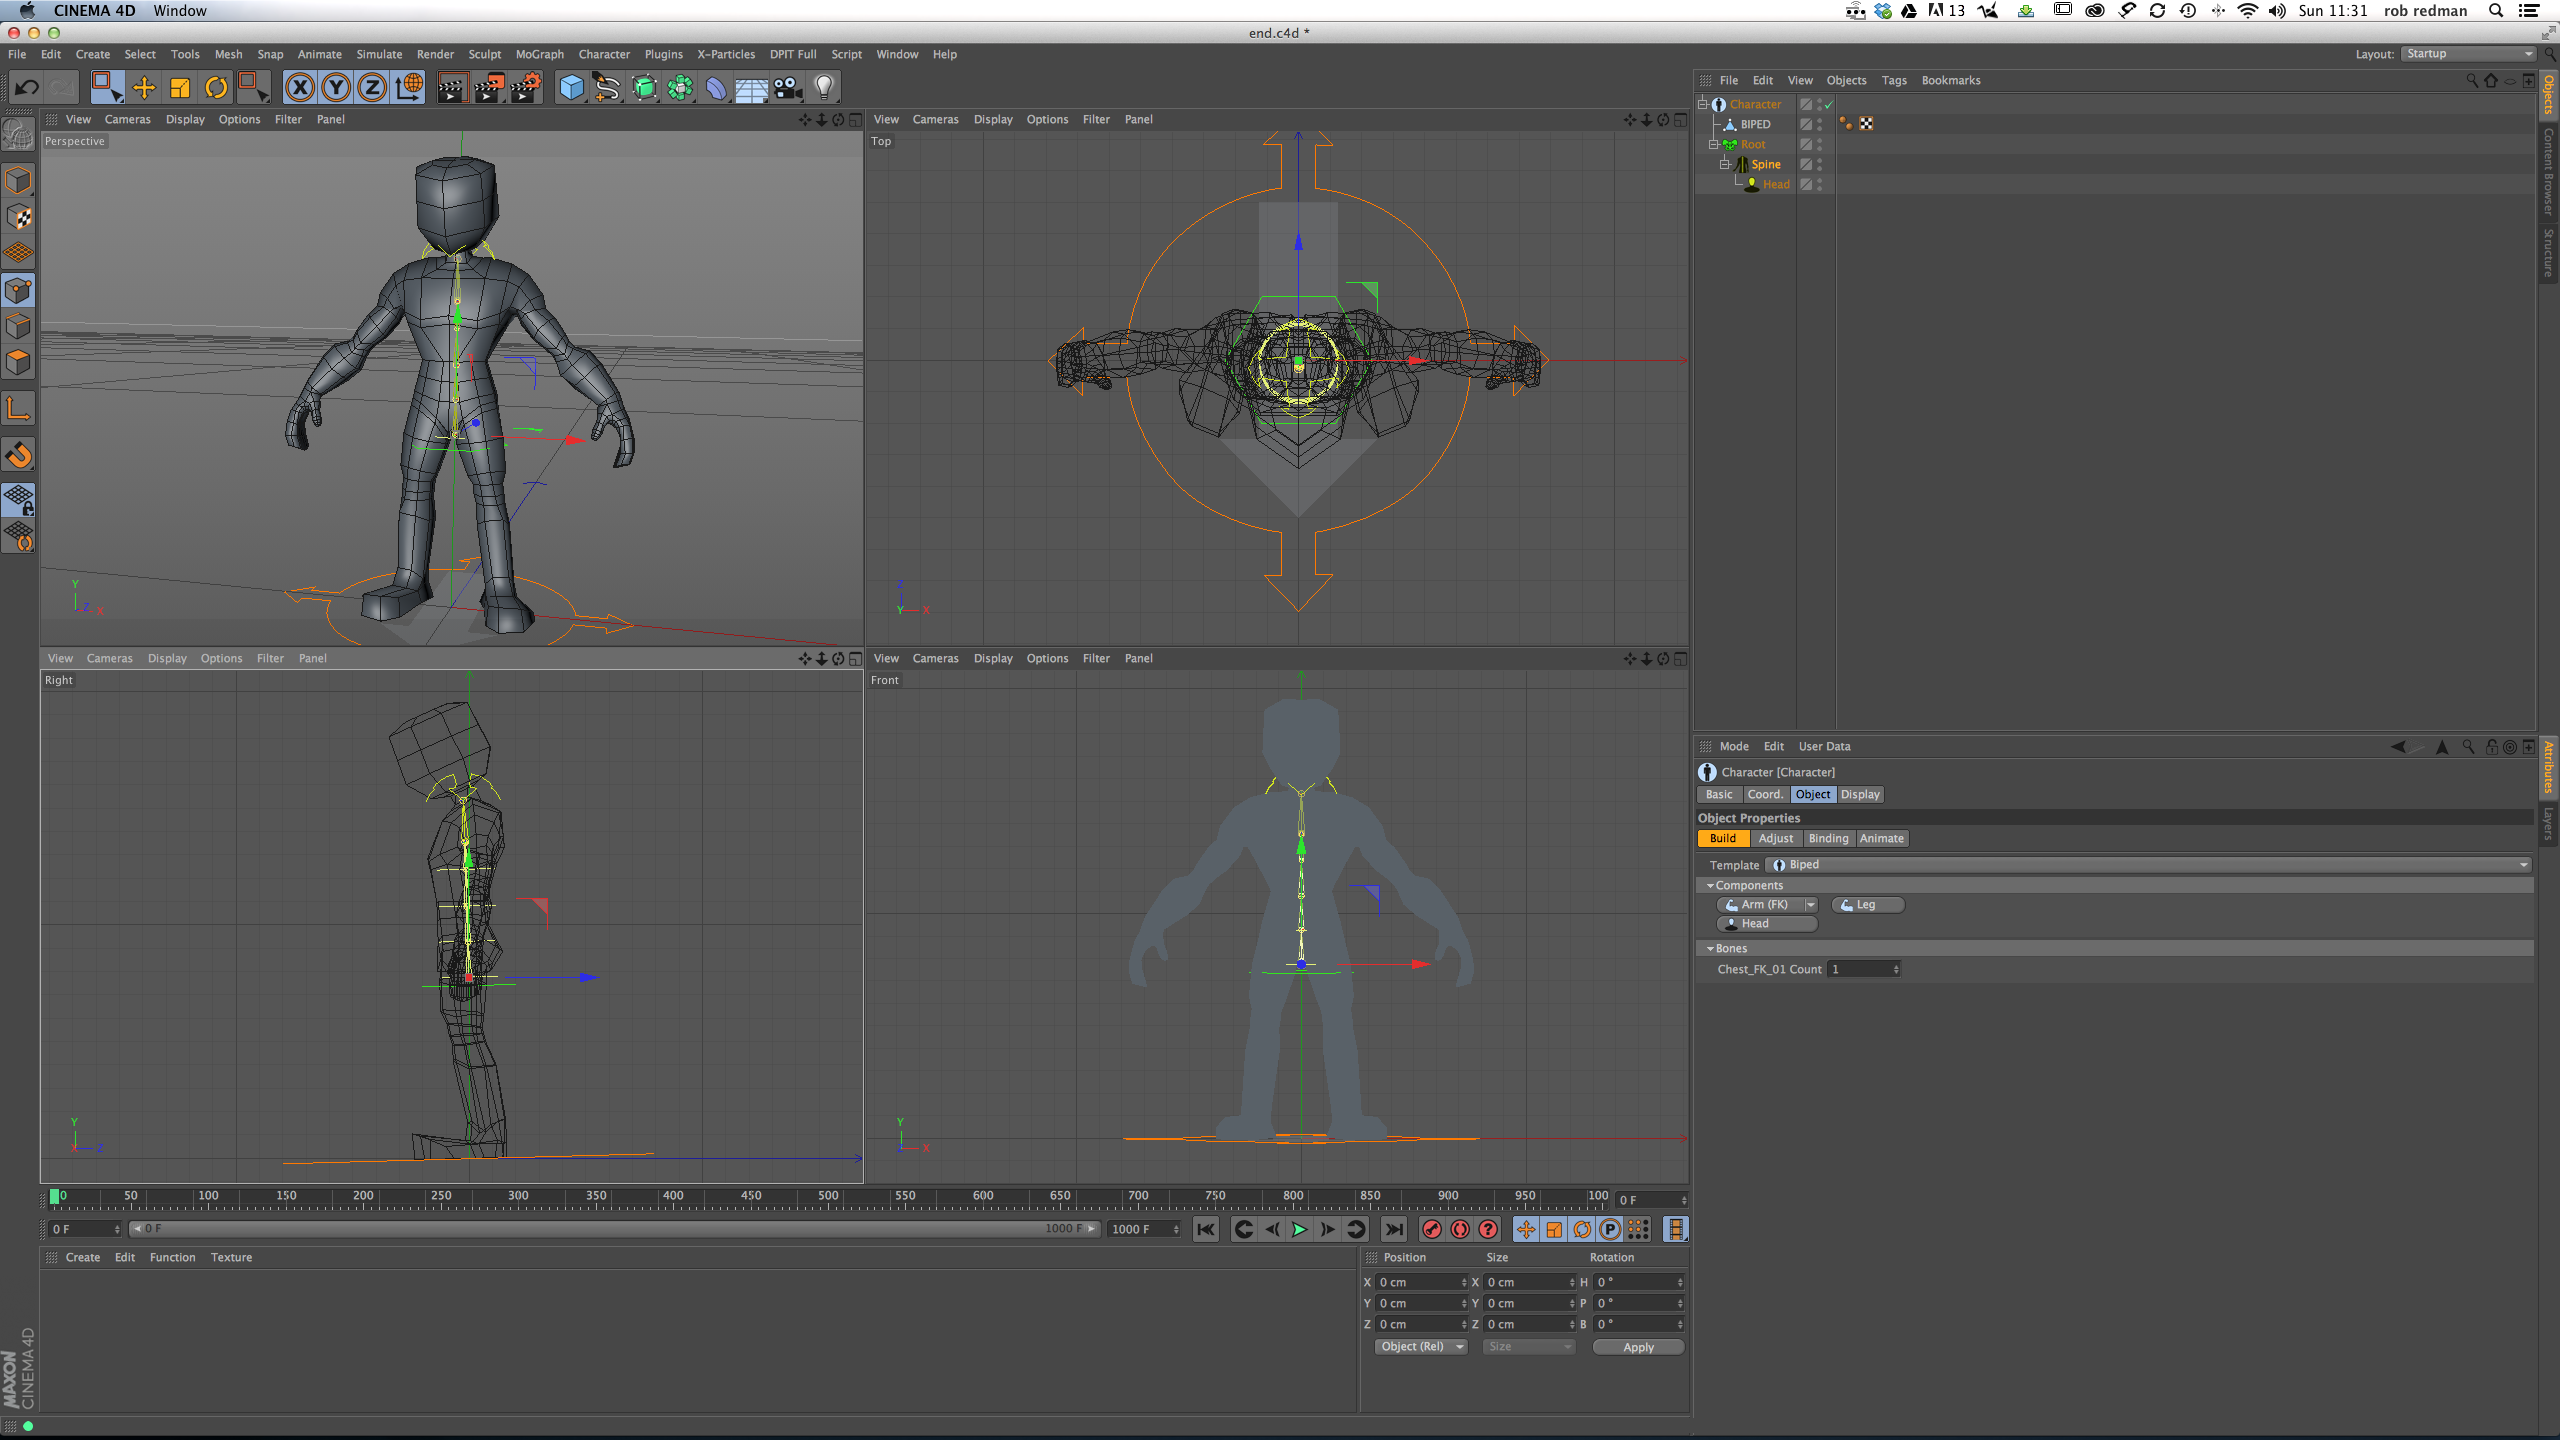
In the build tab you will find a root button. This has a pelvis icon which guides you to place it at the pelvis of your character. This is essentially the starting point for your figures bones and from there you can add the spine and legs (or a tail etc). In your object manager you will see the root in the hierarchy. If you select it, the button in the attributes manager will have changed to show a menu for any bone type that can be attached to the pelvis/root.
Click on the spine and in the dropdown menu choose SpineFK. The differences between FK and IK are outside the realms of this training but it comes down to how you would like the bones to react when you move certain controls. You can also add a head now but selecting the spine in the object manager and then the head button in the attributes manager. This should now offer you a jaw option but that isn't needed for now.
Step 05
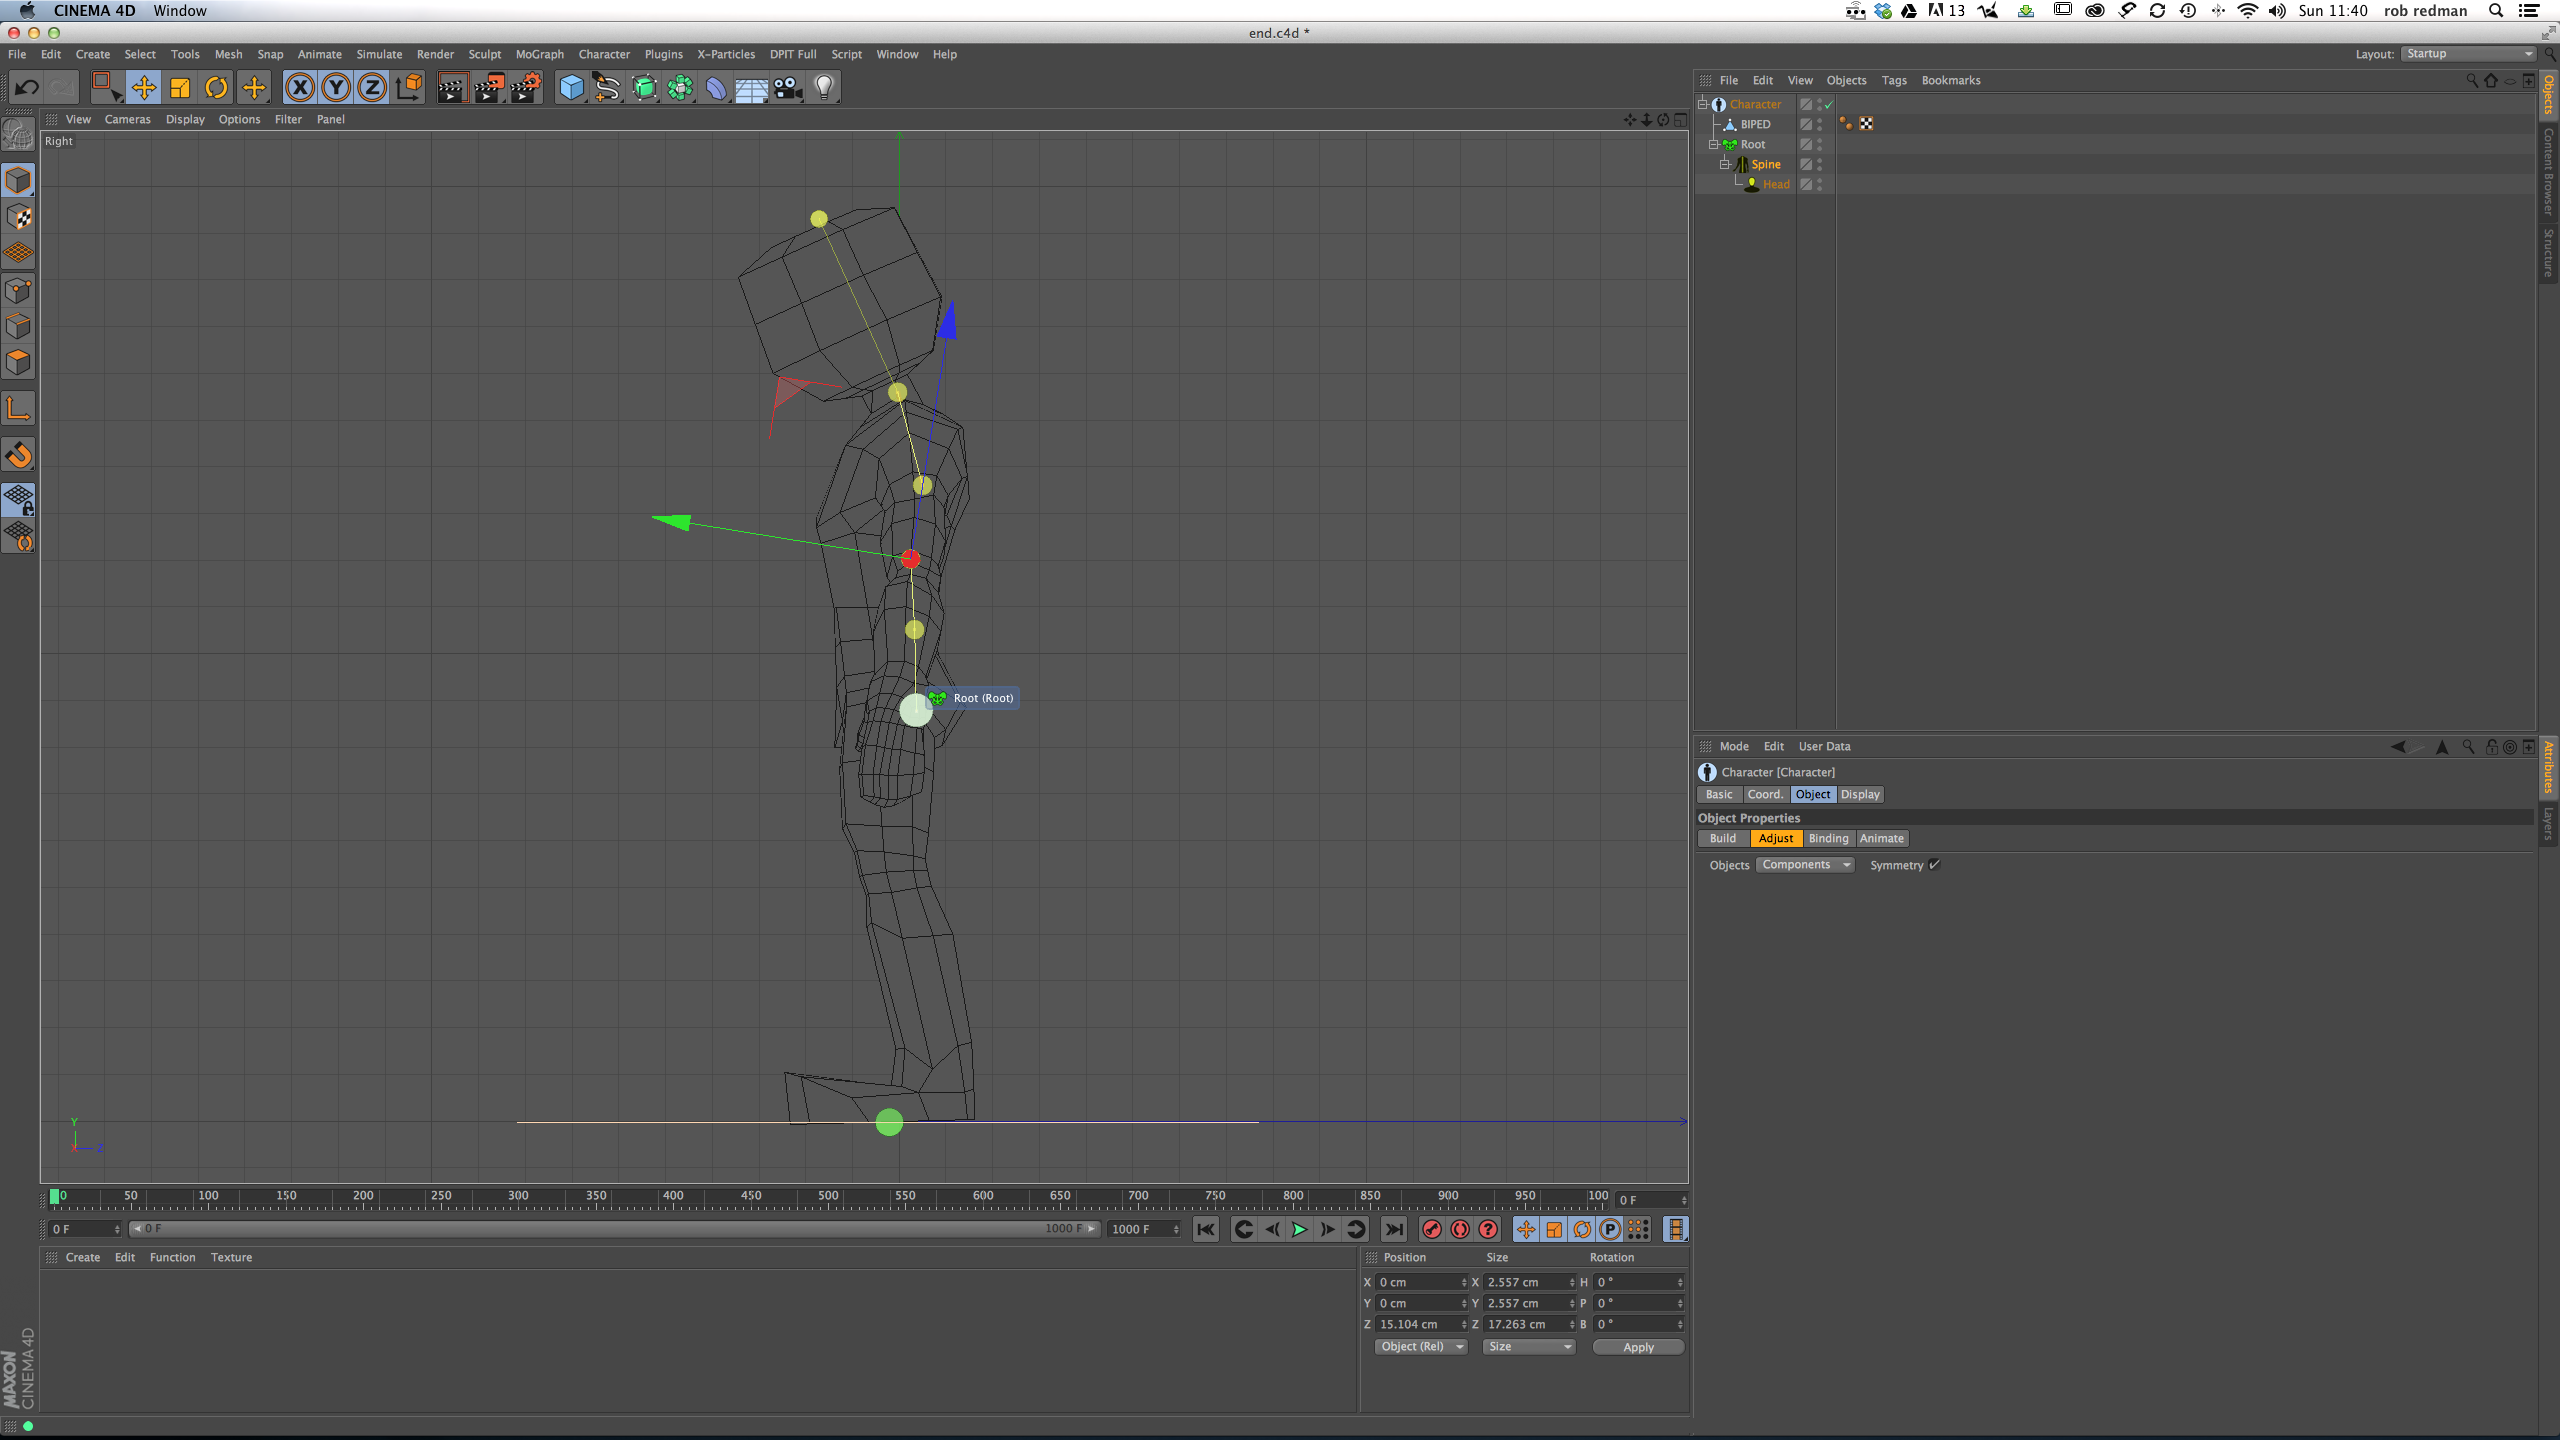
At this point it's a good idea to get the created parts of the rig into the correct areas, so that when the next parts are built they will be more or less right and need less tweaking. Adjusting a complete rig is harder work, as you have to select components which may overlap and so on. In the attributes manager move over to the “Adjust” tab and you will see a dropdown and a check box.
For the dropdown choose component, which will allow you to work simply in the viewport. You can leave the symmetry box checked. It's not needed now but will be later. Now move your cursor over the coloured circles in the viewport. The name should pop up to help you select the correct part. With the move tool (in object mode) you can click and drag the parts around, so that they more closely fit your figure. I find it useful to add some natural resting curve to the spine, as it helps when animating later.
Step 06
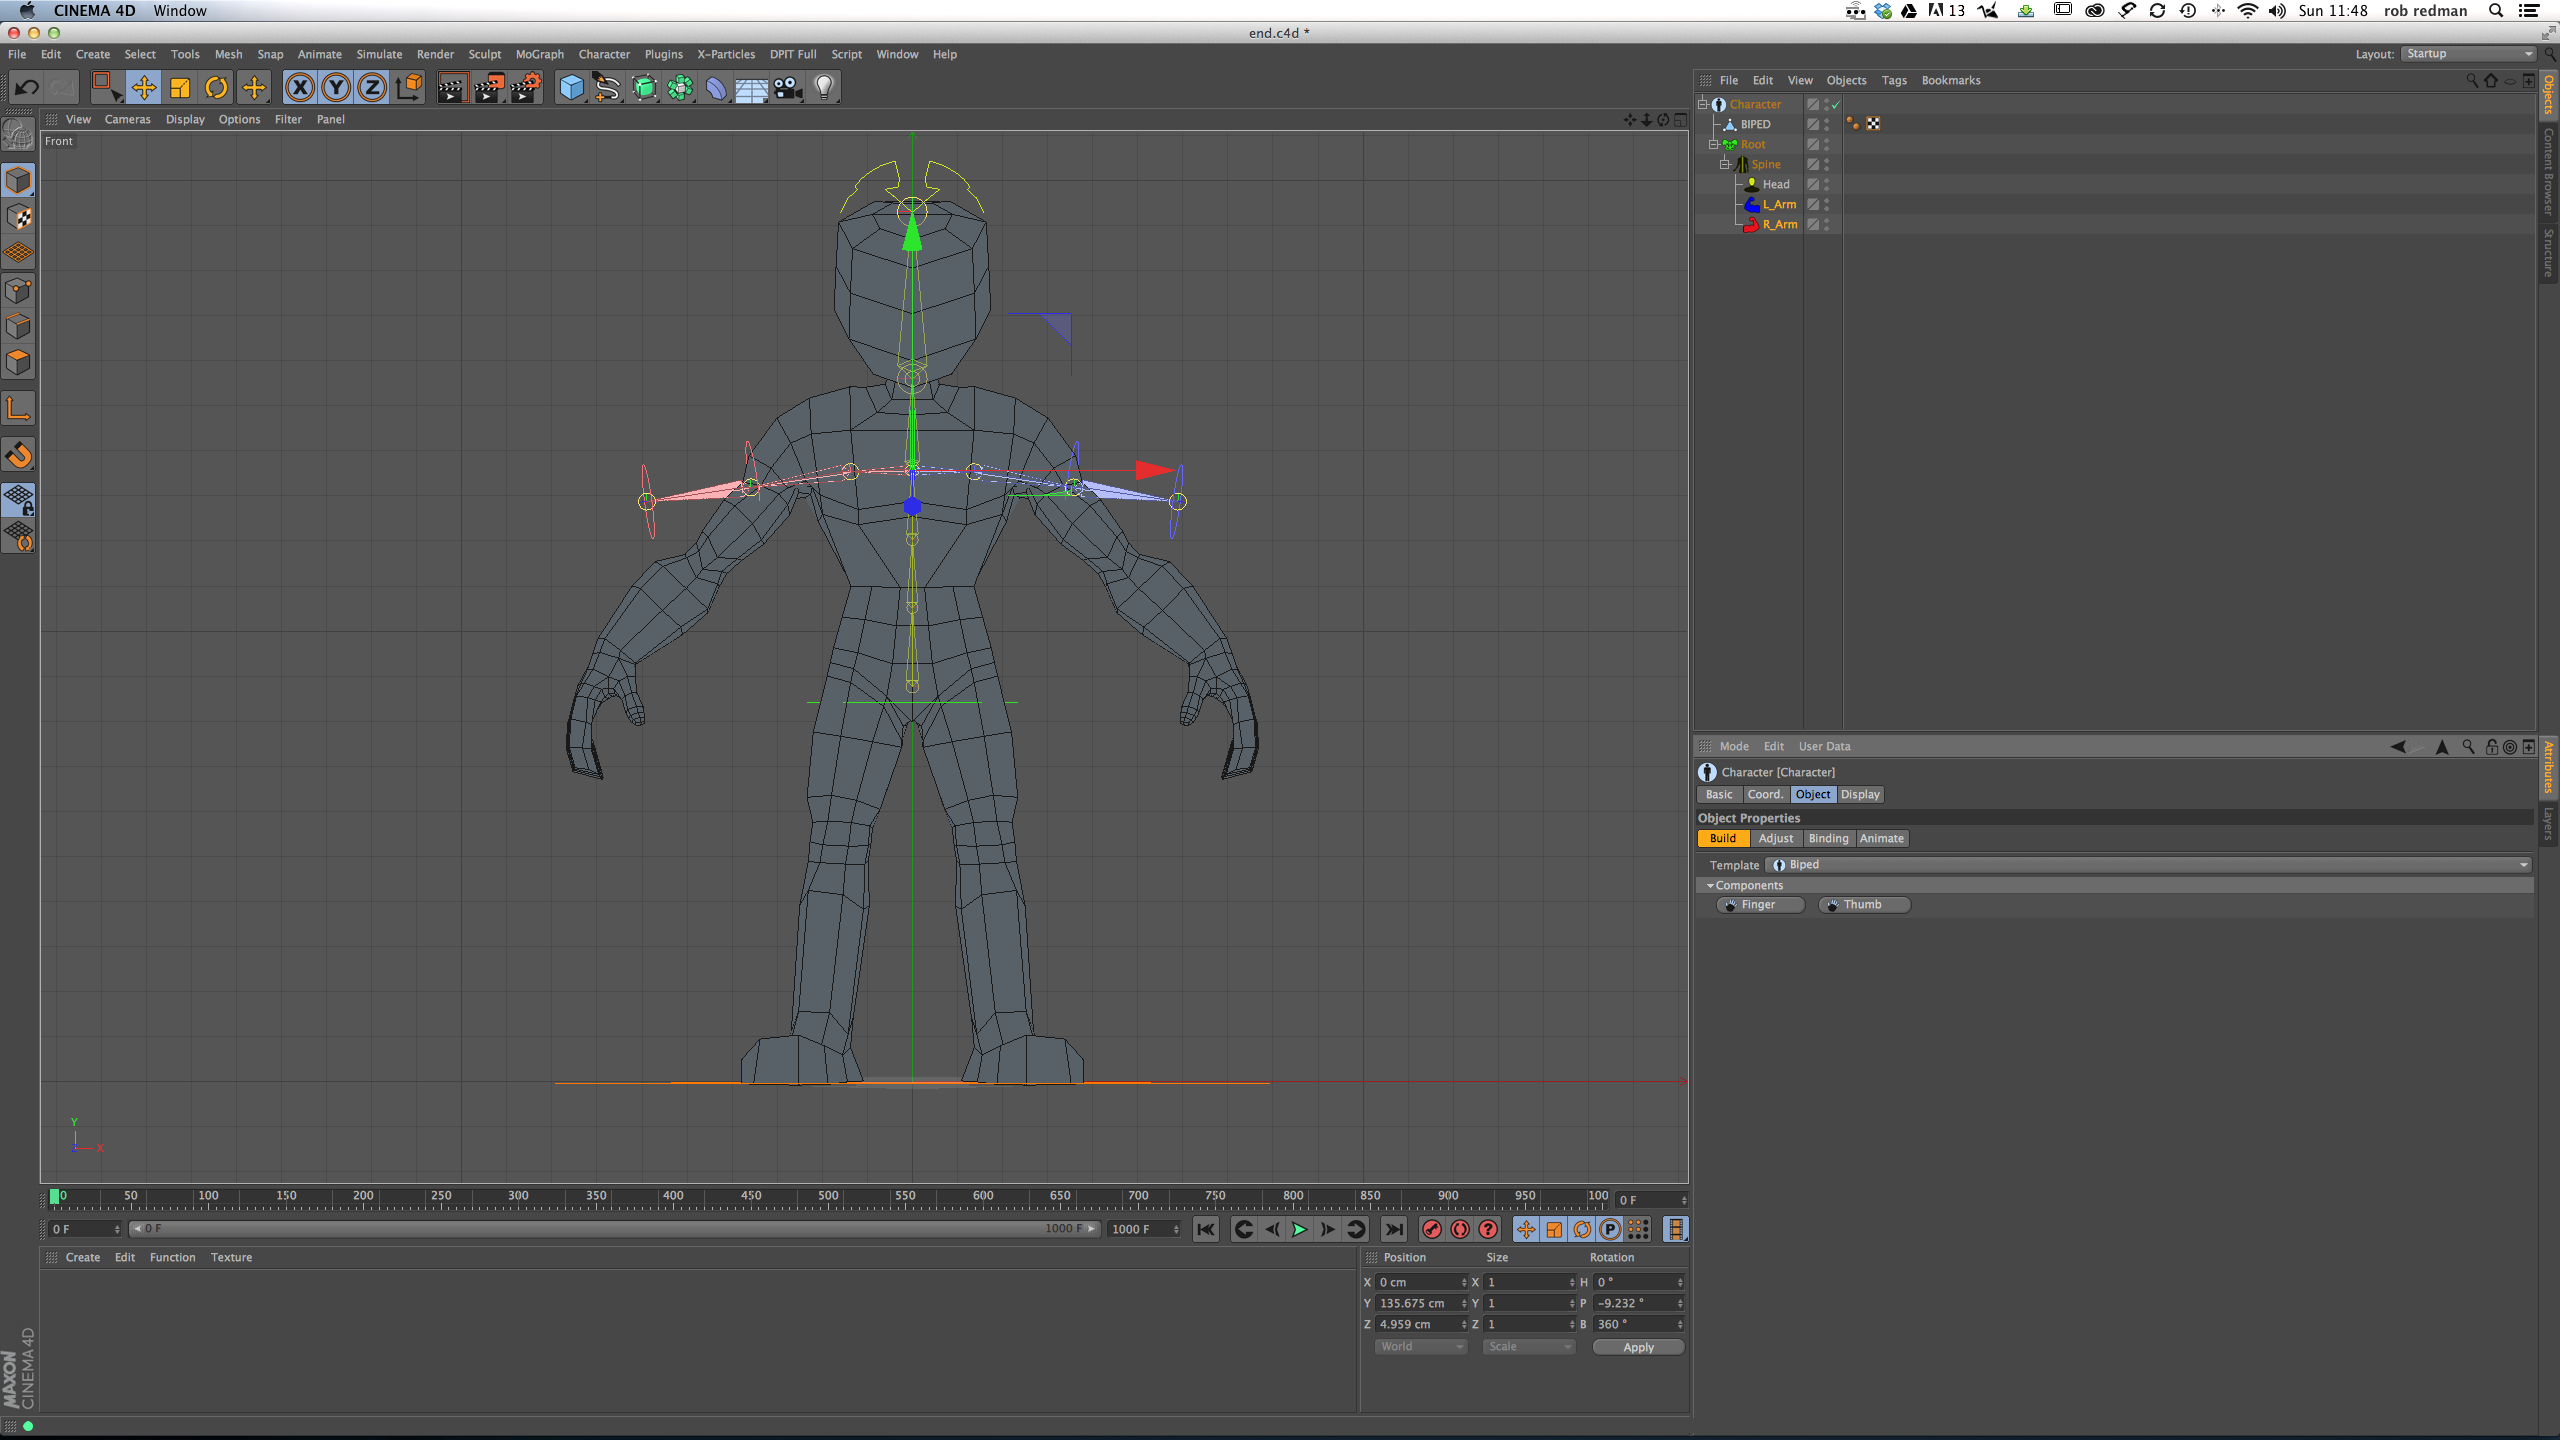
Now head back to the build tab and select the spine again. Under the arm option you will see FK/IK options again. Choose FK for this again and an arm rig will be added to the hierarchy. To save time and make your rig symmetrical hold down Ctrl as you click the arm button. This will add both a left and right, with colour coding to help you visualise and organise. The arms should be selected now and you will have the option to ad fingers and thumbs. You can ignore these but by now you should be getting to grips with how the system works. The figure templates make good guesses at what will be attached where and it streamlines the process, showing the options you need when and where you need them.
Now, go back in to the adjust tab and align the arm components with your mesh. Give a slight angle to the elbows, so aid animating later.
With symmetry still enabled you will halve the time the adjustments take. Also note how adjusting the shoulder will move everything below it in the chain, so always start at the joint nearest the start of the hierarchy. The root will move everything with it.
Step 07
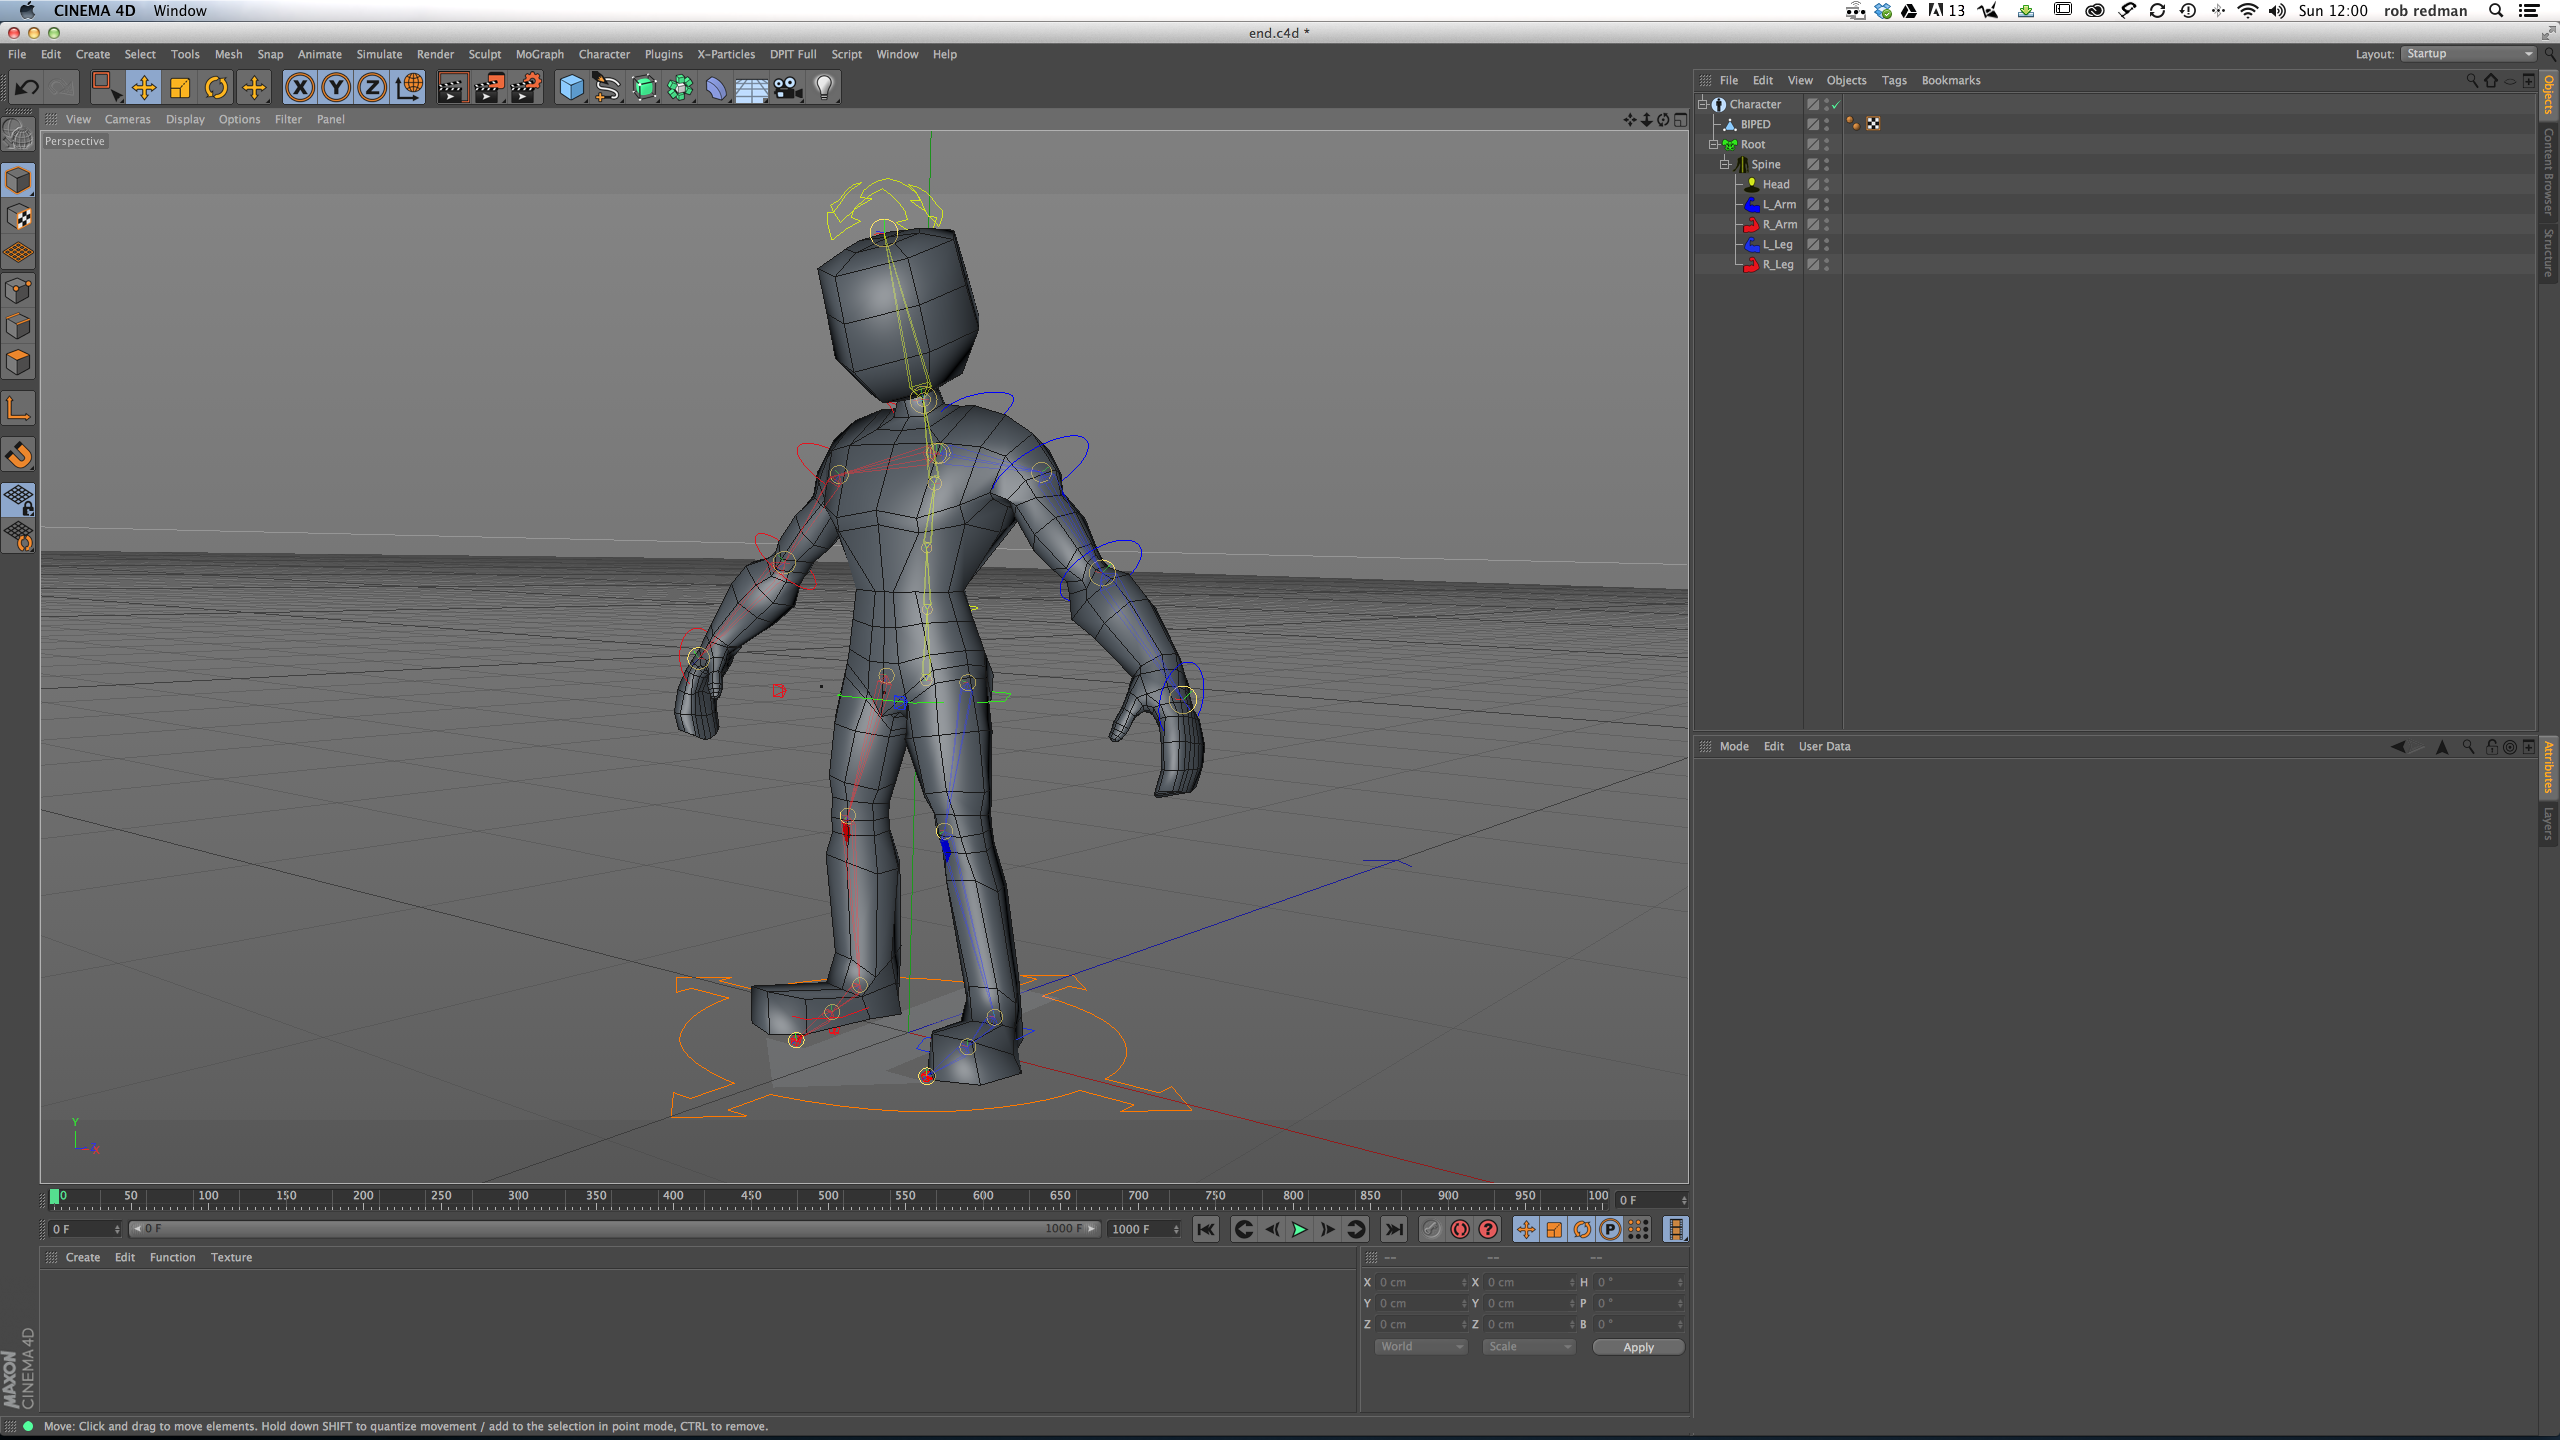
Legs and feet are next and you follow the exact same process. Go back to the build tab and select the spine. Hold Ctrl and click on leg. The leg gives you components for the foot and a master toe controller as well. This one is a single toe, rather than five per foot and just allows for the foot to bend as you animate contact with the floor. The advanced biped can have individual toes (and fingers).
Step 08
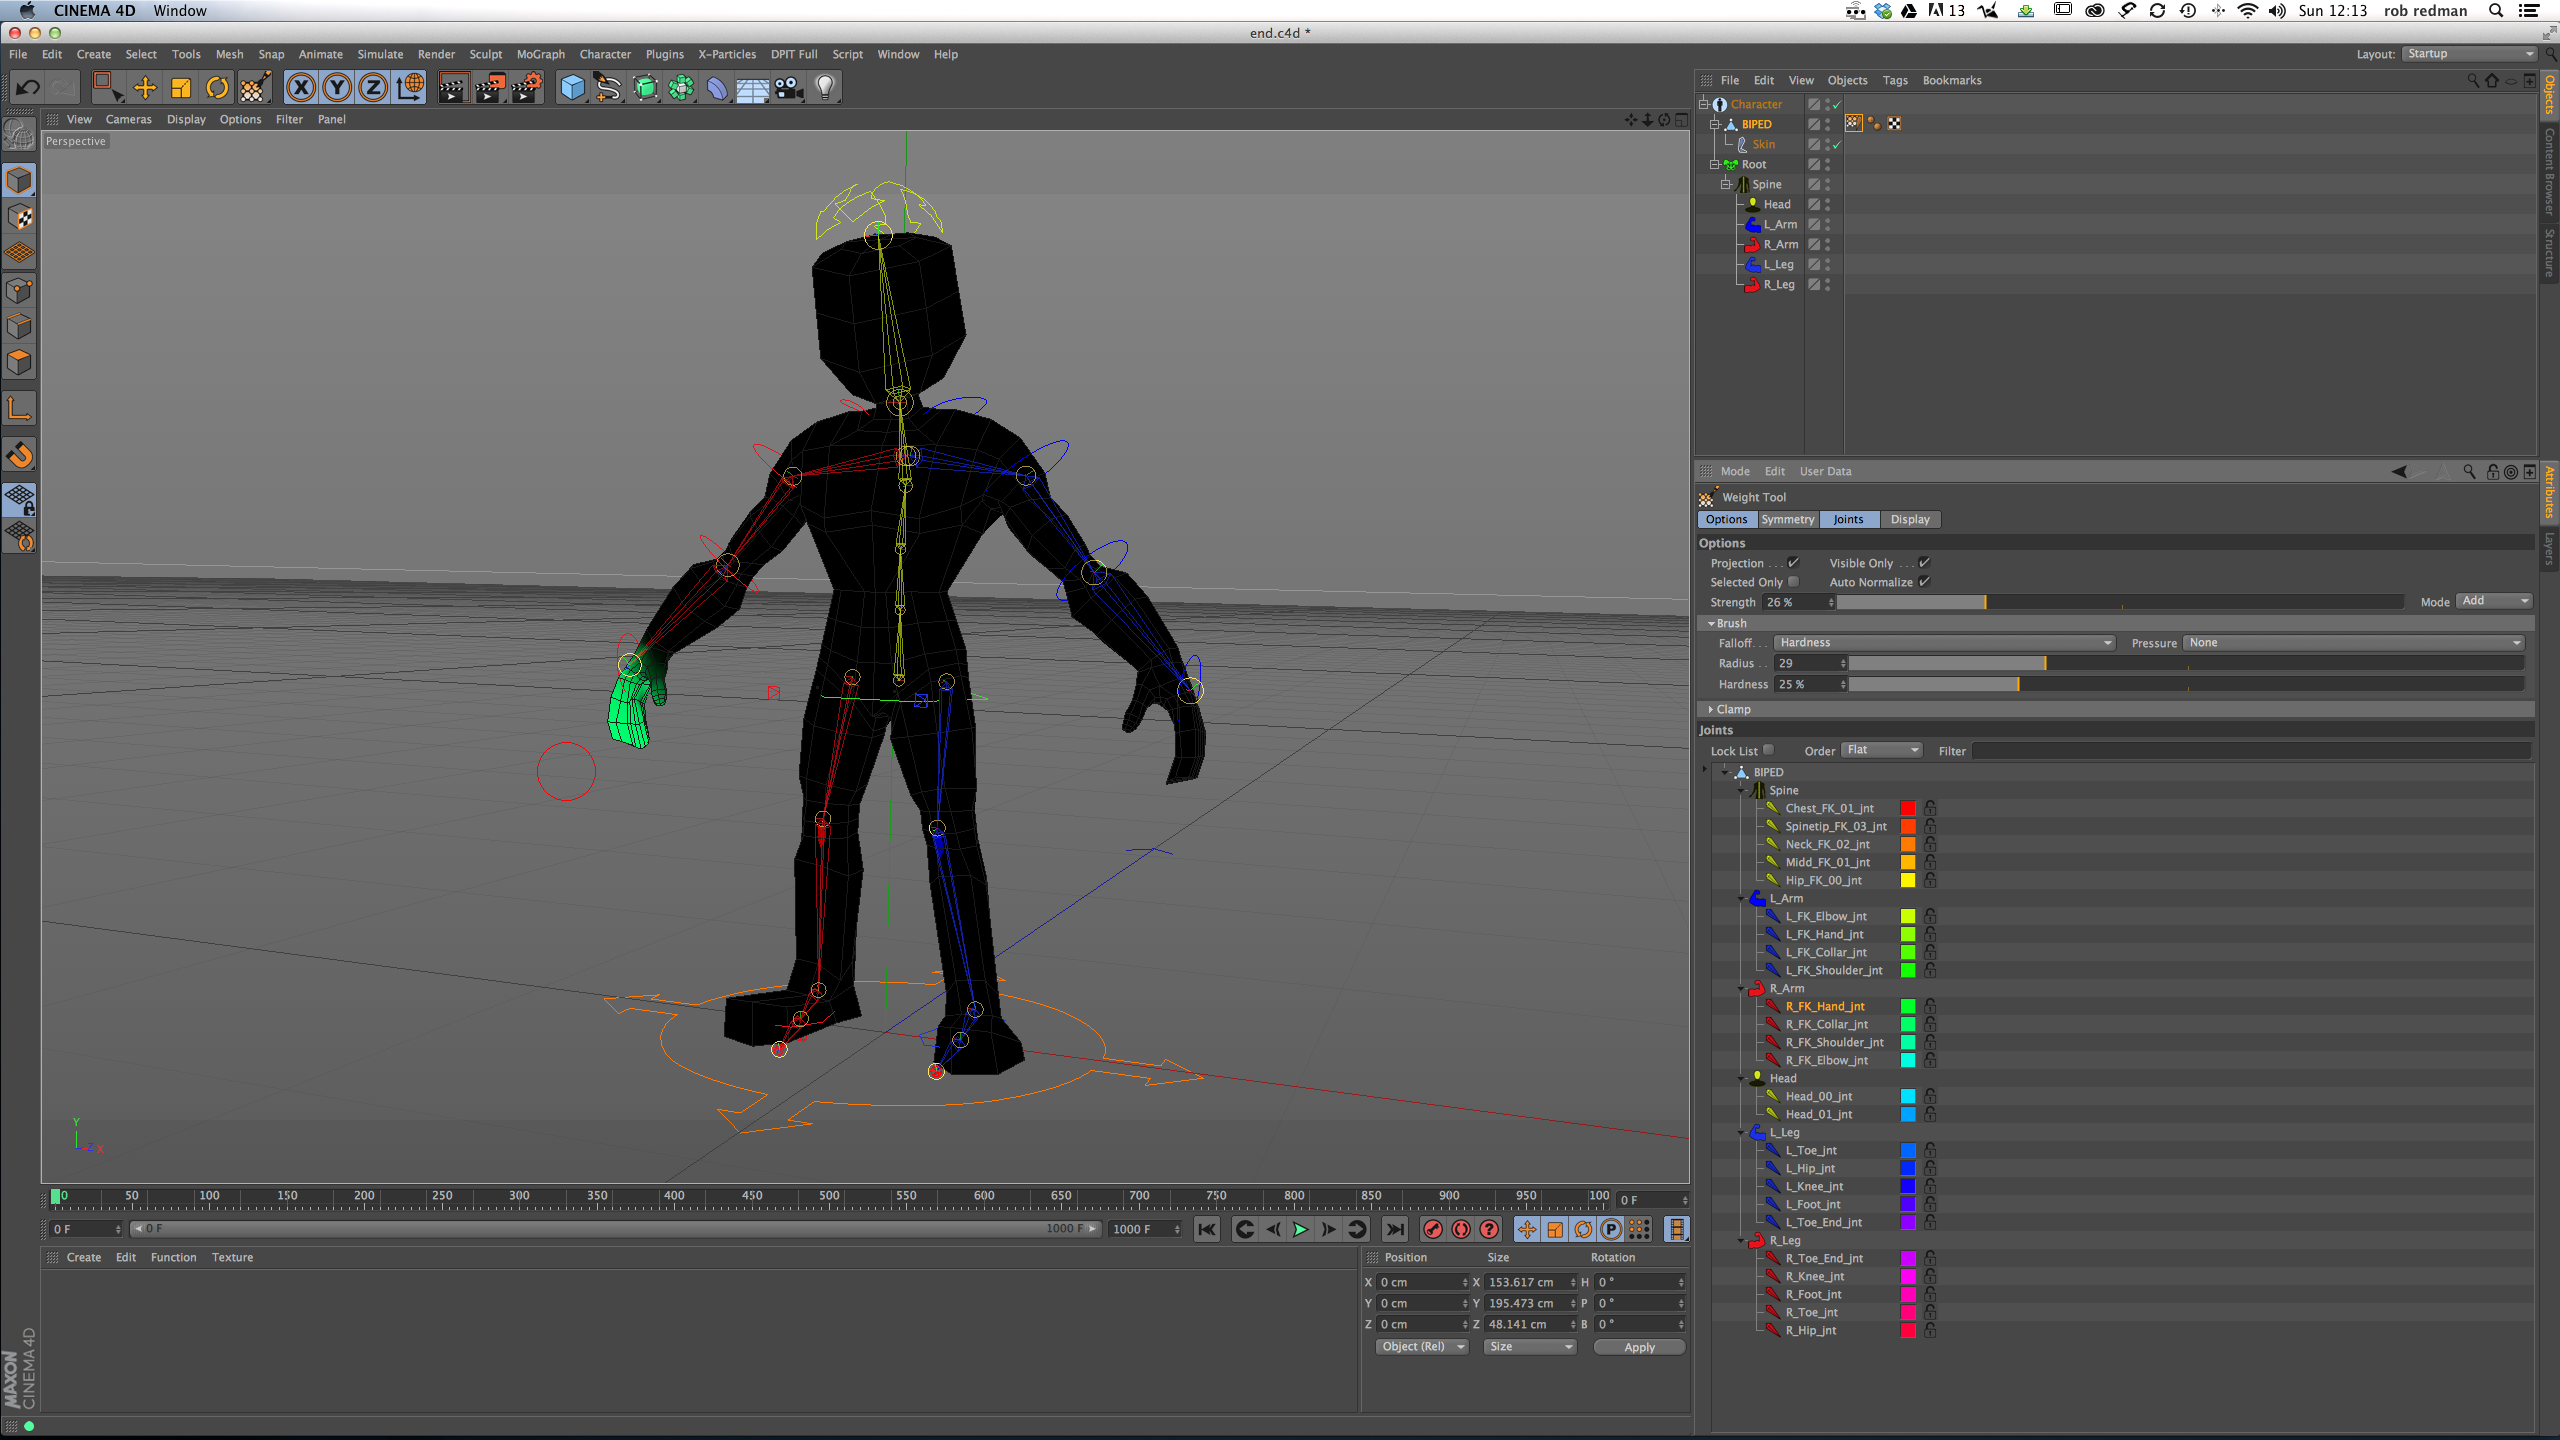
With your rig built and everything moved into the correct position you need to bind it to the mesh, so that your animation of the joints is carried over to your figure. This step is pretty simple. All you need to do is move to the Bind tab and a new Skin object will be created beneath your mesh. On its own it doesn't look much but some new tags will have been added. You will have a weights tag. If you double click it your character will turn black but you will also have all the bones listed and colour coded in your attributes manager. There you can select each bone and see the area of influence it has on the model.
The model will be coloured the same as the name in the list and you can adjust the radius of the bones influence here. Weighting can be a complex subject but ti is worth noting here, even though the character tool does a very good job, specially if you have moved the components into good starting positions.
To make quick adjustments here you can paint directly on the mesh, with any bone selected in the joints list (in the attributes) The paint tool will be active in the viewport once you double click the weight tag.
Step 09
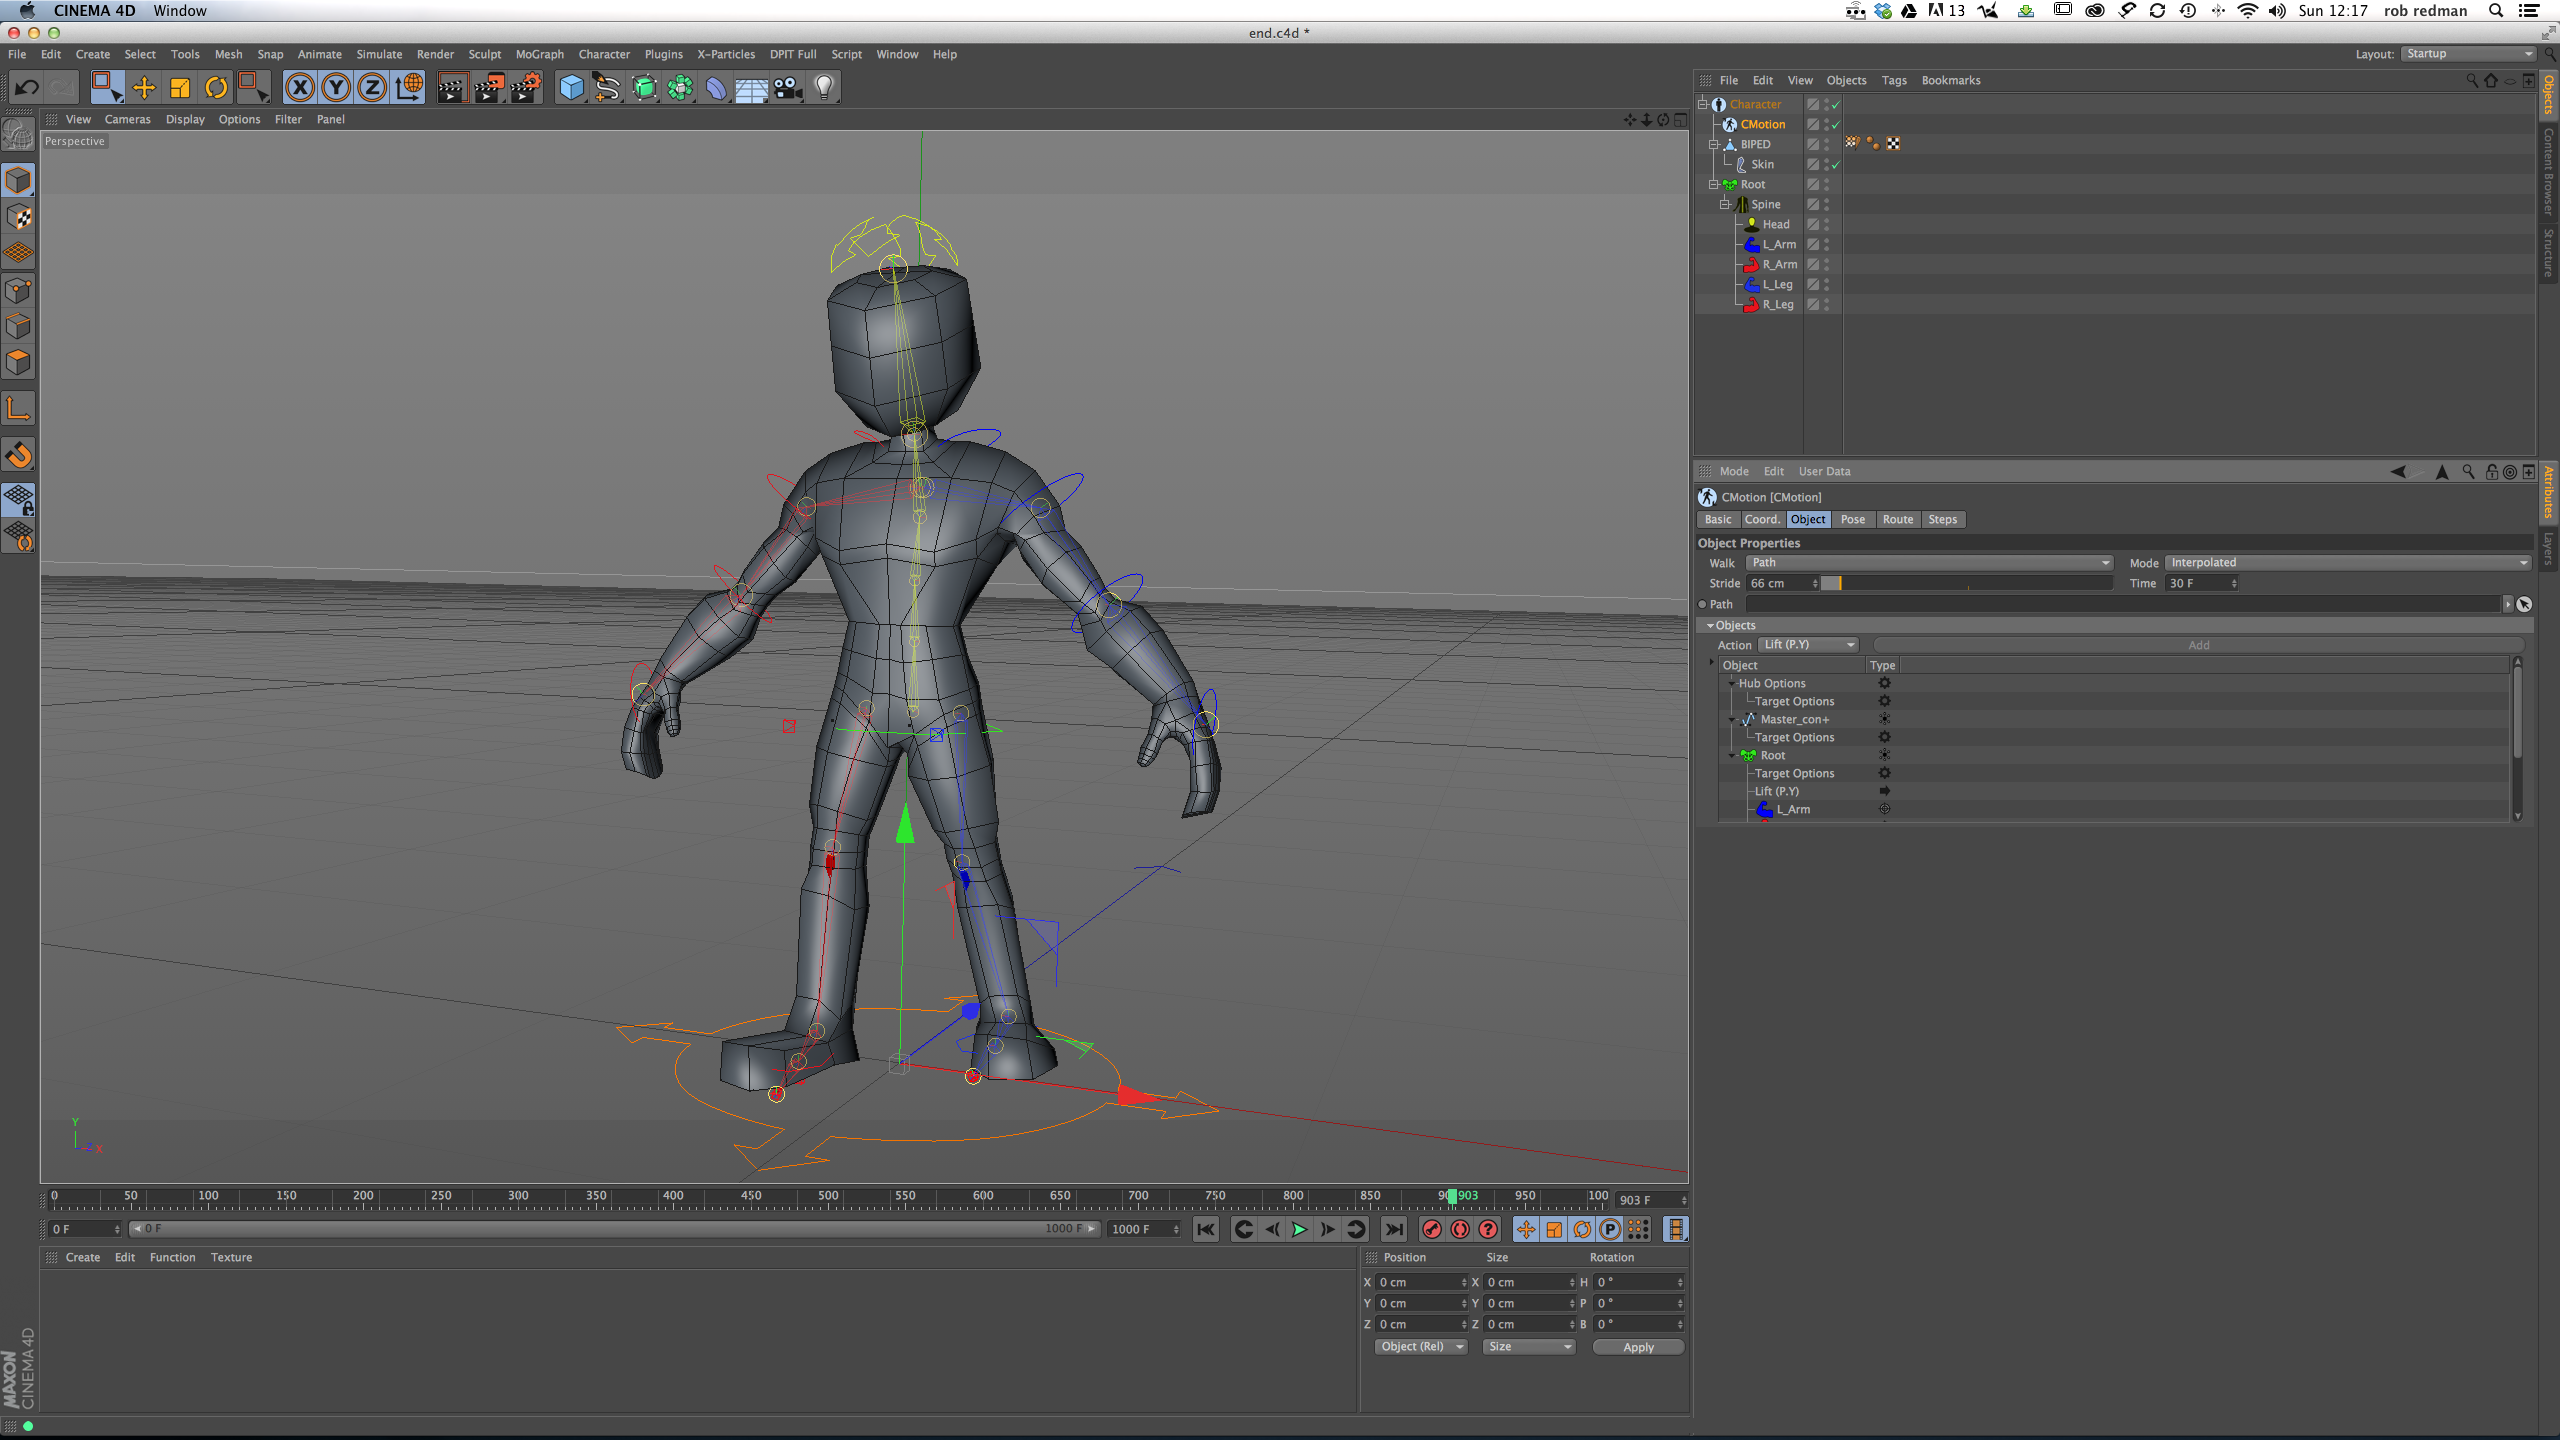
That is your rig completed but there is one last tab you can play with if you choose and it can be fun once you've set everything up. Move to the animate tab and simply click the 'Add Walk' button. Hit play on your timeline and watch as your figure starts walking on the spot. It wont be a realistic walk until you start adjusting things but it is easy to get it walking around a scene and even following the terrain once you've added it. Now is the time to have some fun and start experimenting, not just with walking but rigging other types of figures and seeing what you can do with them.
Hopefully now you are more comfortable rigging and have seen how easy it is to get started.
Words: Rob Redman
Delivered in conjunction with ZED!
This content was produced in collaboration with HP & Intel as part of ZED - a Pop-Up Studio for the Creative Community held in Soho, London. For more information about ZED and any future events see here.

The Creative Bloq team is made up of a group of art and design enthusiasts, and has changed and evolved since Creative Bloq began back in 2012. The current website team consists of eight full-time members of staff: Editor Georgia Coggan, Deputy Editor Rosie Hilder, Ecommerce Editor Beren Neale, Senior News Editor Daniel Piper, Editor, Digital Art and 3D Ian Dean, Tech Reviews Editor Erlingur Einarsson, Ecommerce Writer Beth Nicholls and Staff Writer Natalie Fear, as well as a roster of freelancers from around the world. The ImagineFX magazine team also pitch in, ensuring that content from leading digital art publication ImagineFX is represented on Creative Bloq.
