Create realistic raindrops in 3DS Max
Stuart Dearnaley shows you how to create raindrops and ripples to add action, drama and beauty to your water scenes.
Living in the United Kingdom, rain is something you see a lot of throughout the year. While watching it out of my window I decided it would be great to try to replicate the scene in CG. In this tutorial I’m going to share my process with you, using 3ds Max and V-Ray, so that you can create your own rainy day wherever you are in the world.
The whole effect can be broken down into three key parts: the falling drops of rain, the splashes as they hit the water, and the ripples that disturb the surface. When studying the surface of my pond, I noticed that quite a random mix of ripples and splashes was being created. I certainly couldn’t follow a single raindrop as it hit the surface, and created a splash and a ripple. This would make the process a lot easier in 3D as I could treat them as separate events without anyone really noticing.
So that’s what you’ll do here, starting by creating animated maps for the separate pieces of the puzzle before combining them in the final scene to create the overall effect of raindrops splashing on a pond.
Article continues belowDownload the support files here.
Stage 01
Creating a ripple
For the first section of this tutorial, you’re going to create a map for the ripples that you’ll be using in the next section. You’ll use basic keyframe animation on standard geometry to create a set of fading rings that will eventually drive a bump map on your water surface. Begin by opening a scene in 3ds Max and configuring it to meet your needs.
Video 1 00:22
Make rings
Starting with a fresh scene in 3ds Max, the first thing to do is configure the time range and render size. I’m used to working at 25fps and this tutorial is based on that, so open your Time Configuration panel and set it to PAL, with a frame range of 20. Open the Render Setup dialog and set the frame size to 300x300.
Now you can start to create the animated map that you’ll use later to create multiple overlapping ripples. Start by creating a Torus object with Radius 1 set to 35, Radius 2 to 3.5, and 48 Segments. Now scale it up on the Z axis to about 300 per cent and name it Ripple 01.
Sign up to Creative Bloq's daily newsletter, which brings you the latest news and inspiration from the worlds of art, design and technology.
01:10
Add the motion
Create a keyframe at frame 20 for Radius 2 and the scale transform. Then, with Auto Key turned on and at frame 0, scale the torus down on its X and Y axis to around 10 per cent and set Radius 2 to 6. From here on you should switch to top view, as this is how you’ll be rendering it out.
02:38
Duplicate and fade
Now, with Auto Key off, make a clone of the ripple and change its Radius 1 to 42. Make another clone, this time setting the Radius to 27. Now you have three rings radiating out from the centre but they need to fade out as they grow.
Turn on Auto Key and, with all three selected, set their Visibility to 0 at frames 0 and 20. Go to frame 2, then set the outer and inner rings’ Visibility to 0.2, and the middle ring’s to 0.4.
04:40
Add a material
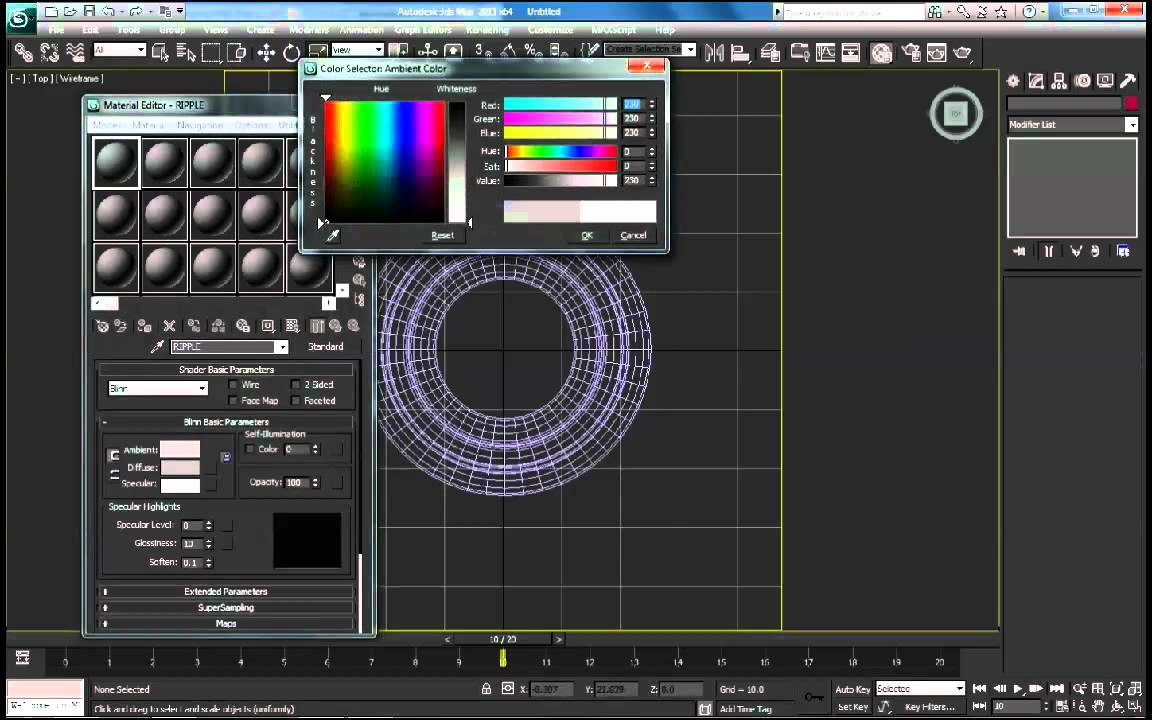
Now it’s time to add a material to the rings. Head into the Material Editor (press [M]) and create a standard material in slot 01. Call it RIPPLE. Set the Diff colour to white, and Self-Illumination to 100.
Your ripples should fade at the edges, so you need to add a Falloff map to the Opacity slot, flip the colours (so that it fades from white in the centre to black at the edges) and then apply this material to all three of your rings. Give it a quick render at various frames to check that it’s looking right before you continue to the next step.
05:30
Render the ripple
Now you can render this out as a sequence to be used as a map in the next scene. Make sure you’re in the top view, turn on your safe frames and zoom the viewport to the extents of the rings at their largest. Set your render output path and file type (I prefer to use a TGA sequence and put it in a folder of the same name) and set the range to Active Time Segment.
Now click Render and let it run through the 20 frames. You can use RAM Player to check your sequence when it’s complete.
Stage 02
Multiplying the ripples
In this section you’ll take the map sequence you just rendered out in the previous stage and create multiple randomly timed ripples with a nice overlapping effect. By setting up an animated emission at this point in the process, you can do some overlay compositing in the final section to make the sequence loopable.
Video 2 00:30
Go with the flow
Start with a fresh scene. Set the Time Configuration to 25fps once again, but this time you’ll use 100 frames and render them at 1,000x1,000.
In the Create panel, navigate to Particle Systems and choose PF Source. Drag to create a new PF Source in the top viewport and set Length and Width to 150. Centre the object to 0, 0, 0. Now, because you need to see the full number of particles you’re making, set Quantity Multiplier for the viewport to 100 per cent.
00:56
Set up the event
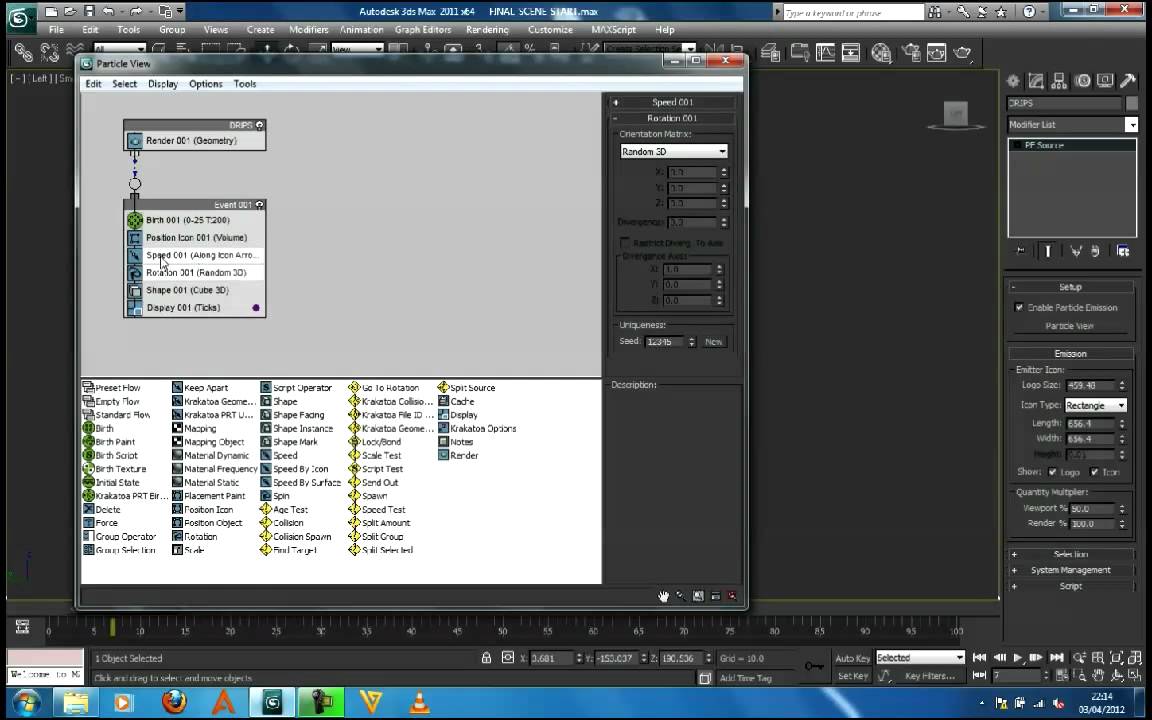
Open the Particle View and remove the Speed, Rotation, and Shape operators from Event 001 because you won’t need them for this setup. Select Display and set Type to Geometry so you can see your particles scale when you create them.
01:15
Set the rate
Select the Birth operator in Event 001, and set Emit Stop to 100. Now click the radio button next to Rate to keyframe the number of particles being created. With Auto Key turned on, set the rate to 0 at frame 0, 500 at frame 50, and 0 at frame 80. The 20-frame gap (81-100) is to allow the mapped particles to die before the sequence ends.
02:05
Make shapes
It’s time to create the particle geometry that you’ll be mapping onto – for this you’ll use a Shape Facing operator, so drag one up into Event 001 after Position Icon. They’re a bit small at first, so set the world scale to 20, with a Variation of 15. Also, make sure they disappear after you’ve finished with them. A Delete operator will do this for you, so drag one up into the bottom of Event 001. Change it to By Particle Age with a Life Span of 20, and 0 Variation.
03:10
Map the ripples
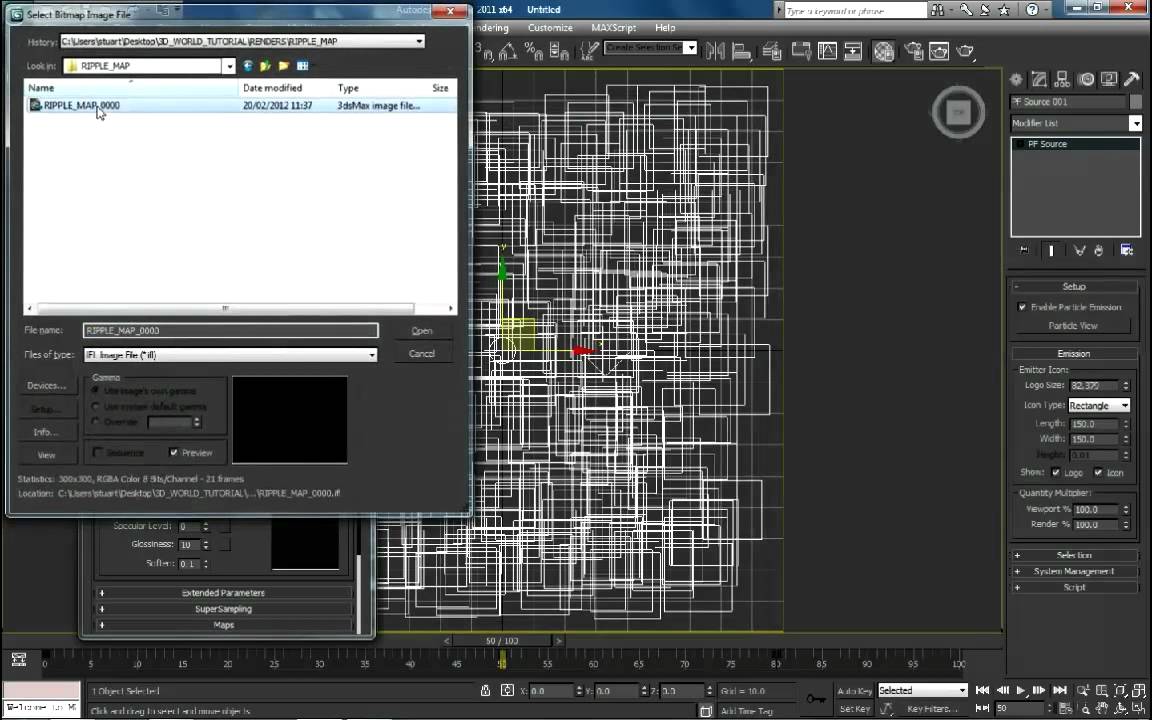
Now you need to add the ripple map you created previously to your particles. Open the Material Editor again and, as before, give it a name, then set the Diff to white and Self-Illumination to 100. This time, you’re going to load up the image sequence, so you’ll use a Bitmap map. Expand the Time menu within the bitmap loader, and you’ll see a tick box labelled Sync Frames To Particle Age. This is a great function for adding animated maps to your particle systems when used in conjunction with a Material Dynamic operator in PFlow. Click it to turn it on, and swap back to Particle View. Drag a new instance of Material Dynamic into Event 001 just above Shape Facing. Now apply your material by dragging it into the available slot in the settings panel.
04:40
Trouble with opacity
You should now have a sequence of particles being created and dying after 20 frames – all mapped with your ripple sequence. Click Render to see how it looks. There’s a problem with the way it’s rendering, due to the overlapping faces and the way it’s trying to figure out the opacity.
To fix this, simply add a gap between the particles on the Z axis. Select the particle system and change Icon Type to Box, then adjust the height to 10. Give it another test and it should be fixed, giving you a nice cumulative overlay effect. Incidentally, you may want to change the scale of the particles to create more overlap of the ripples at this point.
Stage 03
Making a splash
This section is all about making a splash where the raindrops hit the water. It would become a heavy scene if you tried to render hundreds of splashes in the final effect, all with reflection and refraction, so you’ll be making another animated map for use later on. I’ll go through setting up the scene, then you can play with the settings and keyframes to make a couple of variants for the final sequence.
Video 3 00:35
Create your base
Again you’ll start this section with a new scene and configure it in the same way, but this time you only need 15 frames for the splash sequence. Also, due to the size you’ll be seeing them at, you can set your render size to 256x256.
You’ll create your splash through a culmination of gradient ramps, displace modifiers, volume selects and xforms, but first you need some base geometry to deform. This comes in the form of a simple plane. Create one at the centre of your scene with a Length and Width of 80, giving it 50x35 subdivs and naming it SPLASH MAIN. The stretched polygons will break up the uniformity of the shape later on.
01:45
Add some form
Now add a Displace modifier to your plane, set Strength to 30 and turn on Luminance Center. Select the Displace modifier’s Gizmo and scale it down to around 45 per cent. Press [M] to open the Material Editor. In the first Diff slot, create a Gradient Ramp, then drag this up into the sample window to override the material and rename it SPLASH DISP. This is how you’ll control the displacement, but first you need to drag it into the Map slot of the modifier.
02:35
Make a splash
Change the gradient type to Radial, and set the flag values to 127 (mid grey). Next, you need to move the middle flag over to the left and create another two by clicking on the gradient. Turn Auto Key on and then keyframe the values and positions of the flags to create an extruded ripple that runs out from the centre, starting with a dip to a darker value on the first flag at frame 1, and then lighter at frame 2. This is to simulate the initial ‘plop’ as the drop hits the surface.
After this, you want to keyframe the three centre flags moving across the gradient range, with the centre flag reaching a value of 255 at frame 7 and dipping down to around 100 at frame 10, before finally settling back to 127 at frame 12.
05:10
Shape the crown
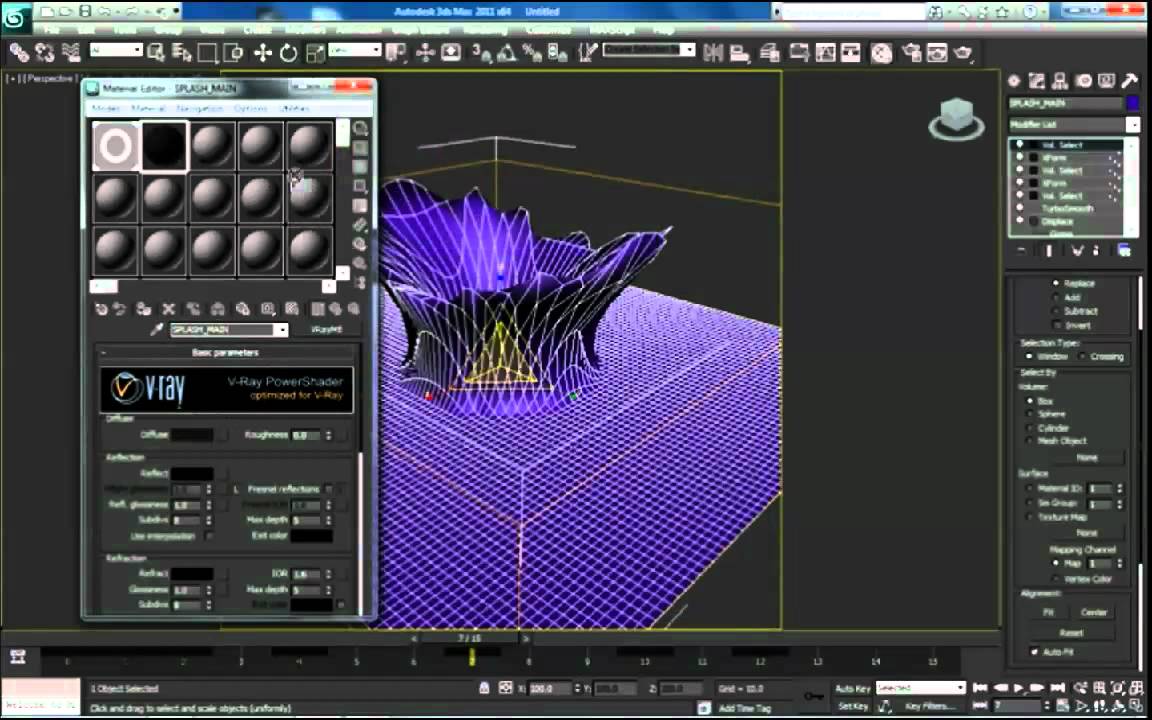
The next step is to modify this ripple and shape it into a crown, so add a TurboSmooth to your splash geometry to give yourself some more polygons to play with. Set Render Iterations to 2, but leave the viewport on 1 so you can still scrub through your frames in real time.
On top of this, add a Volume Select, setting it to Vertex, and moving it up so it selects just the top verts. Turn on Soft Selection, then set Falloff to 9.5 and Pinch to 0.75 to select the top half of the splash. Add an XForm modifier and scale it up to flare out the selected vertices.
Copy the Volume Select and paste it on top of your stack, then tick the Invert checkbox. Add another XForm modifier to this new selection and scale it down on the X and Y to taper in the base of the crown. Finally, add an Edit Poly to the top of the stack to clear your vertex selection.
07:54
Make it wet
It’s time to set up the material that will give the splash its wet look, but first you need to create a camera to work with. In perspective view, orbit around the splash until you have a three-quarter view looking slightly down onto the crown, as that’s the approximate angle you’ll be rendering your final scene from. Press [Ctrl]+[C] to create a new camera from the current view.
Now create a new V-Ray material and name it Splash Main. Set the Diffuse value to a dark grey, Reflection to 220 and Refraction to 210; enable Fresnel Reflections, and apply this material to the splash geometry. Next, add a Noise map to the Bump map slot, setting Scale to 3.
It’s now time to add a radial gradient ramp to the Opacity channel and keyframe it so that only the displaced section is visible during the animation. Add a Noise map to the Environment slot, setting Scale to 100, the Low threshold to 0.5, and the High threshold to 0.6 to give you a map with high contrast. In the Output panel at the bottom, change Output Amount to 20.
Next, give this a quick render to see how it looks. You may find that you have to try a few different settings on your Noise map to get the result looking right – you want to end up with something that has contrasting areas of white and black, because you’ll be using this a bit like an overlay at a later stage in the process.
13:55
Splash drips
Now that you’re happy with how your splash looks, you can add some extra drops of water that splash out of the surface as the raindrop hits.
Create a small sphere at the centre of your splash, name it splash drop 01 and then keyframe the motion as it’s flung from the crown at around frame 7 and falls back down. Now keyframe the Visibility to turn from 0-1 as it starts its move, and from 1-0 as it hits the surface.
Clone this droplet a couple of times and change the keyed positions to add variety. The next thing to do is clone the splash material and rename it SPLASH DROPS. Remove or turn off the Opacity map, and apply to your droplet objects.
17:50
Render time
Now you just need to add some motion blur and render it out. Open the Render Setup panel, then go to the V-Ray tab and the Camera rollout, and turn on Motion Blur, setting Duration to 0.25 and Interval Center to 0.
Give this a quick render and, if you’re happy with how it’s looking, set your output path as before, and render off the sequence.
Stage 04
Creating the raindrops
Making the raindrop should only take a couple of minutes. This is the last map you’ll create before putting it all together in the final scene.
Video 4 00:20
Make the drip
This time you’ll use the scene you created for the splashes, so open it back up. You’re only going to use the material you created for the droplets, so the first thing to do is select everything and delete it.
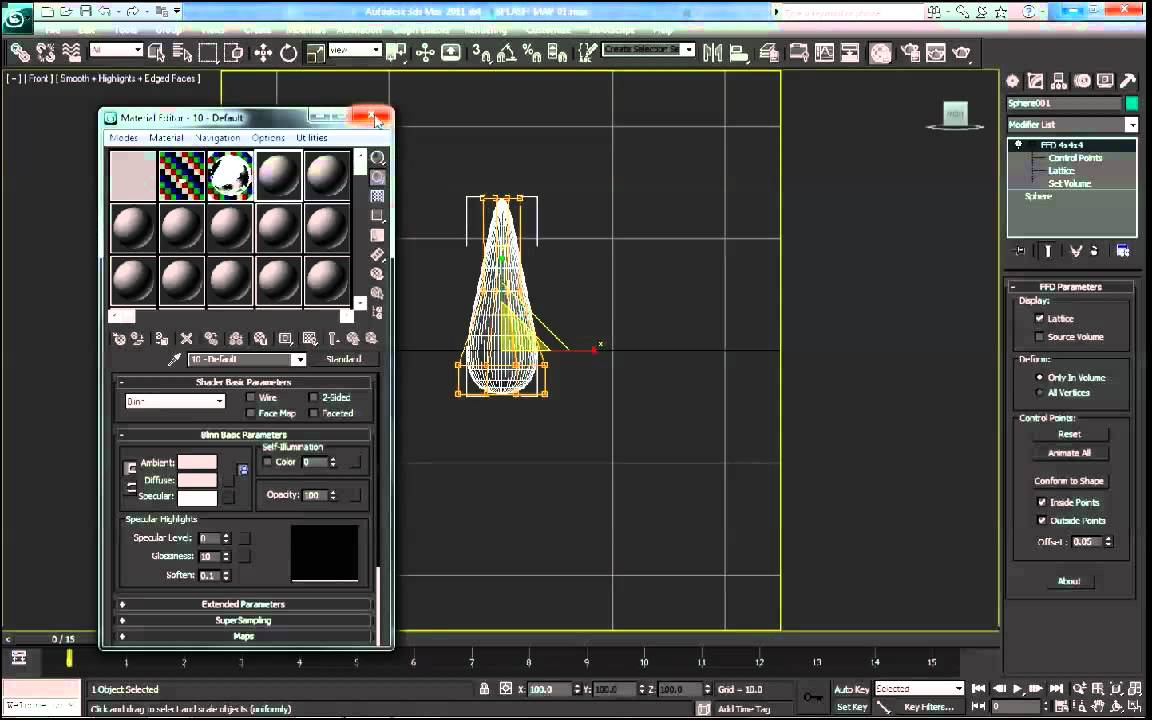
Now create a sphere in the centre of the scene. Add an FFD 4x4x4 modifier to it and, by moving and scaling the Control Points, shape it to create a more teardrop-like form. Now apply the material you created previously with no Opacity map.
01:00
Add the blur
Switch to the front viewport and turn on Auto Key. At frame 0 move the drip up to the top of the frame, and move it to the bottom at frame 5. By rendering a frame between the two, and adjusting the Motion Blur amount, you should be creating a render that looks like a falling raindrop. When you’re happy with the result, save it out as a single frame.
Stage 05
The final scene
This is where you’ll bring it all together and apply the maps you’ve created. I’ve generated a basic scene for you to work with, consisting of a bit of context geometry, a camera and a water surface to which you’ll add the rain.
Video 5 00:20
Bumpy water
Start by loading final_scene_start.max and taking a moment to familiarise yourself with the scene. Give it a quick render from the camera view to see how it looks. Now you’ll add ripples to the surface of the water. Open the Material Editor and add a Composite map to the Bump slot. Add a Bitmap loader to the first slot and load up the Ripple Multi sequence you created earlier, setting the Blur amount to around 1.4. Next, duplicate this layer and change its Time parameters to start at frame 50. This offset will make the sequence loopable. The water should now appear to have ripples deforming the surface.
Note that by leaving a border around your ripple multi map in the previous section, you could also duplicate more layers in your composite map, making it tileable by offsetting the positions in U and V. You could then position and scale the map using a uvmap modifier set to Planar. This would be useful for larger bodies of water.
02:13
Drip, drip, drip…
To set up the material for the raindrops, pick the next available standard material, call it DRIPS and change the Diffuse colour to white. Now load your drip image into the Opacity slot and set its Output value to 0.5.
03:21
Set up the splashes
To make your final material, the splashes, you can again use your previously rendered maps. Create a Multi/Sub-Object material, name it SPLASHES and set the number of materials to match the number of variants you rendered earlier. Set up the first material by changing Diffuse to white, setting Self-Illumination to 100, and adding your first splash sequence to the Opacity slot. Go to frame 7 and select View Image. Alter the red box so the bottom edge is just under the splash base, tick Apply and ensure Crop is enabled.
Now, as you’re about to map this onto particles, set it to Sync Frames To Particle Age as you did with the ripples. From here, you can duplicate this material as many times as you need, changing the loaded sequence each time.
05:08
Let the rain fall
It’s time to set up the particle system that will create your falling rain, but first you’ll add a deflector object to delete the drips. Zoom out in the top view. Go to Create > Space Warps > Deflectors and choose the Deflector, dragging it to cover the environment. Do the same with a new PF Source, and move it up in the scene to above the view of the camera.
Open the particle editor and rename the flow Drips. Delete the Shape and Rotation operators, set Display to Geometry and change Birth Range to -50 to 100. Add a Shape Facing and select the camera as its look at object. Change the particle size to 3, with a Variation of 50 and a W/H Ratio of 0.5. To load the material you can use a Material Static as the map is a single frame, instancing the drip material from the editor. The last bit of this process is to add a Collision Detector, selecting the Deflector from the scene and feeding this output into a Delete node.
07:59
Splash it all over
Now you just need to set up your splash particles. First, create a new PF Source – this time you can just make it somewhere at the side because you’re not going to use the icon for your emission. Back in the particle editor you should now have two flows. Rename the second SPLASHES, and delete all but Birth and Display from the event box. Again, set the Display to Geometry and the time frame from -50 to 100. Add a Position Object and select the water surface as its emitter object. Create a new one or copy the Shape Facing operator from before, setting the size to 6, with a Variation of 30 and a W/H Ratio of 1, but this time setting the pivot to Bottom.
For the material, use the Material Dynamic type that you used for the ripple map setup, instancing in your SPLASHES material. To add variation to the distribution of the splashes, delete the particles after they’ve played through the map sequence. Add an Age Test for this, setting Age to 15 with 0 Variation. Connect this final operator to the Delete node you created in the last step.
10:06
Let it rain
Now change the number of particles for both the drips and the splashes – I’ve set mine to Rate 9,000 for the drips, and Rate 1,500 for the splashes. You can also play with the Bump amount to make the ripples more or less defined on the water surface.
The last thing to do is render it all out. Set up your output paths and frame range, and away you go. The result should be a rain-covered, ripple-filled pool with little splashes dancing on the surface.

The Creative Bloq team is made up of a group of art and design enthusiasts, and has changed and evolved since Creative Bloq began back in 2012. The current website team consists of eight full-time members of staff: Editor Georgia Coggan, Deputy Editor Rosie Hilder, Ecommerce Editor Beren Neale, Senior News Editor Daniel Piper, Editor, Digital Art and 3D Ian Dean, Tech Reviews Editor Erlingur Einarsson, Ecommerce Writer Beth Nicholls and Staff Writer Natalie Fear, as well as a roster of freelancers from around the world. The ImagineFX magazine team also pitch in, ensuring that content from leading digital art publication ImagineFX is represented on Creative Bloq.
