How to publish an ebook to the iBookstore
You've written and designed your ebook - now to share it with the world. Daniel Kemp of Red Jumper Studio walks you through the process from start to finish.
Daily design news, reviews, how-tos and more, as picked by the editors.
You are now subscribed
Your newsletter sign-up was successful
Want to add more newsletters?

Five times a week
CreativeBloq
Your daily dose of creative inspiration: unmissable art, design and tech news, reviews, expert commentary and buying advice.

Once a week
By Design
The design newsletter from Creative Bloq, bringing you the latest news and inspiration from the worlds of graphic design, branding, typography and more.

Once a week
State of the Art
Our digital art newsletter is your go-to source for the latest news, trends, and inspiration from the worlds of art, illustration, 3D modelling, game design, animation, and beyond.

Seasonal (around events)
Brand Impact Awards
Make an impression. Sign up to learn more about this prestigious award scheme, which celebrates the best of branding.
The ebook is a powerful tool for sharing ideas and information, and more and more people are now choosing publish digitally - for a multitude of reasons.
To take one example, these days teachers want to share the ebooks their students have created with a wider audience (not least the parents). It's such a rewarding experience for the students and the teacher to see a book they've created being published and shared beyond the classroom.
As the developers of Book Creator for iPad, a tool that's often used in schools to create ebooks, we wanted to share this tutorial on how to publish a book to the iBookstore. Whatever your reason for publishing an ebook, we'll walk you through the process from start to finish...
- Read our review of Book Creator for iPad here
What you'll need
- An iTunes Connect account
- A Mac capable of downloading and running iTunes Producer
Apple provide an excellent Frequently Asked Questions section on their site to help you get started with these two necessitie. You'll want to make sure you've got Apple's guidance document to hand: Using iTunes Producer 2.9 for Books. It's the definitive guide and is on the whole quite easy to follow.
You may also find the Apple Support Community to be a useful resource. iTunes Producer is essentially about packaging up the details of the book, the assets, and the metadata to submit to the iBookstore.
01. Fire up iTunes Producer
Having downloaded and installed iTunes Producer, click on the Create new package button. New book will already be selected, so click Next. You're now presented with the main window, which consists of 3 main sections - Book, Assets and Delivery, each of which have their own sub-sections (you can see these at the bottom of the window).
The first tab is Book > Info. We're going to work our way through each section, clicking Next to take us onto the next step.
Daily design news, reviews, how-tos and more, as picked by the editors.
02. Book > Info
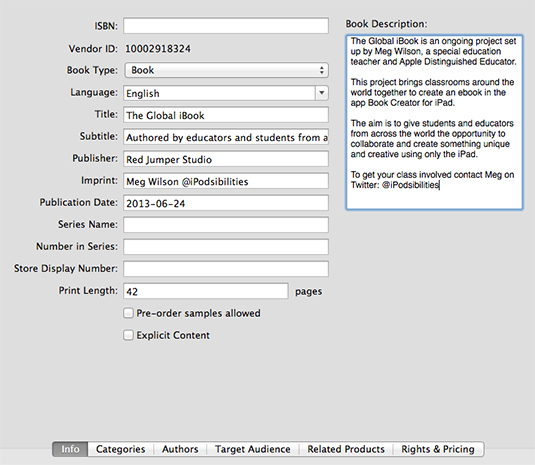
- ISBN: ISBN is the unique industry standard number for recording your book. It is no longer required for submission to the iBookstore (but you might still want one for your book anyway).
- Book Type: Choose Book or Textbook. Note that Textbook only applies if the book is multi-touch format, which doesn't apply to books made in Book Creator.
- Language: Note there is no differentiation between US and UK English.
- Imprint: This is meant to be the brand name for the publisher used on the cover of the book.
- Series Name / Number in Series / Store Display Number: This book is not part of a series so does not apply. Check the iTunes Producer guide for instances of when you would use this.
- Book Description: This will be used in the iBookstore. You can use around 2000 characters for this.
03. Book > Categories

Now categories. Click Add Category and then choose from the category schemes. You can find out about category schemes by clicking the question mark.
BISAC means Book Industry Standards and Communications, whilst in the UK they use the Book Industry Communication (BIC2) taxonomy. CLIL stands for Content and Language Integrated Learning and is championed by the European Commission (hence it's in French!).
Choose the category scheme you want and then choose a category and sub-category from within. There are a lot to choose from, and it's not always easy to find an obvious match. It's also not at all clear how these categories relate to how the book is categorised on the iBookstore. I'm pretty confident the categories I've chosen above would get me listed under the Education section in iTunes.
04. Book > Authors
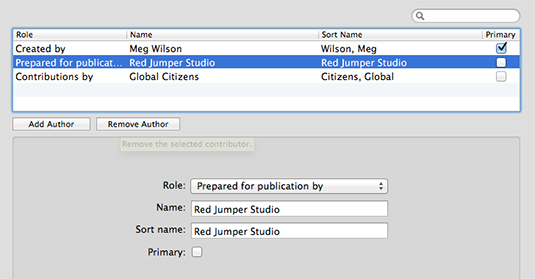
Pretty straightforward this, click Add author for each author you want to add, set the role and give the name. The Sort name is surname, firstname (e.g. Wilson, Meg).
05. Book > Target audience

There are a number of options here, mostly relating to school grades. Click Add Criteria to get started. Start off with an Interest Age (In Years). I found it tricky to decide as you can only choose one (whereas the school grades allow you to add a larger age range). For the Apple target audience, you can choose from General, Children, Young Adult, Primary and Secondary School, College and University, Professional and Scholarly, Alternate Language Learning, Adult Education or Career and Technical Education. Then you'll need to work your way through the school grades for the available school systems. You can set the range to make it available to all school ages up to age 16.
06. Book > Related products
You would only use this section if you have a hard-copy print version or a previous version of the book.
07. Book > Rights and Pricing
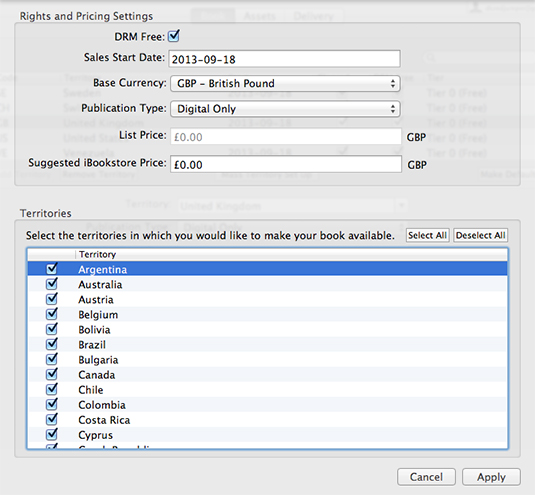
So, this is a key part of your process if you're planning to charge for your book. Click Add Territory to get started and choose the territory you want to add.
- Publication Type: Digital Only means that the book does not have a hard copy paper equivalent, or has been significantly enhanced from the print version (e.g. with audio/video). 'Other' books are those that don't fit into either category.
- Sales Start Date: Choose a date, which must be either today's date or a date in the future.
- Pre-Order Start Date: You may choose to include this, but you don't have to.
- Physical List Price: Apple asks for the retail price of the printed version of the book, if it exists. If there's never been a printed version, you can suggest a suitable retail price here.
- Price Tier: This is the actual price that you want the book to sell for on the iBookstore, and there are different pricing tiers for each territory.
- Cleared for sale: Make sure you have 'Cleared for sale' checked, otherwise the book will not be available in the iBookstore in that territory.
- DRM Free: Digital Rights Management (DRM) is a kind of copyrighting protection for digital files. In this case it would restrict use of the book to the machine that it was downloaded on. Checking the DRM Free box means that this is not the case.
Mass Territory Set Up
If the book you are publishing is free, you do not need to worry too much about getting the pricing exact in each country, so you can use the Mass Territory Set Up to save time.
The fields for this are similar to those for individual territories, but here you can enter one price for the Suggested iBookstore Price and iTunes Producer will automatically choose the appropriate Price Tier for all of the territories you select (based on the Base Currency you choose). An easy task in this case, as the book is free. When you're done, you might want to click the Make Default button to preserve the settings here for all future books you package up in iTunes Producer.
08. Assets > Publication
Clicking Next will automatically bring you to the next section, which is Assets. There are three sub-sections here - Publication, Cover Art and Screenshots. You'll need access to the .epub file of your book. If you've made your book in Book Creator you can use one of the export options to transfer it to iTunes on your Mac or save it to a cloud service such as Dropbox. Under Publication, click on the Choose... button to upload your .epub file.
You will not require a Publication Sample if the book is not a Read Aloud ePub file or Multi-touch format publication (e.g. .ibook made with iBooks Author). However, you could choose to add specific pages from your book that you wanted to be included in the preview. If you don't Apple will choose pages for the sample at random.
09. Assets > Cover Art
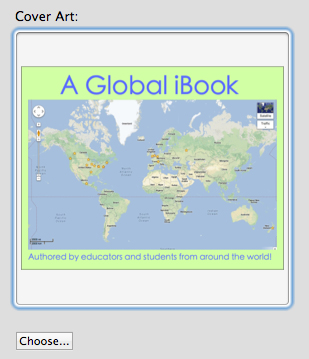
It's annoying that iTunes Producer cannot just use the first page of the book. You'll need to create a separate cover image and upload it here.
The file must be a JPEG, PNG or TIFF file in RGB mode, (these are standard filetypes for images, but if you're not sure what that means then you might need to get some technical help!).
The image must also be a minimum of 1400px on its shortest side. It doesn't matter if the cover art is landscape, portrait or square.
You might have a suitable image already made. But one creative way to make cover art if using Book Creator on the iPad is to take a screenshot of the cover page of your book (press the home and power key at the same time). Better still, you can make use of Book Creator's 'share page' function to save the cover page as an image to the Camera Roll on your iPad.
10. Assets > Screenshots
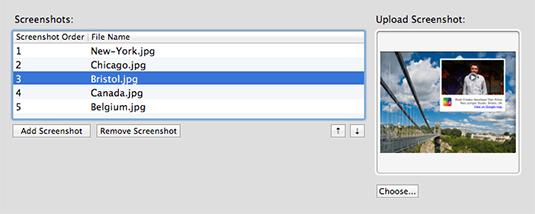
By pressing the home and power buttons at the same time, I took screenshots of pages of the book as viewed in iBooks, emailed them to my Mac and edited in Adobe Photoshop, to remove the iPad toolbar and make sure they remained the right dimensions. I made my images bigger than the standard 1024x768 pixels that older versions of the iPad uses as I want the images to look good on the newer Retina iPads. You can upload up to 5 screenshots and order them as you wish (hint: put the best one first!).
11. Delivery
The moment you open the Delivery pane you'll see that iTunes Producer has validated your book, ready for submission to iTunes. If there are any issues with validation for any of the fields you've entered so far (or if you've missed any), it will tell you. What you're aiming for is a message that looks like this:

You're now ready to send the package to iTunes for verification. It's a good idea to go to File > Save first. Click the Deliver button and the process begins. It takes a while to upload to iTunes, depending on the upload speed of your internet connection. When done you will see a big green tick to confirm it has been successful.
Apple approval
Log into iTunes Connect and click on Manage Your Books to see your book. You can click on the thumbnail for your book and check the status. It took my book about two weeks to be approved and appear on the iBookstore.
Words: Daniel Kemp
Dan Kemp is marketing manager of Red Jumper Studio, developers of Book Creator - the simple way to create beautiful books on the iPad.
Liked this? Read these!
- Free ebooks for designers
- Free ebooks for web designers
- Best iPad apps for designers
- Best iPhone apps for designers
- Mobile website design: 20 pro tips

The Creative Bloq team is made up of a group of art and design enthusiasts, and has changed and evolved since Creative Bloq began back in 2012. The current website team consists of eight full-time members of staff: Editor Georgia Coggan, Deputy Editor Rosie Hilder, Ecommerce Editor Beren Neale, Senior News Editor Daniel Piper, Editor, Digital Art and 3D Ian Dean, Tech Reviews Editor Erlingur Einarsson, Ecommerce Writer Beth Nicholls and Staff Writer Natalie Fear, as well as a roster of freelancers from around the world. The ImagineFX magazine team also pitch in, ensuring that content from leading digital art publication ImagineFX is represented on Creative Bloq.
