
Learning how to draw a cat is simpler than it might seem, and with this step-by-step written and video guide, you can learn to master the feline form with ease. When creating a realistic cat illustration it's best to start with the basic anatomy, but once you've got the practical side down you can start to get creative with your moggy masterpieces.
Whether you prefer working with drawing tablets or sketchbooks, the basic principles for drawing animals are pretty consistent – nail the foundations and you'll find it easier to experiment with your illustrative style. For more handy tips, check out our collection of the best drawing tutorials to hone your skills. See the video below for step-by-step instructions.
01. Collect reference photos

The best way to familiarise yourself with a cat's anatomy is to find a number of photos of cats in random positions – the more positions you can find the better. This helps you form a better understanding of how cats move, sit, jump, and so on. You can also observe your own pets or a simple Google or Pinterest search will do if you don't have your own photos. The important thing to understand is that no matter how big or furry they are, all cats move in pretty much the same way.
02. Start with quick sketches

Try quickly sketching some of the poses from your references. Don't focus on the precision of the lines but try to quickly capture the essence of the moves. These initial sketches will give you a better idea of the cat's structure because we learn quicker by drawing rather that just observing.
To benefit from this exercise even further, you may want to slightly exaggerate the movement of the cat similarly to in cartoons. This can help you better understand the movements of the animal and the way their bodies work.
03. Pick a pose

When you've done some sketches, it's time to choose a pose. I decided to go for both a walking pose and a side view. This will show off the anatomy of the animal and make for a nice clearer demonstration of the drawing process.
04. Draw the skeleton

To find the structure, you need to start with drawing a proper cat skeleton. You can find many drawings of an anatomically correct skeleton online, but these will include much more information than you really need. Observe the proportions between skull, ribcage and pelvis as well as the distances between them. Notice how many joints cats' front and back legs have and which way they bend. Observe the tarsus bone in the back leg, protruding backwards – this plays a big role in how this part of a leg is shaped.
Now draw out a simplified version of the skeleton. If you work digitally, draw your skeleton sketch on a separate layer. If you work in pencil, draw lines very lightly so that they don't overpower the final drawing, you can always erase them later. (Check out our guide to the best pencils for artists if you need to upgrade your creative kit).
05. Add some muscles

The next step is to add some muscles to your skeleton. As before, I'm not suggesting drawing all of the muscles – this stage is about capturing the shape of the cat and establishing its proportions.
Use broader strokes to find shapes of the legs and pay attention to how the flow of lines changes around joints. Make sure the shapes feel full and vigorous and avoid wobbly or uncertain lines. Under all their fur, cats are very muscular and sturdy.
06. Focus on distribution of weight

Since we're drawing our cat in motion, each leg is performing a different task and carries a different load of weight. The back left and the front right leg are carrying most of the weight and help the cat with its balance. The other two opposing legs are more relaxed.
The front left paw – while it still carries a bit of weight – is reaching out forwards to establish another step. The back right paw is finishing the previous step and is about to be lifted off the ground completely. Paying attention to details like this is key to creating a lifelike drawing.
07. Draw the face

Getting your cat’s head in proportion is very important. Make sure you pay attention to proportions between ears, eyes, nose and mouth – it’s easy to fall into a clichéd approach, and give your cat a really big nose, large eyes and cute small ears.
Depending on the species of cat, the size of the ears can vary. In this case the ears are bigger than you may think, so make sure to compare them with the rest of the head. Also notice how the head connects to the neck, and how the neck extends into the chest.
08. Get the eyes right

Cats' eyes often seem bigger because of the colour or patterns of the fur around them. In addition, the irises extend over the whole visible part of the eye, which also creates the feeling that the eyes are very prominent.
09. Refine the facial features

Now is the time to draw with thicker, darker and more defined lines. If you’re working traditionally, swap to a thicker pencil and use more pressure. If you’re working digitally, switch to a new layer while keeping previous layers on a lower opacity.
Refine the shapes of the eyes, mouth and nose (notice how this resembles the letter ‘T’). Add pupils to the eyes. Depending on the cat you may choose to sketch the eyes more narrow or more open. Don't forget about the whiskers – they make a huge difference!
10. Add some fur

Now you have the anatomy in place all you need to do is add a layer of skin and fur to the body and refine the shapes of the head. Remember that, except for a couple of species, most cats have fur all over their bodies.
Cats’ fur tends to vary in thickness depending on the body part it’s covering: it's shorter around the head and paws and gets thicker and longer in the body, especially on the belly and tail. Use small strokes to indicate texture.
Also notice how the skin behaves on the animal depending on the position it’s in. In this pose, on the front left and back right leg the skin gets stretched, while behind the right front leg it wrinkles.
11. Add the final touches
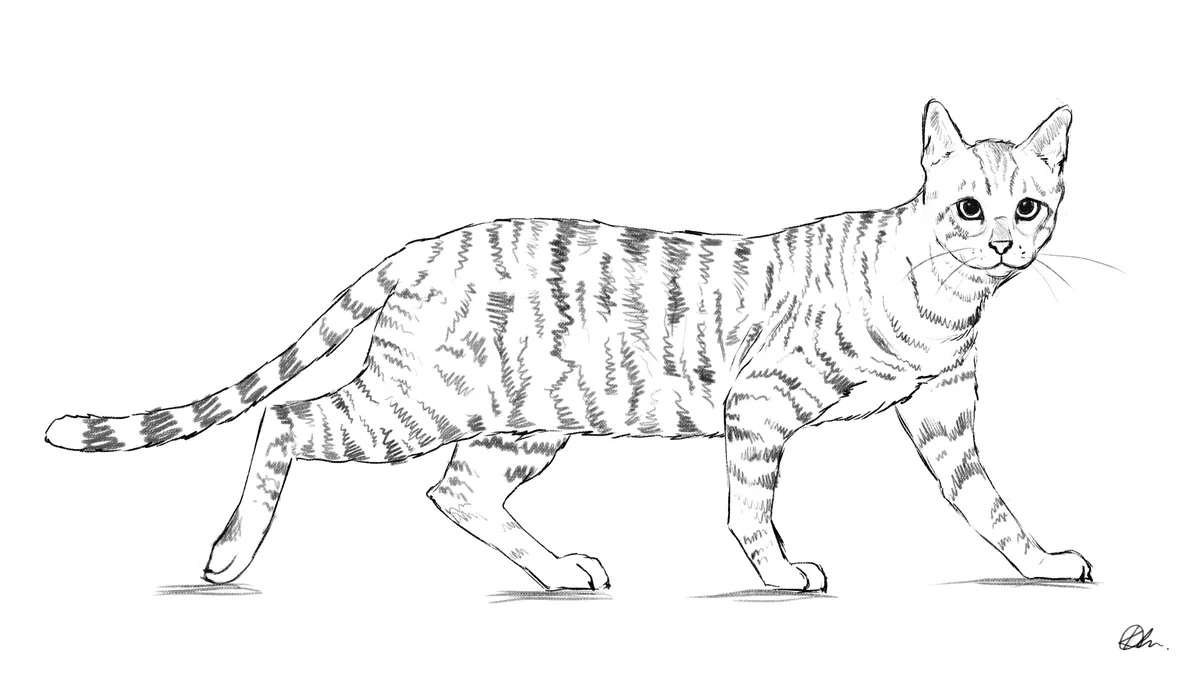
If the cat you're drawing has characteristic patterns on their fur, add these on top. Erase the more prominent sketch lines (if working in pencil) or turn off the sketch layers (for digital artists).
In this case I decided to draw stripes on my cat. Be careful how dark you draw features like stripes, as they can quickly overpower the whole drawing. Use subtle shading lines, and make sure to follow the forms of the cat's body. Drawing fur patterns – especially stripes – can add a lot of depth to your sketch. However, if done incorrectly, it may unintentionally flatten the image.
Try to vary the length, width and shapes of your cat’s stripes. They usually get thicker on the tail, body and upper limbs and thinner around the head and lower paws. Last but not least add a little shadow under your cat's paws to indicate the ground and you are done!
Can I learn drawing by myself?
While many would argue that drawing is a result of natural talent, you can absolutely learn to draw by yourself with enough practise and persistence. It can be frustrating at first, but by starting slow and having patience you can build your skills over time.
Travelling convention artist Tim Von Rueden suggests that creating art is all about confidence. "Creating art takes courage. To fully express who you are, what you’re interested in, how you’re feeling and what you stand for can be daunting. Too many artists play it safe. They find an appealing and marketable comfort zone, and then only create from that space," he says.

