Get started in Amazon Lumberyard: setting up
In the first part of this game creation series, discover some top tips for getting started in Amazon's game engine.
Sign up to Creative Bloq's daily newsletter, which brings you the latest news and inspiration from the worlds of art, design and technology.
You are now subscribed
Your newsletter sign-up was successful
Want to add more newsletters?
Amazon's new game engine, Lumberyard, is free and great for anyone with a budding interest in game and asset creation. This set of basic steps is the first in a series of Lumberyard walkthroughs. We're going to start by creating a very basic scene in Lumberyard. The tutorial will explore the simple workflow basics you'll need to master in order to start creating inside this platform.
In coming tutorials we'll make it more complex by creating a small level, complete with assets we'll rig and texture, before moving into atmospherics and cinematics to really show what can be done in Lumberyard from scratch. We'll also lightly cover AI, storytelling, sound, compiling and debugging.
Getting started
To get started, download and run the installer files, and use the Lumberyard Setup Assistant to set up your development environment. Relative to what you would like to do, it will tell you which additional SDKs and plug-ins you'll need to set up for your project(s). You may also want to grab the Woodland Asset pack and the legacy GameLevel SDK.
Article continues belowBefore you install Lumberyard, it may save you some post-install troubleshooting to grab and install the free community edition of Microsoft Visual Studio 2013, as some of the software required will call on Visual Studio redistributables.
If you do this, remember to reboot after install.
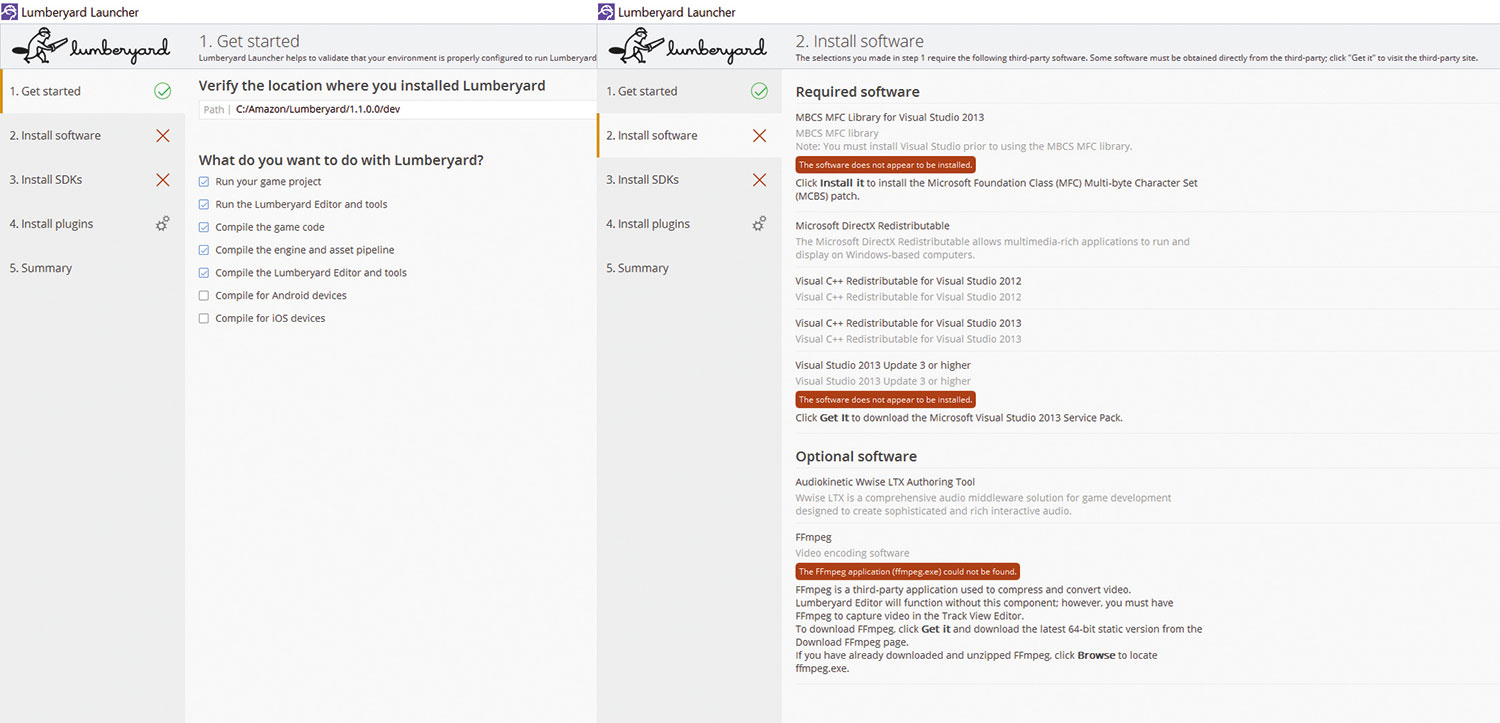
For a plain vanilla, 'getting to know Lumberyard' runthrough, you don't need to do anything except check 'Run Your Game Project' and 'Run the Lumberyard Editor and Tools'.
If you plan on using Substance Designer, you will need to check 'Compile game code' as well, so you'll get the Allegorithmic listing in the SDK section. This will install the Substance plug-in for use in the Lumberyard Editor.
Sign up to Creative Bloq's daily newsletter, which brings you the latest news and inspiration from the worlds of art, design and technology.
Once you're done, click the new 'Configure Project' icon on your desktop or in the Setup Assistant's summary screen. We'll start creating custom projects next issue, but for this walkthrough you can either use the SamplesProject, which should be set as your default, or the GameSDK, which you will have to set as your default by clicking Set to Default in the upper right corner.
The difference between these two is the level of assets and demos available; the SamplesProject has fewer assets and is aimed at beginners, but the GameSDK has a lot of stuff you can look at and rip apart in order to learn. This walkthrough can be run from either project, though.
Also, note that a Lumberyard project works pretty much like a container: any level you create, any asset you bring in, or any Gems you activate in the Project Configurator's upper right via 'Enable Packages' with your chosen project active, will be added to that particular project's setup and assets alone, and won't be accessible by other projects.
This is also where you activate Substance for your project, so if you've installed it, check Substance, click Save and Back to Project.
The Asset Processor may start to churn and may take a few minutes, depending on your system. It's a preloader and updater of all the assets (textures, objects, materials, settings and so forth) in your chosen project, as opposed to loading assets on a per-item basis and then waiting for your project to churn it into your existing set of assets. When the Asset Processor is finished, you can start the editor, or it will start by itself, depending on your settings.
Once your level is generated, you'll see the Lumberyard Editor isn't much different to other 3D applications or game engines when it comes to navigation. In addition to the file menu, you have two default ribbons on startup. The EditMode toolbar contains common commands like Undo/Redo, Select, Scale, Rotate, Move and Load. Hover over them to show their shortkeys.
There's also the Editor toolbar, which brings up any editor from the Asset Browser to the Terrain Editor. Right-click to add additional toolbars, like Object or Debug.
Note that the editors are dockable, so if for example you have the Terrain Layer Editor open, you can drag other editors, like the Material or Terrain Editor on top of it, and it will dock – with the Editor's tab at the bottom of the editor you're using.
The quads in the RollupBar on the right are quick menus and parameter editors, starting with the two tabs we'll be using the most in this walkthrough: Objects and Terrain.
When it comes to navigation, you use W, A, S, D to move forward, right, backward and left. The left mouse button to select, the middle mouse button to scroll/zoom, and the right mouse button to bank. Use [Ctrl]+[G] to see your work from a game perspective, and press Escape to get back into the editor. The bottom bar contains functionality, ranging from locking an item to flythrough speed and audio-muting, in addition to the console.
It can really help you to see your work from a character's perspective, so you may want to open the Database View from the View menu or Editor toolbar if you chose the SamplesProject. Click the Prefabs Library tab>Open>Character_controllers.xml and drag the Spherical Controller into your scene. It will load a fully rigged robot you can move around with – including jumping (Spacebar). The GamesSDK will load a character already present when you press [Ctrl]+[G].
Let's dig deeper into the process, in order to set up and create your first Lumberyard environment.
Get all the assets you need and a helpful video.
01. Generating your level
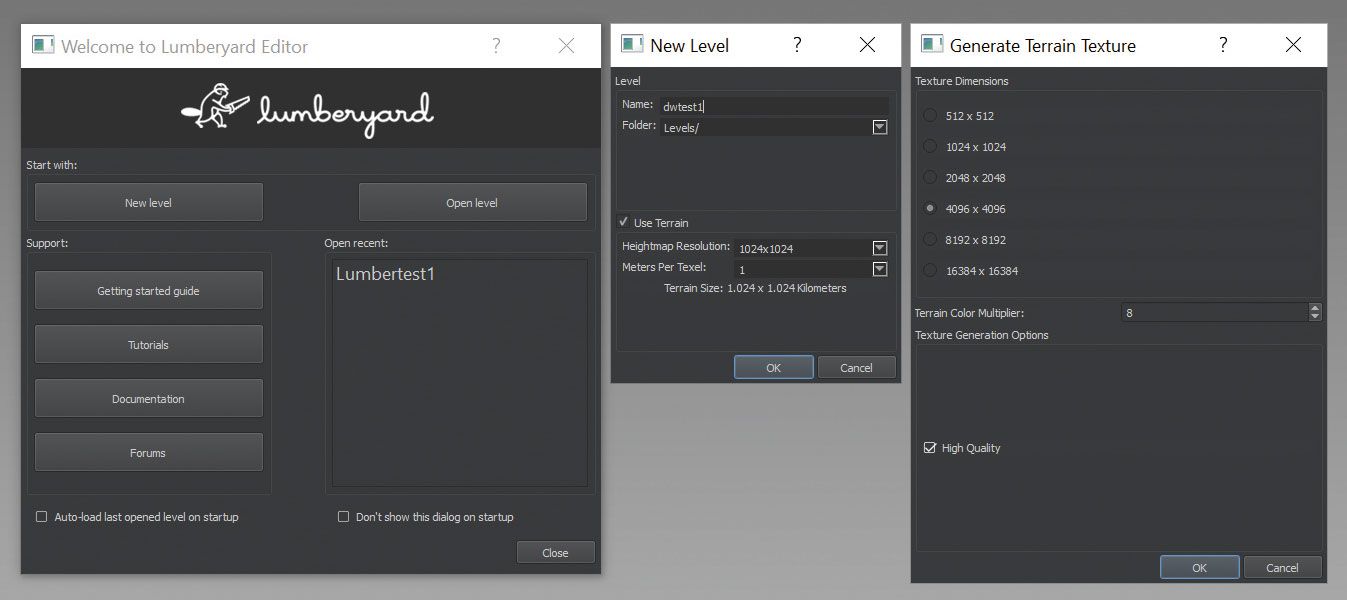
Once the editor has launched, it starts with a pop-up asking you to name your level. Do so. Next, define your terrain's size and texture size; set Terrain Size to a small 1024x1024 and one meter. Then, set the texture at the default 4096x4096 with Colour Multiplier set to default eight. The multiplier's job is to boost the brightness of the layer's colour, and also to dampen distorted colours, or colours with artefacts with increased settings. You can change this setting later if you don't like it. Click OK and Lumberyard generates a plane as your level's starter terrain.
02. Creating a terrain
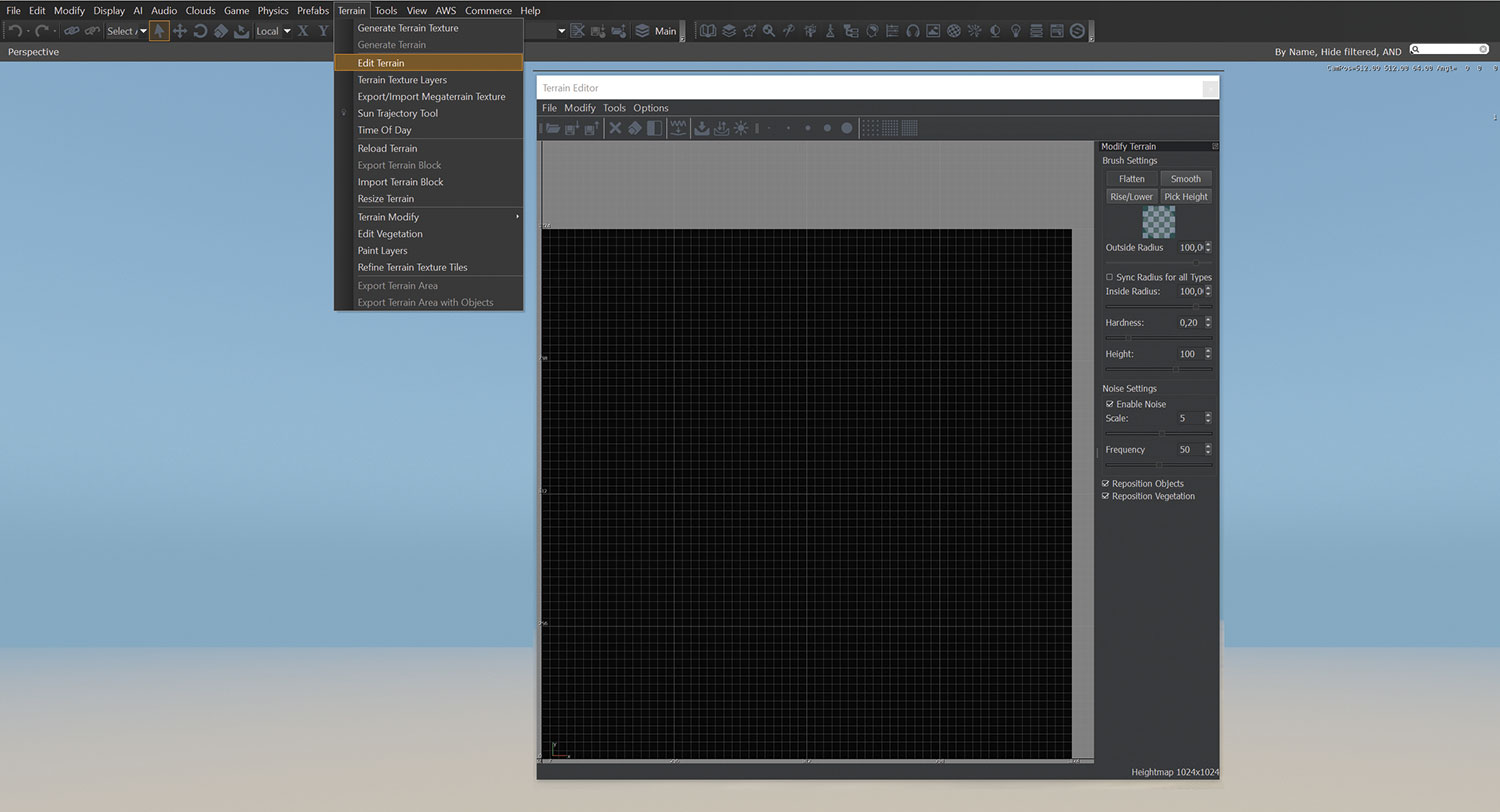
If you've worked with any other terrain generating software, getting the hang of the Terrain Editor is a snap. It just has fewer brushes, but the same three choices: Auto-Generate, Handpaint or Import Heightmap. One good way to generate a low, uneven starter terrain is to use the very big brush in combination with Noise Settings.
It's worth noting that no matter which brush you pick, the Outside Radius of your brush helps define its slope and softness, so for a soft edge, always set your Outside Radius higher than your Inside Radius, in addition to lowering the Hardness. Also Enable Noise with Scale 3, and Frequency 50, for some variation. Handpainting with this setting may be hard to see in the editor, but your brushstrokes will be very visible on your terrain. Also explore Smoothing and Range Reduction in the Modify menu for fine-tuning.
03. Texture prep and set up
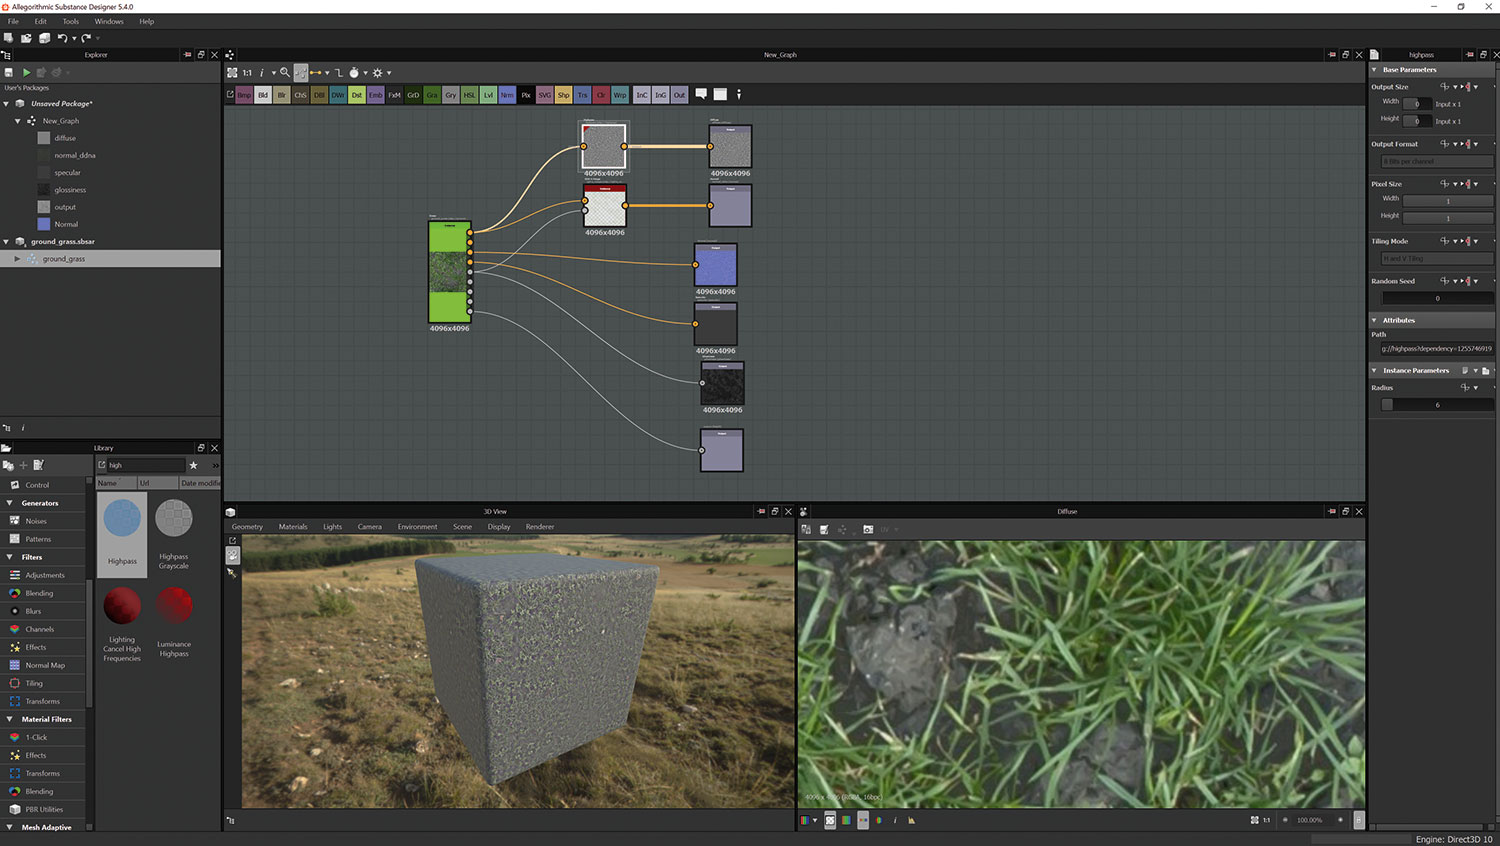
Once you're happy with your terrain, it's time to generate some basic materials – preferably in *.TIF format. Lumberyard uses a Spec/Gloss workflow. This means you'll need a Diffuse, Normal, Specular and Height map to start with. As we're working with the Terrain Layer Shader, you'll need to take some extra prepping steps in order for these to work correctly. First, ensure your map is a square x2 (512x512, 1024x1024, 2048, and so forth). Second, highpass your diffuse map. As Lumberyard is a CryEngine fork, some of the CryEngine workflows remain, including working with terrain materials.
Using the Highpass filter in Photoshop (Filters>Other>Highpass) or the Highpass in Substance Designer's Filters>Adjustments will remove the low-frequency colour variations from your map. This will also mute its appearance significantly. A good Highpass value in Photoshop can be between 10 and 15, but getting it right depends on your image; tweaking and rechecking in-engine. Regardless of whether you're using Photoshop or Substance Designer, your image needs to be saved as a CryTif. Lumberyard will have installed the plug-in for Photoshop. Use the RC converter found in Lumberyard's \bin64\rc folder.
When you're done with your image in Photoshop, go to Save As, and select CryTif from the dropdown. This will bring up the CryEngine converter. In the CryEngine Preset list, select Terrain_Albedo_Highpass. Check 'List All Presets' to the left of the dropdown if it doesn't show right away. Then, select your resolution in the resolution screen, and click OK.
Secondly, Lumberyard needs a material's Gloss Map to be in the Alpha channel of a Normal. A Gloss Map controls the spread of the specular map's intensity, not specularity itself, and the usual rules apply: white for bright, black for matte, and everything in between as nuance.
If you use Substance this is pretty easy, as all you do – provided you've generated or converted a substance to Spec/Gloss – is to plug an RGB-A Merge Node from Filters>Channels into the Normal's final output node, where the Diffuse is RGB and the Gloss Map is A. Save your Normal as output with a DDNA suffix, so Lumberyard will understand that it's a Normal with a Gloss Map in the Alpha, such as 'glossynormal_ddna.ti.'
In Photoshop, once you've got both your Normal and Gloss Map, go to Channels. If there's no Alpha channel, quickly generate one and paste your Gloss Map into it. Now save this file as a TIF/CryTif with the _DDNA suffix so Lumberyard recognises it.
04. Creating a Material
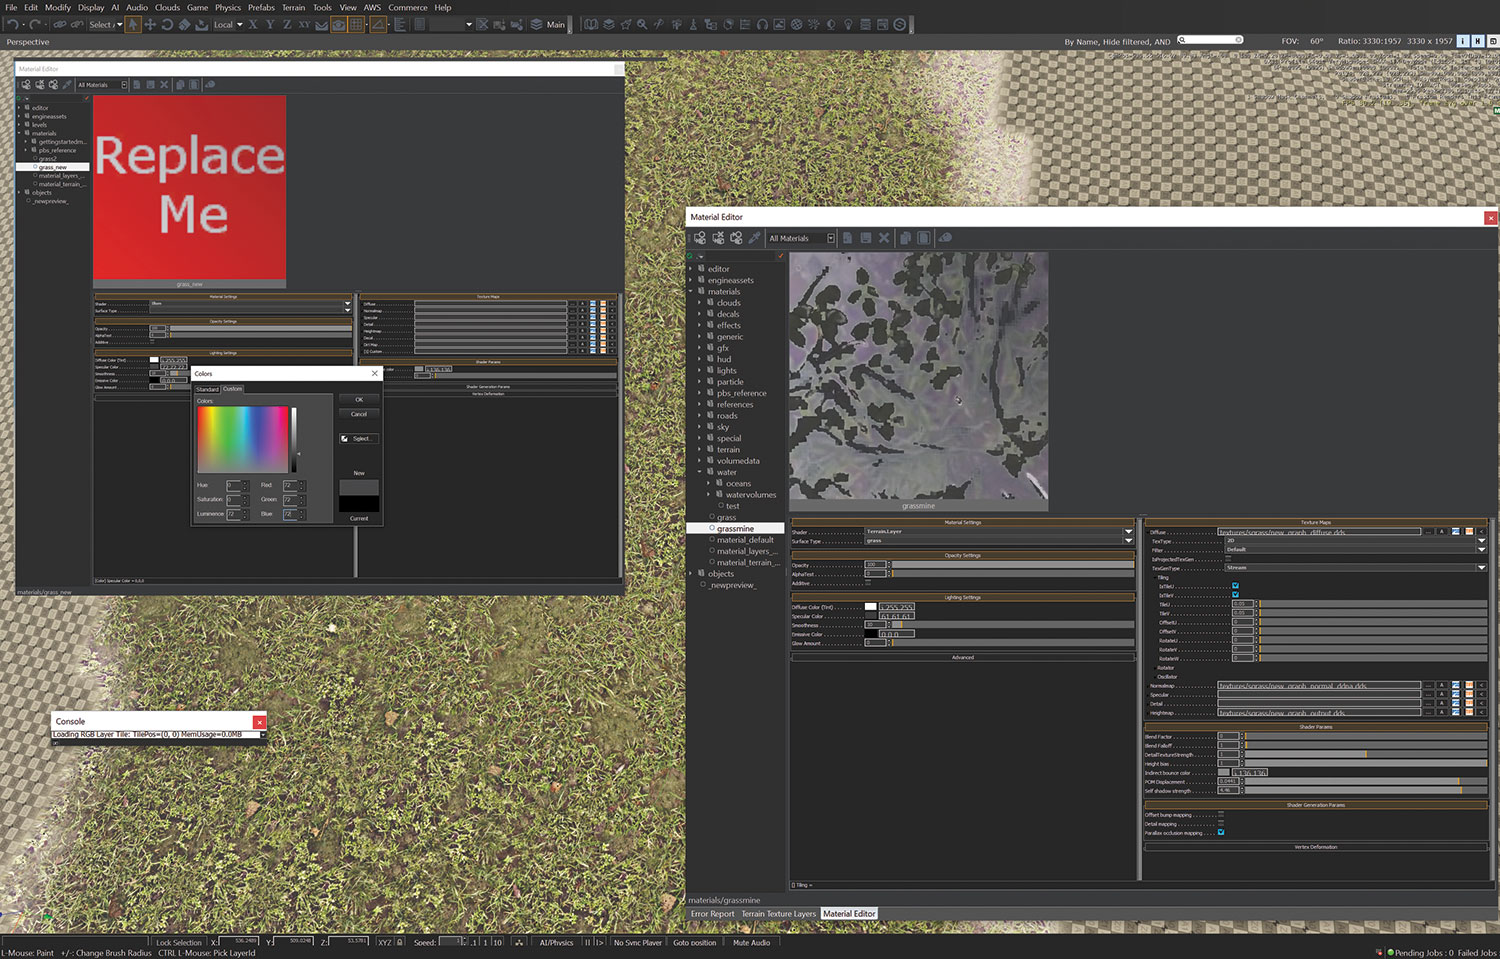
Once you're done prepping, generating a Material is a lot less of a process, especially as Lumberyard currently has no nodes. In the Material Editor, go to the Materials folder, right-click and select Add New Material. Then name your material, such as Grass_Mine. Once the Material is generated, it'll show a red square in the Editor saying Replace Me – and we'll do just that.
Under Material Settings, set the shader to TerrainLayer and Surface Type to Grass. Don't do anything in the Opacity Settings, and under Lighting settings, set your Specular to not-so-reflective at about RGB 70. Skip the Advanced tab, and under Texture Maps, load the textures from your texture folder into their relative slots. If you're using a high-res texture, you can reduce the moiré pattern it generates at its default setting of one by clicking next to Diffuse in Texture Maps, and again next to Tiling in the subsequent parameters. Try setting it to somewhere between 0.25 and 0.5 to begin with, and then tweak.
Depending on the strength of your normal and the look you want for the terrain, you may also want to turn on Parallax Occlusion Mapping under Shader Generation Parameters. A few extra sliders will activate under Shader Parameters. Tweak POM Displacement to your liking, as well as Self Shadow Strength. Save when you're done.
05. Applying textures
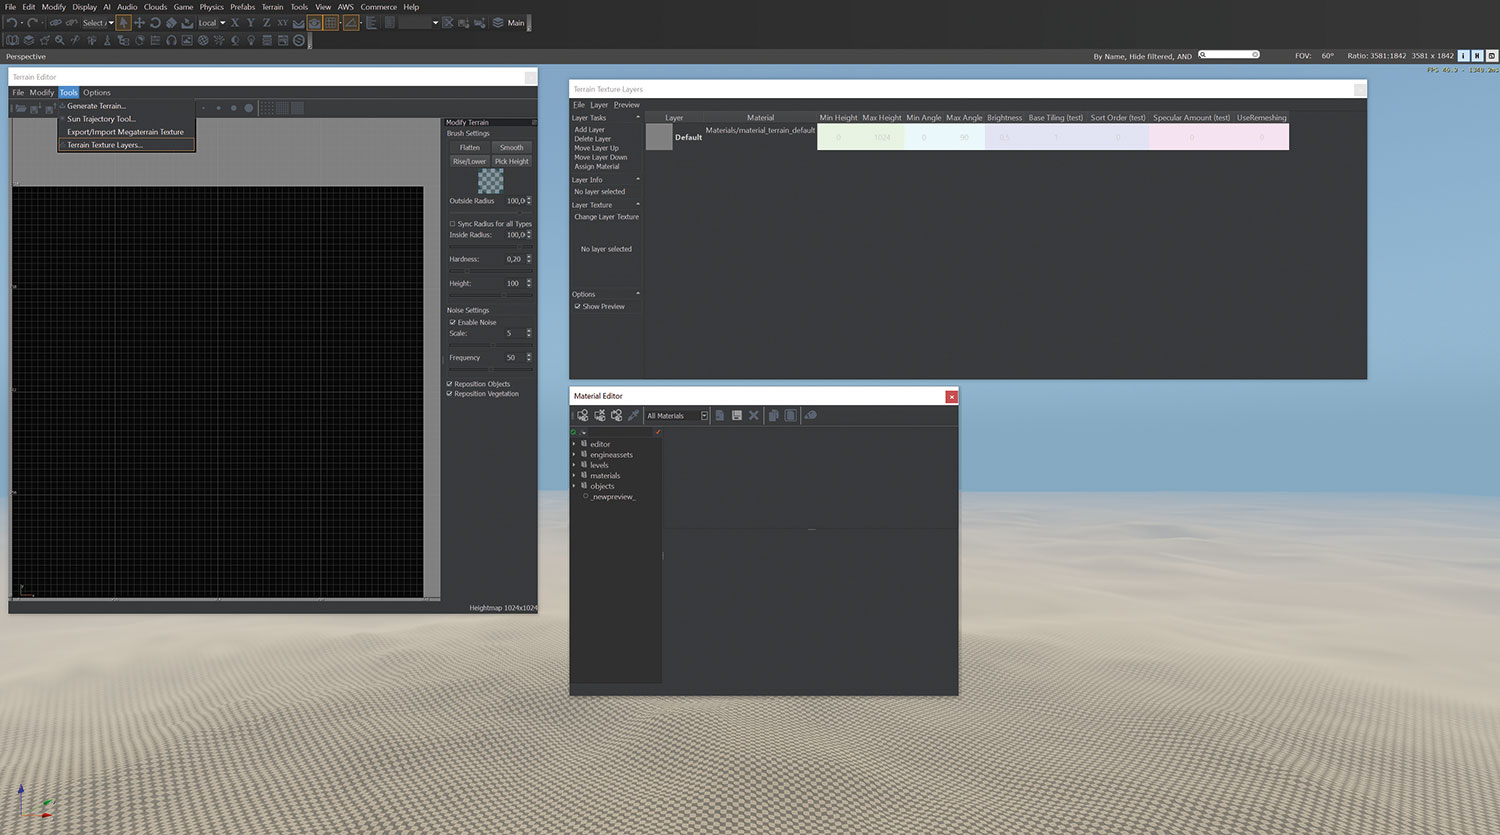
Lumberyard lets you apply terrain textures in layers you generate in the Terrain Layer Editor. Once it's generated you can handpaint or floodfill it to your liking. Do this by opening the Terrain Layer Editor from the Editors ribbon, or View>Open Pane>Terrain Layer Editor. Click Add A New Layer in the Layers task bar on the left. Call it Grass. Go back into the Material Editor, make sure your grass is active by clicking on it, and click back to the Terrain Layer Editor. Click Assign Material. You'll see the material URL above the layer's name change to the assigned material – clicking it brings up the Material Editor.
To check if the material has been applied so you can work with it, click the Terrain tab in the RollupBar (second from left) and click Layer Painter. If you see your layer listed, you can start texturing the terrain. If you don't see it, recheck. The Layer Painter updates almost immediately when a new layer is generated, so it's easy to see if your terrain layer is set up or not.
The Layer Painter brushes are straightforward, but note that if you've set a colour, you'll need to click Save Layer in order to keep it. Use the Reset button to reset; it will reset your material's brightness to its default value.
You can choose whether to handpaint or floodfill your terrain layer. The general workflow is to floodfill the texture you have the most of, and then handpaint details like rock and soil on top of it. In any case, select your relevant layer and handpaint a little to begin with, to see whether your material looks okay. When you're done, finalise your terrain texture by using Generate Terrain Texture in the Terrain Menu – this is also where you can tweak the Terrain Colour Multiplier settings.
06. Adding static items
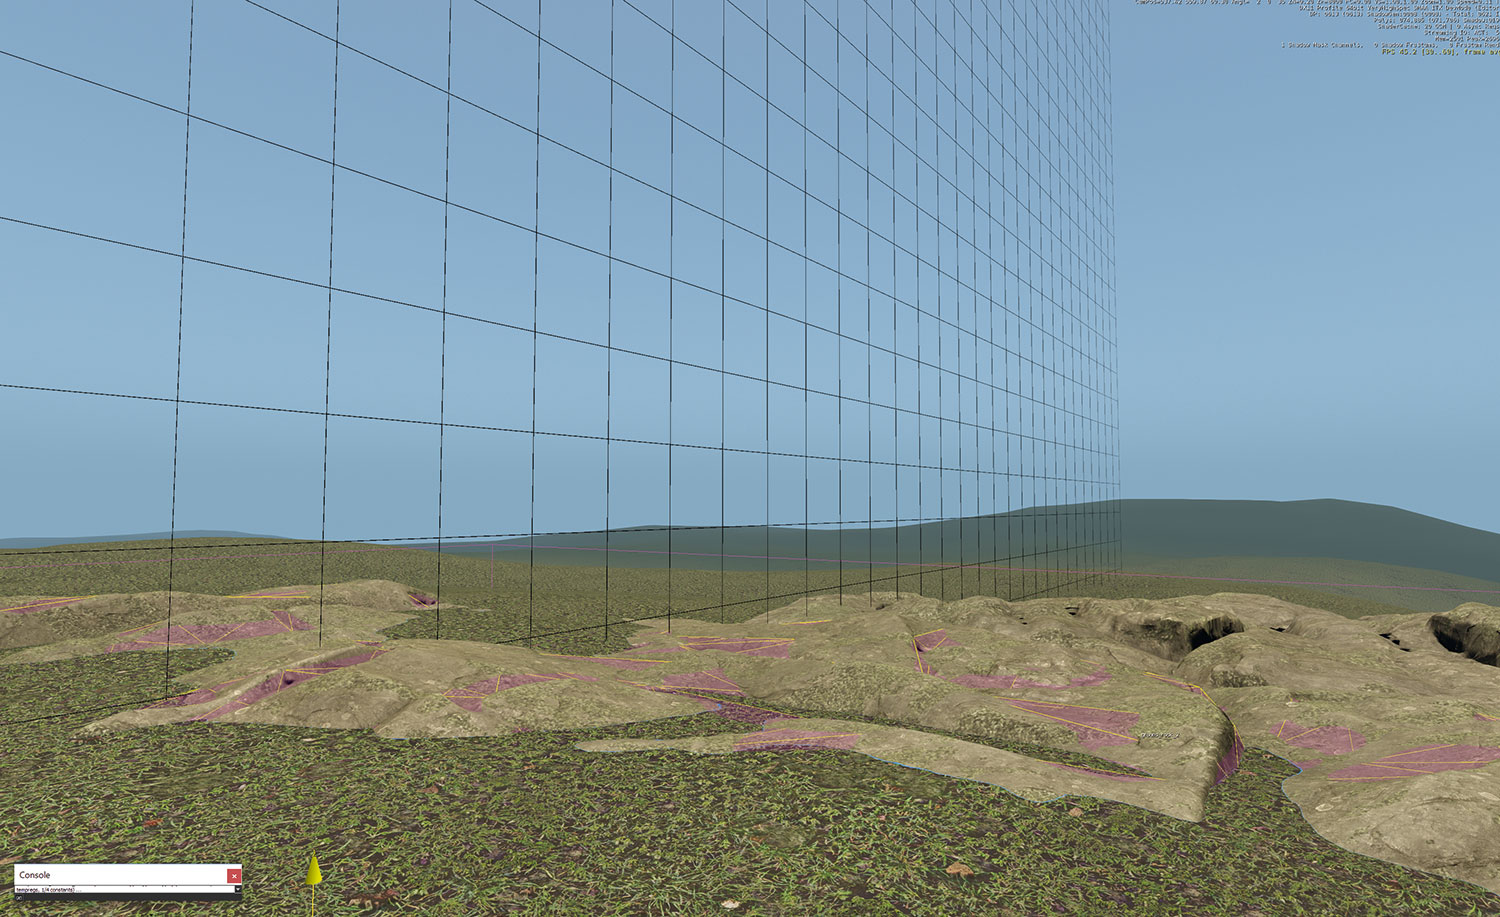
Once you're done texturing your terrain, it's time to add some props. Regardless of which project you decided to work with, go to the Objects quad in the RollupBar, and select Brush. A Brush in Lumberyard is for static items, and they can be anything from a rock to an apartment building. It also means that unless it has been given a set of instructions in the asset file, it won't do anything, bar maybe have its leaves blow in the wind; you can't interact with the object, and its existence in the level is solely to be part of the environment.
Once you've selected Brush, the Browser loads showing a folder named Objects. Click Natural. If you're working with the SamplesProject, you'll see a lot of cartoon-type trees in the browser. If you selected the GamesSDK, you'll see some more subfolders containing more realistic assets. Navigate to the Trees folder, and pick a tree that you like the look of. To add it to your scene, simply select and drag it. You can use the icons on the EditMode toolbar or the shortkeys: 2 for select and move, 3 for select and rotate, 4 for select and scale, to manipulate them, and of course, 1 to select them, so you can tweak their materials, or press delete to get rid of them.
07. Importing Gems
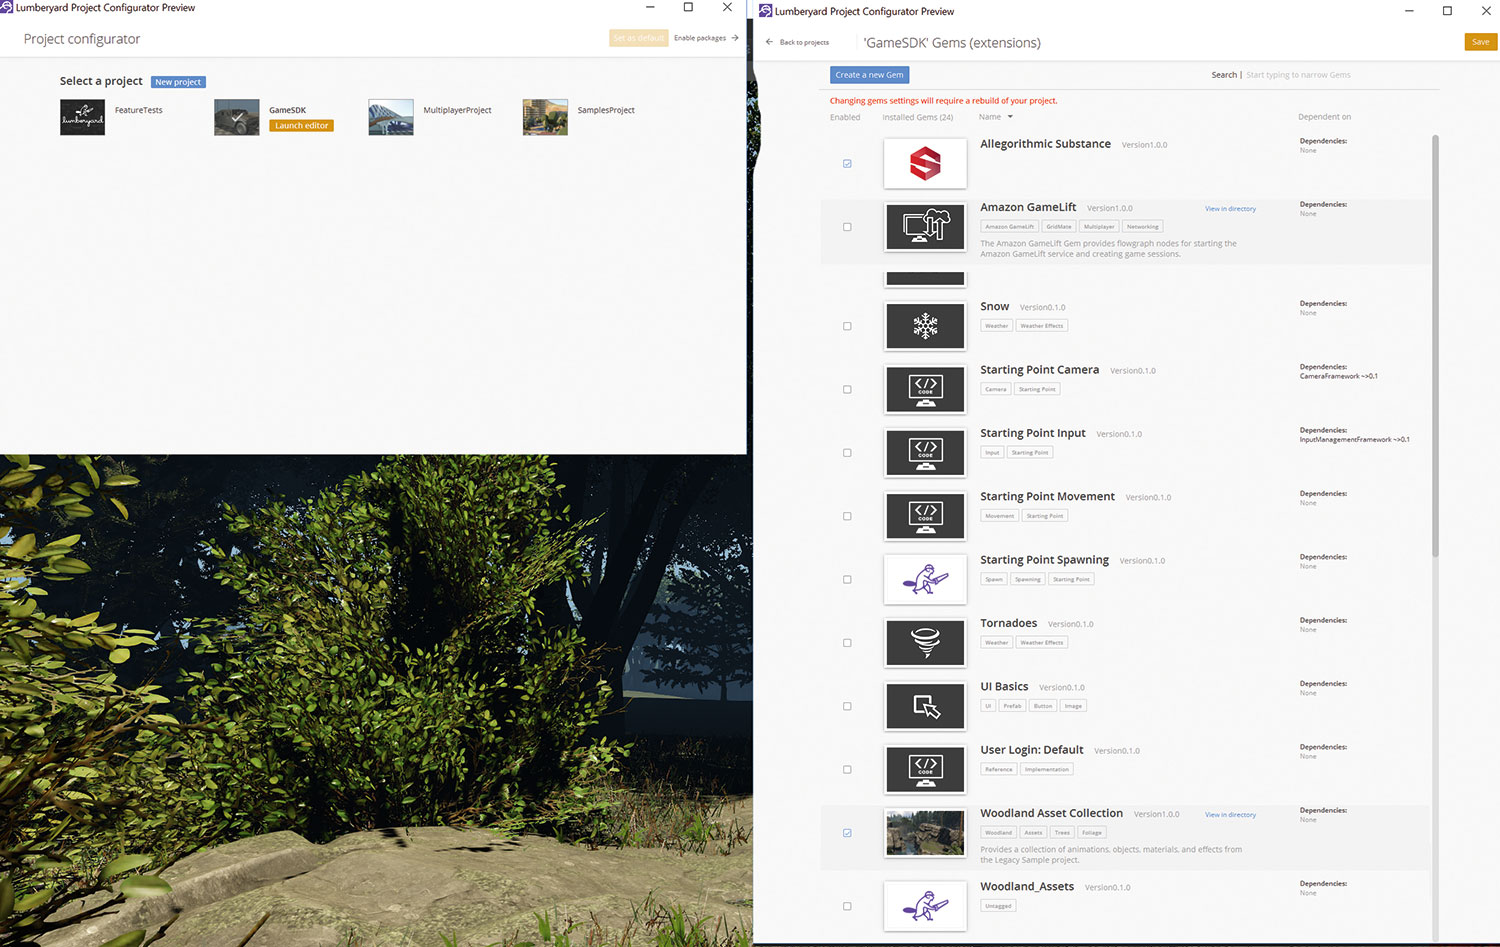
If you downloaded the Woodland Asset pack from Amazon's Lumberyard site, this is where we're going to use its assets to create a few simple mass-instances of rocks and vegetation. To install this Gem, which it is, exit Lumberyard and extract the zip into your \dev\Gems folder.
We'll cover how to create custom Gems in a future issue, but for now, a Gem is a package containing assets and their code, and you compile them as a package – or Gem – to ensure you can use the content in several projects or share it with others. Once you've unpacked it into your Gems folder, start the Project Configurator, make sure your project is selected and check Enable Package in the upper right. Check Woodland Asset Collection, click Save, and with your project selected, click Launch Editor and watch the asset processor do its thing. Once it's done, restart and reload your level or create a new one.
08. Add vegetation
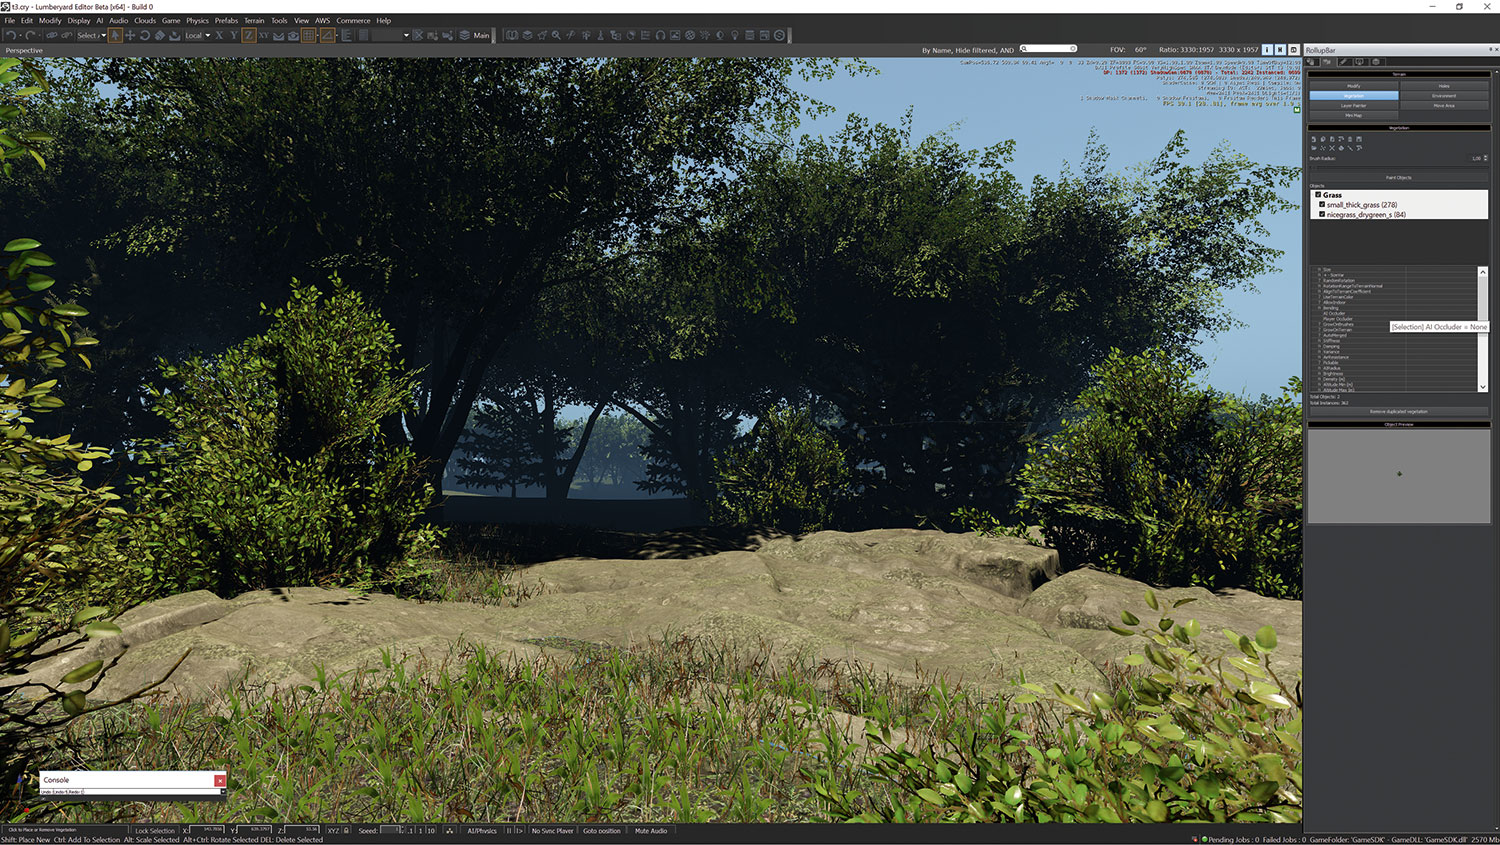
This is where we're going to set up mass instances of vegetation or props. Go to the RollupBar and the Terrain quad, and click Vegetation. In order to define which assets you're going to use to cover your terrain, click Add Category. Name the first one Grass. Right-click Grass, select Add Object, and navigate to the Woodland Assets in Objects>Natural>Ground>Grass and select a few from any one of the folders. When you've got your collection ready, select all your objects, experiment with tweaking your settings – from +-(Sizevar) for a little variety in size, to LOD and/or Sprite Distance.
To get that pretty 'wind in the grass' effect, you need to tweak bending. In addition, especially on multilayered terrains, you may see sharp divides where textures meet or overlap, so make sure the assets can paint on the layer by setting your layer as paintable by enabling 'Paint on Terrain Layers' in the settings listing below. Follow the same procedure for additional categories. You can get rid of your instances either by right-clicking them and selecting Remove Instance, or brushing over while holding the [Ctrl] key down. You may also want to keep an eye on your memory here – as Lumberyard is still in beta, overloading memory is still a common crash-inducer, so perhaps hold off on auto-distributing objects if you're low on memory.
09. Environment lighting
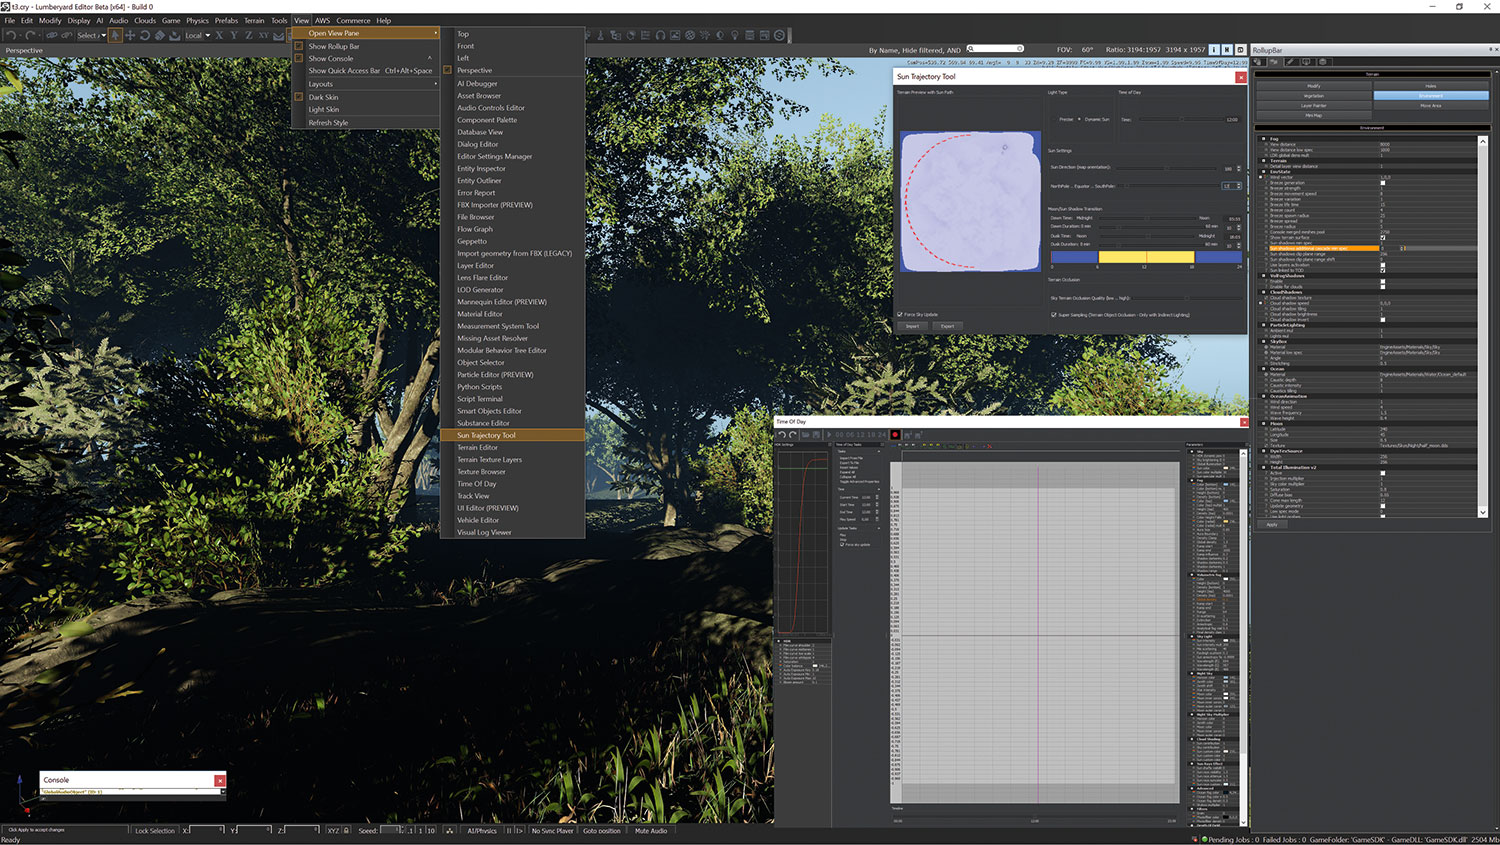
The last thing we're going to take a quick look at is Lumberyard's lighting. CryEngine's Lighting tool has been tweaked and renamed Sun Trajectory Tool, and can be found under View>Open Pane. This is where you define your scene's sun settings and how fast daylight moves to night and back in your scene. In addition, you use the settings in the RollupBar's Terrain tab>Environment to modify Fog, Skybox, and Total Illumination. However, a lot of lighting power can be found elsewhere, under Terrain>Time of Day, with its HDR curve on the left and somewhat daunting list of parameter settings on the right.
To tweak the lighting from one sun in a scene, you use the Sky parameters, which consists mainly of multipliers. Be light-handed here, as a little boost will go a long way. Adjust your sun's colour and intensity in the SkyLight tab, and, still keeping it subtle, explore the Skybox and Total Illumination settings in the Environment tab.
10. Summing up
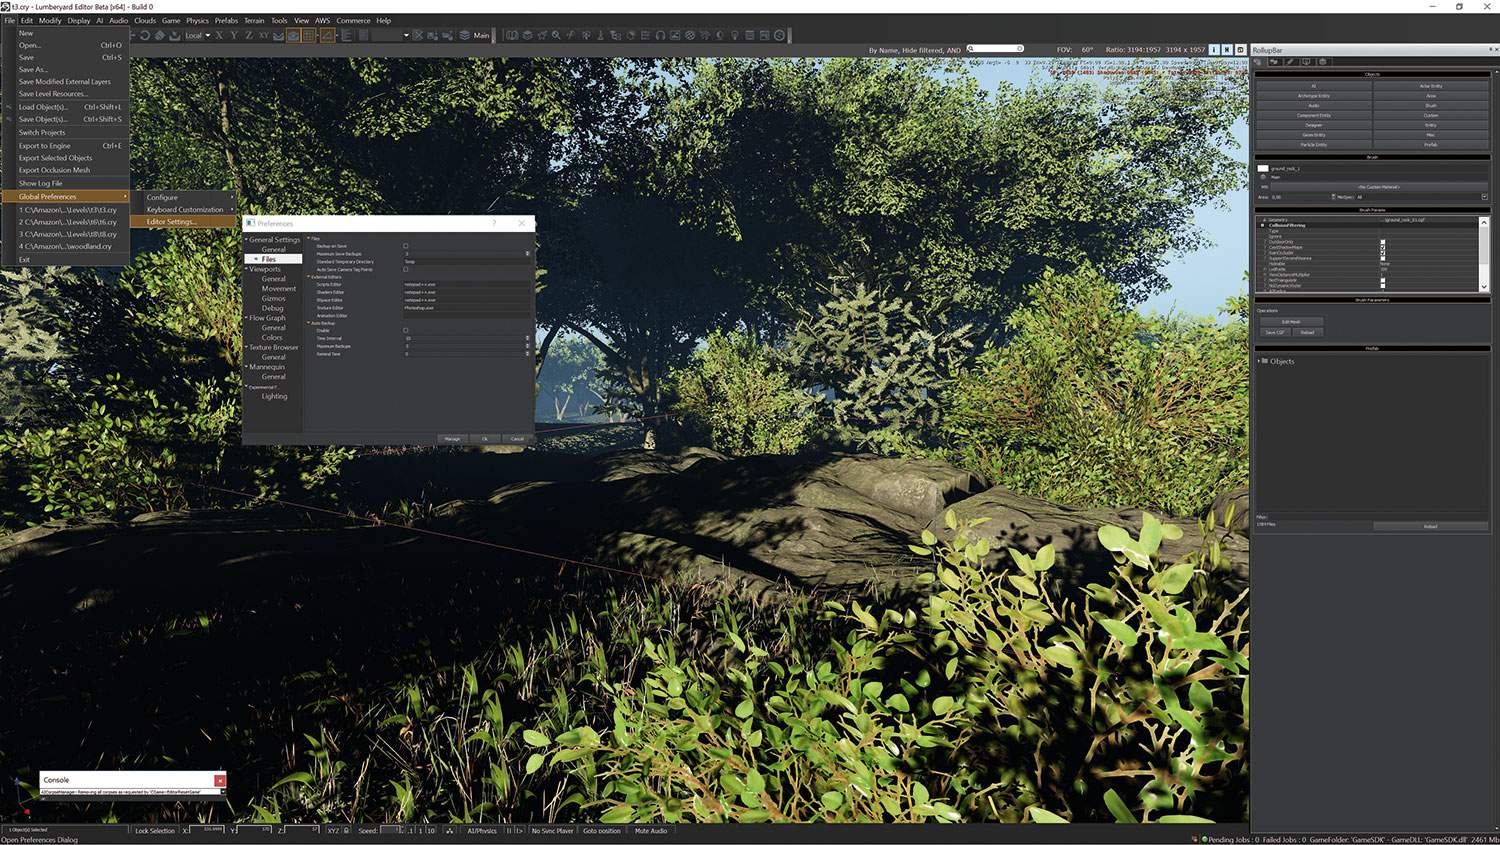
Now you've got a grasp of the scene creation basics,explore and experiment with anything from textures to AI. Don't be afraid to ask questions either, and should your explorations bring Lumberyard crashing down around your ears, there's always the Autobackup in File>Global Preferences>Editor Settings>File>Autobackup. Enable, choose your intervals, and you should be good to go!
This article originally appeared in 3D World issue 212; buy it here! Find the second part of this tutorial in 3D World issue 213.
Related articles:

Cirstyn is a freelance CG artist and educator, with over 15 years' experience in 3D. Her clients include AMD and Daz, and she has written for 3D World magazine for a number of years. She is a certified agile (software) project manager, an avid reader and gamer.
