15 top tips to boost your photography skills
This guide contains everything you need to take your photography skills to the next level.

Whether your interest is professional or you simply like taking pictures for fun, solid photography skills can be extremely useful for designers and illustrators. Let's say you've armed yourself with one of the best cameras for creatives – what next? This essential photography crash course will show you how to improve your photography skills.
From focusing and composition to white balance and lighting, this guide will cement your basic photography skills, rid you of bad habits and leave you to concentrate on capturing better images. We'll walk you through how to make the most of the controls on your DSLR to take better pictures (note that we'll explain procedures for Canon and Nikon cameras, but these techniques will work on cameras made by other manufacturers, too).
You'll also find plenty of tips on these photography websites, and for DSLR photography beginners (or those who just need a reminder) this DSLR cheatsheet is a handy resource, too. While you're here, it's worth taking a look at our guide to the best photo editing apps, for polishing your snaps, as well as our guide to perfecting portrait photography.
Article continues belowBut for now let's get started with our essential photography tips.
01. Take control of focus

Leave your camera to its own devices and it will focus using the central focus point. While this will produce sharp images in many situations, for more creative photography it's better to take some control over the focus point. Your chosen subject won't always be in the centre of the frame, after all.
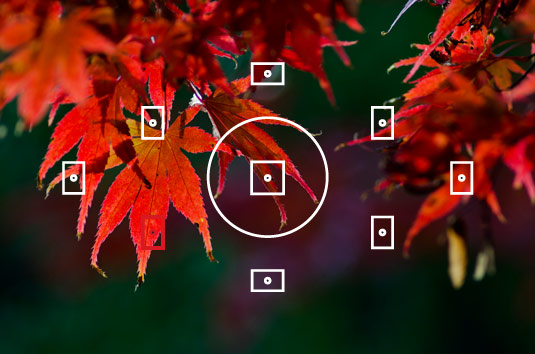
So the first skill you need to master is how to get your camera to focus on exactly the point you want to be sharp. Your camera has a number of focus points spread across the frame – you can see them through the viewfinder – and these offer an excellent solution for focusing on off-centre subjects. You'll need to set your camera to its single-point autofocus mode, rather than the multiple or automatic selection.
The exact procedure for selecting individual focus points (and the number available) varies according to your camera, but generally on Canon models you have to press the AF point selection button, then rotate the input dial or use the selector on the rear of the camera. Look through the viewfinder as you do so, and you'll see the active AF point (in red) move around the frame.
Sign up to Creative Bloq's daily newsletter, which brings you the latest news and inspiration from the worlds of art, design and technology.

On most Nikon DSLRs, once you've selected single-point autofocus, you simply use the four-way controller on the back of the camera to highlight a different AF point.
The main downside to using the outer focus points on many cameras is that they aren't as sensitive as those in the centre of the frame. This means that they can struggle to focus in low light, if the subject is low contrast or you are using a lens with a maximum aperture of f/5.6 or narrower. You may also find that there isn't a focus point exactly where you want the camera to focus.
In both cases you can manually focus the lens, or use a technique known as focus lock, where you highlight the subject with the active AF point and then half-press the shutter release to lock the focus distance before reframing the shot.
02. Focus on moving subjects

Focusing on a static subject is all well and good, but not everything will wait patiently for you while you compose and capture your shot. For this reason, you need to master the art of focusing on moving subjects.
To do this, change the autofocus mode from Single Shot (Nikon) or One Shot (Canon), to Continuous or AI Servo mode. Now, once you've locked focus on your subject by half-pressing the shutter-release button, the camera will continue to refocus as the subject moves, until Below Use Continuous autofocus to track moving subjects you fully press the button to capture your shot.
You can choose from all of the focus points for off-centre subjects, but when shooting in low light, shooting low-contrast subjects or if using lenses with a maximum aperture narrower than f/5.6, you will find these outer points will struggle to focus.
03. Understand what makes a shot blurry
When it comes to mastering focus, you also need to know why your shots aren't sharp. This can be down to focusing, but it may also be due to camera shake or the subject moving. You'll need to spot the cause, fix the problem, then try again.
- Incorrect focusing: If the softness is due to incorrect focusing, you may find that areas in front or behind the subject are sharp. if you can't see any sharp areas, incorrect focusing will give a uniform blur all around each area of the image.
- Movement: You can easily spot blur caused by camera shake by the characteristic 'streaking' of highlight areas. These indicate that the camera (or possibly the subject) has moved at some point during the exposure.
04. Get white balance right

You might forget all about setting the right white balance – especially if you shoot in raw, as then you can change it when you process your images later. However, you'll need to get the right white balance in-camera to be able to assess the exposure and colours of your shots and achieve the best results.
Your camera's Automatic White Balance setting generally does a pretty good job of capturing colours correctly in most lighting conditions, but it's not infallible.
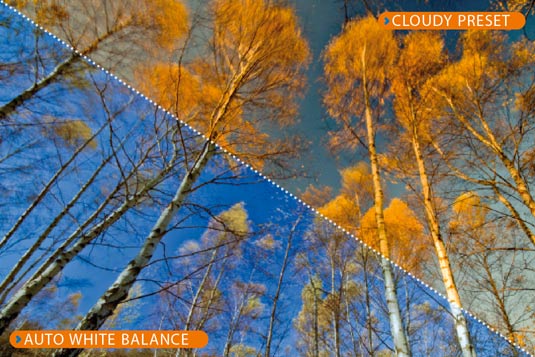
The main situation in which you'll get better results by using one of the manual preset values is when your subject is dominated by a single colour or tone, such as a blue sky, orange sunset or even a large expanse of green grass.

In these situations Automatic White Balance can set a value to counteract this strong colour, so you will get better results by selecting a white balance setting that suits the lighting conditions, such as Sunlight or Shade.
The actual white balance of the light at sunrise or sunset is close to the Tungsten or Artificial Light setting (3,200K). But if you set this preset you will lose much of the warmth that you want to capture in your shot. Instead, try setting the white balance to Daylight, or even Cloudy, to capture the orange glow in all its beauty.
Check out our sister site Digital Camera World's Cheat sheet to White balance presets and article on How to creatively tone your images with white balance settings.
05. Set a custom white balance
Take a shot of a white or grey subject that fills the entire frame (a piece of card is ideal) and is in the same position as the subject you want to shoot. Now select your camera’s Custom or Preset Manual white balance setting.
Next page: Exposure compensation and high-contrast lighting tips
Current page: Photography guide: focusing and white balance
Next Page Photography guide: exposure, lighting and detail
The Creative Bloq team is made up of a group of art and design enthusiasts, and has changed and evolved since Creative Bloq began back in 2012. The current website team consists of eight full-time members of staff: Editor Georgia Coggan, Deputy Editor Rosie Hilder, Ecommerce Editor Beren Neale, Senior News Editor Daniel Piper, Editor, Digital Art and 3D Ian Dean, Tech Reviews Editor Erlingur Einarsson, Ecommerce Writer Beth Nicholls and Staff Writer Natalie Fear, as well as a roster of freelancers from around the world. The ImagineFX magazine team also pitch in, ensuring that content from leading digital art publication ImagineFX is represented on Creative Bloq.
