How to make an animated banner
Luke O'Neill runs through the basics of creating a simple but striking banner ad using Photoshop.
Sign up to Creative Bloq's daily newsletter, which brings you the latest news and inspiration from the worlds of art, design and technology.
You are now subscribed
Your newsletter sign-up was successful
Want to add more newsletters?

Five times a week
CreativeBloq
Sign up to Creative Bloq's daily newsletter, which brings you the latest news and inspiration from the worlds of art, design and technology.

Once a week
By Design
Sign up to Creative Bloq's daily newsletter, which brings you the latest news and inspiration from the worlds of art, design and technology.

Once a week
State of the Art
Sign up to Creative Bloq's daily newsletter, which brings you the latest news and inspiration from the worlds of art, design and technology.

Seasonal (around events)
Brand Impact Awards
Sign up to Creative Bloq's daily newsletter, which brings you the latest news and inspiration from the worlds of art, design and technology.
06. Create frames

Repeat this process until you have three sets of white type and three sets of orange type. Now we need to create two frames for the advert copy. Simply create a new layer, fill it with a colour and then type your message, in this case 'The 100 best free fonts'. Merge the colour layer and type layer and then repeat the process for the final branding frame, in this case I'm simply using the Creative Bloq logo. (For inspiration, see these great free fonts.)
07. Animate the layers
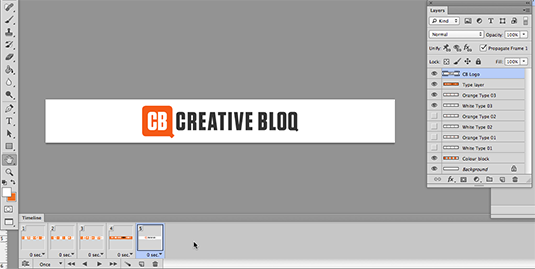
Now that we have all the layers named up and neatly organised, its time to start animating them. If you're using CS6 or above then navigate to Window>Timeline and then choose 'Create Frame Animation' from the drop down. If you're pre CS6 then simply choose Animation from the Window menu.
Now turn all your layers off apart from the background, the coloured blocks and the first set of orange and white type. Duplicate the frame and turn off the first set of orange and white type and turn on the second set. Repeat this process for the final set of type and create separate frames for the copy and logo layers as shown above.
08. Play with frame rate
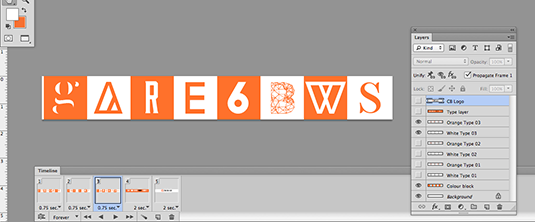
You'll notice that all the frames in the timeline are set to 0 sec and if you press play then they'll cycle through at super fast speed. Now what we need to do is start playing around with the rate at which the animation cycles through each frame, bearing in mind that we'll probably want to linger longer on the actual advertising message and branding.
This stage is very much a matter of trial and error but be careful to ensure that the final message(s) are left static long enough for the viewer to engage with the message. for the purposes of this job I've chosen a 0.75 second frame rate to cycle through the graphic letterforms and then 2 seconds per frame for the final messages.
09. Check the animation
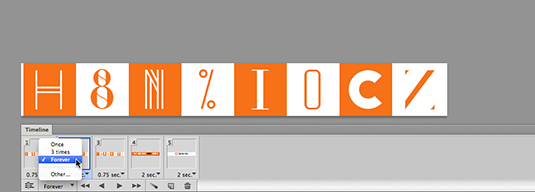
To check your animation simply hit the play button in the timeline panel and ensure that 'Forever' is selected from the drop down if you want the animation to loop continually.
You may wish to experiment with some of the type cycling through at different frame rates or creating more sets of type so there are a greater number of character to cycle through. However, always keep in mind that the more complex the animation then the greater the file size will be. Check with your client what the maximum files size is as this can greatly affect the complexity and options you have when creating your animated banner.
Sign up to Creative Bloq's daily newsletter, which brings you the latest news and inspiration from the worlds of art, design and technology.
10. Save as…
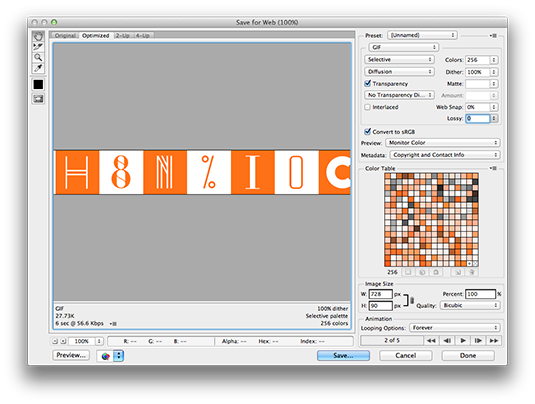
Finally, we need to save out the animation as a GIF. navigate to 'Save for Web and Devices' under the file menu and ensure that GIF is selected. Here you have a number of options but the main ones that will affect the file size are the number of colours you choose to use and the Lossy slide bar.
Play around with these settings and you'll see an estimated file size beneath the image preview window. Bear in mind that there will be a loss of quality if you drastically reduce those two options but the flatter the colours then the better the results. For example, photographic work will noticeably suffer.
Now all that's left to do is save out the file and drag it into your browser to test it.
Words: Luke O'Neill
Luke O'Neill is art editor of T3 magazine.
Like this? Read these!
- The 15 best photo editors
- Photoshop tips, tricks and fixes to try today
- The best Photoshop plugins

The Creative Bloq team is made up of a group of art and design enthusiasts, and has changed and evolved since Creative Bloq began back in 2012. The current website team consists of eight full-time members of staff: Editor Georgia Coggan, Deputy Editor Rosie Hilder, Ecommerce Editor Beren Neale, Senior News Editor Daniel Piper, Editor, Digital Art and 3D Ian Dean, Tech Reviews Editor Erlingur Einarsson, Ecommerce Writer Beth Nicholls and Staff Writer Natalie Fear, as well as a roster of freelancers from around the world. The ImagineFX magazine team also pitch in, ensuring that content from leading digital art publication ImagineFX is represented on Creative Bloq.
