Build a Shopify theme with the Liquid engine
Shopify provides a fast, simple way to build an online store. Keir Whitaker explains how to use its Liquid engine to create templates that will control your store's appearance
Sign up to Creative Bloq's daily newsletter, which brings you the latest news and inspiration from the worlds of art, design and technology.
You are now subscribed
Your newsletter sign-up was successful
Want to add more newsletters?

Five times a week
CreativeBloq
Sign up to Creative Bloq's daily newsletter, which brings you the latest news and inspiration from the worlds of art, design and technology.

Once a week
By Design
Sign up to Creative Bloq's daily newsletter, which brings you the latest news and inspiration from the worlds of art, design and technology.

Once a week
State of the Art
Sign up to Creative Bloq's daily newsletter, which brings you the latest news and inspiration from the worlds of art, design and technology.

Seasonal (around events)
Brand Impact Awards
Sign up to Creative Bloq's daily newsletter, which brings you the latest news and inspiration from the worlds of art, design and technology.
Over the past few weeks, I have been building the Shopify theme for Viewport Industries, the company Elliot Jay Stocks and I formed last year. We chose Shopify for several reasons:
- It allows us to sell both digital and physical products
- It’s fully hosted, meaning no servers to worry about
- It supports a number of payment gateways that integrate nicely with our bank
- It’s theme-based, which means we can easily reuse our existing site’s HTML, CSS and JavaScript
Shopify uses a template engine called Liquid to output data from your store into your templates. Liquid is perhaps the one ingredient of a Shopify theme you haven’t used before and it can be offputting. But the good news is that it’s really not that hard to get started with.
If you have ever used Smarty, ERB or Twig, what follows will be familiar to you. If not, don’t worry: it’s just a matter of learning a few simple rules. Once you have added Liquid skills to your web development toolkit, you’ll be able to start building themes for clients in no time.
Theme files and folders
Shopify themes are nothing more than a number of files (HTML files with a .liquid extension, CSS, JS, images, and so on) and folders. Themes can look and work however you want: there really are no restrictions. Here’s the basic structure of a theme:
- assets
- config
- layouts
- theme.liquid
- snippets
- templates
- 404.liquid
- article.liquid
- blog.liquid
- cart.liquid
- collection.liquid
- index.liquid
- page.liquid
- product.liquid
- search.liquid
With these files, you can create the most basic of themes. Of course, you would probably want to add in some CSS, JavaScript and a few images. You’d put these in the assets folder. (It’s worth noting that you aren’t currently allowed subfolders within your asset folder.)
For more on how themes work, and to find out about the config and snippets folders, I would recommend reading Theme from Scratch and Theme Settings on the Shopify Wiki.
Alternatively you can sign up to the free Partner programme, create a test shop and inspect one of the many free themes available from your test shop’s admin area – just go to the theme editor located in the Themes menu.
Mapping URLs to templates
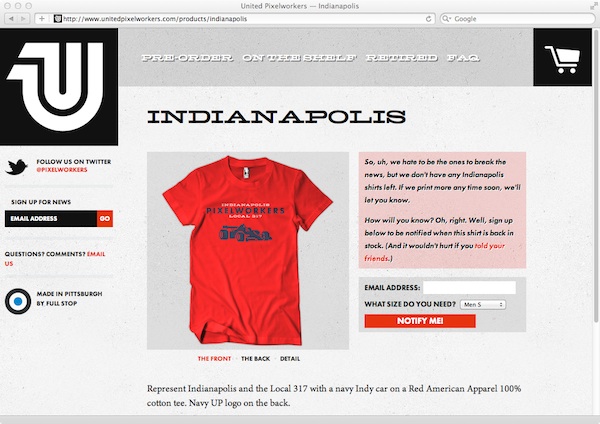
Shopify themes work by mapping the current URL to a specific template. For example, if we are viewing a product that has the following URL...
http://www.unitedpixelworkers.com/products/indianapolis
...then Shopify will know to use your product.liquid template. It’s for this reason that you should only ever use the file names listed above for your templates.
In addition to Shopify knowing which template to display in relation to the current URL, it makes a number of very specific variables available to us. These are known as 'template variables' and enable us to display data in our templates.
For example in our product.liquid template, we have access to the aptly named product variable. This means we can output the name, description, price and the availability of our product in our template. We’ll use the combination of Liquid and template variables to populate our templates with data relating to our products.
For a full list of the available template variables, visit Mark Dunkley’s Shopify Cheat Sheet.
Sign up to Creative Bloq's daily newsletter, which brings you the latest news and inspiration from the worlds of art, design and technology.
Liquid: the basics
Liquid is here to make our lives as theme designers easier. One of the main ways it does this is with the use of layouts. Layouts are ideal for including common page elements such as a header, main navigation, footer, and so on.
In my folder structure above, you’ll notice a file called theme.liquid in the layouts folder. You can think of theme.liquid as our master template. All of our other templates, such as product.liquid, are rendered inside this master template. You can have more than one layout if you wish, but the default one should always be called theme.liquid.
I haven’t seen United Pixelworkers' theme.liquid file, but you could imagine it containing the mark up for the areas outlined in red below.

Here’s what a basic theme.liquid layout might look like:
- <!DOCTYPE html>
- <html>
- <head>
- {{ content_for_header }}
- <title>Page Title Goes Here</title>
- </head>
- <body>
- {{ content_for_layout }}
- </body>
- </html>
You’ll notice two phrases wrapped in double curly braces: {{ content_for_header }} and {{ content_for_layout }}. These are our first examples of Liquid in action.
Shopify often uses {{ content_for_header }} to add specific files to the <head> section of a document: for example, adding in tracking code. {{ content_for_layout }} is where our URL-mapped template’s content will appear. For example, if we are viewing a product page, our product.liquid file will replace {{ content_for_layout }} in our layout file.
Understanding product.liquid
Now that we've run through the basics of layouts, it’s time to look at a template. Shops are all about the products, so let’s look at product.liquid.
Here’s a very simple but functional example of a product.liquid template.
- <h2>{{ product.title }}</h2>
- {{ product.description }}
- {% if product.available %}
- <form action="/cart/add" method="post">
- <select id="product-select" name='id'>
- {% for variant in product.variants %}
- <option value="{{ variant.id }}">{{ variant.title }} - {{ variant.price | money }}</option>
- {% endfor %}
- </select>
- <input type="submit" name="add" value="Add to cart" id="purchase" />
- </form>
- {% else %}
- <p>This product is not available</p>
- {% endif %}
There are a number of key Liquid concepts at work here. Let’s look at them in order.
Output
The first line of code contains the phrase {{ product.title }}. When rendered, this will output the title of the product, which as you now know is determined by the URL. In the United Pixelworkers example below, the product title is simply 'Indianapolis'.

Liquid uses the dot syntax format. In this instance, {{ product.title }} equates to the product template variable and its title attribute. We can output the product description in the same way using {{ product.description }}.
This is known in Liquid terms as output. All output is denoted by double curly braces, as follows: {{ your_output }}.
Logic
On the next line of the code, you’ll notice a statement in a curly brace followed by a %: in this case, {% if product.available %}. This is another important concept in Liquid known as logic. Further down, you’ll notice {% else %} and finally the {% endif %} statements.
This if statement enables us to dictate what our template displays, based one or more conditions: in this case, whether or not our product is available. Effectively this is saying, “if our product is available, show the information relating to it; otherwise show a message letting the user know it is out of stock”.
All logic statements in Liquid use the curly brace percentage notation, i.e. {% if … %}. Just remember to close your statements appropriately, or you’ll run into trouble. For example:
- {% if product.available %}
- Show Add to cart button here
- {% else %}
- Display message about when the product will be next available
- {% endif %}
Filters
Liquid enables us to manipulate our output in several ways. One of these is to use filters. The content that goes into the filter will come out the other end altered in a specific way.
Looking at the product.liquid example above, you’ll notice {{ variant.price | money }}. A variant is a term used to describe a variation of a product: for example, different colours and sizes. What’s interesting here is that we use a filter to change the price output – in this case, by using the money filter. This will result in the shop's currency symbol being added to the front of the price.
Other filters include strip_html, which will strip out any HTML tags from a given piece of text and ucase, which will convert it to upper case.
You can also join filters together. For example:
- {{ article.content | strip_html | truncate: 20 }}
In this instance, we are taking the content attribute of the article template variable and passing it to the strip_html filter and finally to the truncate filter. You’ll notice that the truncate filter allows us to specify how long we want the final output to be: in this case, 20 characters.
Filters also allow us to make quick work of creating script and image elements in templates. Here’s a very quick way of using a filter to output an image with an associated alt tag:
- {{ 'logo.png' | asset_url | img_tag: 'Site Logo' }}
Using this in our Shopify theme will result in the following img element being rendered in our template:
- <img src="/files/shops/your_shop_number/assets/logo.png" alt="Site Logo" />
The asset_url filter is very useful as it returns the full path to the current theme's assets folder. Using this filter makes it possible for you to apply your theme across multiple shops and not have to worry about paths.
What’s next?
Hopefully, these few examples have shown you that Liquid isn’t that complicated. Of course, there is much more you can with do with it, but by mastering output, logic and filters, you are well on the way to understanding most of what you will need to build a Shopify theme.
Further resources and inspiration

The Creative Bloq team is made up of a group of art and design enthusiasts, and has changed and evolved since Creative Bloq began back in 2012. The current website team consists of eight full-time members of staff: Editor Georgia Coggan, Deputy Editor Rosie Hilder, Ecommerce Editor Beren Neale, Senior News Editor Daniel Piper, Editor, Digital Art and 3D Ian Dean, Tech Reviews Editor Erlingur Einarsson, Ecommerce Writer Beth Nicholls and Staff Writer Natalie Fear, as well as a roster of freelancers from around the world. The ImagineFX magazine team also pitch in, ensuring that content from leading digital art publication ImagineFX is represented on Creative Bloq.
