Pro tips for using scalable vector graphics
Sara Soueidan explores how scalable vector graphics can be used for much more than just creating and animating shapes.
An SVG graphic can contain basic shapes, complex shapes, or both. There are six basic shapes defined in SVG <circle>, <ellipse>, <line>, <polygon>, <polyline> and <rect>.
Each shape is described, positioned and styled using SVG 'presentation attributes'. For example, the attributes used on each of the elements in the following snippet are all SVG presentation attributes:
<circle  cx="100" cy="200" r="250" /> <!-- cx, cy position the circle's centre on the x and y axes, and r specifies the size of the circle's radius. All three are presentation attributes -->

<rect x="300" y="100" width="400" height="220" /> <!-- x, y, width and height are presentation attributes used to position and size the rectangle -->

<line x1="100" y1="300" x2="300" y2="100" stroke-width="5" /> <!-- the stroke-width presentation attribute sets the thickness of the line -->- See Sara Soueidan talk about SVG at Generate London 2015 – buy your ticket today!
In addition to the basic shapes, you can create complex shapes using the SVG <path> element. An SVG <path> has a presentation attribute d – short for 'data' – which contains the data that defines the outline of the shape you’re drawing. The path data consists of a set of commands and coordinates that tell the browser where and how to draw the points, arcs and lines that make up the final path
Here's an example of an SVG <path>:
<path d="M 100 100 L 300 100 L 200 300 z" fill="deepPink" stroke="#009966" stroke-width="2" />The above path draws a rectangle by moving M to the point (100, 100), drawing a line L to the point (300, 100), then drawing another line to the point (200, 300), and closing the path z to form a triangular shape. You can learn more about the SVG <path> syntax in this article by Chris Nager – or in the SVG specification.
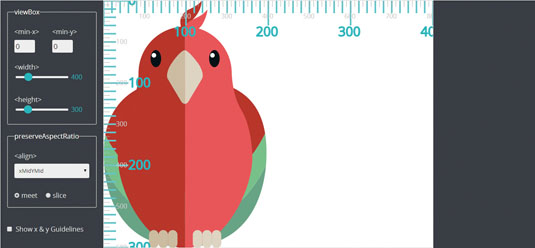
In most cases, when you're working with complex SVG graphics you're likely to create these shapes in a graphics editor like Illustrator or Inkscape, then export the entire graphic as an SVG, and embed it into your page.
At first glance, exported SVGs may seem tricky because they contain a lot of code that seems intimidating at first. However, editors usually include meta data, comments and extra elements that can be safely removed without affecting the rendering result of your SVG.
Daily design news, reviews, how-tos and more, as picked by the editors.

As such, it is generally a good idea to optimise your SVG using one of the several optimisation tools available, to make the code cleaner. I would recommend Peter Collingridge's online SVG editor, or the node.js-based tool SVGO. After optimising the SVG, it becomes much more readable and – more importantly – smaller.
Embedding SVGs
After creating and optimising your SVG, you can embed it in your page in a number of ways. What you want to do with your SVG will help you decide which approach to take. The six embedding techniques are:
- <img src="your-graphic.svg" alt="image description" />
- .element { background-image: url(path/to/your-graphic.svg); }
- <object type="image/svg+xml" data="your-graphic.svg><!-- fallback here --></object>
- <iframe src="your-graphic.svg"><!-- fallback here --></iframe>
- <embed type="image/svg+xml" src="your-graphic.svg" />
- <svg> <!-- inline svg content --></svg>
If you want to animate your SVG using CSS animations, you need to make sure you add the animations inside the <svg> in a <style> tag. Any animations defined externally will not work, unless you're embedding the SVG inline in an HTML document.
CSS interactions (such as hover) will not work if the SVG is embedded using <img>, or as a background image in CSS. For scripting with JavaScript, the <object> tag is your best bet, and even though <iframe> is similar to <object> in many aspects, controlling it from the main page's JavaScript can be tedious.

It's also worth mentioning that with <object> and <iframe>, you get a default fallback mechanism, where anything you define between the opening and closing tags will be rendered by the browser if it cannot render the referenced SVG image. Pretty cool, right?
Structuring SVG code
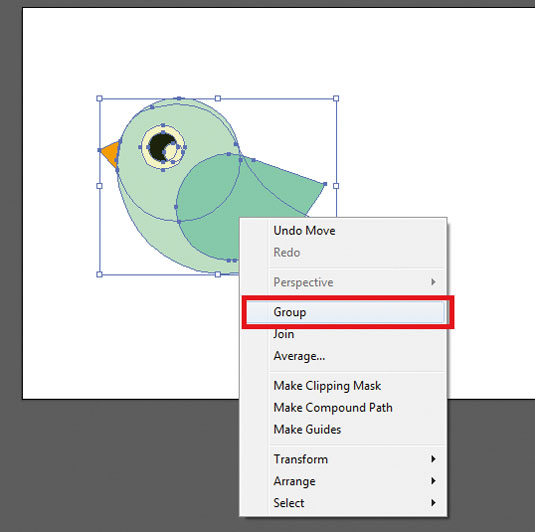
In addition to creating elements, you can organise them into groups. This comes in handy when you want to transform or animate an element made up of a group of shapes – instead of transforming each shape, you can transform them all as a group, thus preserving the spatial relationship between them. Grouping elements in SVG is similar to grouping them in a graphics editor.

To group elements, you can use the SVG <g> element. The group element is used for logically collecting together sets of related graphical elements. So if our bird was part of a bigger image, you could group all its elements together to make working with it easier.
<g id="bird">

        <g id="body">

            <!-- elements making up the body shape -->

            <path id="wing" d="M105.78,75.09c4.56,0,8.84,1.13,12.62,3.11c0,0,0.01-0.01,0.01-0.01l36.23,12.38c0,0-13.78,30.81-41.96,38.09

            c-1.51,0.39-2.82,0.59-3.99,0.62c-0.96,0.1-1.92,0.16-2.9,0.16c-15.01,0-27.17-12.17-27.

17-27.17

            C78.61,87.26,90.78,75.09,105.78,75.09"/>

        </g>

        <g id="head">

            <!-- elements making up the head: eyes, beak, etc. -->

        </g>

</g>
Any styles or animations (including transformations) you apply to the group will be inherited by all the elements inside it. This is very useful, and you’ll probably find yourself using groups in SVG a lot.
SVG also comes with the ability to 'copy' and 'paste' elements. The copied elements can be either rendered or defined as a reusable invisible 'template'. You can reuse an element with the <use> element – SVG naming conventions are very convenient, as you can see!
For example, to create another bird in our SVG canvas, we could reuse the existing bird like so:
<use x="100" y="100" xlink:href="#bird" />The xlink:href attribute is used to specify the ID of the element you want to reuse. The x and y attributes specify the position of the pasted element, relative to the positioning of the original element. So in the example shown above, the new bird will be positioned 100 units to the right of the original bird, and 100 units below it.

The <defs> element also be used to define an element, and then reuse it, too. The element defined inside <defs> will not be rendered, and when placed using x and y on <use>, it will be positioned relative to the SVG Current User Coordinate System.
It is possible to define anything inside <defs>; not just shapes. The following example defines a linear gradient, and uses that gradient to fill the background of a rectangle (see image above left):
<defs>

<linearGradient id="greenishOrangeGradient">

            <stop offset="0%" stop-color="#81CCAA" />

            <stop offset="100%" stop-color="#F69C0D" />

        </linearGradient>

</defs>

<rect x="100" y="100" width="700" height="450" fill= "url(#greenishOrangeGradient)" stroke="orange" stroke-width="1"/>
The gradient gets as ID. This ID is then used to reference the gradient and use it as a fill colour for the rectangle.
SVG animations
SVG provides us with the ability to animate elements by animating their numeric values (such as x, y, width and height), animating their transformations (rotation, translation and so on), animating their colours, or animating their motion along a path.
These animations can be achieved by using the native SVG animation elements. Some of these are imported from SMIL, and others have been added to SVG as an extension. There are four animation elements in SVG: <animate>, <animateTransform>, <animateMotion> and <set>. The names are self-explanatory.

When using an animation element, you can specify its target using the xlin:href attribute that contains the ID of an element in the same document. If you do not specify a target, the closest ancestor of the animation element will become the target. The following is an example of a circle that is animated so it moves 100 units horizontally. We do that by animating the x-coordinate position of its centre:
<circle cx="50" cy="50" r="15" fill="blue" stroke="black" stroke-width="1">

            <animate attributeName="cx" from="50" to="150" dur="3s" repeatCount="1" />

</circle>
When animating an element, you need to specify what attribute you're animating using the attributeName attribute. from and to specify the beginning and end values of the animated attribute, and dur specifies the duration of the animation. You can also specify the number of times you want the animation to run, using the repeatCount attribute.
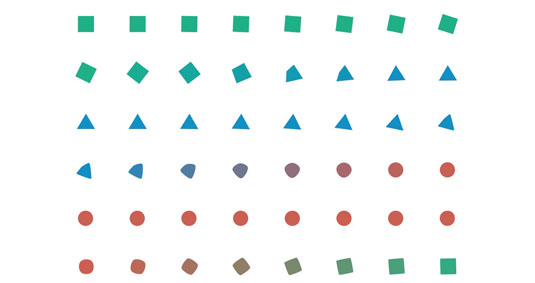
Using SVG animations, you can morph shapes into one another. An example is a simple loading spinner, which changes shape and colour. For more information, I recommend this introductory article by Noah Blon.
SVG graphics effects
SVG has way more to offer than just creating shapes and animating them. SVGs have built-in graphics effects like clipping and masking, blend modes, filters and even lighting effects!
For example, you can clip an element using the SVG <clipPath> element. The <clipPath> element specifies the area of the element that will remain visible after the clipping is applied (read a full explanation in my article here).
Using a mask, you can create more subtle masking effects that look less like they're being cut with scissors. An example is shown in the image above, which is a watercolour splatter text effect from this article about techniques for creating textured text using SVG and CSS.
Blending modes and filters enable you to create effects similar to those you can create in graphics editors. SVG basically provides us with a range of different Photoshop effects, right in the browser.
At Generate London on 17-18 September 2015, Sara Soueidan will be delivering a keynote presentation. Get your ticket now!
See Sara Soueidan talk at Generate!

Thank you for reading 5 articles this month* Join now for unlimited access
Enjoy your first month for just £1 / $1 / €1
*Read 5 free articles per month without a subscription

Join now for unlimited access
Try first month for just £1 / $1 / €1

The Creative Bloq team is made up of a group of art and design enthusiasts, and has changed and evolved since Creative Bloq began back in 2012. The current website team consists of eight full-time members of staff: Editor Georgia Coggan, Deputy Editor Rosie Hilder, Ecommerce Editor Beren Neale, Senior News Editor Daniel Piper, Editor, Digital Art and 3D Ian Dean, Tech Reviews Editor Erlingur Einarsson, Ecommerce Writer Beth Nicholls and Staff Writer Natalie Fear, as well as a roster of freelancers from around the world. The ImagineFX magazine team also pitch in, ensuring that content from leading digital art publication ImagineFX is represented on Creative Bloq.
