How to create a realistic camera rig in Maya
Digital artist Pat Imrie explains how to set up a CG version of a real-world camera in a four simple steps.
Being able to set-up a CG version of a real-world camera, using groups and simple controllers, is an important skill. Multi-node cameras are useful because they impose the physical limitations of real-world cameras. This will encourage you to think more cinematically about how you position your camera. This may sound like a disadvantage, but it is in fact an advantage as you will end up with a more realistic result and the camera will help to tell your story rather than detract from it.
It also means cleaner, more efficient and better behaved animation. At times, if all the channels on a camera are animated simultaneously over a long period the rotations can get mixed up and cause errors. A noticeable jitter may be present in some rendered shots and is a result of the camera being pushed beyond its limits. The multi-node camera method we are going to use, eliminates these issues by splitting up the rotation and translate channels into separate groups or nodes.
01. Create camera groups
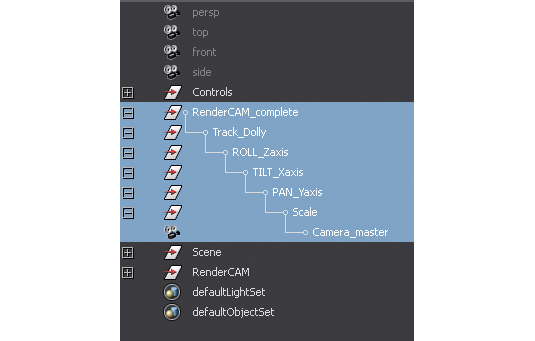
Firstly, let's talk about setting up the camera itself. Start by creating a standard camera (Create>Cameras>Camera). Select and rename the camera to Camera_master. We will scale the camera up so it is easier to spot in a scene.
To do this, first select the camera and group it to itself (Ctrl+g) rename the group, Scale. Select the group and scale it up in all axes (uniformly) by 2.5 units. Open the group and reselect the Camera_master. You will notice that none of the values on its Channel Control have changed. We want the camera to remain like this – any key frames we use will be applied to the groups or nodes that we will create.

02. Replicate the real world
Next we will group the camera into a set of nodes that replicate the real-world terms of physical camera movement. For example, when we rotate a camera in the Y direction, this is called a pan, the X is known as tilt and the Z is called roll.
As such we will take the scale group and group it to itself three times. Rename the groups Pan_Yaxis, Tilt_Xaxis and Roll_Zaxis, respectively. Naming them this way reminds us which rotational axis relates to its real-world counterpart and will be important when setting up controllers.
Next you need to group everything again and rename it Track_Dolly, these relate to the X (left and right) and Z(back and forth) directions. At its most basic, when a camera moves forward or back (Z direction) it can be referred to as Dolly-In or Dolly-Out. When moving left or right (X direction) it is known as Tracking-Left or Tracking-Right. Group everything one last time and rename this group RenderCAM.
Daily design news, reviews, how-tos and more, as picked by the editors.
03. Control groups
As well as setting up the camera you also need to create the controls for the camera. First take the RenderCAM group and move it up eight units in Y to create a visual cue for the tripod.
Create a set of four controllers using either NURBS curves or Locators and position them relative to the group they will control. For the rotational groups of PAN, TILT and ROLL, we will use an Orient Constraint to connect the controller and group. Select the Controller and the desired Group and go to Constrain>Orient Constrain>Options. In the options, select Maintain Offset and then choose the desired Axis (X, Y or Z). Click apply to connect the controller to the group.
For the Track_Dolly group, we will use a Parent Constraint, found under Constrain>Parent Constrain>Options. In the options, turn on Maintain Offset and choose all the Translate axes and deselect the Rotate axes.
04. Lock down
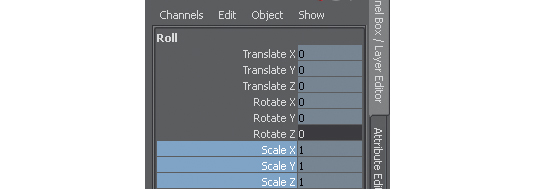
Lastly, select each controller and lock out any non-required channels by selecting them in the Channel Control, right-clicking and choosing Lock Selected. For example, on the Roll control, select all the channels excluding the Rotate Z, now right- click>lock selected. This will lock these channels meaning they cannot be adjusted or have keys accidentally applied to them.

While this is a basic setup, you could easily expand it to include more controls and more nodes. I have used this setup to great effect on many projects and it does help save time whether you are in the early stages of layout or making a change later on down the pipeline.
Pat Imrie is a freelance 3D artist and trainer specialising in modelling and digital sculpture for TV, film and games.
This article originally appeared in 3D World issue 174.
Liked this? Read these!
- Maya tutorials: 40 awesome projects to try today
- The best 3D movies of 2014
- Download free textures: high resolution and ready to use now

The Creative Bloq team is made up of a group of art and design enthusiasts, and has changed and evolved since Creative Bloq began back in 2012. The current website team consists of eight full-time members of staff: Editor Georgia Coggan, Deputy Editor Rosie Hilder, Ecommerce Editor Beren Neale, Senior News Editor Daniel Piper, Editor, Digital Art and 3D Ian Dean, Tech Reviews Editor Erlingur Einarsson, Ecommerce Writer Beth Nicholls and Staff Writer Natalie Fear, as well as a roster of freelancers from around the world. The ImagineFX magazine team also pitch in, ensuring that content from leading digital art publication ImagineFX is represented on Creative Bloq.

