How to model and render a surrealist scene
Enrico Cerica uses Blender to bring his imagination to life in this surrealist image, from modelling to rendering.
Sign up to Creative Bloq's daily newsletter, which brings you the latest news and inspiration from the worlds of art, design and technology.
You are now subscribed
Your newsletter sign-up was successful
Want to add more newsletters?
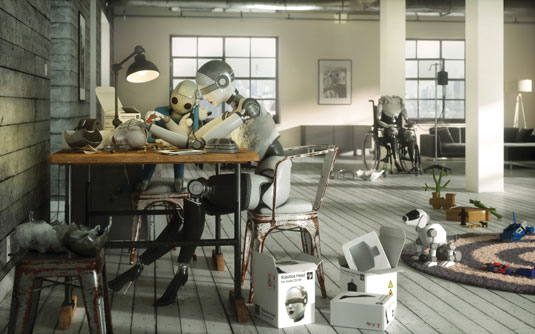
I've always been fascinated by surrealism. I often have Magritte in mind when I create my work, in the way he distorts reality to create ambiguity and push the viewer to search and find the hidden messages, as can be seen in this image Cyber Destiny: Repairing GrandMa.
Often what is really exciting is when you start rendering and progressively discover your idea becoming reality. With this kind of scene I enjoy the whole process, beginning with the research, which may require several weeks of maturation.
I usually don't have a precise plan of what I will create. The start point is an idea, then I let my imagination lead my work. I may change my mind during the process to achieve an attractive result, but without straying too far from the core idea.
Article continues below 
The next step consists of creating the overall environment to get an idea of the space. I then create the models and furniture and proceed with the details. I model everything I'm using in this scene, from the vase to the more complex rigged robots, so I tend to reuse existing models to make the process quicker.
I use Blender for almost all the modelling and texturing, including UV mapping, texture painting, sculpting and fluid simulations. In this image I used particle systems for the carpets and plants. When accurate cloth is required, I use Marvelous Designer as it produces high-quality meshes, then use Blender's Decimate modifier to reduce the amount of polygons without losing quality.
As I use Octane to render, I always consider the memory and texture limits during the modelling process. I use Instances Scattering for the high amount of objects used in carpets; here I used the particle system for the carpet but the rest is standard modelling.
Making the scene's furniture
01. UV mapping
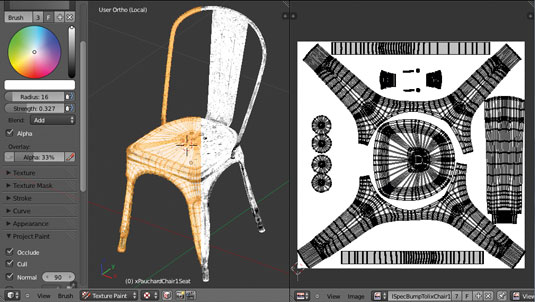
I unwrap the chair and organise the unfolded parts over the mapping space. I then use the Texture Paint function to paint the texture map directly on the model.
Sign up to Creative Bloq's daily newsletter, which brings you the latest news and inspiration from the worlds of art, design and technology.
02. The maps
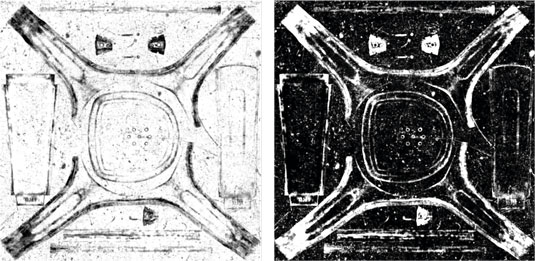
I improve the map that was generated by Blender to add some more scratches and also to create the bump, specular, mask and eventually the normal maps.
03. Octane Node
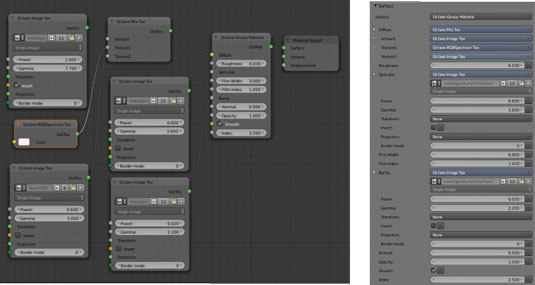
I create the Octane Material Node. The OctaneRender for Blender plug-in offers a Node Graph Editor similar to the one used, with Cycles. It relies on the same interface.
Words: Enrico Cerica
While Enrico Cerica has worked in IT for 24 years, not touching CG in his day job, he creates stunning commercial still images and arch-viz projects in his spare time as a freelancer. This article originally appeared in 3D World issue 182.

The Creative Bloq team is made up of a group of art and design enthusiasts, and has changed and evolved since Creative Bloq began back in 2012. The current website team consists of eight full-time members of staff: Editor Georgia Coggan, Deputy Editor Rosie Hilder, Ecommerce Editor Beren Neale, Senior News Editor Daniel Piper, Editor, Digital Art and 3D Ian Dean, Tech Reviews Editor Erlingur Einarsson, Ecommerce Writer Beth Nicholls and Staff Writer Natalie Fear, as well as a roster of freelancers from around the world. The ImagineFX magazine team also pitch in, ensuring that content from leading digital art publication ImagineFX is represented on Creative Bloq.
