How to animate motion graphics to music
Rob Redman take you through the method behind animating to sound.
Sign up to Creative Bloq's daily newsletter, which brings you the latest news and inspiration from the worlds of art, design and technology.
You are now subscribed
Your newsletter sign-up was successful
Want to add more newsletters?
There are many good reasons why you might want to animate to sound. It could be that you have to match an audio track supplied by a client, or you have been provided with a score which you need to match in terms of pacing and mood. On top of that it could be that there is a dialogue track that needs matching, or even lip syncing. Sound and vision go hand in hand for many creative artists, so lets look at a way of combining the two.
In this tutorial we will look at a supplied audio track, which is comprised of simple music, so we don't have to worry about syncing so much (which is a series of lessons in itself). My background is in design and photography but I also studied commercial sound production at university level, through a love of music, which has led to me combining them all many times.
Audio driver
What we will do here is to actual let the audio drive the animation. Cinema 4D has an effector for its mograph module that lets us easily manipulate a set of clones using a sound file.
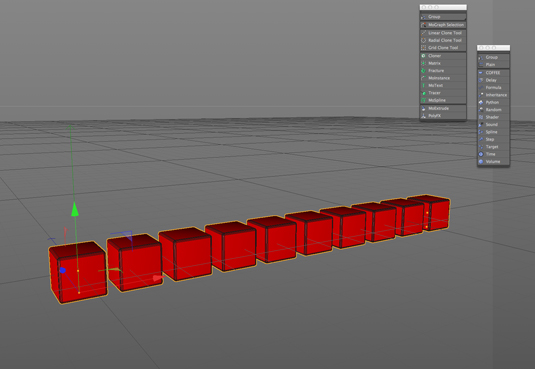
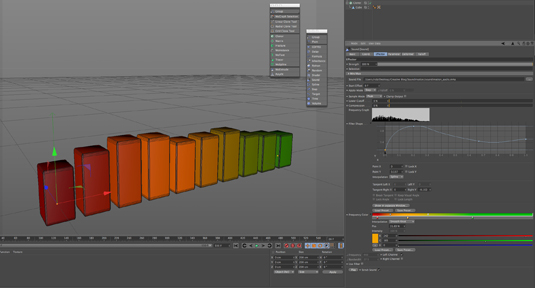
Article continues belowWe will start off with a simple cloner, housing a cube, with the clones aligned in a row. What we are going for is the kind of graphic equaliser look that you might see in any DAW plugin (read our guide to becoming a sound mixing master) or high end stereo. We will then load up the audio file (which can be downloaded here) and use it to drive the height of the clones, to match the peaks of the audio's volume on the waveform. As you can see from the other animations here, it is possible to create many varied looks using these simple tools, so once you've got to grips with how it works have a play around with different models, cloners and modes.
01. Set up the cloner

First up we need to set up the clones that will react to the audio, so add a cube to the scene. Now, the idea is to increase the height of the cubes at the same time the volume increases. A standard cube has it's axis in the centre, so when we increase its height, or Y value, it will elongate both up and down. If you would prefer it to only grow upward, you will need to make it editable (by hitting the C key), then hold L while dragging the gizmo to the bottom of the cube. Do this in the side view, so it's easier to see. If you turn on snapping you can be more precise.
Once your cube is ready hold Alt and add a cloner to the scene. Holding Alt makes the cube a child of the cloner and saves a step.
Set the cloner up how you prefer. I've turned the mode to Line and chosen 10, for the count, changing the direction and distance, so I have a pleasingly spaced group.
Sign up to Creative Bloq's daily newsletter, which brings you the latest news and inspiration from the worlds of art, design and technology.
02. Load the audio
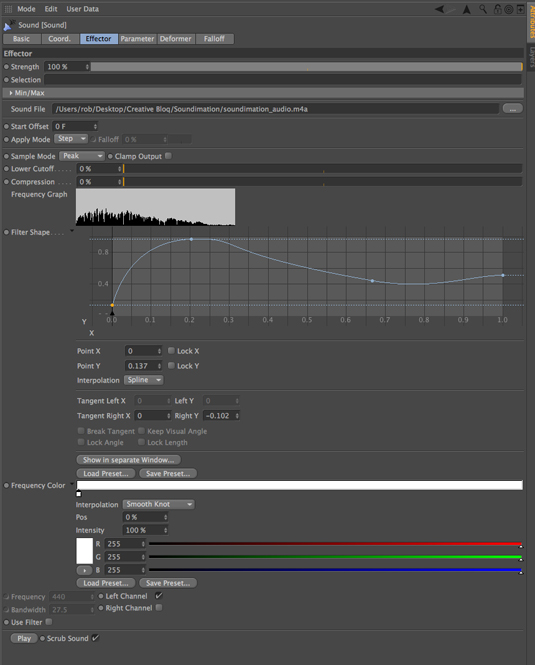
With the cloner selected add a sound effector to the scene. Having the selection makes the effector work with the cloner, without having to set anything up. Make sure you have enough frames on your timeline to account for the audio file.
You can also go into the effector tab and choose an offset, so if you want to ignore the start of the sound file, maybe because it has a slow or quiet start, you can assign a start frame in the offset field.
03. Choosing an effect
There are many many things you can do with the sound effector and here we will look at a couple. Move to the parameter tab and you will see that by default the Position box is checked and a default Value of 50 is set on the Y axis. If you hit the start button you will see your clones jump up and down together, up to a maximum of 50cm. Instead uncheck the position and check the scale. With the audio still playing increase the scale Y amount until you are happy. I chose about 10 with my 100cm cubes.
You are probably wondering why they are all jumping together and that is easily fixed (although it has it's uses). Just go to the apply mode menu in the effector field and in the drop-down choose step, which will duplicate the width of your waveform and spread the effect across your clones, so that each 10% of the waveform corresponds to a single cube. Much more what we want and probably more what you were expecting.
04. Adjusting the frequencies

If you find that your audio track has more information in one area you can smooth things out for a more even EQ. Under the effector tab you will find a filter shape drop-down. Click through and you will see a spline graph. By Ctrl-clicking on the graph you will add control points. The spline corresponds to the waveform, so moving points up and down here will in turn boost or lower that frequency. You can see here that I have reduced the lowest bass and given the mids a bit of a push.
05. LED EQ

My favourite old stereo used to have a graphic EQ with a coloured display which is really easy to replicate. Under the frequency controls is a white bar which, like a lot of sound effector controls, is mapped across the frequency range. Clicking on the bar creates a new knot, which you can colour either by unfolding the options or double clicking the small square representing the knot. I've gone for the red to green but the options are limitless. You could always employ the shader effector here to get some even more interesting results but this is a pretty good start.
06. Experiment
That is a simple overview of the basics of the sound effector. Delve into the different options, maybe play with the rotation and position controls, or try mixing all three. Add in a random effector or see if you can create a flock of clones, that have organic motion but still react to the audio. The key to anything in 3D is to hit buttons, experiment and see what you can come up with while you learn.
It's worth noting that you could use these methods to create 2D GUI elements by using object buffers to send to a compositing programme as simple alphas. You aren't restricted to purely 3D, nor are you forced to use cloned parametric objects. You could deform a spline with sound, or animate text. The options really are pretty much boundless.
Words: Rob Redman
Exclusive: Register for ZED today!
Want to stay on top of the latest techniques? Then register for ZED, a 'Pop-Up Studio for the Creative Community' being held in London, Soho, until Oct 22. Be inspired by intimate presentations from brilliant keynote speakers and outstanding new examples of audiovisual artistry. Details here (hurry - tickets are free, but limited!).

The Creative Bloq team is made up of a group of art and design enthusiasts, and has changed and evolved since Creative Bloq began back in 2012. The current website team consists of eight full-time members of staff: Editor Georgia Coggan, Deputy Editor Rosie Hilder, Ecommerce Editor Beren Neale, Senior News Editor Daniel Piper, Editor, Digital Art and 3D Ian Dean, Tech Reviews Editor Erlingur Einarsson, Ecommerce Writer Beth Nicholls and Staff Writer Natalie Fear, as well as a roster of freelancers from around the world. The ImagineFX magazine team also pitch in, ensuring that content from leading digital art publication ImagineFX is represented on Creative Bloq.
