Control how objects shatter in Blender 2.6
Indulge your inner demolition team with Rob Redman’s advice for destruction.
Sign up to Creative Bloq's daily newsletter, which brings you the latest news and inspiration from the worlds of art, design and technology.
You are now subscribed
Your newsletter sign-up was successful
Want to add more newsletters?
Almost every 3D artist I have ever spoken to enjoys destroying things digitally – there’s something fascinating about watching a complex event unfold in front of you and having the means to control it. So you turn on whatever dynamics engine you use and start blowing things up, or crashing cars. The problem with this is that we often miss what makes these tools perfect for serious VFX as we indulge our inner demolition team.
What makes this kind of simulation so believable is that we have ultimate control over how things break. You can just add an object to a scene, hit Divide and then watch it fall – but for finer control, there are also methods of telling Blender exactly how you want the object to break. You could use particles for this, which is a useful method, but for the most intuitive workflow I’d suggest using the Grease Pencil.
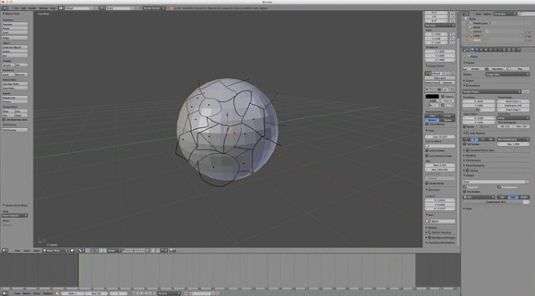
Start Blender and press [Cmd]+[,] to open the Preferences. Under Add Ons, type Cell and activate Cell Fracture, which adds a new button to the Object menu. Load your object awaiting destruction – I’m using a basic sphere, but the principles apply to more complex objects too – and press [N] to switch to the Grease Pencil. Add a new layer and switch the mode to Surface, which allows you to draw directly on the surface of the model.
Article continues belowYou can now define the areas that you want to break. Start off by adding simple dots to signify the centres of large chunks and make them close together for smaller chunks. You can even draw in squares, circles or other shapes to define patterns (such as the radial breaks you get in glass)
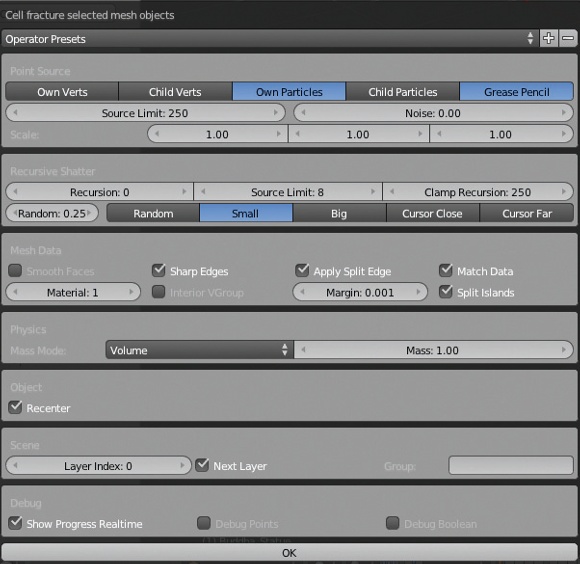
Once you are happy that you have given Blender enough guidance to create the destruction, you can go to the Object menu and click the New Cell Fracture button, which will open up the tool’s options palette. Go to the Grease Pencil tab and adjust the number of pieces you want. (I used 250.)
To clarify the process, create a new material in slot 1, and then in the Cell Fracture window in the Mesh panel, change the material to 1 as well. You can leave the other settings as they are and click OK. You will see lots of chunks forming in a cube around the object and then disappearing again. If you changed the colour of the new material, the internal parts of the chunks will be the new colour. The external parts – the original geometry – won’t change, which helps you to see what has happened.
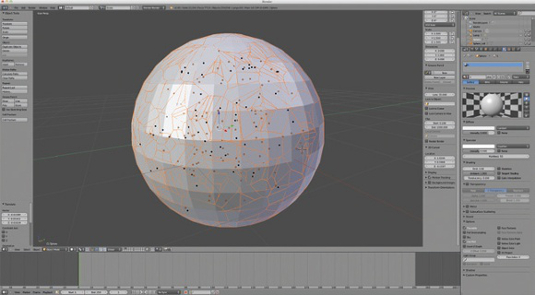
Once the process is complete you might see the cracks, but to see the actual chunks switch to your next layer, where everything will become clearer.
Sign up to Creative Bloq's daily newsletter, which brings you the latest news and inspiration from the worlds of art, design and technology.
You can now see that you have great-looking chunks of geometry and, when you move to Blender Game mode and add physics (don’t forget to add a floor), the object will break apart in a much more controlled fashion, with more dense areas of destruction just where you want.
01 BREAK IT UP

Prepare the geometry you want to break apart. It’s best to use something with some thickness, so for this model run the Solidify modifier, but be aware of intersecting geometry which can break the cell fracture. Now using the Grease Pencil, draw out where you want the higher density of chunks.
02 DEFINE THE CHUNKS

When your mesh is ready, press the new Cell Fracture button (once you’ve activated it in Preferences). In the Point Source panel, under Grease Pencil, change the Source Limit to define the amount of chunks. I used 250; higher numbers take longer to calculate. If you want a different material inside, you can assign it to the material slot under Mesh Data, then click OK.
03 BOUNDING BOX

You will see all the chunks appear and disappear in an automatically created bounding box and, once complete, you can delete the Grease Pencil markings and move over to the next layer. There you will clearly see the chunks, clearly defined (with a slight gap, set by the margin of the Cell Fracture) and a mass indicator for each chunk, which is a guide to help with dynamics.
Discover what’s next for Augmented Reality

The Creative Bloq team is made up of a group of art and design enthusiasts, and has changed and evolved since Creative Bloq began back in 2012. The current website team consists of eight full-time members of staff: Editor Georgia Coggan, Deputy Editor Rosie Hilder, Ecommerce Editor Beren Neale, Senior News Editor Daniel Piper, Editor, Digital Art and 3D Ian Dean, Tech Reviews Editor Erlingur Einarsson, Ecommerce Writer Beth Nicholls and Staff Writer Natalie Fear, as well as a roster of freelancers from around the world. The ImagineFX magazine team also pitch in, ensuring that content from leading digital art publication ImagineFX is represented on Creative Bloq.
