5 steps to an irresistible Instagram bio
How to make an Instagram bio that helps you stand out from the crowd, and promotes you and your feed.
Instagram bios are an important part of your Instagram feed. They're often the first thing people look at when they click on your feed, and if you don't include the right information in them (i.e. your contact details), you could end up losing clients.
But what exactly makes the perfect Instagram bio? Here, we examine some of our favourite Insta bios, and extract five top tips on making your own killer bio. An extra trick you may also like to try is adding your own custom font to your Insta profile, see our dedicated how to change the font in your Instagram bio post for a step-by-step on how to do this.
To edit your Instagram bio, just go to Edit Profile on Instagram, and then click on the Bio section to edit. Once you're there, here's what to do...
01. Be super-succinct

You only have 150 characters to play with in your Instagram bio, so you can't waffle on too much even if you wanted to, but keep your message as succinct as possible. Think about what a person who has no idea who you are and has just stumbled across your feed needs to know. Who are you? Where are you? What are your interests? What should people expect to find on the page?
What you write in your Instagram bio will depend on what exactly you are aiming for with your Instagram account. Personal accounts might list your interests, while more work-focused accounts should list what you do, perhaps including the company you work for or any clients (with an @), perhaps not. It's a good idea to list your location, if you think that's relevant. You can also include hashtags and keywords (see the next point).
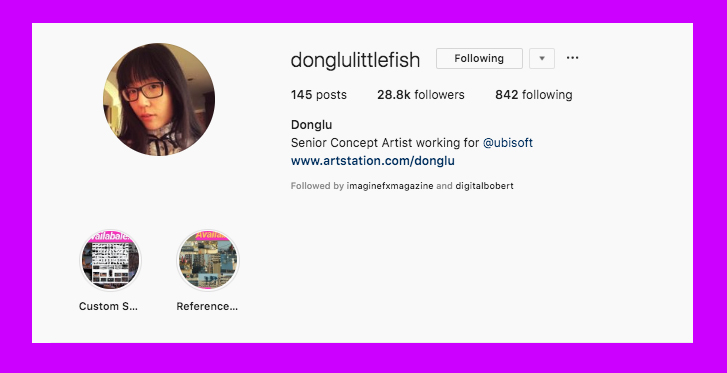
Concept artist Donglu, who has over 28,000 followers, keeps things simple with her bio, which says what she does and links to her employer.
02. Include hashtags

We don't recommend including lots of hashtags in your bio, because that usually looks a bit #toomuch, but the odd hashtag can help people find your page, and also shows what you're about. To search for relevant hashtags, click search within Instagram and look under 'Tags'. You can then see a list of hashtags and how many posts use them daily.
Daily design news, reviews, how-tos and more, as picked by the editors.
You can also include any hashtag that you want people to use when referencing your content, or a particular campaign you're involved in, just as D&AD does (above). Also note how D&AD has quite a long Instagram bio, but that it is still clear and succinct, and tells you exactly what you need to know about the organisation.
Including your own hashtag can seem a bit over-the-top if you're just starting out, so probably don't include your name as a hashtag if you've only got 100 followers. You might find it isn't used in the way you'd hoped.
In general, remember that people have a limited attention span online, particular on Insta, so keep all of your bio text short and sweet, and make sure it is easy to scan. You can do this using line spacing and emojis (see below).
03. Use line breaks and emojis

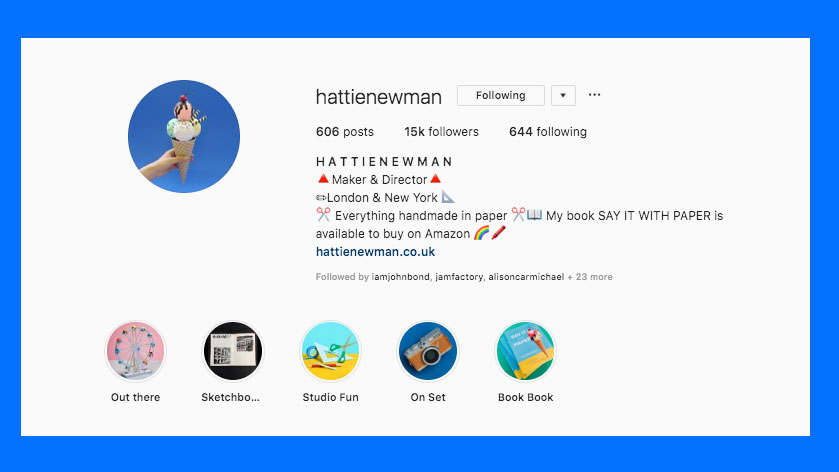
One way to break up your bio and make it look better is to space it out, and add interest and colour with emojis. Paper artist Hattie Newman does this brilliantly in her bio, which lists what she does, her location, and describes her book. She breaks this info up on different lines and with emojis, ensuring that nothing gets lost and it all looks eye-catching and colourful.
Creating line breaks in your Insta bio can be a bit fiddly, and the same rule applies in your bio as it does when creating line breaks in captions on Instagram (read our post about Instagram hacks such as making line breaks if you're not sure what we mean).
To create a line break, write on one line, and then click Return immediately afterwards. If you leave a space before you click Return, you won't get a proper line break. You may find this is easier to do on desktop rather than mobile.
Getting the spacing of your emojis right can also be a bit fiddly on mobile. Make sure you check everything is lined up nicely once you've clicked save. And if not, just go back and edit until you get it looking how you want.
04. Include a call to action

It's best to include a call to action (CTA) on your Instagram bio. This sounds like a marketing term (because it is), but calls to action are vital for anyone who wants people to interact with them, their work, or their feed.
Think about someone you don't know clicking on your feed. What do you want them to do? Would you like them to buy your work? Click on your website? Follow your other account? Comment on your posts?
Whatever it is, don't be shy about it. Include this information in the form of a button that says 'email' or 'contact' for example. This is for business accounts only and happens automatically when you include your contact details on your profile (see how to switch to a business account in our post on how to make money on Instagram).
Your CTA could also be a link, and you can use emojis to point at this link to direct people to it. Note how doodle artist Hattie Stewart keeps her profile short and sweet with just two words and an emoji, and then one link to her website – that's her CTA. Also note the use of emojis for her Instagram Stories – read more about crafting Instagram Stories here.
Remember that you only get one link on your Instagram profile, so choose it wisely, you might want to include your website, a link to your shop, or perhaps a link about you and your work you want to direct people to. You could even link to another social media account if you have more work there.
If you want to include more than one link, there is a way (sort of). See the tip below.
05. Use Linktree for multiple links

Instagram doesn't let you include more than one link in your bio. But if you want to be sneaky, you can use Linktree to add more than one. Linktree is designed specifically for Instagram and it creates one URL that then links out to multiple links, so you can have your website, your shop, your Facebook page, your Behance, and so on, all in one place. It's free, you just need to sign up. You can see Linktree's own Linktree (meta, we know) above.
Read more:

Rosie Hilder is Creative Bloq's Deputy Editor. After beginning her career in journalism in Argentina – where she worked as Deputy Editor of Time Out Buenos Aires – she moved back to the UK and joined Future Plc in 2016. Since then, she's worked as Operations Editor on magazines including Computer Arts, 3D World and Paint & Draw and Mac|Life. In 2018, she joined Creative Bloq, where she now assists with the daily management of the site, including growing the site's reach, getting involved in events, such as judging the Brand Impact Awards, and helping make sure our content serves the reader as best it can.
