Filmmaking used to be a highly expensive art, but these days, entire shoots can be done with the likes of Filmic Pro and just a smartphone. Obviously the better your phone is the better the end product will look. We tried out Filmic Pro (officially styled FiLMiC Pro) with the iPhone 12 Pro, and we have to say that the results were impressive.
Filmic Pro has been used to create films such as Tangerine, as well as videos for Lady Gaga and Selena Gomez, and has meant many amateur and professional filmmakers are now free from hauling around huge or expensive equipment.
The app costs $14.99, but when you open it there's no introductory tutorial, and some might find the interface a little daunting. Here, we talk you through the basics of getting set up in Filmic Pro, as explained to us by Filmic Pro's Eliot Fitzroy. Note that these really are just the basics, as there are plenty more advanced settings to dig into once you've got these sorted.
To buy Filmic Pro, go to your phones app store or the Filmic Pro website. If you've got the app but feel your phone is letting you down, then explore our best camera phone buying guide.
How to use Filmic Pro
01. Navigate basic controls

When you open up Filmic Pro, make sure you are viewing it in landscape, as you'll be able to see all of the controls properly. The first things to play around with are the white circle on the screen – which controls the exposure – and the white square, which controls the focus. You can move these around your screen until you're happy with their placement.
With the circle and square in white, the app will respond to changes in the scene, so if something comes into shot, it will switch to focus on that. If you want to set these so that the exposure and focus are fixed, simply tap the circle or square. They will turn red, which means they are locked. Tap again to unlock.
02. Choose your lens

Select your lens by clicking on the little cone on the bottom right of your screen. You can choose from an ultrawide lens, wide lens, a tele lens or switch into selfie mode.
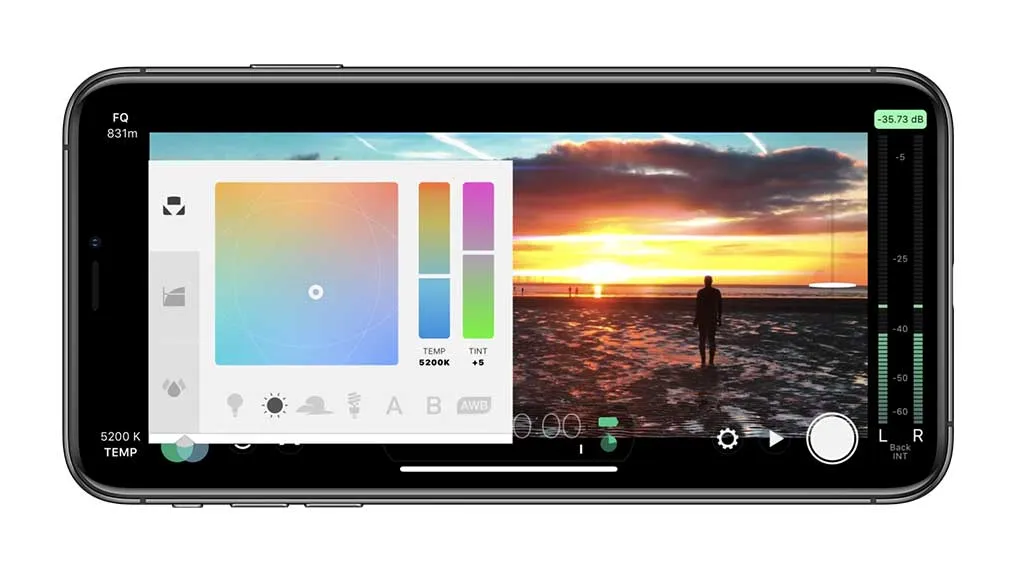
03. Set white balance

To set the white balance in your scene, tap on the three overlapping circles in the bottom left of your screen. You should get a little pop-up appear, where you can move around the white balance to adjust the temperature and tint. If AWB in the bottom-right of the screen is blue, that means auto white balance is selected. If you tap it, it will turn red and lock.
To exit the pop-up, tap outside of it.
04. Choose your resolution

To set the resolution, go to Settings (the cog on the bottom right of the screen), then resolution. Here, you can choose your aspect ratio, as well as whether to shoot in 2K, 3K or 4K. You can also choose the quality, with FiLMiC Extreme being the most extreme, or best, of the bunch.
05. Set the frame rate

Set the frame rate by tapping settings, and then framerate. The default is 24 frames per second, which is standard for cinematic capture, but you can increase this if you wish.
04. Adjust audio levels

To adjust the audio levels, use the slider on the side of your screen (you can see it here on the right of the image, though there's no sound being recorded). Set the audio settings by going to Settings (the cog in the bottom-right of the screen), then Audio. Here, you can change the microphone, stereo quality (PCM is the highest possible quality), and choose between sample rates of 44.1 kHz and 48.0 kHz.
Once you're happy with your settings, you can save them as presets using the Preset option in Settings.
05. Record and view your clip

To start recording, tap the white circle on the right of the screen. While you are recording you still have control, and so can adjust the settings outlined above as needed. You can also click the white button in the left-corner of your screen to get manual control – adjusting the wheels to play around with the focus and exposure.
To watch your clip, tap the play button, which should bring up a library of your clips. Tap the box with tick on it to select more than one clip. Tap the film button to save to your camera roll, and go to Settings, Device, to choose to automatically save to camera roll . Back in the Play menu, use the icon with the arrow to share, or the bin to delete. You can also swipe right on a clip to bring up the delete option.
To get the most out of Filmic Pro, you'll need a decent smartphone or tablet. See today's best deals on top smartphones below:
Read more: