How to quickly build shapes in Illustrator
Art editor Luke O'Neill demonstrates how to quickly and easily create shapes in Illustrator.
For those wanting to get into using Adobe Illustrator, it can seem like a daunting task at first, as the working processes are quite different to the more organic nature of Photoshop. Whereas you can fudge your way around Photoshop to a certain extent, Illustrator is a precision tool that often requires things to be done in a certain way.
Expand your vector knowledge with these top Illustrator tutorials
Through the next five steps I'll demonstrate how easy it is to quickly build shapes and graphics in Illustrator using some of the basics shape and shape building tools. Once you have your head around the basics and understand how vectors work you'll be creating complex graphics and illustrations before you know it.
01. Create a simple graphic arrow
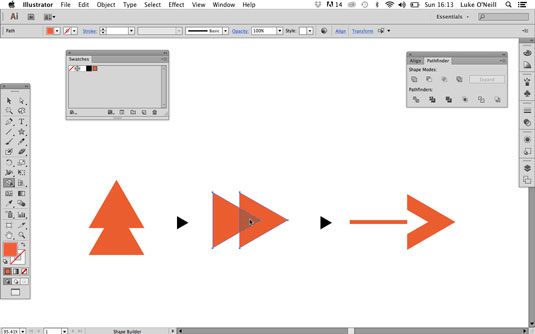
Select the polygon tool and click to draw on the art board whilst holding shift. With shift still selected, use the cursor keys to reduce the number of sides to three to create a triangle. Select the triangle shape and, whilst holding alt, click and drag the shape to duplicate it so that you have two overlapping triangles.
With both triangles selected, hit 'R' and hold shift to rotate the triangles 90 degrees. Now select the shape builder tool and holding alt to bring up the 'minus' function. Now simply click on the overlapping shapes to create a bold triangular shape and simply add in a line to complete the arrow.
02. Create a magnifying glass icon
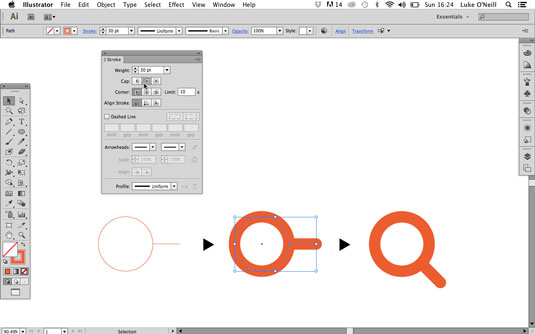
Begin by drawing a perfect circle with the ellipse tool and a straight line that sits flush to the right hand side of the circle. It helps to use the grid and have 'snap to grid' turned on when doing this. Next, increase the stroke weight to 30 and select 'round cap' in the stroke panel.
With both strokes selected, navigate to Object > Expand to make the strokes solid shapes. Now simply draw a line between the two shapes with the shape builder tool and rotate the shape 90 degrees to finish the magnifying icon.
Sign up to Creative Bloq's daily newsletter, which brings you the latest news and inspiration from the worlds of art, design and technology.
03. Make shiny shapes
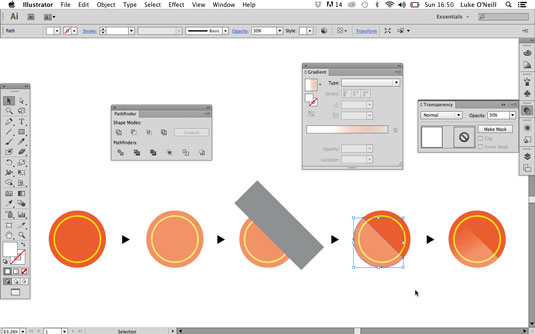
It's very easy to make simple shapes, logos and graphics appear as if they're shiny or glossy. Start with the shape that you wish to make shiny, in this case a circular graphic. Copy the circle shape and hit cmd+F to paste it over the top of the original graphic. Make it white and reduce its opacity down to 30 per cent in the transparency panel.
Now draw a rectangular shape over the top, rotate it 90 degrees and use the minus function in the pathfinder panel to subtract the rectangular shape from the circle. To increase the effect you could give the shine layer a gradient fill and reduce the opacity of the darker colour to 0%.
04. Knock out strokes
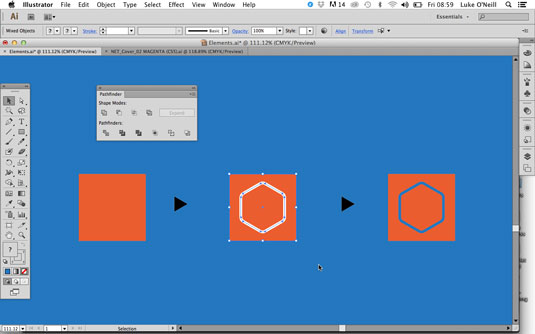
Any path can in Illustrator can be converted to a shape and built on to or knocked out of other shapes. Start by drawing a simple square and then, using the pen tool, draw a simple graphic that you'd like to knock out of the shape, in this case a cube shape. Now with the shape selected navigate to object > path > outline stroke to make the stroke an object.
Now with both objects selected, choose the 'minus front' option from the pathfinder panel to knock out the front shape. This can be particularly useful when designing logos where you want to show through to the background that the logo is overlaid onto.
05. Use the duplicate tool to create background patterns
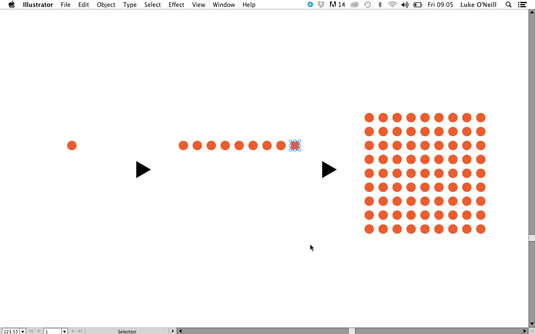
Some of the most useful techniques are the simplest. First start by drawing a simple circle withe grid turned on and snap to grid selected. Hold alt and grab the circle along the grid to copy it. With the circle still selected simply hit cmd > D to duplicate the circle as many times as you want. once you have a row you can select them all and repeat the process vertically.
Finally use the pathfinder unite option to make all the circles act as one object. This is useful for performance as Illustrator can slow down if you have many different individual objects. The same goes for if you wish to paste the pattern directly into InDesign.
Words: Luke O'Neill
Luke O'Neill is art editor of T3 magazine.
Like this? Read these!
- The 15 best photo editors
- Photoshop tips, tricks and fixes to try today
- The best Photoshop plugins

The Creative Bloq team is made up of a group of art and design enthusiasts, and has changed and evolved since Creative Bloq began back in 2012. The current website team consists of eight full-time members of staff: Editor Georgia Coggan, Deputy Editor Rosie Hilder, Ecommerce Editor Beren Neale, Senior News Editor Daniel Piper, Editor, Digital Art and 3D Ian Dean, Tech Reviews Editor Erlingur Einarsson, Ecommerce Writer Beth Nicholls and Staff Writer Natalie Fear, as well as a roster of freelancers from around the world. The ImagineFX magazine team also pitch in, ensuring that content from leading digital art publication ImagineFX is represented on Creative Bloq.
