Integrate Google Maps and Flickr into a real-time app
Use JavaScript, CSS and the Google Maps API to build a custom-themed, real-time Flickr visualisation like NET-A-PORTER LIVE. James Christian and web developer Ben Gannaway reveal the techniques they used
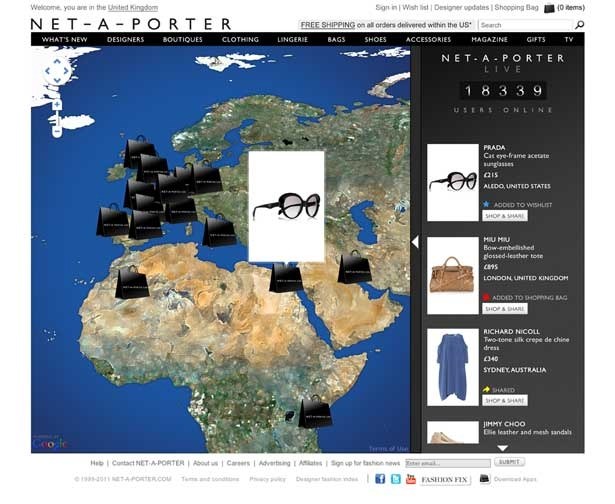
Here at NET-A-PORTER.COM we were challenged by the business to showcase what’s hot and trending amongst our very active and global community of customers. NET-A-PORTER LIVE is a real-time visualisation that polls a live feed from our servers and plots user activity on the map, anonymised to city-level accuracy. This tutorial reveals the techniques we used to create a custom-themed UI and how to integrate with a (near-) live feed of user activity.
NET-A-PORTER LIVE is a HTML/JS/CSS application built on JavaScriptMVC that includes product details and activity feed views that allow the users to shop and share the products. For phase one we thought ‘Why re-invent the wheel?’ and incorporated the Google Maps API framework with a customised look and feel.

To keep this tutorial lean we’ve dropped the MVC framework and focused on the customisation of the map’s visual elements and touch on integration with a (near) real-time data source. Rik Lomas wrote a great tutorial back in 2006 that covers a lot of the fundamentals, but note that the API has evolved and we’re using v3 in this tutorial.
First up, we’ll need some activity to map. We’ve opted to use Flickr’s Panda API because it provides a near-real-time feed of ‘interesting’ shots. See a demo of the tutorial app here:
naplabs.github.com/dot-net-magazine-google-maps-tutorial/index.html
This tutorial will feature snippets from the full source code that can be downloaded here: github.com/naplabs/dot-net-magazine-google-maps-tutorial.
In order to access the Flickr API you’ll need to set up an API key on their site. This key is passed with each request to the API to uniquely identify your application in case of abuse.
If you’ve downloaded our sample code, make sure to update the ConfigObject.js with your key.
MapTutorial.configObject = { apiKey:"PUT YOUR FLICKR API KEY HERE!"}Next, we construct the URL that will access the API as an AJAX request.
var _url = "http://api.flickr.com/services/rest/" +"?method=flickr.panda.getPhotos" // The API method to get photos +"&api_key="+MapTutorial.configObject.apiKey // Our unique API key +"&panda_name=wang+wang" // Panda server with Geo-tagged images +"&extras=geo" // Include lat-long values in response +"&per_page=1&page=1" // Pagination of results +"&format=json" // Response in JSON notation +"&jsoncallback=?"; // JSONP wrapper function name. // "?" replaced by jQuery with callback function nameWe’ve selected to use the ‘Wang Wang’ Panda service because it delivers images that are geotagged with latitude and longitude values. To test the feed, just paste the generated URL in to your browser’s address bar. Here’s a sample response:
jsonFlickrApi({ photos: { photo: [ { title: "Mont Tremblant, Quebec", id: "5954444866", secret: "2c72398835", server: "6003", farm: 7, owner: "35465018@N02", ownername: "VLADIMIR NAUMOFF", latitude: 46.118328, longitude: -74.601676, accuracy: "11" }, { title: "Art outside these walls.", id: "5954524756", secret: "e99abfdae8", server: "6137", farm: 7, owner: "27241981@N00", ownername: "BrndnTd", latitude: 41.395419, longitude: 2.161779, accuracy: "16" } ], interval: 60, lastupdate: 1311084024, total: 42, panda: "wang wang" }, stat: "ok"})Now that we’re happy with the URL, we pass it as a parameter to jQuery.ajax(). This will perform the asynchronous HTTP request and callback to our success or error functions based on the server’s response.
Daily design news, reviews, how-tos and more, as picked by the editors.
$.ajax({ url:_url, dataType:'jsonp', success:processNewPhotos, error:error})Assuming the Pandas are happy, our success function “processNewPhotos()” should be called with the JSON payload returned by Flickr.
// Function to process a whole new set of photosvar processNewPhotos = function(flickrResponse){ // Confusingly flickrResponse.photos.photo is actually an array var currentPhotoSet = flickrResponse.photos.photo; // For simplicity, we always cancel the 'update display' timer // and re-check we have anything to show if (updateDisplayTimer) { clearInterval(updateDisplayTimer); } if ((currentPhotoSet) && (currentPhotoSet.length > 0)) { // Process the first photo updateDisplayWithNextPhotoInSet(currentPhotoSet); // Setup timer to process remaining photos in set updateDisplayTimer = setInterval(function(){ updateDisplayWithNextPhotoInSet(currentPhotoSet); },4000); // Update display every 4 seconds } // If first response from the API, start the API fetch timer if (!apiFetchTimer) { // Set the fetch interval based on API response (returned in seconds) // (Demo assumes this won't change) var apiFetchIntervalMs = flickrResponse.photos.interval * 1000; // Start the API fetch timer apiFetchTimer = setInterval(topScope.fetchNewPhotos,apiFetchIntervalMs); };}First we grab the array of photos from the Flickr response and assign them to a new convenience variable ‘currentPhotoSet’. After immediately processing the first photo, we then initialise an ‘updateDisplayTimer’ to iterate through the photo set and update the display with the next photo every four seconds. Calling the API once would be a bit boring for our users, so finally we setup another timer ‘apiFetchTimer’ to poll the Flickr API as frequently as we are instructed to do so in the “interval” value in the API response (typically every 60 seconds).
Now on to the pretty part! Here’s our index.html...
<!DOCTYPE HTML PUBLIC "-//W3C//DTD HTML 4.01 Transitional//EN" "http://www.w3.org/TR/html4/loose.dtd"><html xmlns="http://www.w3.org/1999/xhtml"> <head> <meta http-equiv="Content-Type" content="text/html; charset=utf-8" /> <title>.Net Magazine Tutorial Project</title> <link rel="stylesheet" type="text/css" href="mapStyle.css"> <!--include jQuery--> <script type="text/javascript" src="lib/jquery/jquery-1.4.2.min.js"></script> <!--include Google Maps API. To avoid unexpected changes, best to specify a version number--> <script type="text/javascript" src="http://maps.google.com/maps/api/js?sensor=false&v=3.3"></script> <!-- Include our scripts --> <script type="text/javascript" src="lib/Resources/InfoBox.js"></script> <script type="text/javascript" src="lib/MapTutorial.js"></script> <script type="text/javascript" src="lib/ConfigObject.js"></script> <script type="text/javascript" src="lib/Service/Photos.js"></script> <script type="text/javascript" src="lib/Controllers/ContentController.js"></script> <script type="text/javascript" src="lib/Controllers/MapController.js"></script> <script type="text/javascript" src="lib/Controllers/DocumentController.js"></script> <script type="text/javascript"> // Initialise the application $(document).ready(function(){ var docControl = new MapTutorial.Controllers.DocumentController(); docControl.init(); }) </script> </head> <body> <div id="mapContainer" class="mapContainer"></div> <a class="sourceCodeLink" target="_blank" href="https://github.com/naplabs/.net-Google-Maps-Tutorial"><p>Tutorial source code</p></a> </body></html>Beyond including our scripts and styles, the HTML is pretty basic: a header tag and a “mapContainer” div. The application is initialised once the DOM is fully loaded at $(document).ready(...).

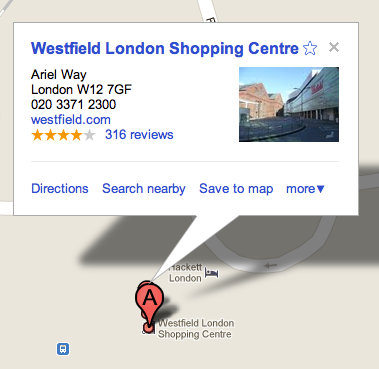
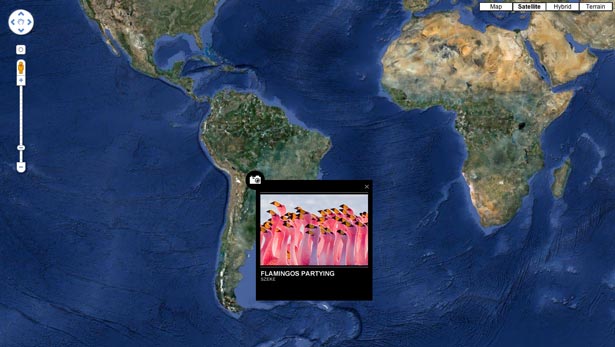
The Google Maps UI elements in the screenshot above are known as the Marker (the red pointer “A”) and the InfoWindow (the comic book speech bubble). Styling InfoWindows is not well supported by the API so we’re using the InfoBox element provided by google-maps-utility-library-v3. This class behaves like an InfoWindow but supports configuration properties to specify styling with CSS markup. We’re aiming to create something that looks like this:

The styling for the application is defined in the following CSS:
body {background-color:white;color:white;font-family:Arial, Helvetica, sans-serif}.mapContainer{width:100%;height:700px;float:left}.infoBox{padding-top:5px;background-color:black; width:250px; background-repeat:repeat-x;border-top:1px solid black;}.infoBoxContent{ padding: 5px;color:white;font-size:10px;font-weight:bold}.infoBoxContent ul {list-style:none;padding-left:0;margin-left:0}.infoBoxContent ul li {}.imageBorder{width:100%;height:8px;background-image:url('images/imgBorder.png');clear:both;}.imageBorderTop{margin-top:15px;margin-bottom:5px}.imageBorderBottom{margin-top:3px;background-image:url('images/imgBorder.png');}.flickrPhotoTitle {font-size:120%; text-transform:uppercase;}.flickrPhotoUser {color:grey; text-transform:uppercase;}.sourceCodeLink {width:100%; text-align:right; margin:10px; font-size:12px; font-weight:bold;}The positioning of map UI elements over the map will be controlled by JavaScript and the Google Maps API, but we still have a lot of control over the presentation and layout of the InfoBox and its contents.
We’re going to create and re-use a single Marker and InfoBox instance; the Marker will pinpoint the geolocation derived from the photo and the InfoBox will contain the actual image and some information about the image. As we update the display with a new photo from Flickr, we will recycle these elements by changing their location on the map and the InfoBox’s inner HTML.
Here’s the code that initialises our map:
var map;var markerIcon, marker;var infoBox, infoBoxContent;this.initialiseMap = function(){ // Centre the map and markers to start var latlng = new google.maps.LatLng(0, 0); // Construct the map element and specify "mapContainer" as it's container div id var mapOptions = { zoom: 3, center:latlng, mapTypeId: google.maps.MapTypeId.SATELLITE // Use default satelite tiles }; map = new google.maps.Map(document.getElementById("mapContainer"), mapOptions); // Create a MarkerImage that will be used as the icon in the marker markerIcon = new google.maps.MarkerImage("images/MarkerIcon.png"); // Create the actual Marker object by passing a reference to the map and the marker icon marker = new google.maps.Marker({ position: latlng, map: map, icon:markerIcon, animation: google.maps.Animation.DROP, visible:false // Invisible to start as we have nothing to show }); // Create the InfoBox content div container and assign it with a class name // so we can style with CSS infoBoxContent = document.createElement("div"); infoBoxContent.className="infoBoxContent"; // Create the InfoBox element. Note that the default class name assigned to the // InfoBox is "infoBox" - see CSS file. var ibOptions = { // Include the content container div content: infoBoxContent, // Position and style the info box properties not managed in ".infoBox" CSS // See http://google-maps-utility-library-v3.googlecode.com/svn/trunk/infobox/docs/reference.html#InfoBoxOptions pixelOffset: new google.maps.Size(-5, -10), closeBoxMargin: "0px 0px 0px 0px", closeBoxURL: "images/CloseButton.png", infoBoxClearance: new google.maps.Size(1, 1), // Invisible to start as we have nothing to show isHidden:true }; infoBox = new InfoBox(ibOptions) // Reveal the InfoBox when the user clicks the Marker google.maps.event.addListener(marker, 'click', function() { infoBox.open(map,marker); infoBox.show(); }); // Hide the InfoBox when the user clicks the close box in the InfoBox google.maps.event.addListener(infoBox, 'closeclick', function() { infoBox.hide(); });}We start by declaring our Map element and specifying the <div> id that it should inject itself in to: “mapContainer” as declared in index.html. Note that the map element’s position and size is defined in the .mapContainer CSS listed previously.
Next we construct the marker icon from an image URL and pass the icon into the constructor of the actual Marker object that we’ll be moving around the map and will respond to user clicks. The Marker is added to the Map by passing a reference to the Map instance when constructing the Marker.
The InfoBox element is configured with its position offset to the Marker. Here we also set the close button icon and position (or ‘closeBox’ as it’s referred to). InfoBox instances have the default class of “infoBox” applied, so all other aspects are styled in our CSS.
Finally we add a ‘click’ event listener to the Marker instance that reveals the InfoBox when clicked and a custom ‘closeclick’ event listener to the InfoBox to hide the InfoBox when the ‘closeBox’ is clicked.
Now that the UI elements are setup (but hidden), we need to react to receiving requests to display a new photo from our controller once it has processed the response from the Flickr API. To do this, we reconfigure the Marker and InfoBox instances declared previously with values read from the Flickr response ‘Photo’ object:
this.addNewActivity = function(photo){ // Derive the lat-long from the photo. Pan the map to that location var latLng = new google.maps.LatLng(photo.latitude,photo.longitude); map.panTo(latLng); // Also update the poistion of the marker to that location and ensure it’s visible marker.setPosition(latLng); marker.setVisible(true); // Construct the image URL that will retrieve the current photograph // using the standard Flickr URL convention var imageURL= "http://farm" + photo.farm + ".static.flickr.com/" + photo.server + "/" + photo.id + "_" + photo.secret + "_m.jpg"; // Build a string containing the InfoBox contents HTML var infoBoxContentsHTML = '<div class="imageBorderTop"></div>'; infoBoxContentsHTML += '<img class="flickrImage" width="240" src="' + imageURL + '" />'; infoBoxContentsHTML += '<div class="imageBorderBottom"></div>'; infoBoxContentsHTML += '<div class="photoInfoContainer"><ul>'; infoBoxContentsHTML += '<li class="flickrPhotoTitle">' + photo.title + '</li>' infoBoxContentsHTML += '<li class="flickrPhotoUser">' + photo.ownername + '</li></ul></div>'; // Set this string as the content HTML infoBoxContent.innerHTML = infoBoxContentsHTML; // Set the content div to be the InfoBox.content and open it relative to the Marker position infoBox.setContent(infoBoxContent) infoBox.open(map,marker);}Here we create a Google Maps LatLng object that contains the geotag values pulled from the Flickr API response and instruct the Map to pan to (or, animate to the centre of) this location. We also move our Marker instance to that location and ensure it is now visible.
Next we need to create the contents for the InfoBox element. First we construct a Flickr image URL (‘imageURL’) based on their schema convention and values returned from their API. Next we concatenate a string (‘infoBoxContentsHTML’) with HTML snippets that are defining the visual elements we want to display in the InfoBox. Then we set this string as the innerHTML of the infoBoxContent <div> and pass infoBoxContent to the InfoBox instance as its new contents element. Finally we instruct the InfoBox to open, positioned relative to the Marker instance.
Custom map tiles
For NET-A-PORTER LIVE we customised the experience even further by creating our own map. We created a high-resolution Mercator projection map as a PNG and imported it in to MapTiler. This is an easy-to-use GUI built on top of GDAL2Tiles that generates map tile images that can be used in place of the standard Google Maps tile-sets. The generated tile images are saved in a standard folder and file structure that are easily sync’d up to your web servers.
In order to access the tiles, you need to create a class that implements the MapType interface and set it on the map:
function CustomMapType(){}CustomMapType.prototype.tileSize = new google.maps.Size(256, 256);CustomMapType.prototype.minZoom = 3; CustomMapType.prototype.maxZoom = 5; CustomMapType.prototype.getTile = function(coord, zoom, ownerDocument){ var div = ownerDocument.createElement('DIV'); var numTiles = 1 << zoom; var wrappedX = coord.x % numTiles; wrappedX = wrappedX >= 0 ? wrappedX : wrappedX + numTiles; div.innerHTML = '<img src="'+appConfig.mapPath+zoom + '/' + wrappedX + '/' + (Math.pow(2,zoom)-coord.y-1)+'.png" />' div.style.width = this.tileSize.width + 'px'; div.style.height = this.tileSize.height + 'px'; return div;};// Now attach the custom map type to the map's registry and set on the mapvar customMapType = new CustomMapType();map.mapTypes.set('custom',customMapType);map.setMapTypeId('custom');The key method here is ‘getTile()’ that returns a element representing the tile for the requested co-ordinate space and zoom level. The <img> tag source URL is constructed using the same file naming convention that the MapTiler tool used to output its tile images.
Once attached and selected as the Map Type for your Map element, tile requests will be directed to your hosts.

The Creative Bloq team is made up of a group of art and design enthusiasts, and has changed and evolved since Creative Bloq began back in 2012. The current website team consists of eight full-time members of staff: Editor Georgia Coggan, Deputy Editor Rosie Hilder, Ecommerce Editor Beren Neale, Senior News Editor Daniel Piper, Editor, Digital Art and 3D Ian Dean, Tech Reviews Editor Erlingur Einarsson, Ecommerce Writer Beth Nicholls and Staff Writer Natalie Fear, as well as a roster of freelancers from around the world. The ImagineFX magazine team also pitch in, ensuring that content from leading digital art publication ImagineFX is represented on Creative Bloq.
