Create dramatic mono portraits with Photoshop
Use Adjustment Layers to take control of your black-and-white conversions and create a moody monochrome image with this eight-step tutorial.
Daily design news, reviews, how-tos and more, as picked by the editors.
You are now subscribed
Your newsletter sign-up was successful
Want to add more newsletters?

Five times a week
CreativeBloq
Your daily dose of creative inspiration: unmissable art, design and tech news, reviews, expert commentary and buying advice.

Once a week
By Design
The design newsletter from Creative Bloq, bringing you the latest news and inspiration from the worlds of graphic design, branding, typography and more.

Once a week
State of the Art
Our digital art newsletter is your go-to source for the latest news, trends, and inspiration from the worlds of art, illustration, 3D modelling, game design, animation, and beyond.

Seasonal (around events)
Brand Impact Awards
Make an impression. Sign up to learn more about this prestigious award scheme, which celebrates the best of branding.
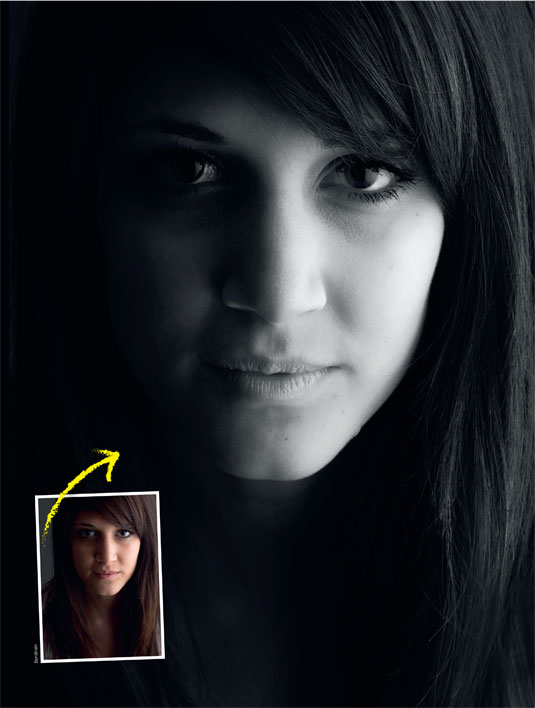
Many portrait photographers make their subject stand out from the crowd by printing the shot in black and white. By portraying the subject using varying greyscale tones, photographers can emphasise contrasting features, such as dark eyes and light skin, to create prints with impact.
Thanks to Adjustment Layers in Photoshop CS6 (also available in Photoshop CS3-CS5) you can take your mono conversions a step further and produce high-contrast shots that add drama, evoking moods and feelings that would be harder to achieve with a standard greyscale image.
Shooting tips
To create a more dramatic-looking monochrome print, avoid shooting the subject with a camera-mounted flash. This direct light source will fill in all the shadows on their face and create a high-key flat-lit portrait.
By popping the flash to the side of the subject, you can plunge part of the face into darkness, creating a more mysterious-looking monochrome shot as features such as the eyes and mouth emerge from the darkness.
Converting to mono
To convert a portrait to black and white, you’ll need to do more than simply throw away all the colour information, or you’ll just end up with a bland wash of greys.
Photoshop’s powerful Black & White Adjustment Layer lets you lighten and darken specific areas with a great deal of precision, so you can emphasise some features and hide others. We’ll also look at adjusting Levels to darken midtone details and enhance the shot’s sense of mystery.
Click here to download your start image
01. Desaturate the shot
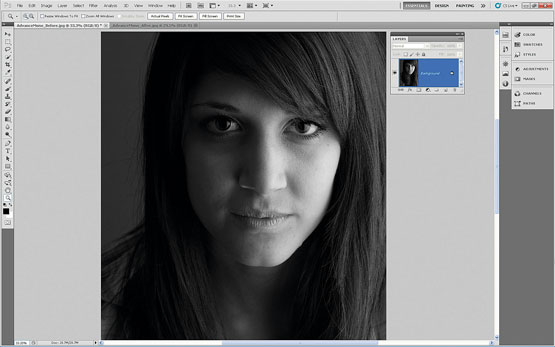
Open advanced_mono_before.jpg. Try removing colour the quick way by choosing Image>Adjustments>Desaturate. The resulting black-and-white image is okay, but lacks the high-contrast impact of our final version. You’ll also see too many shadow details, which diminishes the mystery. Choose Edit>StepBackward to restore the colour.
Daily design news, reviews, how-tos and more, as picked by the editors.
02. Crop it
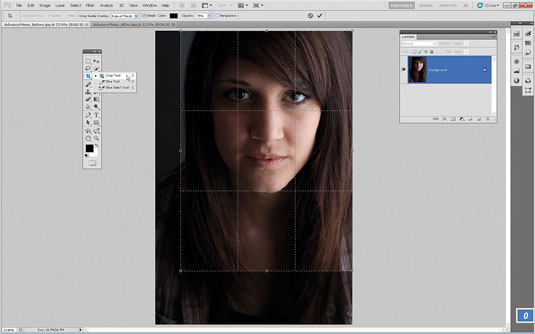
Before you start tweaking tones, it makes sense to crop the shot, because there’s no point in adjusting areas that you’re going to remove. By cropping the shot, you can zoom in on the model and make her more dominant in the frame. This adds more drama and impact to the image. Grab the Crop tool, use it to reframe the image and hit Return.
03. Create an Adjustment Layer
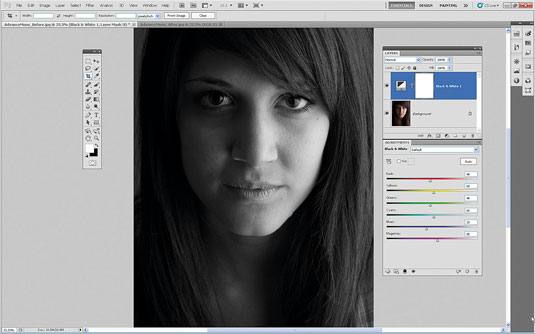
Go to Window>Layers to open the Layers palette. For more control over the tones in the greyscale conversion, choose Layer>New
AdjustmentLayer>Black&White. Click OK in the New Layer command box to add the ‘Black & White 1 Adjustment Layer’ to the Layers palette.
04. Powerful presets
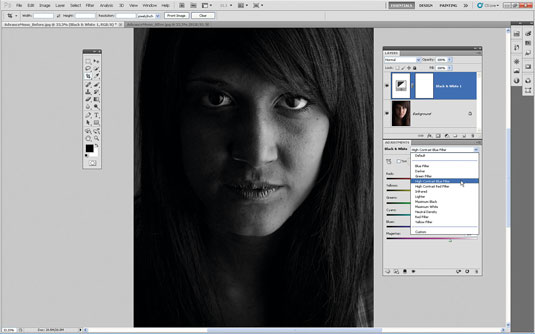
Initially, the Adjustment Layer creates a similar result to the Desaturate command, but you now have more control. Set the drop-down preset menu to High Contrast Blue Filter. This reduces the value of the Reds and Yellows sliders, darkening skin tones.
05. Selective adjustments
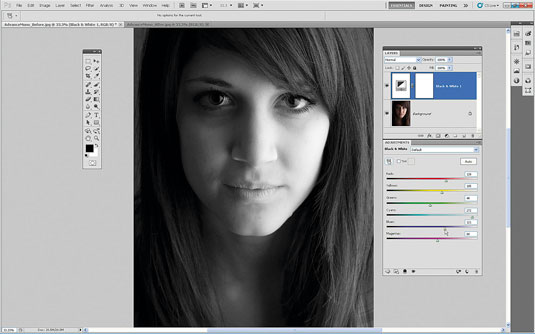
Go back to the Default setting. To lighten the highlights in the face, drag Reds up to 128 and Yellows to 105. Enhance the white of the subject’s left eye by pushing Cyans up to 272. Pop Blues up to 121 to make the delicate blue tint in her eyes stand out more.
06. Moody midtones
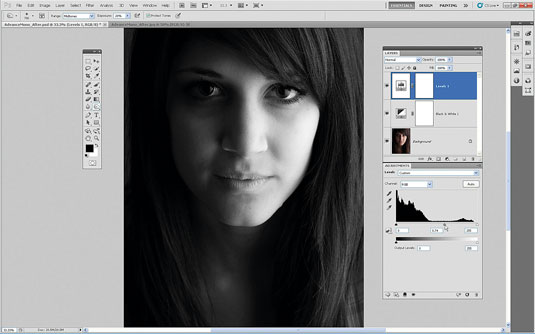
Make more of the model’s face fade further into the darkness by adjusting the midtones. Go to Layer>NewAdjustmentLayer>Levels. Slide the grey Midtone input level slider to a value of 0.74. This leaves the highlights untouched, but tips the grey midtones towards the shadows.
07. Burn the shadows
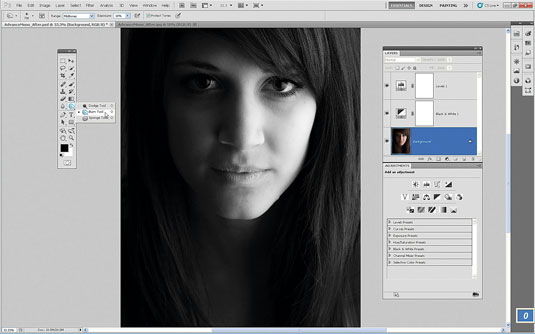
Click on the ‘Background’ layer to target it. Grab the Burn tool, then set Range to Midtones and Exposure to 20%, so you can make incremental tonal adjustments using just a few strokes. Set Size to 700. Gently spray over the midtone details on the shaded side of the face to darken them even more.
08. Dodge the highlights
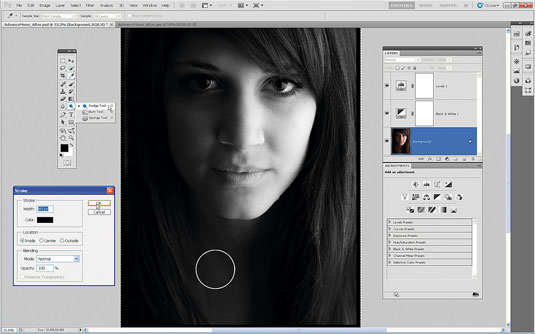
To emphasise the model’s hair, select the Dodge tool. Set Range to Highlights, Size to 200 and Exposure to 25%. Spray over the hair to make the shiny highlights stand out. To create a border, choose Select>All, then Edit>Stroke. Set Width to 40 pixels, Colour to Black, Location to Inside and click OK.
Don't forget to check out:
- Create a sinister fantasy backdrop in Photoshop
- Master studio portrait photography: set up a studio today!
- 101 Photoshop tutorials!

The Creative Bloq team is made up of a group of art and design enthusiasts, and has changed and evolved since Creative Bloq began back in 2012. The current website team consists of eight full-time members of staff: Editor Georgia Coggan, Deputy Editor Rosie Hilder, Ecommerce Editor Beren Neale, Senior News Editor Daniel Piper, Editor, Digital Art and 3D Ian Dean, Tech Reviews Editor Erlingur Einarsson, Ecommerce Writer Beth Nicholls and Staff Writer Natalie Fear, as well as a roster of freelancers from around the world. The ImagineFX magazine team also pitch in, ensuring that content from leading digital art publication ImagineFX is represented on Creative Bloq.
