Give yourself the Picasso look with Photoshop!
To celebrate the famous painter's birthday, here's how to create a Picasso-style multi-exposure portrait with Photoshop in six steps.
Daily design news, reviews, how-tos and more, as picked by the editors.
You are now subscribed
Your newsletter sign-up was successful
Want to add more newsletters?

Five times a week
CreativeBloq
Your daily dose of creative inspiration: unmissable art, design and tech news, reviews, expert commentary and buying advice.

Once a week
By Design
The design newsletter from Creative Bloq, bringing you the latest news and inspiration from the worlds of graphic design, branding, typography and more.

Once a week
State of the Art
Our digital art newsletter is your go-to source for the latest news, trends, and inspiration from the worlds of art, illustration, 3D modelling, game design, animation, and beyond.

Seasonal (around events)
Brand Impact Awards
Make an impression. Sign up to learn more about this prestigious award scheme, which celebrates the best of branding.
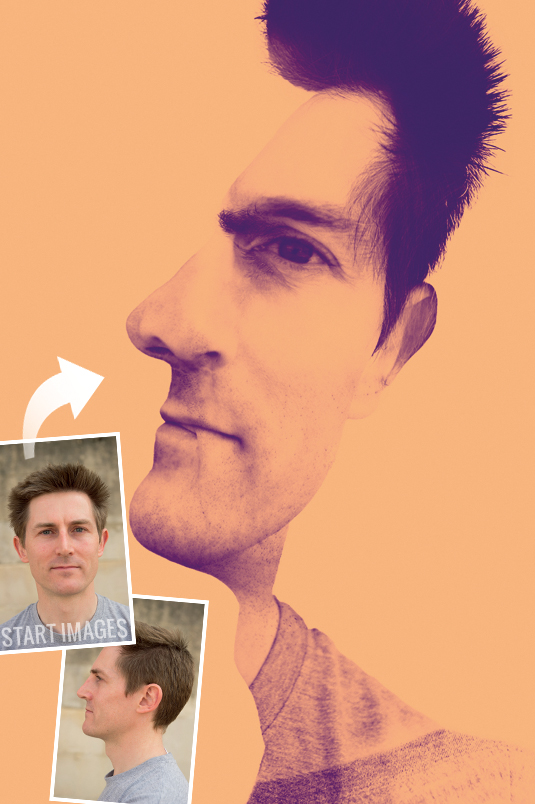
Picasso took an unconventional approach to portrait painting. He evoked an impression of his subjects by rendering their face in profile while depicting features like the eyes and nose as if viewed from head on. We can apply this approach to portrait photography and convert some standard shots into a creative composite that sums up our subject in an eye-catching way.
In this walkthrough we'll demonstrate how to use Photoshop CS6's tools to combine both a face-on and profile view of a subject in a single image so that we can summon up more about their identity than we could in a conventional portrait.
Is this surreal life
We'll kick off by cropping the start images to make the subject's key features look more prominent in the frame and then add them to a layered document. You'll then use Selection tools to remove unwanted background details before converting the selections into masks. No selection is initially perfect, so we'll demonstrate how to apply brush strokes to the Layer Masks to hide or reveal particular facial features.
We'll also demonstrate how to use fill layers to add simplified washes of colour to the shot's shadows and highlights to help push the end result in a more artistic direction. Here are two images to get you started...
Click here to download image 1
Click here to download image 2
01. Crop the face
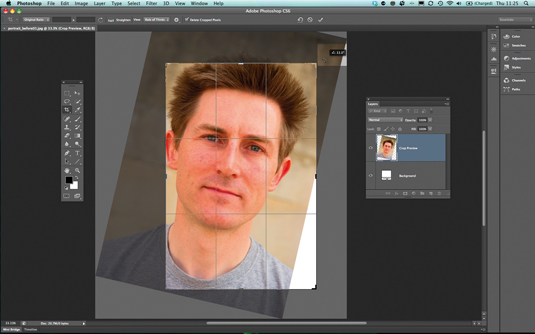
Open 'portait_before01.jpg'. Grab the Crop tool. Set it to Original Ratio. Drag a corner handle to crop out the edges of the frame and zoom in on the subject. Drag outside the crop box to rotate the shot by 12 degrees. Drag inside the box to position the face as shown. Hit Enter.
02. Remove background
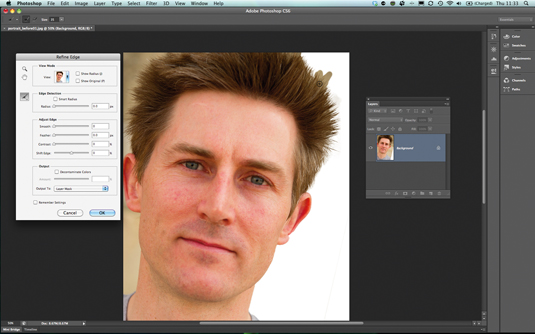
Grab the Quick Selection tool. Spray over the beige background on the right to select it. Choose Select>Inverse. Click the Refine Edge option. Spray the Refine Radius tool over the spiky hairs to add them to the selection. Set Output to Layer Mask. Click OK.
03. Add new portrait
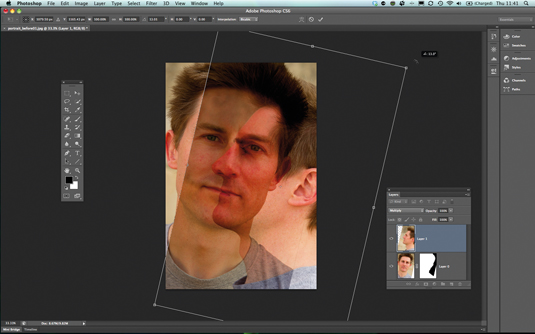
Open ‘portrait_before02.jpg’. Choose Select>All and then Edit>Copy. Edit>Paste the shot into the main project. Set the pasted layer’s Blend Mode to Multiply. Press Cmd/Ctrl+T to activate the Free Transform tool. Rotate, scale and position the layer so key features overlap.
Daily design news, reviews, how-tos and more, as picked by the editors.
04. Add a layer mask
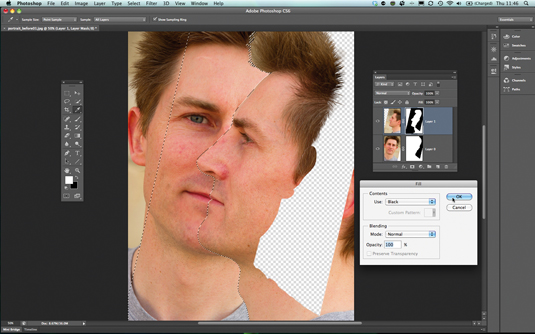
Cmd/Ctrl click on the ‘Layer 0’ mask to reactivate the selection. Click on ‘Layer 1’. Click the Add layer mask icon. Restore the ‘Layer 1’ Blend Mode to Normal. Click on the ‘Layer 1’ thumbnail. Use the Quick Selection tool to select the beige background. Click on the ‘Layer 1’ mask. Choose Edit>Fill. Set Contents to Black. Click OK.
05. Edit the mask
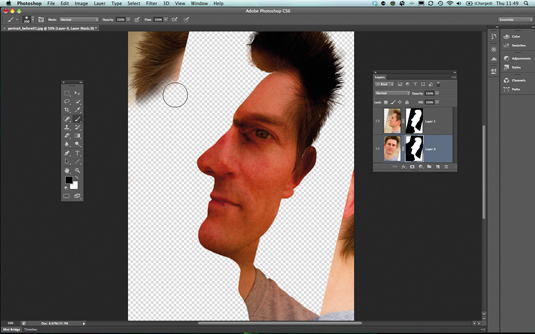
Click on ‘Layer 0’ mask and fill the selection with black. Press Cmd/Ctrl+D to deselect the marquee. Set ‘Layer 1’ Blend Mode back to Multiply. Grab the Brush tool. Paint a black brush on the Layer Masks to remove any areas that aren’t overlapping. Reduce the Opacity to 50% and spray on the top layer’s eye.
06. Colour the image
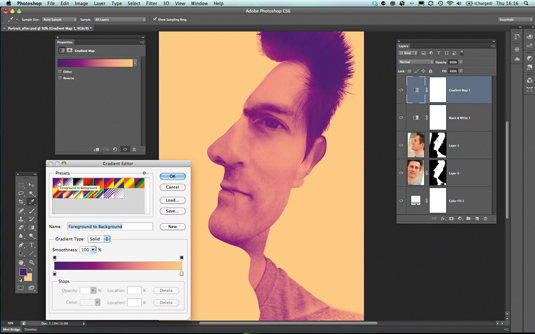
Click the Create new fill icon and choose Solid Color. Choose white and place the layer at the bottom of the stack. Add a Black & White Adjustment Layer. Use the High Contrast Red Filter preset. Set the Foreground colour to purple and background to orange. Add a Gradient Map and use the Foreground to Background preset.
Get Practical Photoshop magazine!
This tutorial first appeared in Practical Photoshop magazine, the number one magazine for lovers of photography and image-editing. If you want extra 'genius tips' for tutorials like this one, you'd better get hold of the mag!
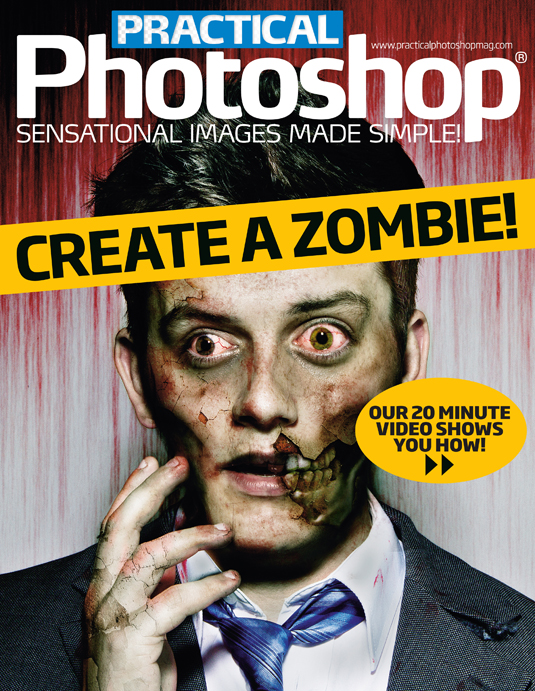
And FREE for iPhone and iPad just in time for Halloween and the new season of The Walking Dead, Practical Photoshop has released a 'Create a Zombie!' special.
Featuring a 20 minute tutorial video and full step-by-step walkthrough, it'll show you how to turn your nearest and dearest into gruesome, undead, flesh-eaters quicker than you can say "Braaaiins..." Stagger here to get it!
Now check out our massive list of 101 Photoshop tutorials!

The Creative Bloq team is made up of a group of art and design enthusiasts, and has changed and evolved since Creative Bloq began back in 2012. The current website team consists of eight full-time members of staff: Editor Georgia Coggan, Deputy Editor Rosie Hilder, Ecommerce Editor Beren Neale, Senior News Editor Daniel Piper, Editor, Digital Art and 3D Ian Dean, Tech Reviews Editor Erlingur Einarsson, Ecommerce Writer Beth Nicholls and Staff Writer Natalie Fear, as well as a roster of freelancers from around the world. The ImagineFX magazine team also pitch in, ensuring that content from leading digital art publication ImagineFX is represented on Creative Bloq.
